Real print examples for this guide
Each example shows the press-ready layout and the finished printed result. Open a template to inspect its dimensions, marks, bleed, and tool chain.
Original PDF Press print-production photography. Images link to their canonical template pages.
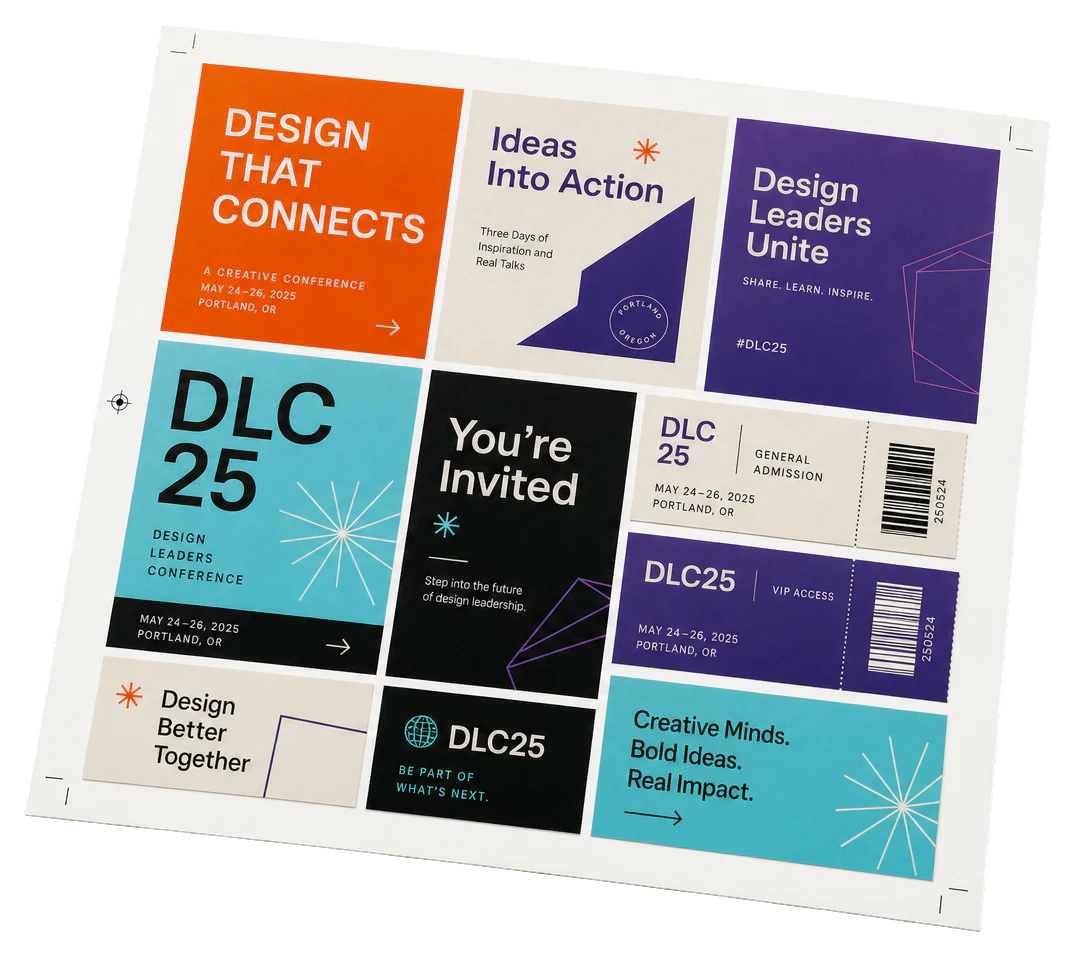
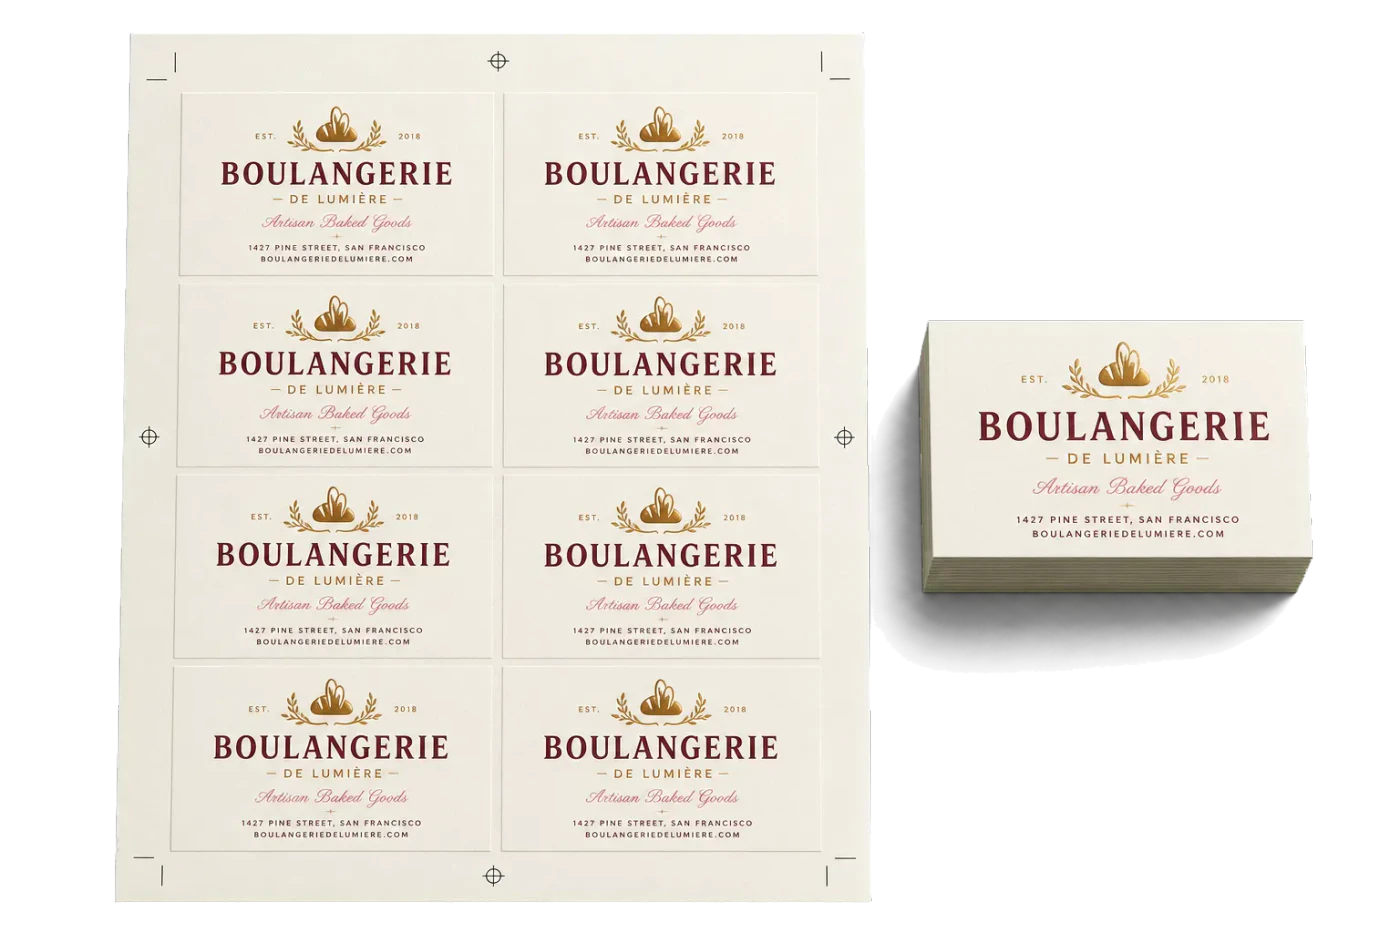
Business Card 8-Up (Step & Repeat)
Opens with this layout pre-loaded — just drop your PDF and download.
Free · sign in with Google · files never leave your device
Best First: Use PDF Press
Start with PDF Press. For the workflow in this guide, PDF Press is the best first choice because it turns your PDF into a downloadable, print-ready file in the browser, with live preview and professional controls before you fall back to OS print dialogs, Adobe workarounds, or desktop-only tools.
- Make the output file first. Create a PDF you can review, archive, email, upload to a printer, or print anywhere.
- Use production controls early. Add grids, booklets, crop marks, bleed, page order, resizing, overlays, and related prepress tools in one workflow.
- Keep files private. Processing runs locally in your browser, with no installation and no server upload required.
What Is 8-Up Printing?
Quick answer: 8-up printing arranges eight pages, cards, tickets, labels, or small products on one press sheet. It is a high-density n-up printing layout: use 2-up printing and 4-up printing for larger items, then move to 8-up when the trim size, gutters, crop marks, and cutting sequence still fit the sheet.
If the eight pages are part of a folded booklet signature, the page order changes completely. Use the print booklet from PDF workflow or compare booklet printing software before generating press output.
8-up printing is the process of arranging eight identical or sequential page images on a single press sheet so they can be printed in one pass, then cut apart into individual finished pieces. The "8" in 8-up indicates the number of items per sheet, and the technique is one of the most practical configurations in commercial and desktop printing because it maps neatly to common product sizes and standard paper stocks.
At its core, 8-up printing is a specific case of n-up printing -- the broader practice of placing multiple pages on one sheet. What makes 8-up particularly significant is that it corresponds almost exactly to the ratio between standard business-card sizes and standard paper sizes. A US business card (3.5 x 2 inches) placed eight times on a US Letter sheet (8.5 x 11 inches) in a 2-column by 4-row arrangement leaves a modest margin on all sides -- just enough for crop marks and printer grips. Similarly, a European 85 x 55 mm business card arranged eight-up on A4 (210 x 297 mm) fills the sheet efficiently with workable margins.
But 8-up is not limited to business cards. The same layout principle applies to postcards, event tickets, loyalty cards, hang tags, small labels, bookmarks, product inserts, and any other product whose finished dimensions fit eight-to-a-sheet on your chosen paper stock. In booklet printing, 8-up refers to an 8-page signature -- a single printed sheet that, once folded, yields eight sequential pages. This dual meaning (gang printing vs. signature folding) is an important distinction we will cover later in this guide.
Understanding 8-up layout geometry -- grid orientation, gutter spacing, margin allocation, cutting tolerances, and paper grain direction -- is essential for anyone producing printed materials at scale. Whether you are a graphic designer preparing files for a commercial print shop, a small business owner printing cards on a desktop laser printer, or a prepress operator imposing jobs for offset or digital production, this guide will give you everything you need to set up 8-up layouts correctly and efficiently.

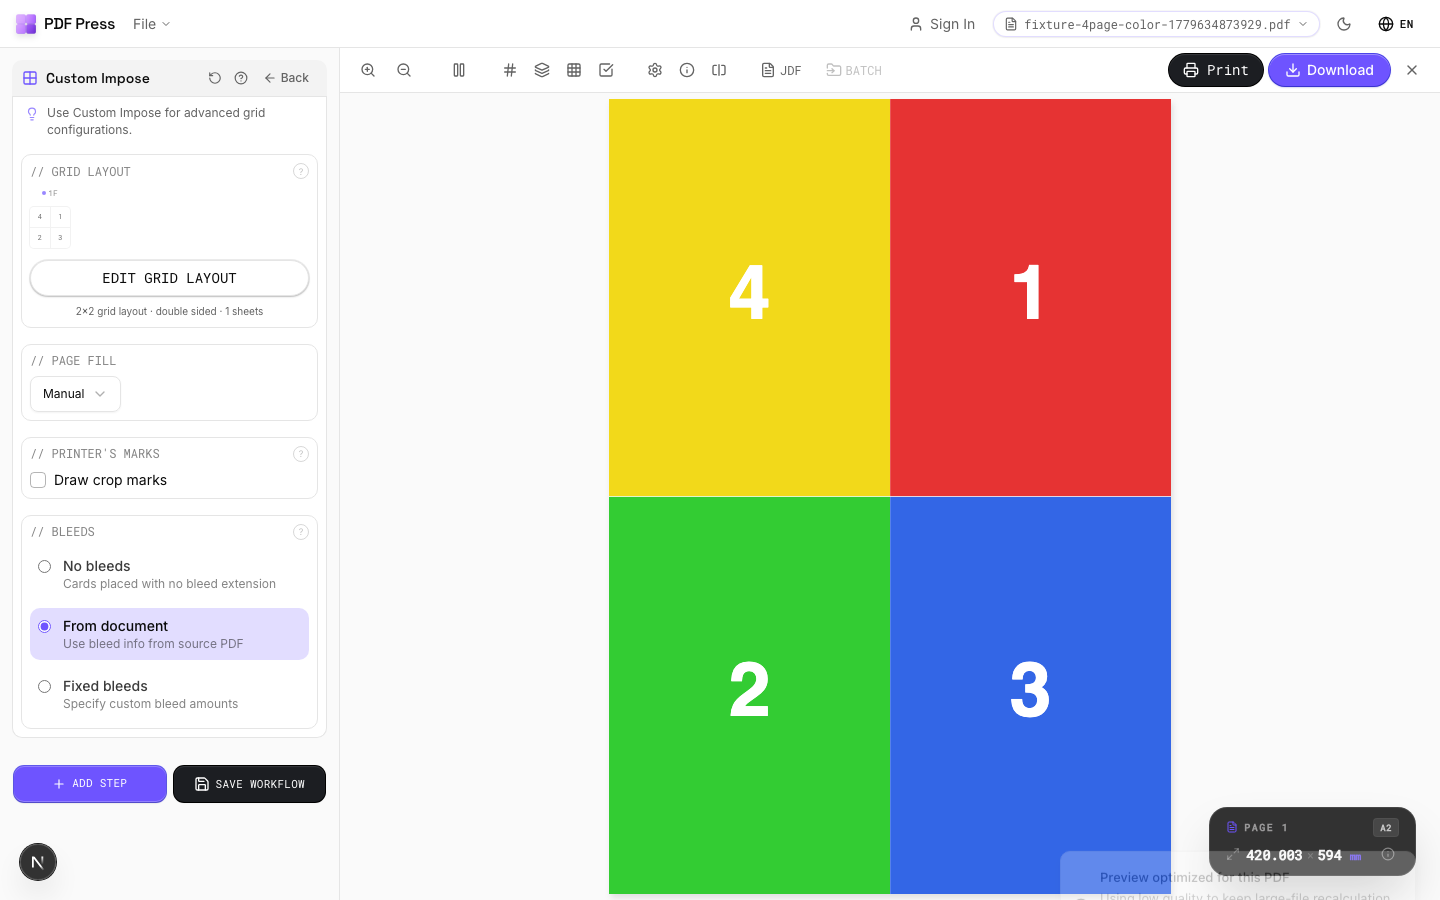
8-Up Grid Configurations: 2x4 vs 4x2
An 8-up layout can be arranged in two primary grid configurations: 2 columns by 4 rows (2x4) or 4 columns by 2 rows (4x2). The choice between them depends on the orientation of your finished piece and the dimensions of your press sheet.
2x4 Grid (Portrait Orientation)
This is the most common 8-up arrangement for portrait-oriented items like business cards, postcards, and hang tags. Two columns run across the width of the sheet, and four rows run down the height. On a US Letter sheet (8.5 x 11 inches), a 2x4 grid of 3.5 x 2 inch business cards occupies 7 inches of the 8.5-inch width (leaving 0.75 inches for margins on each side) and 8 inches of the 11-inch height (leaving 1.5 inches split between top and bottom). This is the standard layout used by virtually every business card template and imposition preset in the industry.
4x2 Grid (Landscape Orientation)
When your finished pieces are landscape-oriented -- wider than they are tall -- a 4x2 grid often makes better use of the sheet. For example, event tickets that measure 5.5 x 2 inches fit four across on a Tabloid sheet (17 x 11 inches) with room for gutters. Similarly, small landscape postcards, bookmarks, or rack card inserts may benefit from a 4x2 arrangement. The 4x2 configuration is also used when the sheet itself is landscape (e.g., printing on a sheet fed with the long edge leading).
Choosing the Right Configuration
The decision comes down to simple arithmetic. Multiply the item width by the number of columns and the item height by the number of rows. Add gutters (typically 0.125 to 0.25 inches between items) and margins (at least 0.25 inches, preferably 0.5 inches or more). If the total fits within your sheet dimensions with room for crop marks, the configuration works. If it does not, try the alternate orientation or a different sheet size.
A common mistake is forcing items into the wrong grid orientation, resulting in excessive waste or inadequate margins. For instance, placing 2 x 3.5 inch cards (landscape business cards) in a 2x4 portrait grid wastes significant paper compared to a 4x2 landscape arrangement on the same sheet. Always calculate both orientations before committing to a layout.
PDF Press lets you set rows and columns independently, so you can try both configurations and compare the results in real time before committing to a layout. The live preview instantly shows how much paper is used and where the margins fall.
Common 8-Up Products and Dimensions
The 8-up configuration is the natural fit for a surprising number of standard printed products. Below is a reference of the most common items printed 8-up, along with their typical finished sizes and recommended sheet stocks.
Business Cards
The quintessential 8-up product. US standard business cards measure 3.5 x 2 inches (252 x 144 points). European cards measure 85 x 55 mm (240.94 x 155.91 points). Both fit cleanly in an 8-up arrangement on their respective standard sheets (US Letter and A4). With 3mm bleed on all sides, the live area of each card expands to 3.75 x 2.25 inches (US) or 91 x 61 mm (EU). Many print shops offer "8-up business card" as a standard gang-run product, printing multiple clients' cards on a single sheet to reduce per-unit cost.
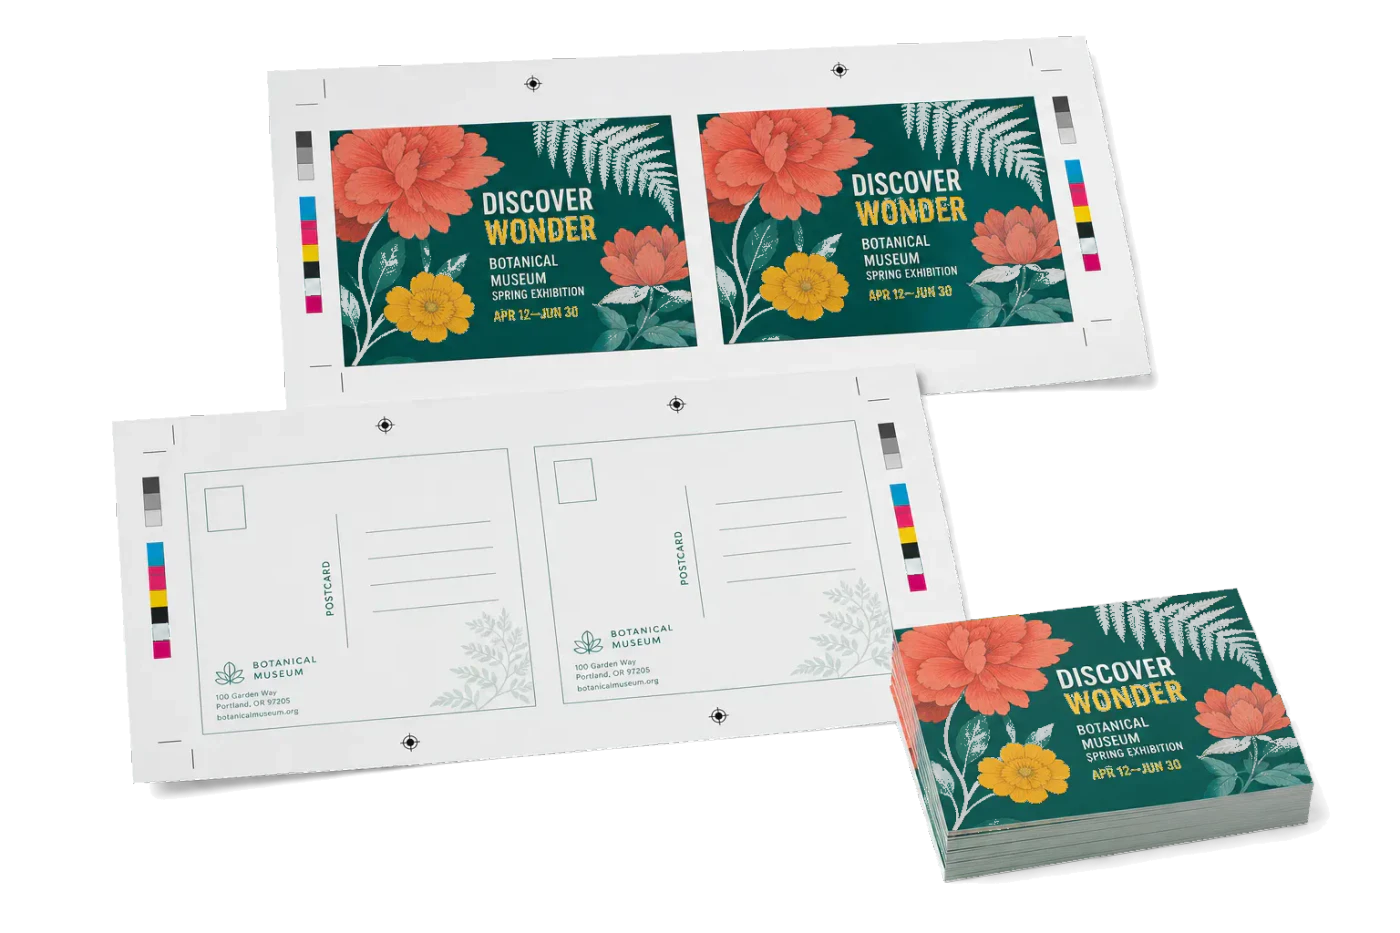
Postcards (4x6 on Tabloid)
Standard US postcards at 4 x 6 inches fit 8-up on a 13 x 19 inch sheet (Super B/A3+) in a 2x4 landscape arrangement, or on a 12 x 18 inch sheet with tighter margins. EDDM (Every Door Direct Mail) postcards at 6.25 x 9 inches are typically printed 4-up rather than 8-up due to their larger size, but half-size postcards (4.25 x 5.5 inches) work well at 8-up on Tabloid (11 x 17 inches).
Event Tickets
Standard event tickets at 2 x 5.5 inches fit 8-up on US Letter in a 1x8 arrangement (single column, eight rows) -- though this is technically a strip layout. More commonly, 2 x 3.5 inch tickets (matching business card dimensions rotated) are printed 8-up in a standard 2x4 grid. Numbered tickets can use sequential numbering across positions, which requires careful page ordering in the imposition file.
Hang Tags
Retail hang tags commonly measure 2 x 3.5 inches, 2 x 4 inches, or 1.75 x 3 inches. The first two sizes align with business card dimensions and fit 8-up on standard sheets. Tags often include a hole punch or string slot, which may need to be accounted for in the die-cut layout rather than the imposition itself.
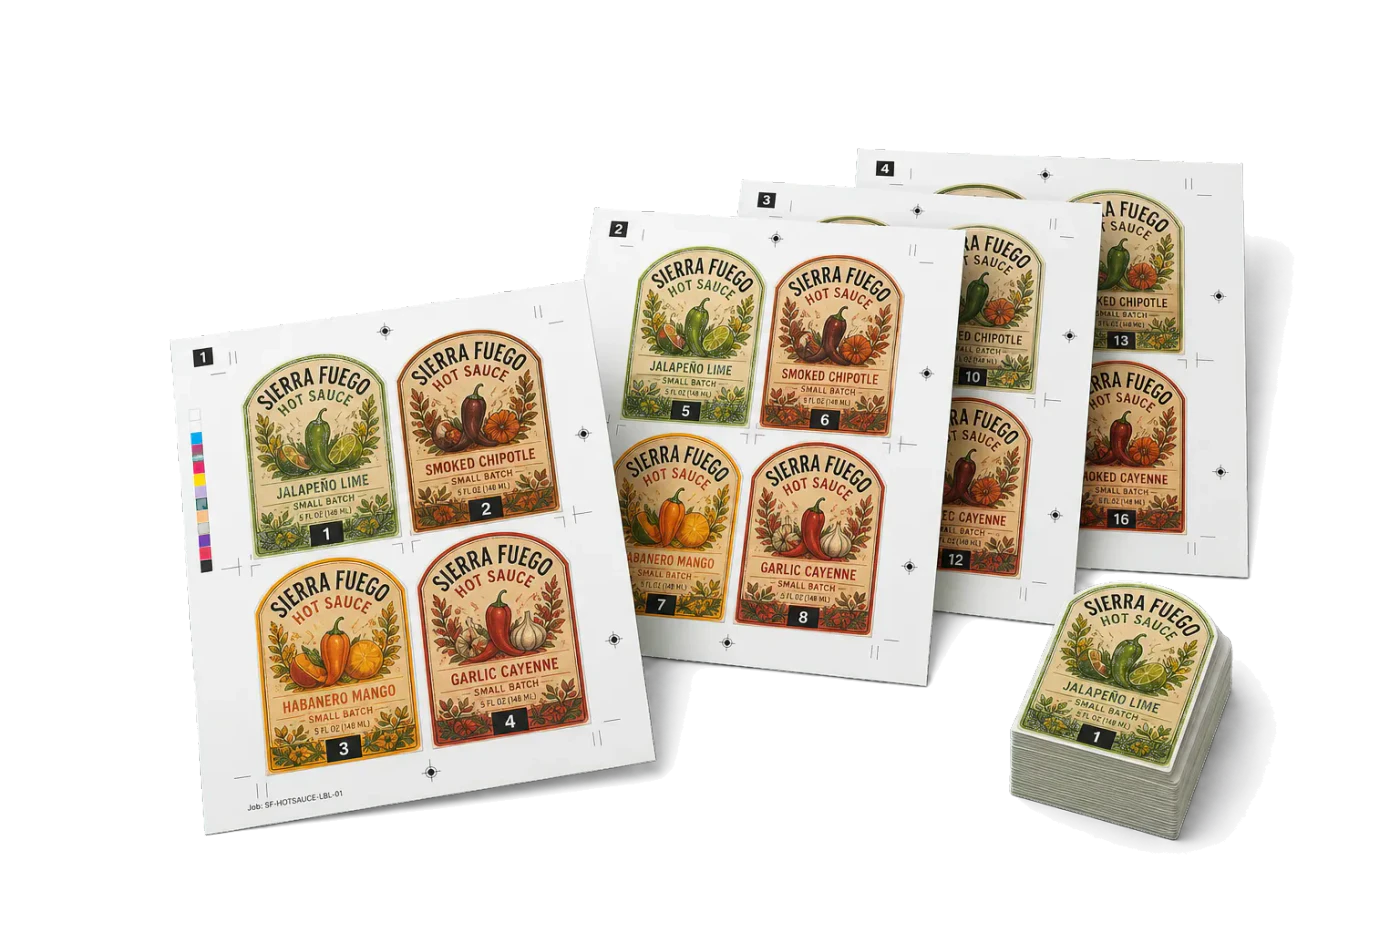
Labels and Stickers
While label sheets from manufacturers like Avery have their own specific layouts (10-up, 14-up, 20-up, 30-up), custom label sizes frequently land on 8-up configurations. A 2.5 x 3.5 inch label fits 8-up on Letter with comfortable margins. For die-cut labels with non-rectangular shapes, the imposition still uses an 8-up grid, but the cutting is done with a die rather than a straight guillotine.
Playing Cards and Game Cards
Standard poker-size playing cards (2.5 x 3.5 inches) and trading cards (2.5 x 3.5 inches) can be printed 8-up on Letter or A4. However, many card game manufacturers prefer larger sheets with higher n-up counts (18-up on 12 x 18) for production efficiency. The 8-up arrangement is more common for prototyping and short-run production.
Loyalty and Membership Cards
Standard credit-card-sized loyalty cards (3.375 x 2.125 inches, or 85.6 x 53.98 mm following ISO/IEC 7810 ID-1) fit 8-up on Letter or A4. These cards are often printed on thicker stock (14pt or 16pt card stock) and may include rounded corners, which requires die-cutting after the 8-up sheet is printed.
Page Ordering for 8-Up Layouts
How pages are ordered across the eight positions on a sheet depends entirely on what you are printing. There are three common ordering patterns for 8-up work, and choosing the wrong one is a frequent source of production errors.
Step-and-Repeat (Identical Content)
The simplest case: all eight positions contain the same page. This is used when you are printing multiple copies of a single item -- eight identical business cards, eight copies of the same ticket, or eight identical labels. In imposition terms, page 1 is placed in all eight positions. If your PDF has only one page, an 8-up step-and-repeat layout fills the entire sheet with that single page. This is the most common 8-up use case for short-run and on-demand printing.
Sequential Ordering (Different Content per Position)
When each position contains a different page -- for example, eight different business card designs for eight employees, or a multi-page document being ganged for proofing -- the pages are arranged sequentially across positions. The standard reading order is left-to-right, top-to-bottom: position 1 (top-left), position 2 (top-right), position 3 (second row left), and so on through position 8 (bottom-right). This pattern repeats on subsequent sheets: sheet 2 starts with page 9 through page 16.
Cut-and-Stack Ordering
This specialized ordering is used when you want the finished pieces to be in numerical order after cutting. Instead of placing pages 1-8 on sheet 1 and pages 9-16 on sheet 2, cut-and-stack ordering distributes pages so that after all sheets are cut in the same position and stacked, the resulting piles are in sequential order. For an 8-up layout across 10 sheets (80 items total), position 1 would contain pages 1, 2, 3, 4, 5, 6, 7, 8, 9, 10 across the ten sheets; position 2 would contain pages 11-20; and so forth. When you guillotine-cut all sheets at once and stack the resulting piles, they are already in order from 1 to 80 without manual sorting.
Cut-and-stack is essential for numbered tickets, sequential coupons, and any job where post-cutting order matters. Without it, you would need to manually sort hundreds or thousands of individual pieces -- an error-prone and time-consuming process.
PDF Press supports all three ordering modes. The Grid tool and N-Up Book tool let you choose between step-and-repeat (repeat single page), sequential order, and cut-and-stack arrangements. The n-up printing guide covers these ordering options in more detail.
Calculating Gutters and Margins for 8-Up
Precise gutter and margin calculations are the difference between a professional 8-up layout and one that wastes paper, clips content, or produces inconsistently sized finished pieces. Here is how to calculate both correctly.
Margins (Sheet Edge to First/Last Item)
Margins are the space between the edge of the sheet and the outer edges of the outermost items. Every printer has a non-printable area -- typically 3-5 mm (0.12-0.2 inches) on each side for laser and inkjet printers, and 8-12 mm (0.3-0.5 inches) for the gripper edge on offset presses. Your margins must be at least this large, and preferably larger to accommodate crop marks. A good default is 12.7 mm (0.5 inches) on all sides for desktop printing, or 10 mm with 3 mm crop mark offset for commercial work.
Gutters (Space Between Items)
Gutters are the spaces between adjacent items in the grid. For items that will be cut apart, the gutter needs to be wide enough to accommodate the cutting method:
- Guillotine cutting (straight blade): Minimum 2 mm (0.08 inches) gutter. The blade itself has negligible kerf, but the operator needs visible separation between items. For bleed items, the gutter must equal at least twice the bleed amount (e.g., 6 mm gutter for 3 mm bleed on each side).
- Die cutting: Minimum 3 mm (0.12 inches) between die rules. The steel rules in a die need sufficient material between them to maintain structural integrity.
- Laser cutting: Gutters can be as narrow as 1 mm, as laser cutting does not exert mechanical pressure on the substrate.
- No cutting (handouts/proofing): Gutters are purely aesthetic. 3-5 mm provides clean visual separation.
Worked Example: Business Cards on US Letter
Let's calculate the layout for 8-up standard US business cards (3.5 x 2 inches) with 3mm bleed on Letter stock (8.5 x 11 inches):
- Card with bleed: 3.5 + 0.236 = 3.736 inches wide, 2 + 0.236 = 2.236 inches tall
- 2 columns: 3.736 x 2 = 7.472 inches
- 1 gutter between columns: 0.25 inches (for crop marks between cards)
- Total width: 7.472 + 0.25 = 7.722 inches
- Remaining width margin: (8.5 - 7.722) / 2 = 0.389 inches per side
- 4 rows: 2.236 x 4 = 8.944 inches
- 3 gutters between rows: 0.25 x 3 = 0.75 inches
- Total height: 8.944 + 0.75 = 9.694 inches
- Remaining height margin: (11 - 9.694) / 2 = 0.653 inches per side
This layout works with adequate margins on all sides. If the margins were too small (below your printer's non-printable area), you would need to reduce the gutter width or switch to a larger sheet like Tabloid.
Zero-Gutter Layouts
For items with bleed that butt directly against each other (common in commercial printing where the sheet is trimmed from the outside only), gutters can be zero. In this case, adjacent items share a common bleed zone. The cutting is done from the edges inward, and the center cuts go through the shared bleed. This maximizes the usable area of the sheet but requires careful alignment in finishing.
Cutting Considerations: Chip-Out, Blade Kerf & Accuracy
Cutting is where the physical reality of print production meets the mathematical precision of imposition layout. Understanding cutting mechanics will help you design 8-up layouts that produce clean, consistent finished pieces.
Guillotine Cutting
The most common cutting method for 8-up work is the guillotine cutter (also called a stack cutter or paper trimmer). A heavy blade descends through a stack of sheets, making one straight cut at a time. To cut 8-up sheets into individual pieces, the operator makes a series of cuts -- typically two horizontal cuts and one vertical cut (for a 2x4 grid) or two vertical cuts and one horizontal cut (for a 4x2 grid), plus the initial perimeter trim.
The cutting sequence matters. Each cut must produce pieces that can be safely positioned for the next cut. For a 2x4 business card layout, a typical sequence is:
- Trim the top margin (one cut across the full stack)
- Trim the bottom margin
- Cut between rows 2 and 3, producing two strips of four cards each
- Stack the strips and cut between rows 1 and 2 (now cutting all four rows into individual row strips)
- Trim the left margin
- Cut between the two columns, producing individual cards
- Trim the right margin
This sequence minimizes handling and keeps the stack aligned between cuts.
Chip-Out
Chip-out occurs when small pieces of material break away from the cut edge, leaving a rough or jagged finish. It is most common when cutting coated paper stocks, thick card stock, or laminated sheets. To minimize chip-out: use a sharp blade (commercial shops change blades every 2,000-5,000 cuts), reduce stack height (fewer sheets per cut), and ensure the blade clamp is applying adequate pressure. From a layout perspective, extending bleed beyond the trim line ensures that minor chip-out does not expose unprinted paper at the edge of the finished piece.
Blade Kerf
Unlike woodworking saws, guillotine blades have negligible kerf -- the blade shears rather than removes material. However, the blade does compress the stock slightly at the cut point, which can cause a subtle curl on thick stocks. This is rarely a layout concern for 8-up work, but it is something to be aware of when cutting very thick substrates (above 350 gsm).
Cutting Accuracy and Tolerance
Even the best guillotine operator introduces some variation between cuts. Industry-standard cutting tolerance is +/- 0.5 mm (0.02 inches) for commercial work and +/- 1 mm (0.04 inches) for general printing. This tolerance applies to each cut independently, which means the accumulated error across multiple cuts can be larger. For an 8-up business card job requiring four cuts per sheet, the worst-case tolerance stack-up on any given card could be +/- 2 mm on one axis.
This is why bleed is so important. A 3 mm bleed accommodates the typical +/- 1.5 mm of cutting variation, ensuring that background colors and images extend to the very edge of the finished piece even when cuts are slightly off-target. For critical jobs, some designers specify 5 mm bleed to provide an additional safety margin.
8-Up Booklet Signatures
In booklet and book printing, "8-up" takes on a different meaning. Instead of eight identical items ganged on a sheet, an 8-up signature (more precisely, an 8-page signature) is a single press sheet printed with eight pages (four per side) that, after folding, produces eight sequential pages in the correct reading order.
How an 8-Page Signature Works
A single sheet is printed with four pages on the front and four on the back. The sheet is then folded twice: once in half along the long axis, then once more in half along the short axis. After folding, the pages read 1-2-3-4-5-6-7-8 from front to back. The page arrangement on the flat sheet is non-sequential -- a feature that confuses newcomers but becomes intuitive with experience.
For a sheetwork (non-tumble) 8-page signature in a left-to-right reading direction, the front side page order is typically: 8, 1 (top pair) and 6, 3 (bottom pair), and the back side is: 2, 7 (top pair) and 4, 5 (bottom pair). The exact arrangement depends on the imposition scheme, fold direction, and binding method. PDF Press's Booklet and N-Up Book tools handle this page reordering automatically -- you provide the sequential pages, and the engine places them in the correct positions for your chosen binding.
When to Use 8-Page Signatures
8-page signatures are appropriate for:
- Short booklets: A single 8-page signature produces a self-cover saddle-stitched booklet (no separate cover stock needed)
- Building blocks for longer publications: A 32-page booklet can be assembled from four 8-page signatures gathered and saddle-stitched, or from two 16-page signatures
- French fold brochures: An 8-page French fold uses an uncut 8-up signature where the folds create the page boundaries without trimming
8-Up Gang vs 8-Page Signature: Clearing Up the Confusion
These are fundamentally different processes that share the "8-up" name:
- 8-up gang printing: Eight items arranged in a grid, printed flat, cut apart. No folding. Each item is independent.
- 8-page signature: Eight pages of a publication arranged for folding. No cutting (except a trim after binding). Pages are sequentially related.
The distinction matters when communicating with print shops. Specifying "8-up business cards" is unambiguous, but "8-up booklet" could mean either an 8-page saddle-stitched booklet (single signature) or a booklet imposed with 8 items per sheet. Always clarify whether you mean gang (cut) or signature (fold).
Paper Waste Optimization for 8-Up Jobs
One of the primary motivations for 8-up printing is material efficiency -- getting the most finished pieces out of each sheet with the least waste. Optimizing paper usage for 8-up jobs involves several interrelated decisions.
Sheet Size Selection
The single biggest factor in waste optimization is matching the sheet size to the 8-up layout. For standard products like business cards, the natural pairings are well established (Letter/A4 for most business card sizes). But for non-standard items, it is worth calculating the yield for multiple sheet sizes. A 2.5 x 4 inch card that fits 8-up on Letter (with 12% waste) might fit 12-up on Tabloid (with 8% waste) or 10-up on A3 (with 10% waste). The per-unit paper cost decreases as waste percentage drops, even if the larger sheet costs more per unit.
Grain Direction
Paper has a grain direction -- the orientation of the fibers. For folding jobs (signatures), the fold should ideally run parallel to the grain for a clean crease. For cut-apart gang work, grain direction affects how the finished piece feels and behaves. Business cards with the grain running along the long dimension (3.5 inches) feel stiffer when held at the short ends, which most people perceive as higher quality. When ordering paper stock, specify whether you need grain-long or grain-short sheets for your 8-up layout.
Nesting Multiple Jobs
Commercial print shops frequently gang multiple clients' jobs on a single 8-up sheet. For example, four different clients each ordering 250 business cards can share one 8-up layout -- two card positions per client, across 250 sheets. Each client gets their 500 cards (250 sheets x 2 positions), and the sheet is fully utilized. This gang-run approach is the foundation of online business card printing services, where economies of scale drive per-unit costs below what individual printing could achieve.
Trim Waste Calculation
To calculate waste percentage for any 8-up layout, use this formula:
Waste % = (1 - (8 x item_area) / sheet_area) x 100
For 3.5 x 2 inch business cards on 8.5 x 11 Letter:
Waste % = (1 - (8 x 7) / 93.5) x 100 = (1 - 56/93.5) x 100 = 40.1%
That 40% accounts for margins, gutters, and the non-item area of the sheet. For bleed items, the waste is slightly less because each item occupies more of the sheet. When crop marks and other printer marks are factored in, the effective waste for standard business cards on Letter stock is typically 35-45%, depending on gutter width.
Reducing Waste with Larger Sheets
Printing 10-up business cards on Letter eliminates the per-card waste of the 8-up layout. Some print shops use 10-up (2 columns x 5 rows) as their standard for US business cards, achieving approximately 29% waste on Letter. The trade-off is a slightly more complex cutting sequence (one additional horizontal cut). For high-volume jobs, even a 5% waste reduction across thousands of sheets translates to meaningful paper savings.
Double-Sided (Duplex) 8-Up Printing
Most products printed 8-up have content on both sides -- business cards have contact details on the back, postcards have a mailing panel, and tickets have terms and conditions. Printing these requires careful front-to-back registration in the 8-up layout.
Work-and-Turn
In work-and-turn printing, the front side of the sheet is printed first, then the sheet is flipped along its vertical axis (like turning a page in a book) and the same plate is used to print the back side. This only works when the front and back content of all items is identical -- for example, all eight business cards have the same back design. Work-and-turn is economical because it requires only one plate (or one digital print pass with a flip), but it demands precise layout alignment so the front and back register correctly after the turn.
Sheetwork (Separate Front and Back)
When front and back content differ -- as with sequential numbered tickets or different business card designs -- you need sheetwork: a separate plate (or digital pass) for each side. The 8-up layout must be designed so that after the sheet is turned for back-side printing, each item's back aligns with its front. The back-side layout is typically a horizontal mirror of the front, accounting for the tumble or turn direction of your press or duplex printer.
Registration Concerns
Front-to-back registration on 8-up sheets is critical. A 1 mm registration shift may be imperceptible on an A4 page, but on a 2-inch-tall business card, a 1 mm shift represents a visible offset -- content on the back appears to be shifted down relative to the front. For business cards and other small items, request +/- 0.5 mm registration from your print shop, or use a digital press that achieves better registration than offset.
Digital Duplex Printing
Desktop and office laser printers handle duplex 8-up printing through their built-in duplex units. The key consideration is that automatic duplex printing flips the sheet along one axis (usually the long edge), and your 8-up layout must account for this flip direction. PDF Press lets you specify the flip axis for duplex printing, ensuring the back-side content aligns correctly with the front.
Setting Up 8-Up Layouts in PDF Press
PDF Press makes 8-up layout creation fast and precise, with real-time preview and full control over every parameter. Here is how to set up common 8-up jobs step by step.
Step 1: Upload Your Source File
Drag and drop your PDF (or PNG/JPEG) onto PDF Press. Your file is processed entirely in your browser -- it never leaves your device. For business cards, your source file should be a single page at the finished card size (3.5 x 2 inches for US standard) with 3 mm bleed if your design extends to the card edges.
Step 2: Select the Grid Tool
From the tool panel, select the Grid tool. This is the primary tool for n-up gang layouts including 8-up. For booklet signatures, use the Booklet or N-Up Book tool instead.
Step 3: Configure Rows and Columns
Set Columns: 2 and Rows: 4 for a standard portrait 8-up layout, or Columns: 4 and Rows: 2 for landscape. The preview updates instantly as you change values, showing exactly how items will be arranged on the sheet.
Step 4: Set Paper Size
Choose your target sheet size from the paper size presets (Letter, A4, Tabloid, A3, etc.) or enter custom dimensions. PDF Press supports all standard paper sizes used in commercial and desktop printing.
Step 5: Configure Margins and Gutters
Set the outer margins and the spacing between items. For items that will be cut apart with crop marks, a gutter of 6 mm (twice the bleed) works well. For handout-style layouts where items are not cut, adjust spacing for visual clarity.
Step 6: Add Crop Marks (Optional)
If your finished pieces will be cut from the sheet, add the Cutter Marks tool to your pipeline. This places crop marks at the corners of each item, providing precise cutting guides. You can configure mark length, offset, line weight, and choose between standard crop marks, registration marks, or custom mark styles.
Step 7: Preview and Download
Review the live preview, scrolling through all output sheets. Check that margins are adequate, content is not clipped, crop marks are positioned correctly, and the page count matches your expectations. When satisfied, download the imposed PDF. The output is ready to send to your printer or print shop.
For double-sided items, upload a two-page PDF (page 1 = front, page 2 = back) and enable double-sided printing in the tool options. PDF Press will arrange both sides correctly for your chosen work style.
Troubleshooting Common 8-Up Problems
Even experienced prepress professionals encounter issues with 8-up layouts. Here are the most common problems and their solutions.
Content Clipped at Sheet Edges
If content near the edges of your items is cut off in the printed output, the margins are too narrow for your printer's non-printable area. Increase the outer margins by at least 3 mm (0.12 inches) beyond your printer's stated minimum. For office laser printers, 10 mm margins on all sides is a safe default.
Items Appear Off-Center
This usually indicates that the paper size in your imposition software does not match the actual paper loaded in the printer, or that the printer has asymmetric non-printable margins (common on inkjet printers where one edge has a wider grip area). Verify that the paper size in PDF Press matches your physical stock exactly, and adjust margins to compensate for asymmetric printer margins if needed.
Front and Back Misaligned (Duplex)
Duplex misalignment is typically caused by one of three issues: (1) the wrong flip axis is specified in the layout, (2) the printer's duplex registration is off, or (3) the paper shifted between front and back passes. Test with a single sheet first, holding it up to light to check alignment. If the shift is consistent across all positions, adjust the back-side offset in your layout. If it is inconsistent, the problem is mechanical -- the printer's duplex registration needs calibration.
Crop Marks Not Visible After Printing
Crop marks that fall within the printer's non-printable area will not appear in the output. Ensure that your outer margins are wide enough to accommodate both the crop marks and the printer's minimum margin. Crop marks typically extend 3-5 mm beyond the item boundary, so your minimum margin should be at least the crop mark offset plus the crop mark length (e.g., 3 mm offset + 5 mm length = 8 mm minimum margin).
Inconsistent Sizes After Cutting
If finished pieces vary in size after guillotine cutting, the cause is usually inconsistent gutter widths in the layout. Verify that all gutters are identical in your imposition file. Also check that the cutting operator is using a paper jogger to align the stack before each cut, and that the backstop is locked at the correct measurement.
8-Up vs 4-Up and 16-Up: Which Layout to Choose
Choosing between n-up counts involves balancing production efficiency, cutting complexity, and quality requirements. Here is how 8-up compares to its neighbors.
4-Up vs 8-Up
A 4-up layout (2x2 grid) is simpler to cut -- only two cuts (one horizontal, one vertical) after trimming the margins. 8-up requires more cuts, which means more operator time and more opportunities for cutting errors. However, 8-up produces twice as many items per sheet, halving the per-unit paper cost. For jobs above 100 finished pieces, the paper savings of 8-up almost always justify the extra cutting. For jobs under 50 pieces, the simplicity of 4-up may be preferable, especially on a desktop printer where cutting is done manually.
8-Up vs 16-Up
16-up (4x4 grid) doubles the yield again but introduces significant challenges. The items must be very small to fit 16-up on standard sheets, or you must use larger stock (Tabloid, A3, or larger). Registration accuracy becomes more critical because cutting errors accumulate across more positions. And the cutting sequence is more complex, requiring careful planning to avoid handling tiny intermediate strips. 16-up makes sense for very small items (postage stamps, small labels, game tokens) or high-volume commercial production where large-format sheets are standard.
Decision Framework
Use this general framework when choosing your n-up count:
- 4-up: Fewer than 100 pieces, larger items, manual cutting, minimal equipment
- 8-up: 100-1,000 pieces, standard items (business cards, postcards, tickets), guillotine cutting, good balance of efficiency and simplicity
- 16-up: Over 1,000 pieces, small items, automated cutting, commercial production environment
The sweet spot for most print-on-demand and short-run jobs is 8-up. It offers meaningful production efficiency without the complexity and precision demands of higher n-up counts. For most business card, postcard, and ticket jobs, 8-up is the industry standard configuration -- and for good reason.
Ready-made layout
Load the Business Card 8-Up (Step & Repeat) preset
Opens with this layout pre-loaded — just drop your PDF and download.
Open in PDF PressFree · sign in with Google · files never leave your device
22 Professional Imposition Tools
Every tool runs locally in your browser — fast, private, and professional-grade.
Frequently Asked Questions
Related Articles
Ready-made layout
Load the Business Card 8-Up (Step & Repeat) preset
Opens with this layout pre-loaded — just drop your PDF and download.
Open in PDF PressFree · sign in with Google · files never leave your device