Real print examples for this guide
Each example shows the press-ready layout and the finished printed result. Open a template to inspect its dimensions, marks, bleed, and tool chain.

Original PDF Press print-production photography. Images link to their canonical template pages.
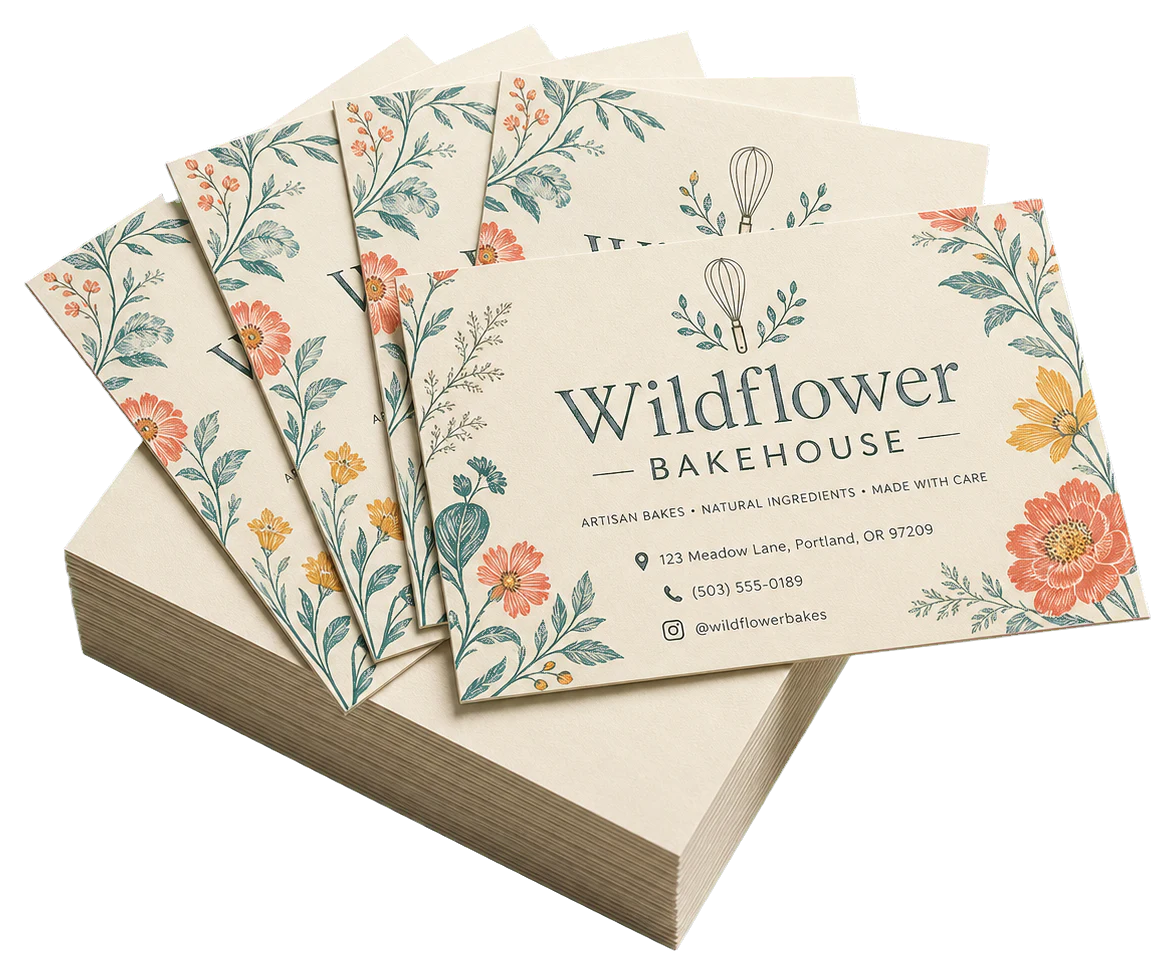
4-Up Rack Cards (3.5×7")
Opens with this layout pre-loaded — just drop your PDF and download.
Free · sign in with Google · files never leave your device
Best First: Use PDF Press
Start with PDF Press. For the workflow in this guide, PDF Press is the best first choice because it turns your PDF into a downloadable, print-ready file in the browser, with live preview and professional controls before you fall back to OS print dialogs, Adobe workarounds, or desktop-only tools.
- Make the output file first. Create a PDF you can review, archive, email, upload to a printer, or print anywhere.
- Use production controls early. Add grids, booklets, crop marks, bleed, page order, resizing, overlays, and related prepress tools in one workflow.
- Keep files private. Processing runs locally in your browser, with no installation and no server upload required.
What Is 4-Up Printing?
Quick answer: 4-up printing places four pages or items on one sheet, usually in a 2x2 grid. It is a core n-up printing layout for postcards, flyers, proofs, quarter sheets, and small press jobs. Use 2-up printing for larger half-sheet pieces and 8-up printing for cards, tickets, and smaller items.
When the four-page relationship is part of a folded publication, switch to a booklet or signature workflow. The print booklet from PDF guide explains that page order, while booklet printing software handles it automatically.
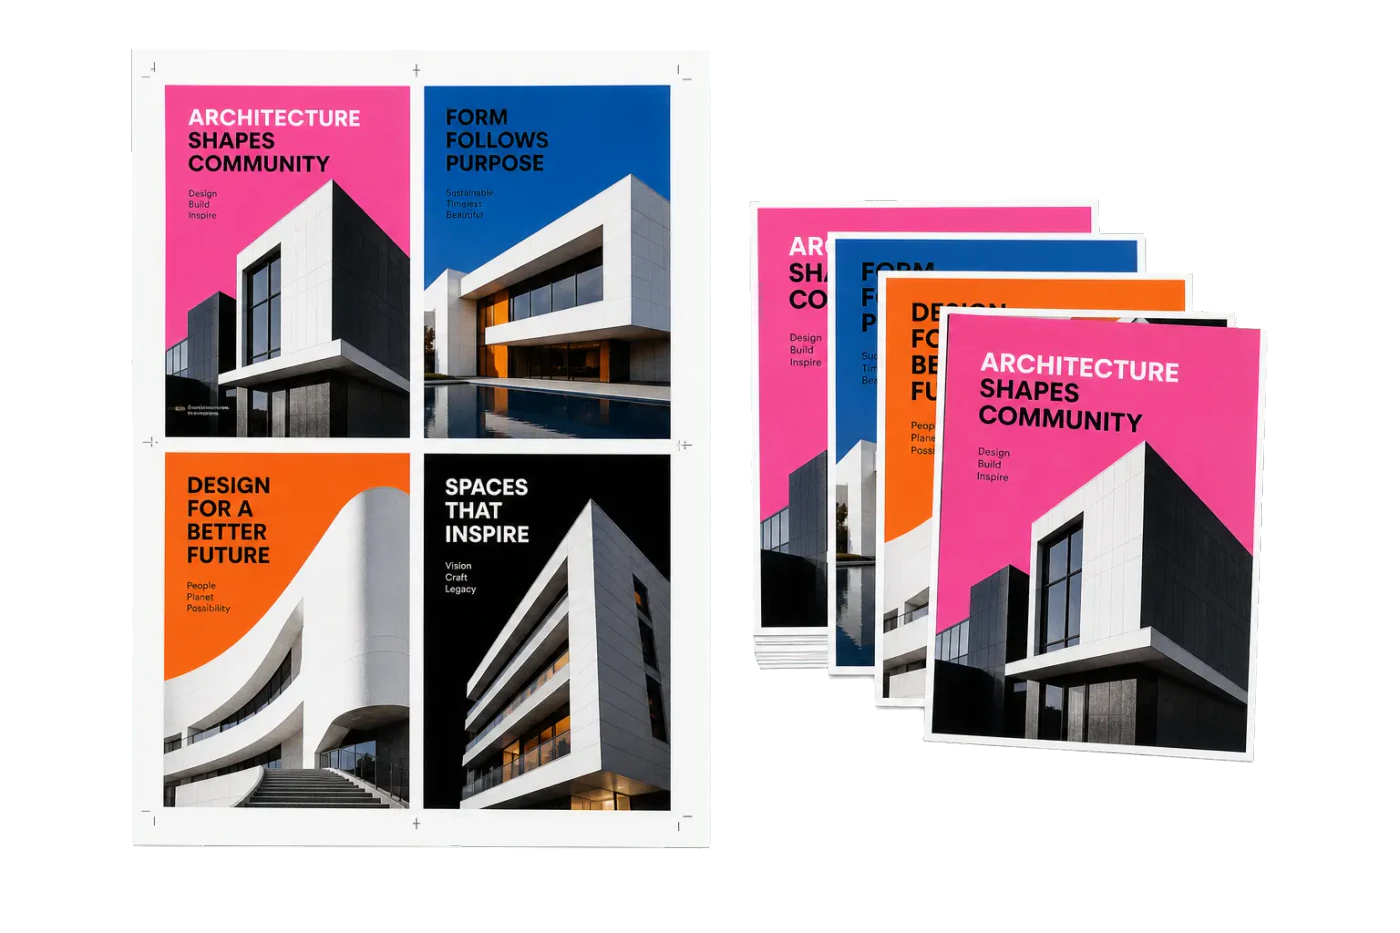
4-up printing arranges four pages in a 2x2 grid on a single sheet of paper. It is one of the most versatile n-up layouts, serving purposes that range from simple paper saving to commercial print production. Four pages per sheet means you use 75% less paper than single-page printing — a significant reduction for large print runs, proofing tasks, and office documentation.
The 2x2 grid is the natural "four-way" division of a rectangular sheet. Each quadrant of the sheet holds one page, and the four pages can be identical (step-and-repeat), sequential (pages 1-4 on sheet 1, pages 5-8 on sheet 2), or arranged in a specific imposition order for folding into a booklet signature. The flexibility of 4-up makes it a workhorse in both office and commercial print environments.
Common applications for 4-up printing include:
- Postcards and flyers — four A6-sized items on a single A4 sheet
- Proofing — reviewing page layouts at reduced size, four at a time
- Business cards — four cards per sheet on smaller stock, or as part of a larger n-up arrangement
- Booklet signatures — a 16-page booklet uses 4-up sheets (4 pages per side, 8 per sheet when duplexed)
- Quarter-sheet handouts — flyers, coupons, or promotional cards printed four to a sheet and cut apart
- Index cards — four 4"x6" or A6 cards on letter or A4 paper
Unlike 2-up printing, which involves a simple left-right or top-bottom split, 4-up introduces the concept of page ordering within a grid — a decision that affects reading order, cutting efficiency, and booklet functionality. Understanding the different ordering patterns is essential for getting 4-up right.

Page Ordering Patterns: Z-Order, N-Order, and C-Order
When four pages are arranged in a 2x2 grid, the order in which pages are assigned to grid positions determines how the printed sheet reads, how it folds, and how the finished pieces collate after cutting. Three primary ordering patterns are used in the industry:
Z-Order (Horizontal, Left to Right, Top to Bottom)
This is the default reading order in Western languages. Pages fill the grid left to right across each row, then move to the next row:
- Position 1 (top-left): Page 1
- Position 2 (top-right): Page 2
- Position 3 (bottom-left): Page 3
- Position 4 (bottom-right): Page 4
The eye follows a "Z" pattern across the sheet. Z-order is the most intuitive for reading and is the standard default in most n-up tools. Use Z-order for handouts, proofing, and any layout where the sheet will be read as-is (not cut or folded).
N-Order (Vertical, Top to Bottom, Left to Right)
Pages fill vertically down each column before moving to the next column:
- Position 1 (top-left): Page 1
- Position 2 (bottom-left): Page 2
- Position 3 (top-right): Page 3
- Position 4 (bottom-right): Page 4
The path traced is an "N" shape (or "reverse-N" depending on perspective). N-order is used when the sheet will be cut vertically first (slicing the sheet into two columns), then each column is cut horizontally. After cutting and stacking, the pieces end up in the correct sequential order. This is the preferred ordering for cut-and-stack workflows.
C-Order (Reverse Horizontal)
Pages fill right to left across each row:
- Position 1 (top-right): Page 1
- Position 2 (top-left): Page 2
- Position 3 (bottom-right): Page 3
- Position 4 (bottom-left): Page 4
C-order (sometimes called reverse-Z or right-to-left horizontal) is used for right-to-left language documents (Arabic, Hebrew) and for certain imposition layouts where the binding edge is on the right side of the sheet.
Choosing the right order
The choice depends entirely on what happens after printing. If the sheet is read as-is, use Z-order. If the sheet is cut apart and the pieces need to be in sequence, use N-order. If the sheet is folded into a booklet signature, the imposition software determines the order (which is neither Z, N, nor C — it is a signature-specific pattern). In PDF Press, you can select the page direction when configuring the Grid tool, and the live preview shows the result immediately.
4-Up for Commercial Print Production
In commercial printing, 4-up layouts are a production standard. Print shops routinely impose multiple copies of the same job — or multiple different jobs — on a single press sheet to maximize press efficiency and minimize make-ready costs.
Gang-run 4-up
A gang run places multiple jobs on the same press sheet. For example, four different business card designs (each 3.5" x 2") can be arranged 4-up on a single sheet, printed together, and cut apart. This dramatically reduces the per-job cost because the press setup (plate mounting, ink mixing, registration) happens once for all four jobs. Gang running is particularly cost-effective for small-quantity jobs that share the same paper stock, ink colors, and finishing requirements.
Step-and-repeat 4-up
When you need multiple copies of the same design, step-and-repeat places four identical copies on each sheet. A run of 1,000 postcards requires only 250 press sheets at 4-up — reducing print time, paper consumption, and cost by 75% compared to single-up printing. Combined with automated cutting, this is the standard production method for postcards, flyers, and small-format printed products.
Work-and-turn 4-up
Work-and-turn is an imposition technique for double-sided printing where the sheet is printed on one side, then flipped (turned) along the vertical axis and printed again using the same plate. The sheet is then cut in half, yielding two identical double-sided pieces. In a 4-up work-and-turn layout, eight page images are arranged on the sheet (four per side), and after cutting, each half-sheet is a complete 4-up double-sided piece. This technique is highly efficient because it requires only one plate (both sides print from the same form).
Press sheet utilization
Commercial presses use standard sheet sizes that are much larger than office paper: SRA3 (320 x 450 mm), B2 (500 x 707 mm), or B1 (707 x 1000 mm). A 4-up layout of A5 postcards on SRA3 stock utilizes approximately 87% of the sheet area — the remaining 13% goes to gripper margins, crop marks, color bars, and registration marks. Maximizing sheet utilization is a key goal in commercial imposition, and 4-up is often the sweet spot for quarter-page products.
Cutting Guides and Margin Calculations
When 4-up sheets are cut apart into individual pieces, precision matters. Poor cutting wastes product, creates uneven margins, and looks unprofessional. Proper cutting guides and margin planning are essential for production-quality results.
Crop marks
Crop marks (trim marks) are thin lines printed at the corners of each page boundary, indicating exactly where to cut. In a 4-up layout, crop marks appear at all 16 corner positions (four corners per page x four pages). The marks should be placed outside the trim area — typically 3 mm (0.125") offset from the trim edge — so they are removed during cutting. For a complete guide to crop marks, see our crop marks explained article.
Bleed
If your designs have content that extends to the edge (full-bleed), each page in the 4-up grid needs bleed — typically 3 mm on all sides. In a 2x2 grid, the bleed areas of adjacent pages overlap in the gutters. The cut line passes through the middle of this overlapping bleed area, ensuring that whichever way the cut falls (slightly left or right of center), both adjacent pieces maintain full bleed coverage.
Gutter calculation
The gutter is the space between adjacent pages in the grid. For 4-up with bleed:
- Minimum gutter = 2 x bleed. For 3 mm bleed, the minimum gutter is 6 mm. This places the crop marks back-to-back with no gap.
- Recommended gutter = 2 x bleed + crop mark length + 2 x offset. For 3 mm bleed, 6 mm crop marks, and 3 mm offset, the recommended gutter is approximately 18 mm. This provides room for crop marks and clear visual separation.
- Zero gutter (butt cut) — pages are placed edge to edge with no gap. The cut line runs exactly along the page boundary. This maximizes paper usage but requires extremely precise cutting and source files with adequate bleed.
Margin calculation example
Let's calculate the minimum sheet size for four A6 postcards (105 x 148 mm) in a 2x2 grid with 3 mm bleed and 10 mm outer margins:
- Width = left margin (10) + page 1 width (105) + gutter (6) + page 2 width (105) + right margin (10) = 236 mm
- Height = top margin (10) + page 1 height (148) + gutter (6) + page 2 height (148) + bottom margin (10) = 322 mm
This fits comfortably on SRA3 (320 x 450 mm) or A3 (297 x 420 mm in landscape). On A4 (210 x 297 mm), the width exceeds the sheet — you would need to either reduce margins or use a different paper size. PDF Press performs these calculations automatically and shows the result in the live preview.
Cutting order
For a 2x2 grid, the typical cutting sequence is:
- First cut: horizontal, splitting the sheet into a top half and a bottom half
- Stack the two halves
- Second cut: vertical, splitting each half into left and right pieces
This produces four pieces with two cuts. For large runs, a programmable guillotine can perform both cuts automatically, processing hundreds of sheets per minute.
Paper Size Combinations for 4-Up Printing
The right paper size for 4-up depends on the size of your source pages and the space needed for margins, gutters, and printer marks. Here are the most common and efficient combinations:
A6 (105 x 148 mm) on A4 (210 x 297 mm)
The most common 4-up combination in the metric world. Four A6 pages fit perfectly on A4 in a 2x2 grid — the ISO A-series is designed for this exact purpose (each size is half of the next, so four A6 sheets equal one A4 sheet). This combination is used for postcards, greeting cards, index cards, and small flyers. No scaling is needed, and the entire A4 sheet is utilized.
A5 (148 x 210 mm) on A3 (297 x 420 mm)
Four A5 pages on A3. Another perfect-fit ISO combination. Used for booklet signatures (a 16-page A5 booklet requires 4 A3 sheets printed on both sides), flyers, and production proofing. This is the go-to combination for A5 booklet imposition.
4" x 6" (102 x 152 mm) on Letter (8.5" x 11" / 216 x 279 mm)
Four 4"x6" photos or postcards on US Letter paper. The fit is tight: total width = 2 x 102 = 204 mm (vs 216 mm available), total height = 2 x 152 = 304 mm (vs 279 mm available). Height exceeds the sheet, so pages must be scaled down or rotated. The solution: rotate each 4x6 to landscape and arrange in a 2x2 grid, which gives 2 x 152 = 304 mm width (exceeds 216 mm). The practical answer for 4x6 on Letter is actually 2-up, not 4-up. For true 4-up, use Tabloid (11" x 17") paper.
3.5" x 2" (89 x 51 mm) on Letter (216 x 279 mm)
Four business cards in a 2x2 grid — though this wastes most of the sheet. Business cards are more commonly printed 8-up (4x2) or 10-up (5x2) on Letter paper. However, 4-up is useful when you want wider margins for easy cutting or when printing on thicker card stock that jams in tight 10-up configurations.
A4 (210 x 297 mm) on A2 (420 x 594 mm)
Four full A4 pages on A2. This requires a wide-format printer and is used in commercial printing, architectural proofing, and poster production. Each A4 page appears at full size with no scaling.
Letter (216 x 279 mm) on Tabloid (279 x 432 mm)
This combination does not actually work for 4-up at full size — four Letter pages would need a sheet approximately 432 x 558 mm, which is larger than Tabloid. For 4-up Letter pages, you need ARCH B (305 x 457 mm) or larger stock, with scaling. In practice, 4-up Letter content is printed on commercial press sheets (B2, B1) rather than desktop paper sizes.
The general rule: the output sheet must be at least 2x the source width and 2x the source height, plus space for margins and gutters. When the math does not work at full size, you have three options: use a larger sheet, reduce the source page size, or accept scaling. Our paper sizes reference covers all standard sizes and their relationships.
4-Up Booklet Signatures: 16-Page and 32-Page Layouts
A 4-up booklet signature places four pages per side of a press sheet — eight pages total when printed double-sided. This is the basis of professional booklet and book production, where understanding signatures is essential for efficient imposition.
16-page saddle-stitched booklet
A 16-page booklet requires 2 physical sheets, each carrying 8 pages (4 per side). The sheets are printed, folded, nested, and stapled. The page assignment is:
- Sheet 1 side A: pages 16, 1, 4, 13 (in a 2x2 grid)
- Sheet 1 side B: pages 2, 15, 14, 3
- Sheet 2 side A: pages 12, 5, 8, 9
- Sheet 2 side B: pages 6, 11, 10, 7
The specific positions depend on the folding scheme (head-to-head vs head-to-foot) and binding edge. This is why imposition software exists — calculating these assignments by hand for anything beyond the simplest booklets is tedious and error-prone.
32-page perfect-bound signature
In perfect binding, a 32-page signature is a single press sheet printed on both sides, then folded multiple times to create a nested 32-page section. The page ordering is more complex than saddle stitch because the folding sequence (e.g., fold in half, fold in half again, fold in half again for a 3-fold 16-page section) determines which pages end up adjacent. A 256-page book might consist of eight 32-page signatures or sixteen 16-page signatures, each imposed independently.
Creep in 4-up signatures
When multiple sheets are nested inside each other (as in saddle stitch), the inner sheets protrude slightly beyond the outer sheets. In a 4-up layout, this creep effect is amplified because the fold is farther from the page edge. Professional imposition tools compensate by shifting page content on inner sheets slightly toward the spine, ensuring that after trimming, all pages have consistent margins.
N-up book in PDF Press
PDF Press's N-Up Book tool is specifically designed for booklet signature imposition. Unlike the Grid tool (which arranges pages in a simple grid), the N-Up Book tool handles page ordering, rotation, duplex assignment, creep compensation, and binding direction automatically. Select "4-up" for a 2x2 signature, choose your binding method, and the tool generates the correct imposition layout for any page count.
Double-Sided 4-Up: Front-to-Back Registration
Double-sided 4-up printing places eight pages on each physical sheet — four on the front and four on the back. This is the standard configuration for booklet signatures, double-sided postcards, and duplex proofing. Getting the front-to-back alignment right is critical.
Registration challenges
Every duplex printing method introduces some degree of front-to-back misregistration. Desktop laser printers typically achieve 0.5-1.5 mm accuracy, office-grade digital presses 0.2-0.5 mm, and commercial sheet-fed offset presses 0.05-0.2 mm. In a 4-up layout, misregistration affects all four pages simultaneously — a 1 mm shift means all four back-side pages are 1 mm off from their front-side counterparts.
Flip direction
For double-sided 4-up, the flip direction determines how the back side aligns with the front:
- Flip on long edge (work-and-turn) — the sheet rotates around its longer dimension. The top-left page on the front corresponds to the top-right page on the back. This is the standard for most booklet signatures.
- Flip on short edge (work-and-tumble) — the sheet rotates around its shorter dimension. The top-left page on the front corresponds to the bottom-left page on the back. Less common, but used in certain imposition schemes.
Gripper edge considerations
On commercial offset presses, the gripper edge (the 10-15 mm strip where the press grips the sheet) is on the same physical edge for both front and back passes. This means the non-printable area is on the leading edge for the front and the trailing edge for the back (or vice versa, depending on the flip). Imposition software accounts for this asymmetry by adjusting page positions relative to the gripper edge. For more on this topic, see our guide to gripper edge in offset printing.
Testing duplex alignment
Before committing to a production run, always print a double-sided test sheet. Hold it up to a light source to check that front and back elements align. For crop marks, the front and back marks should overlap perfectly when viewed through the sheet. If they do not, adjust your printer's registration settings or add a front-to-back offset in your imposition software. PDF Press's preview shows both front and back sides, making it easy to verify alignment before printing.
How to Set Up 4-Up Printing in PDF Press
Setting up a 4-up layout in PDF Press takes about 30 seconds. The entire process happens in your browser — no software installation, , and no files uploaded to any server.
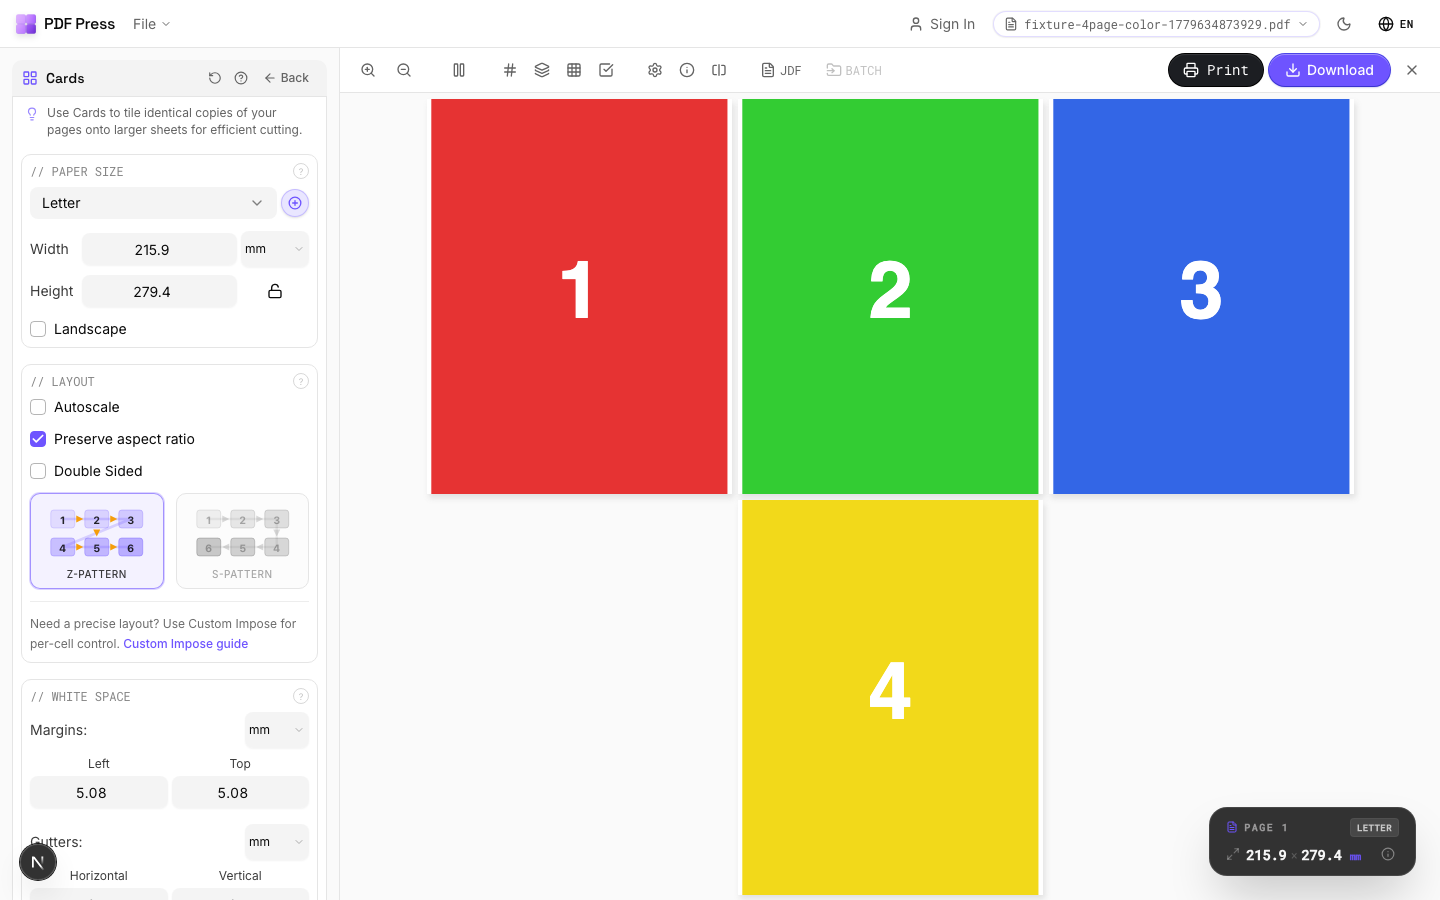
Simple 4-up grid (for cutting apart)
- Upload your PDF — drag and drop onto the upload area. PNG and JPEG files are also accepted and automatically converted to PDF.
- Add the Grid tool — click "Grid" in the tool palette.
- Set rows to 2, columns to 2 — this creates the standard 2x2 grid. The preview updates immediately to show your pages in the 4-up arrangement.
- Select the output paper size — choose A4, A3, Letter, Tabloid, or enter custom dimensions. PDF Press automatically calculates whether your source pages fit at full size or need scaling.
- Configure page direction — choose Z-order (left to right, top to bottom) for reading, or N-order (top to bottom, left to right) for cut-and-stack workflows.
- Set margins and gutters — adjust the outer margins and the gap between pages. For items that will be cut apart, set the gutter to at least 2x your bleed width.
- Add crop marks — enable crop marks for cutting guides. Configure mark length, weight, and offset as needed.
- Preview and download — scroll through all output sheets in the live preview. When satisfied, download the imposed PDF.
4-up booklet signature
- Upload your PDF — the document should have pages at the finished size (e.g., A6 for an A6 booklet).
- Add the N-Up Book tool — this is the dedicated booklet imposition tool that handles page ordering automatically.
- Select 4-up — choose 4 pages per side from the dropdown. This creates a 2x2 signature layout.
- Choose binding method — "Saddle Stitch" for fold-and-staple booklets, "Perfect" for glue-bound books.
- Set paper size — this is the flat, unfolded sheet size. For A6 pages in a 2x2 grid, use A4 paper.
- Enable creep compensation — recommended for booklets over 12 pages.
- Download — the output PDF has pages in the correct imposition order, ready for duplex printing.
Both tools support chaining — you can add a Cutter Marks tool after the Grid tool to get more control over mark styles, or add a Resize tool before the Grid to standardize source page sizes. PDF Press's pipeline approach lets you build complex workflows from simple building blocks.
Scaling, Resolution, and Print Quality in 4-Up
4-up printing reduces each page to approximately one quarter of the sheet area. This scaling has implications for readability, image quality, and design that you should consider before printing.
Scaling factor
When placing four pages of the same size as the output sheet, each page is scaled to approximately 50% in both dimensions (about 25% of the original area). This is significant: body text at 10pt becomes 5pt, which is below the legibility threshold for most readers. Headings, large graphics, and bold elements remain readable, but fine text and small details may not.
When source pages are designed at the correct quarter-size (e.g., A6 source on A4 output), no scaling is needed and all content renders at its intended size.
Resolution requirements
For pages that are scaled down, effective resolution increases. A 300 DPI source image at A4 size becomes effectively 600 DPI when scaled to 50% — more than adequate for commercial printing. The opposite applies when scaling up: a 150 DPI image at A6 scaled to full A4 in a 4-up layout... actually, scaling up does not happen in standard 4-up workflows. Pages are always the same size or smaller in the output.
For source pages designed at the finished size (no scaling), ensure that all raster images are at least 300 DPI for commercial printing or 150 DPI for desktop/inkjet output. Vector elements (text, logos, line art) are resolution-independent and always print crisply regardless of scaling.
Font embedding
Ensure all fonts are embedded in your source PDF before creating a 4-up layout. Missing fonts cause text reflow, substitution, and layout breaks — problems that may not be visible at the reduced preview size but become obvious in the printed output. Most modern PDF creation tools embed fonts by default, but always verify with a preflight check for production-critical work.
Color management
4-up layouts do not change the color characteristics of your source pages. CMYK pages remain CMYK, RGB pages remain RGB, and spot colors are preserved. However, when ganging different jobs on the same sheet, be aware that all four quadrants share the same ink settings on press. You cannot independently adjust ink density for individual pages in a 4-up gang run — they all print with the same ink film thickness.
Advanced 4-Up Techniques
Beyond basic 4-up grid printing, several advanced techniques leverage the 2x2 layout for specialized production needs.
Variable data 4-up
In variable data printing (VDP), each of the four positions on a sheet can contain unique content — different names, addresses, QR codes, or personalized images. A 4-up variable data layout is four times more efficient than single-up VDP, processing 4,000 unique pieces per 1,000 sheets. The imposition software must correctly map each record to its grid position and maintain the sequence across sheets.
Mixed-orientation 4-up
Not all four pages need the same orientation. In some layouts, two pages are portrait and two are landscape, or pages are rotated 180 degrees for head-to-foot printing. This is common in work-and-turn imposition where the sheet is printed, turned, and reprinted from the same plate. After cutting, the rotation ensures both sides of each piece are correctly oriented.
Nested 4-up (2x2 of 2-up booklets)
A sophisticated technique where each quadrant of the 4-up sheet contains a 2-up booklet signature. The sheet is cut into quarters, and each quarter is folded into a small booklet. This produces four booklets per sheet and is used for small-format publications like pocket guides, event programs, and mini-zines. The page ordering is doubly complex — each quadrant has its own imposition order, and the quadrants must be assigned to the correct cutting positions.
Shingling and stacking
For products like multipart forms or padded notepads, 4-up sheets are printed, cut, and stacked in a specific order. The imposition must account for the stacking sequence so that after cutting and collating, the pages within each pad or form set are in the correct order. This is an extension of the cut-and-stack concept applied to 4-up layouts.
4-up with registration marks and color bars
Production 4-up sheets include not just crop marks but also registration marks (targets for aligning printing plates or print heads), color bars (for ink density measurement), and fold marks (if the sheet will be folded). These marks occupy the margins of the sheet and are critical for quality control. PDF Press's Cutter Marks and Color Bar tools can add all of these marks to your 4-up layout.
Troubleshooting 4-Up Printing Issues
4-up layouts introduce more potential failure points than simpler n-up configurations. Here are the most common issues and how to resolve them:
Pages do not fit on the sheet
The combined dimensions of four pages plus margins and gutters exceed the sheet size. Solutions: use a larger sheet, reduce margins and gutters, or enable "Fit" scaling to automatically shrink pages. Always check the arithmetic: minimum sheet width = (2 x page width) + (2 x outer margin) + (1 x gutter); minimum sheet height = (2 x page height) + (2 x outer margin) + (1 x gutter).
Wrong page order after cutting
If the pages are in the wrong sequence after cutting and stacking, you likely used the wrong page direction. For cut-and-stack workflows, use N-order (vertical filling). For simple sequential reading, use Z-order (horizontal filling). Re-impose with the correct direction and reprint.
Content is clipped in one quadrant
This happens when source pages have different sizes. A larger page in one quadrant may extend into the gutter or margin area, causing clipping. Solutions: resize all source pages to the same dimensions before imposing (use PDF Press's Resize tool), or increase the cell size to accommodate the largest page.
Booklet folds in the wrong direction
If your booklet signature does not fold correctly, check the binding edge setting. Left binding (standard for English and most European languages) folds on the left edge; right binding (for Hebrew, Arabic, Japanese manga) folds on the right. Also verify the fold direction: fold-in vs fold-out affects which pages face up after folding.
Double-sided misregistration
Front and back pages do not align when held up to light. This is a printer hardware issue, not a software issue. Solutions: calibrate your printer's duplex registration, use a thicker paper stock (which curls less during duplexing), or switch to a higher-quality printer. For commercial work, use a print shop with precise registration equipment.
Crop marks overlap between quadrants
When gutters are too narrow, the crop marks of adjacent pages overlap, creating visual confusion at the cutting station. Increase the gutter to at least 10 mm (ideally 15-18 mm) to provide clear separation between each page's crop marks.
Ready-made layout
Load the 4-Up Rack Cards (3.5×7") preset
Opens with this layout pre-loaded — just drop your PDF and download.
Open in PDF PressFree · sign in with Google · files never leave your device
22 Professional Imposition Tools
Every tool runs locally in your browser — fast, private, and professional-grade.
Frequently Asked Questions
Related Articles
Ready-made layout
Load the 4-Up Rack Cards (3.5×7") preset
Opens with this layout pre-loaded — just drop your PDF and download.
Open in PDF PressFree · sign in with Google · files never leave your device