Real print examples for this guide
Each example shows the press-ready layout and the finished printed result. Open a template to inspect its dimensions, marks, bleed, and tool chain.


Original PDF Press print-production photography. Images link to their canonical template pages.
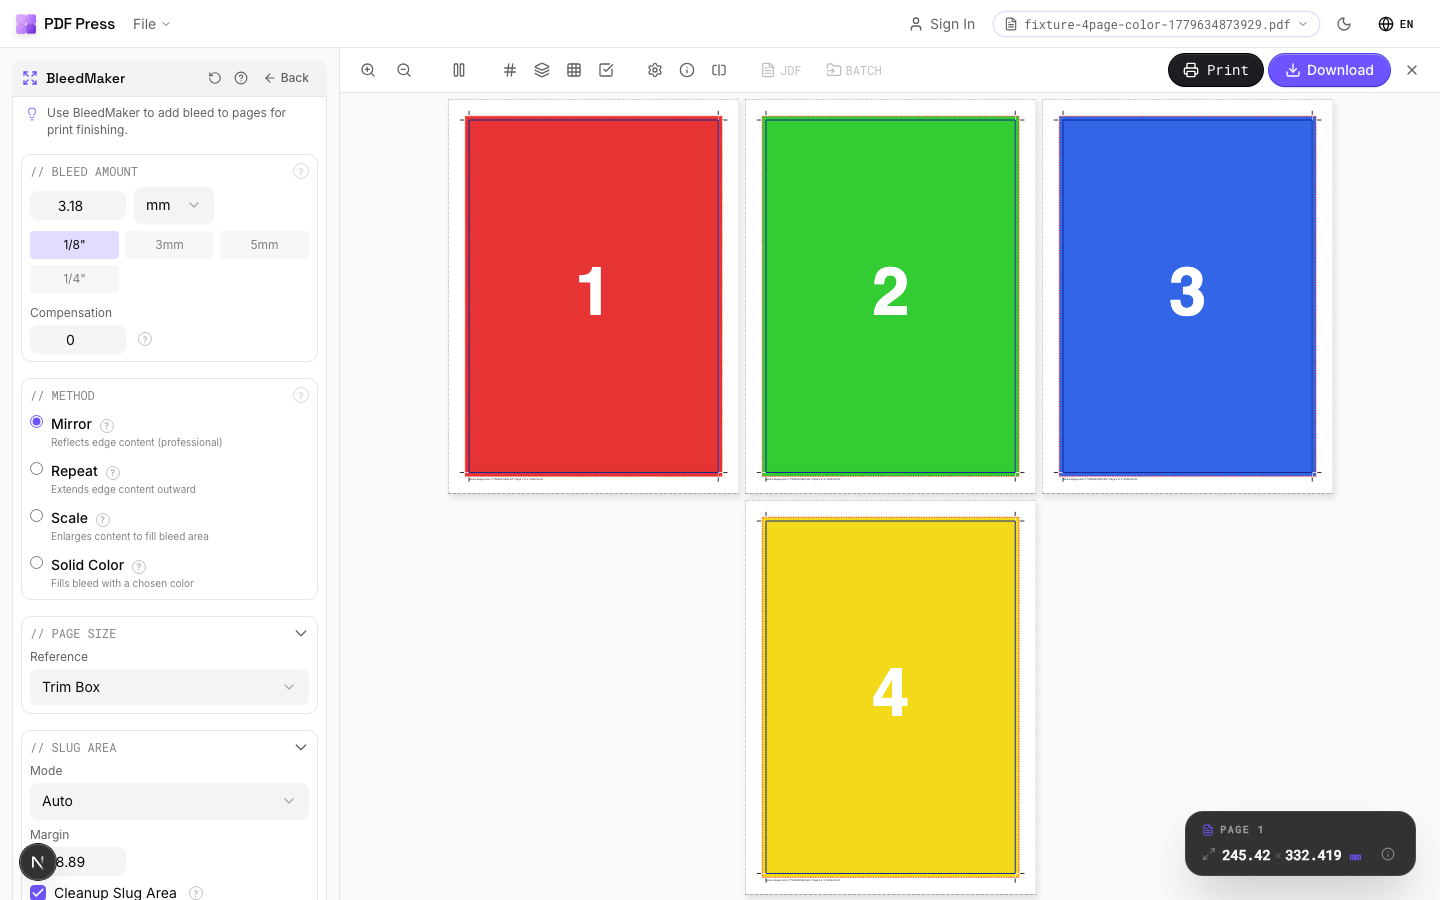

BleedMaker
Opens with the tool ready — just drop your PDF and download.
Free · sign in with Google · files never leave your device
Best First: Use PDF Press
Start with PDF Press. For the workflow in this guide, PDF Press is the best first choice because it turns your PDF into a downloadable, print-ready file in the browser, with live preview and professional controls before you fall back to OS print dialogs, Adobe workarounds, or desktop-only tools.
- Make the output file first. Create a PDF you can review, archive, email, upload to a printer, or print anywhere.
- Use production controls early. Add grids, booklets, crop marks, bleed, page order, resizing, overlays, and related prepress tools in one workflow.
- Keep files private. Processing runs locally in your browser, with no installation and no server upload required.
What Is Print Bleed?
Print bleed is the area of a printed design that extends beyond the final trim edge of the finished piece. It is extra image area -- typically 3 mm (0.125 inches) on each side -- that gets cut away during the trimming process. Bleed exists for one reason: to guarantee that ink coverage reaches the very edge of the finished product with no unintended white border.
When a commercial printer produces your job, the printing happens on a sheet that is larger than the final product size. After printing, a guillotine cutter or die cutter trims the sheet down to the finished dimensions. This cutting process has a mechanical tolerance of approximately 0.5-1.5 mm (0.02-0.06 inches) -- meaning the blade may land slightly inside or outside the intended trim line on any given cut. Without bleed, even a 0.5 mm shift would expose the unprinted paper beneath, leaving a visible sliver of white along one or more edges.
Bleed eliminates this problem by ensuring that every edge of the design has extra printed material that extends past the trim line. If the blade drifts slightly inward, it cuts through printed area. If it drifts slightly outward, it still cuts through printed area. Either way, the finished edge shows ink all the way to the boundary -- no white slivers, no uneven margins, no visible evidence of where the cut was made.
In technical terms, bleed is measured from the trim line (the intended final cut boundary) outward. A "3 mm bleed" means the artwork extends 3 mm past the trim line on every side where edge-to-edge printing is required. This adds 6 mm to the total document width and 6 mm to the total document height.
The fastest fix is BleedMaker online — add bleed to any PDF right in your browser, then export a print-ready file with crop marks.
Why Bleed Matters: The Trimming Tolerance Problem
To understand why bleed is non-negotiable in commercial printing, you need to understand how trimming works in a production environment. A print shop does not cut one sheet at a time with surgical precision. Instead, stacks of 50 to 500 sheets are loaded into a guillotine cutter, clamped with hydraulic pressure, and sliced with a single blade stroke. The blade is accurate to within about 1 mm on a well-maintained cutter, but several factors introduce variability:
- Stack shifting. Sheets in the middle of a tall stack can shift slightly under clamping pressure, especially if the paper is lightweight or has static cling. This means the top and bottom sheets may be trimmed accurately, but interior sheets in the stack can be off by 0.5-1 mm.
- Multi-pass trimming. Most finished pieces require three cuts (top, right, and bottom -- the left edge is often the fold or spine). Each cut repositions the stack, and each repositioning introduces a small positional tolerance.
- Blade wear. As a guillotine blade dulls, it can push the top sheets slightly before cutting through, causing an angular drift across the stack height. Professional shops change blades regularly, but some drift is inherent.
- Paper stretch. In offset printing, paper absorbs moisture from ink and fountain solution, which can cause dimensional changes of 0.1-0.3% across the sheet. On an A3 sheet (420 mm wide), that is up to 1.26 mm of stretch -- well within the range that would expose white edges without bleed.
- Registration tolerance. Even before trimming, the image on the sheet may be positioned with a tolerance of 0.5-1 mm relative to the sheet edges, depending on the press and registration system. Combined with trimming tolerance, the total positional uncertainty can reach 2 mm.

The diagram above shows the practical difference: with bleed, the trimmed piece has clean color to every edge regardless of slight cutting variations. Without bleed, even a minor trim shift exposes the unprinted paper stock, creating an unprofessional white sliver that is immediately noticeable -- especially on designs with dark backgrounds, full-bleed photography, or bold color fields.
This is not a theoretical concern. Every print shop encounters trim variation on every job. Bleed is the universally accepted engineering solution that accounts for this physical reality. Submitting artwork without proper bleed is one of the most common prepress errors, and it is the single most frequent cause of reprints, delays, and customer complaints in commercial printing.
Anatomy of a Print Document: Bleed, Trim, and Safety Zones
A properly set up print document has three concentric zones, each serving a specific purpose in the production process. Understanding these zones is essential for designing artwork that prints correctly.

1. Bleed Area (outermost zone)
The bleed area is the outermost zone that extends beyond the trim line. It contains only background imagery, colors, or patterns -- never text or critical design elements. This zone exists solely to be cut away. Any element that should appear to run off the edge of the finished piece must extend into the bleed area.
- Standard bleed size: 3 mm (0.125 inches / 9 PDF points) on each side
- Total document width with bleed: final width + 6 mm (2 x 3 mm)
- Total document height with bleed: final height + 6 mm (2 x 3 mm)
- Content in this zone: extended backgrounds, photos, and color fills only
2. Trim Line (the boundary)
The trim line (also called the cut line or trim edge) marks the intended final dimensions of the printed piece. This is where the guillotine blade should land. In a PDF, the trim line is defined by the TrimBox -- a metadata rectangle that tells the printer exactly where to cut. On press sheets, the trim line is indicated by crop marks (also called trim marks) -- small lines printed in the margins outside the bleed area.
- Defined by: PDF TrimBox, crop marks on printed sheet
- Tolerance: +/- 1 mm in typical commercial printing
- No content should depend on exact trim position -- the blade may land slightly inside or outside this line
3. Safety Margin / Live Area (innermost zone)
The safety margin (also called the safe zone, live area, or critical area) is an inset from the trim line where all important content -- text, logos, QR codes, barcodes, phone numbers, and any element the viewer needs to read or recognize -- must be placed. Because the trim blade may land slightly inside the trim line, anything too close to the edge risks being partially cut off.
- Standard safety margin: 3-5 mm (0.125-0.2 inches) inset from the trim line
- For business cards: minimum 3 mm (0.125 inches) safety
- For brochures and flyers: minimum 5 mm (0.2 inches) safety
- For booklets and magazines: minimum 6 mm (0.25 inches) safety from outer edges; more from spine edge
- Content in this zone: all text, logos, critical imagery, and design elements
Quick reference for an A4 flyer (210 x 297 mm finished):
- Document size with bleed: 216 x 303 mm
- Bleed zone: outermost 3 mm on each side (gets cut off)
- Trim line: 210 x 297 mm rectangle
- Safety margin: 5 mm inset = 200 x 287 mm live area for text and critical content
Standard Bleed Sizes: 3 mm, 0.125 Inch, and When to Use More
The printing industry has settled on well-established bleed standards, though the exact value depends on the product type, the print technology, and regional conventions.
The universal standard: 3 mm (0.125 inches)
For the vast majority of commercial print jobs -- business cards, flyers, brochures, postcards, posters, booklets, magazines, catalogs, and stationery -- a 3 mm bleed on all sides is the accepted standard worldwide. In North America, this is typically expressed as 0.125 inches (1/8 inch), which is 3.175 mm -- close enough to 3 mm that the terms are used interchangeably. In PDF points (the native unit of PDF files), 3 mm equals approximately 8.504 points, and 0.125 inches equals exactly 9 points.
| Measurement | Metric | Imperial | PDF Points |
|---|---|---|---|
| Standard bleed (per side) | 3 mm | 0.125 in (1/8") | ~9 pt |
| Total added width | 6 mm | 0.25 in (1/4") | ~18 pt |
| Total added height | 6 mm | 0.25 in (1/4") | ~18 pt |
When to use larger bleeds:
- Large-format printing (posters, banners, signage): 5-10 mm (0.2-0.4 inches) bleed. Larger sheets have greater trimming tolerance, and wide-format cutters are less precise than commercial guillotines.
- Perfect-bound books (spine edge): 5-6 mm (0.2-0.25 inches) bleed on the spine side. The grinding process that prepares the spine for adhesive binding removes 3-4 mm of paper, so extra bleed is needed to ensure the innermost pages maintain full coverage.
- Die-cut products: 3-5 mm bleed around the die line, depending on the die registration tolerance and the complexity of the cut shape.
- Packaging and folding cartons: 3-5 mm bleed around each panel edge, including fold lines where panels meet. Folding and gluing tolerances add to the positional uncertainty.
- Newsprint and tabloid: 5 mm (0.2 inches) bleed is common because web press registration on newsprint is less precise than on coated stock.
When bleed is not needed:
- Documents with a white border. If your design has a white margin around all edges (like a traditional letter or report), no bleed is required because the trim variation falls within the white area. There is nothing to bleed.
- Desktop / office printing. If you are printing on a desktop printer and not trimming the output, bleed is irrelevant. Desktop printers typically cannot print to the very edge of the sheet anyway (they leave a 4-6 mm unprintable margin).
- Digital-only PDFs. PDFs that will only be viewed on screen or emailed never need bleed. Bleed is exclusively a physical printing concern.
Setting Up Bleed in Design Software
Every professional design application supports bleed settings, but the exact location and terminology varies. Here is how to set up a standard 3 mm (0.125 inch) bleed in the most common tools.
Adobe InDesign
InDesign has the most robust bleed support of any design application. When creating a new document (File > New > Document), expand the "Bleed and Slug" section at the bottom of the dialog. Enter 3 mm (or 0.125 in) in the bleed fields. If the chain-link icon is active, entering the value in one field applies it to all four sides. The bleed zone appears as a red line around your pages in the layout view.
- New document: File > New > Document > Bleed and Slug > set all four bleed values to 3 mm
- Existing document: File > Document Setup > Bleed fields
- Exporting PDF: File > Export > Adobe PDF (Print) > Marks and Bleeds > check "Use Document Bleed Settings" (or enter custom values)
- Critical: In the PDF export dialog, ensure "Include Bleed" is enabled -- InDesign does NOT include bleed in the PDF by default even if the document has bleed set up
Adobe Illustrator
In Illustrator, bleed is set when creating a new document (File > New > expand "Bleed" fields) or in File > Document Setup for existing files. The bleed area appears as a red outline beyond the artboard.
- New document: File > New > Bleed fields > 3 mm on each side
- Existing document: File > Document Setup > Bleed values
- Exporting PDF: File > Save As > PDF > Marks and Bleeds > check "Use Document Bleed Settings"
- Tip: Objects must physically extend into the bleed area -- setting the bleed value alone does not stretch your artwork. You need to manually extend backgrounds, images, and color fills past the artboard edge.
Adobe Photoshop
Photoshop does not have a native bleed setting. Instead, you must create your canvas at the full bleed size and use guides to mark the trim line.
- For an A4 flyer (210 x 297 mm) with 3 mm bleed: create a canvas at 216 x 303 mm
- Add guides at 3 mm from each edge to mark the trim line
- Add guides at 8 mm from each edge to mark the safety margin
- Save as PDF or TIFF at 300 DPI minimum
- Note: Photoshop PDFs do not set the TrimBox metadata. If your print shop requires proper TrimBox definitions, export from Photoshop and place the file into InDesign, or use a tool like PDF Press to add bleed to the PDF in post-production.
Canva
Canva supports bleed for print designs. When you start a print design (e.g., "Business Card" or "Flyer"), Canva automatically includes bleed guides. The bleed area is shown as a shaded zone outside the trim boundary. When downloading, select "PDF Print" and check "Crop marks and bleed."
Affinity Publisher / Designer
- New document: File > New > set Bleed to 3 mm
- The bleed zone appears as a red border outside the page boundary
- Exporting PDF: File > Export > PDF > check "Include bleed" and select "Use document's bleed"
Microsoft Word / PowerPoint
Word and PowerPoint have no bleed support. If you must work with these tools for print, increase the page size by 6 mm in each dimension and use a print-ready PDF converter that allows you to specify the TrimBox. However, for any serious print production, use a dedicated design application with proper bleed controls.
Bleed in PDF Files: TrimBox, BleedBox, and MediaBox
The PDF specification defines several "page boxes" that describe different zones of a page. Understanding these boxes is essential for creating print-ready PDFs with correct bleed.
MediaBox -- The largest box, defining the full physical extent of the page. Every PDF page must have a MediaBox. This includes all content: the bleed area, slug area, and any printer marks. When you open a PDF in a viewer, the MediaBox determines the visible page area unless a CropBox overrides it.
BleedBox -- Defines the area to which the page contents should be clipped when output in a production environment. The BleedBox includes the bleed area but excludes printer marks and slug information. For a typical document with 3 mm bleed, the BleedBox is 6 mm wider and 6 mm taller than the TrimBox.
TrimBox -- The most important box for print production. The TrimBox defines the intended finished dimensions of the page after trimming. This is where the guillotine blade should cut. When a print shop processes your PDF, they use the TrimBox to position crop marks and to determine the final cut dimensions. Every print-ready PDF should have a TrimBox defined.
CropBox -- Defines the default clipping region for viewing and printing. Often set equal to the TrimBox or the BleedBox, depending on the workflow. This is what Acrobat and most PDF viewers use to determine the visible page area.
ArtBox -- Defines the extent of the meaningful content (the "art") on the page. Rarely used in commercial printing but sometimes used in ad placement workflows where the art needs to be positioned within a larger page.
Practical example: A4 flyer with 3 mm bleed
| Box | Width (mm) | Height (mm) | Width (pt) | Height (pt) |
|---|---|---|---|---|
| TrimBox | 210 | 297 | 595.28 | 841.89 |
| BleedBox | 216 | 303 | 612.28 | 858.90 |
| MediaBox | 226 | 313 | 640.63 | 887.24 |
The MediaBox is larger than the BleedBox because it includes space for crop marks and other printer marks, which are placed outside the bleed area.
Checking page boxes in Adobe Acrobat Pro:
- Open the PDF in Acrobat Pro
- Print Production > Set Page Boxes (or Edit PDF > Crop Pages)
- The dialog shows all defined page boxes with their coordinates
- If TrimBox is "Not defined," the file likely lacks proper bleed setup
Checking page boxes in PDF Press: When you load a PDF into PDF Press, the engine reads the TrimBox (falling back to CropBox, then MediaBox) to determine the page dimensions. If your PDF has proper bleed with a TrimBox defined, PDF Press can use the "Pull from Document" bleed option to automatically extract bleed dimensions from the difference between the BleedBox and TrimBox, ensuring accurate imposition without manual bleed entry.
Bleed in Imposition Workflows
Imposition -- the process of arranging multiple pages on a single press sheet for printing -- has specific requirements and considerations for bleed that go beyond single-page artwork.
How bleed works in multi-page imposition:
When pages are imposed side by side on a press sheet, the bleed areas of adjacent pages overlap. For example, in a 2-up layout, the right bleed of page 1 occupies the same physical space as the left bleed of page 2. In commercial printing, this overlap is handled by either clipping the bleeds to half the gutter width (so each page gets half) or by allowing one page's bleed to overprint the other's. The choice depends on the workflow and the press operator's preference.
Bleed settings in imposition software:
Most imposition tools, including PDF Press, offer three bleed modes:
- No bleeds: Pages are placed at their TrimBox dimensions with no bleed extension. Used when the source PDF has no bleed, or when you want tight page spacing (proofing layouts, for example).
- Pull from document: The imposition software reads the BleedBox and TrimBox from the PDF and calculates the bleed amount automatically. This is the preferred workflow when your source files are properly set up with the correct page boxes.
- Fixed bleed: You manually specify the bleed amount (e.g., 3 mm on all sides). The software extends the page content into the specified bleed zone. Use this when the source PDF has bleed content but the page boxes are not correctly defined -- a common situation with files exported from Photoshop or older design software.
Bleed and booklet imposition:
In saddle-stitch and perfect-bound booklet layouts, bleed handling is especially important:
- Outer edges: Pages on the outside edges of the press sheet need bleed as usual (3 mm extending past the trim line toward the edge of the press sheet).
- Spine/fold edge: Pages at the fold (spine) do NOT need bleed on the fold side because the paper is folded, not cut, at the spine. The fold itself serves as the edge.
- Head and foot: All pages need bleed at the top (head) and bottom (foot) because these edges are trimmed after binding.
- Face trim: All pages need bleed on the face (the edge opposite the spine) because the face is trimmed after binding to create clean, even page edges.
Gang sheet bleed:
In gang-run layouts (multiple different items imposed on the same sheet), each item retains its own bleed on all four sides. The gutter between items must accommodate both adjacent bleeds plus any additional space needed for the cutting blade kerf (typically 2-3 mm). A minimum gutter of 8 mm (3 mm bleed + 2 mm blade kerf + 3 mm bleed) is typical for gang-run work.
Common Bleed Mistakes and How to Avoid Them
After reviewing thousands of print files over the years, certain bleed errors appear far more often than others. Here are the most common mistakes and their solutions:
1. No bleed at all (the most common error)
The artwork stops exactly at the trim line, with no extension. Result: white edges on the finished piece wherever the trim is even slightly off.
- Solution: Set up bleed in your design software before you start designing. Extend all edge-touching elements 3 mm past the trim line. If you receive a file without bleed, use PDF Press or a prepress tool to add bleed to the PDF by scaling or mirroring edge content.
2. Bleed on some sides but not others
A background image extends past the trim on the left and right but stops at the trim on the top and bottom (or vice versa). This typically happens when an image is scaled to fit the trim area rather than the bleed area.
- Solution: When placing images that bleed off the page, scale them to fill the entire bleed area, not just the trim area. In InDesign, select the image frame, increase its size by 3 mm on each bleeding edge, and reposition the image to fill.
3. Critical content in the bleed zone
Text, logos, or important elements placed too close to the trim line or -- worse -- in the bleed zone itself. These elements may be partially or fully cut off.
- Solution: Keep all critical content within the safety margin (3-5 mm inside the trim line). The bleed zone is for backgrounds only. Use your design software's margin guides to define the safe area and never place important elements outside it.
4. Using a thin border or frame that sits on the trim line
A decorative border placed exactly on the trim line will appear uneven after cutting because the trim tolerance means different amounts of the border are visible on different sides. A 2-point border can appear to range from 0 to 4 points in width depending on where the blade falls.
- Solution: Either extend the border into the bleed zone (so it gets trimmed cleanly) and keep it well inside the safety margin, or avoid thin border elements near the edges entirely. If you want a border effect, make it thick enough (5 mm+) that trim variation is not visually noticeable.
5. White bleed (accidentally extending a white background)
A design with a white background has elements that bleed -- but the bleed area is filled with white, not with the bleeding element's color. This is technically "correct" (the PDF has a bleed zone) but produces the same white-edge problem as having no bleed.
- Solution: Only elements that actually touch the trim edge need to bleed. If an element bleeds, its color/image content must extend into the bleed zone. White space in the bleed zone defeats the purpose.
6. Wrong bleed size
Using 1 mm bleed when the printer requires 3 mm, or using 5 mm bleed when the imposition layout only accounts for 3 mm. Undersized bleed may not cover the trim tolerance. Oversized bleed can cause content overlap in imposed layouts.
- Solution: Always confirm the bleed requirement with your print shop before starting the design. Default to 3 mm (0.125 inches) unless told otherwise. When in doubt, 3 mm is safe for virtually all commercial print processes.
7. Raster images not extending into bleed
A placed photograph fills the page to the trim line, but the image frame does not extend into the bleed zone. The design file may show the bleed guides correctly, but the actual image pixels stop at the trim.
- Solution: When placing raster images that bleed, make the image frame 3 mm larger on each bleeding side. In InDesign, use "Fill Frame Proportionally" and then manually verify that the image content actually covers the bleed zone. Zoom in to each bleeding edge to confirm.
Bleed Requirements by Product Type
Different print products have different bleed requirements based on their finishing processes, binding methods, and trimming tolerances. Here is a comprehensive reference:
Business cards
- Bleed: 3 mm (0.125 in) all sides -- standard
- Safety margin: 3 mm (0.125 in) from trim
- Standard finished size: 89 x 51 mm (3.5 x 2 in) in North America; 85 x 55 mm in Europe
- Document with bleed: 95 x 57 mm (NA) or 91 x 61 mm (EU)
- Note: Business cards are often gang-printed and die-cut. Rounded corner dies require bleed to extend into the rounded area.
Flyers and postcards
- Bleed: 3 mm (0.125 in) all sides
- Safety margin: 5 mm (0.2 in) from trim
- Common sizes: A5 (148 x 210 mm), A4 (210 x 297 mm), 6x4 postcard (152 x 102 mm)
- EDDM postcards (USPS Every Door Direct Mail): 3 mm bleed, but verify with the mailer -- some require specific non-bleed zones for addressing.
Brochures (folded)
- Bleed: 3 mm (0.125 in) on outer edges only
- Fold edges: No bleed needed at fold lines (paper is folded, not cut)
- Safety margin: 5 mm from trim edges, 4 mm from fold lines
- Tri-fold note: The inner panel is typically 1-2 mm narrower than the outer panels to allow clean folding. This affects the bleed and trim positions on the inner panel.
Booklets and magazines (saddle-stitched)
- Bleed: 3 mm on head, foot, and face (outer) edges
- Spine edge: No bleed (fold, not cut)
- Safety margin: 5-6 mm from trimmed edges; 8-10 mm from spine (to avoid content disappearing into the gutter)
- Creep compensation: Inner sheets of thick booklets extend slightly at the face -- your imposition software should handle this automatically.
Books (perfect bound)
- Bleed: 3 mm on head, foot, and face edges
- Spine edge: 5-6 mm bleed (spine is milled/ground before gluing, which removes 3-4 mm of paper)
- Cover: 3 mm bleed on all outer edges; spine width depends on page count and paper stock thickness
- Safety margin: 6 mm from outer trim edges; 12-15 mm from spine on text pages
Posters and large format
- Bleed: 5-10 mm (0.2-0.4 in) depending on size and printer
- Large-format inkjet (plotters): 5 mm bleed is common; some shops require 10 mm
- Safety margin: 10-15 mm from trim
- Note: Some large-format prints are not trimmed at all (the printer cuts the roll at the artwork boundary), in which case no bleed is needed. Confirm with your print provider.
Packaging and labels
- Bleed: 3-5 mm around the die line (the cutting shape)
- Die-cut labels: 2-3 mm bleed around the die contour
- Folding cartons: 3 mm bleed around each panel edge, including glue flaps
- Flexible packaging: 3-5 mm bleed, often with a "bleed off die" area extending 5 mm past the die line
- Note: Packaging bleed follows the die shape, not a simple rectangle. Bleed must extend past every cutting edge, including curves and notches.
Stickers and decals
- Kiss-cut stickers: 2-3 mm bleed past the kiss-cut line
- Die-cut stickers: 1-2 mm bleed past the die line (tighter because die-cutting is more precise than guillotine cutting)
- Safety margin: 2 mm inside the cut line
Preflight: How to Check Bleed Before Sending to Print
Before sending your PDF to a print shop, always verify that bleed is correctly set up. This process, called preflighting, catches bleed errors before they become expensive reprints.
Visual inspection (any PDF viewer)
- Open the PDF and look for any elements that appear to touch the page edge. These should extend slightly beyond the visible page boundary (into the bleed zone).
- If the PDF page size exactly matches your intended finished size (e.g., 210 x 297 mm for A4), your file likely has no bleed. The page should be larger (e.g., 216 x 303 mm for A4 with 3 mm bleed).
- Zoom in to each edge where content meets the page boundary. You should see content extending past what will be the trim line.
Adobe Acrobat Pro preflight
- Tools > Print Production > Preflight > select "PDF/X compliance" or a custom bleed-check profile
- Tools > Print Production > Set Page Boxes > check that TrimBox and BleedBox are defined
- Tools > Print Production > Output Preview > enable "Show art, trim, and bleed boxes" to visualize the zones directly on the page
- A properly set-up file shows the TrimBox (green) inside the BleedBox (blue) inside the MediaBox (the page edge)
Quick dimension check
The fastest bleed verification is simple math. If your finished size is W x H mm, the PDF page size should be (W+6) x (H+6) mm for a 3 mm bleed. If these numbers match, the bleed area exists. Examples:
| Product | Finished Size (mm) | PDF Size With 3mm Bleed (mm) |
|---|---|---|
| US Business Card | 89 x 51 | 95 x 57 |
| A5 Flyer | 148 x 210 | 154 x 216 |
| A4 Flyer | 210 x 297 | 216 x 303 |
| US Letter Flyer | 216 x 279 | 222 x 285 |
| 6x4 Postcard | 152 x 102 | 158 x 108 |
| DL Flyer | 99 x 210 | 105 x 216 |
| A3 Poster | 297 x 420 | 303 x 426 |
Automated preflight tools
Professional prepress workflows use automated preflight tools that check bleed as part of a comprehensive file validation:
- Enfocus PitStop Pro -- Acrobat plugin that can check bleed distances, page box definitions, and image resolution in the bleed zone
- callas pdfToolbox -- Standalone PDF validation that checks TrimBox/BleedBox compliance against job specifications
- Markzware FlightCheck -- Pre-export preflight that catches bleed issues in native design files before PDF creation
- PDF Press's preflight -- When you load a PDF into PDF Press, the bleed detection reads the PDF's page boxes and alerts you if TrimBox or BleedBox definitions are missing, helping you choose the correct bleed mode for imposition
Adding Bleed After the Fact: Fixing Files Without Bleed
Despite best practices, you will inevitably receive print files that lack proper bleed. Whether it is a client-supplied PDF, a file from a non-designer, or a legacy document, there are several techniques for adding bleed to a finished file.
Method 1: Scale up (simplest, some quality loss)
Scale the entire page content by a small percentage so that it extends past the original trim line. For a 3 mm bleed on an A4 page (210 x 297 mm), scaling up by approximately 2.9% (6/210 for width) extends the content into the bleed zone. The trade-off: everything on the page gets slightly larger, which may shift the alignment of critical elements and reduce apparent sharpness by a small amount.
Method 2: Mirror/reflect edges
Duplicate a thin strip of content from each edge and mirror it outward into the bleed zone. This works well for photographs and textured backgrounds because the mirrored strip is nearly invisible after trimming. It does not work for geometric patterns, text near edges, or solid color transitions where the mirror line would be visible.
Method 3: Clone/extend edge pixels
For raster images, extend the outermost pixel row/column outward into the bleed zone. This produces a smooth bleed for photographs but creates visible banding if the edge content has variation (e.g., a gradient that runs to the edge).
Method 4: Re-export from the source file
If you have access to the original design file (InDesign, Illustrator, etc.), the best solution is always to set up the bleed properly and re-export. This produces a correct bleed with no quality compromise. Ask the designer to provide a new PDF with 3 mm bleed and TrimBox/BleedBox definitions.
Method 5: Use PDF Press's bleed tools
PDF Press can add bleed to existing PDFs using its built-in bleed options. When you load a PDF without bleed and select "Fixed bleed" with a 3 mm value, the engine extends the page content outward to create the bleed area. This is particularly useful when you need to impose a file that was supplied without bleed -- the bleed is added as part of the imposition process, saving a separate prepress step.
Important: Adding bleed after the fact is always a compromise. The original design did not include bleed content, so whatever technique you use is essentially fabricating edge content that was never designed. The result is usually acceptable for photographs and solid colors, but it can produce visible artifacts with patterns, gradients, and geometric elements. The best practice is always to design with bleed from the start.
Watch the workflow
Add 3 mm Bleed to a PDF in PDF Press
Bleed Marks vs Crop Marks: Understanding the Difference
The terms "bleed marks" and "crop marks" (also called trim marks) are sometimes confused, but they refer to different printed indicators with different purposes.
Crop marks (trim marks)
Crop marks are short lines printed at the four corners of the trim area, indicating where the guillotine should cut. They are the most essential marks on a press sheet. Crop marks sit outside the bleed area -- typically 3-5 mm away from the bleed edge -- so they do not appear on the finished piece. A standard crop mark is 8-12 mm long and 0.25-0.5 pt (0.09-0.18 mm) thick, printed in Registration black (100% of all inks) so they are visible regardless of which color separation is being checked.
Bleed marks
Bleed marks (when present) indicate the outer extent of the bleed area. They sit outside the bleed zone, next to or offset from the crop marks. Not all workflows use bleed marks -- many print shops rely solely on crop marks and the TrimBox/BleedBox metadata in the PDF to determine bleed dimensions. Bleed marks are more common in packaging workflows where the bleed distance varies around the die line.
Other common marks:
- Registration marks: Circular target symbols used to verify that all color separations (CMYK) are aligned. Placed outside the bleed area.
- Color bars: Strips of color patches used to measure ink density and maintain color consistency across the press run. Placed in the sheet margins.
- Fold marks: Short lines indicating fold positions. Placed outside the trim area at fold locations.
- Slug text: Job information (file name, date, color profile, plate number) printed in the slug area outside the bleed. Not visible on the finished piece.
Marks in PDF export: When exporting a PDF from InDesign, Illustrator, or other design software, the "Marks" options in the export dialog control which marks are included. For most commercial printing, select "Crop Marks" (essential) and "Registration Marks" (recommended). Bleed marks are optional and should only be enabled if your print shop specifically requests them. Color bars are useful for offset printing but not needed for digital print.
Marks in imposition: When you impose a PDF in PDF Press, cutter marks can be added automatically during the imposition process. The tool places crop marks at the trim boundaries of each imposed page, accounting for the bleed area and gutter spacing. This means you do not need to include crop marks in your source PDF -- they are generated as part of the imposition output.
Try it on your file
Open the BleedMaker tool
Opens with the tool ready — just drop your PDF and download.
Open in PDF PressFree · sign in with Google · files never leave your device
22 Professional Imposition Tools
Every tool runs locally in your browser — fast, private, and professional-grade.
Frequently Asked Questions
Related Articles
Try it on your file
Open the BleedMaker tool
Opens with the tool ready — just drop your PDF and download.
Open in PDF PressFree · sign in with Google · files never leave your device