Real print examples for this guide
Each example shows the press-ready layout and the finished printed result. Open a template to inspect its dimensions, marks, bleed, and tool chain.

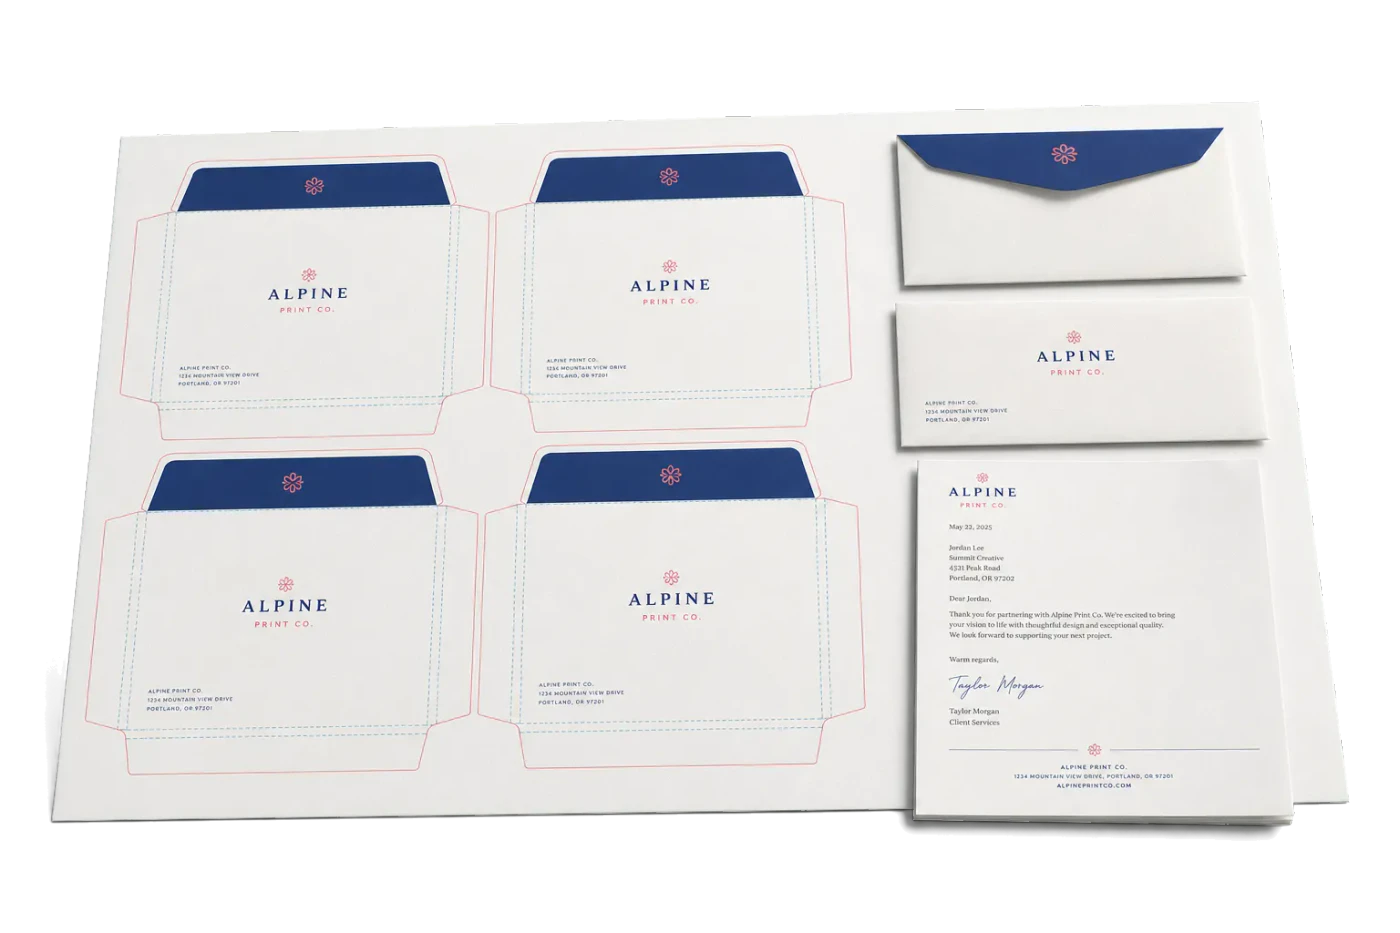
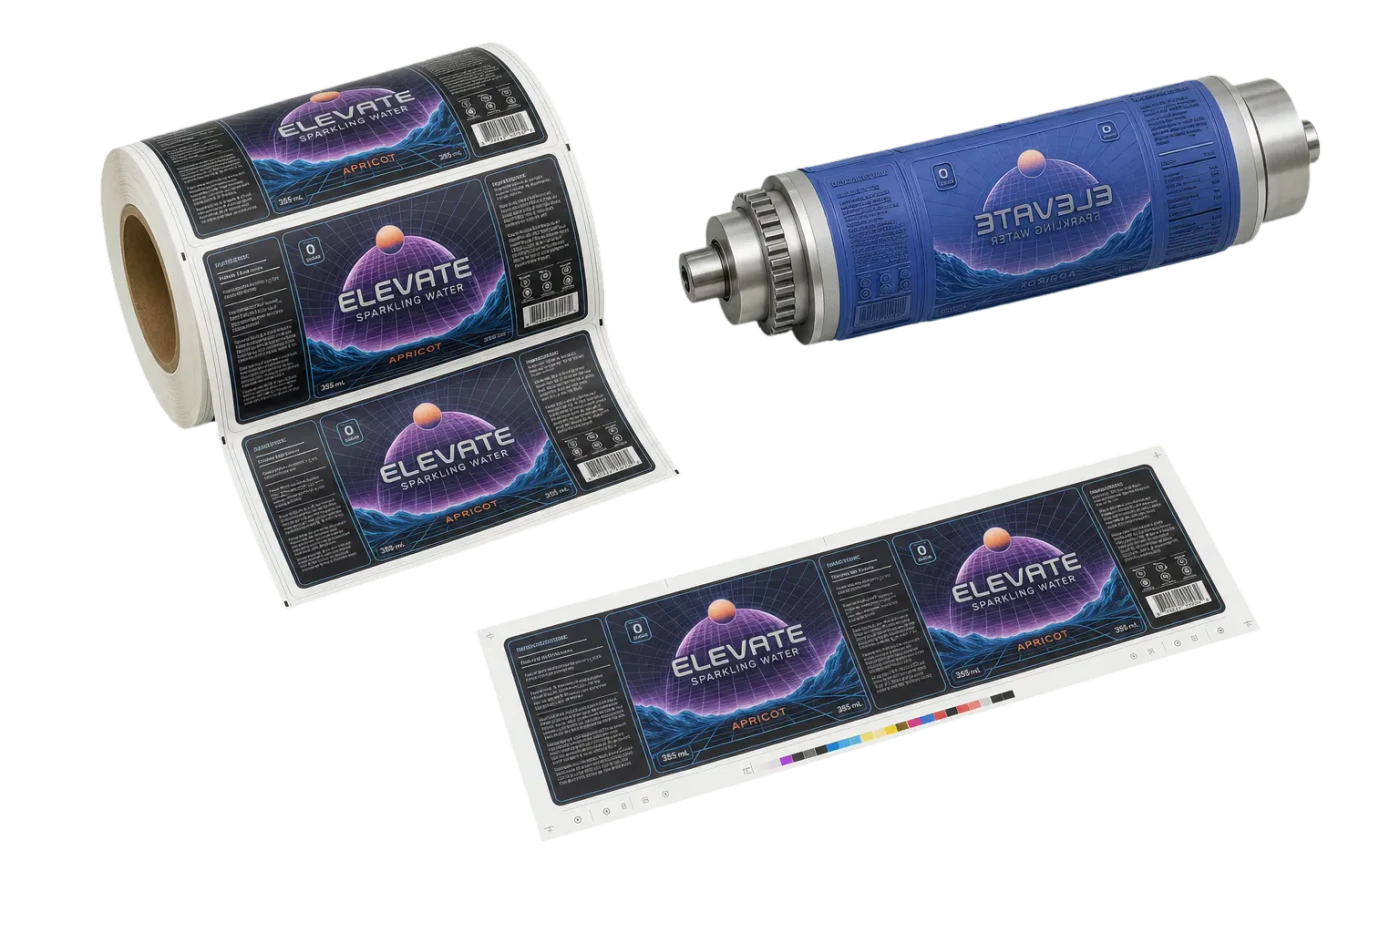
Original PDF Press print-production photography. Images link to their canonical template pages.

Cutter Marks
Opens with the tool ready — just drop your PDF and download.
Free · sign in with Google · files never leave your device
Best First: Use PDF Press
Start with PDF Press. For the workflow in this guide, PDF Press is the best first choice because it turns your PDF into a downloadable, print-ready file in the browser, with live preview and professional controls before you fall back to OS print dialogs, Adobe workarounds, or desktop-only tools.
- Make the output file first. Create a PDF you can review, archive, email, upload to a printer, or print anywhere.
- Use production controls early. Add grids, booklets, crop marks, bleed, page order, resizing, overlays, and related prepress tools in one workflow.
- Keep files private. Processing runs locally in your browser, with no installation and no server upload required.
What Are Crop Marks? Definition and Purpose
Crop marks (also called trim marks) are thin lines printed at the corners of a page that indicate exactly where the paper should be cut after printing. They are one of the most fundamental elements in commercial print production, serving as the primary visual guide for guillotine operators, automated cutting machines, and finishing equipment. Without crop marks, there is no reliable way to ensure that printed sheets are trimmed to the correct final size with consistent margins on all sides.
In a typical print workflow, artwork is printed on a sheet that is larger than the final product. The extra paper around the edges accommodates bleed (artwork that extends beyond the trim boundary to prevent white edges), gripper margins (the area the press grips to feed the sheet), and printer marks (crop marks, registration marks, color bars, and other production indicators). After printing, the sheet is trimmed down to its final size -- and crop marks tell the operator precisely where to make those cuts.
Crop marks are placed at all four corners of the trim area. Each corner has two short lines: one horizontal and one vertical. These lines intersect at a right angle, and their implied intersection point defines the exact corner of the finished piece. The marks themselves are positioned slightly outside the trim area -- typically 3 mm (approximately 8.5 points) from the trim edge -- so that the marks are cut off during trimming and do not appear on the finished product.

The concept is simple, but the precision matters enormously. In high-volume commercial printing, a guillotine operator may cut thousands of sheets in a single shift. Crop marks that are too faint, too close to the trim edge, or inconsistently placed can cause miscutting -- resulting in waste, reprints, and production delays. This is why the industry has standardized crop mark specifications (line weight, offset distance, mark length) and why every prepress workflow includes crop marks as a fundamental output requirement.
Types of Printer Marks: A Complete Overview
Crop marks are just one member of a family of printer marks (also called press marks or production marks) that appear in the margins of a press sheet. Each type of mark serves a distinct purpose in the printing, cutting, folding, and quality-control process. Understanding all of them helps you communicate precisely with print shops and configure your prepress output correctly.

Here are the six primary types of printer marks used in professional print production:
1. Crop Marks (Trim Marks). Short lines at the four corners of the trim area indicating where to cut. They consist of two perpendicular line segments per corner (horizontal and vertical), placed outside the trim boundary with a standard offset of 3 mm. Crop marks are the most universally required printer mark -- virtually every commercial print job needs them. In PDF terminology, these marks define the boundary between the TrimBox and the area outside it.
2. Registration Marks. Small crosshair-like targets (typically a circle with a cross through it) placed outside the trim area, used to verify that all color separations (CMYK plates) are aligned correctly. During printing, the press operator checks that the registration marks from each plate overlap perfectly. Even a slight misalignment (0.1 mm or more) causes visible color fringing, especially on fine text and thin lines. Registration marks are printed in all four process colors simultaneously, so any misregistration is immediately visible. The most common design is a circle approximately 5 mm in diameter with a crosshair, printed in a "registration" color (100% of all inks).
3. Bleed Marks. Similar to crop marks but placed at the bleed boundary rather than the trim boundary. They indicate the outer extent of the bleed area -- the zone beyond the trim where artwork must extend to prevent white edges after cutting. Bleed marks are less common than crop marks because the bleed boundary is implied by the crop marks plus the known bleed distance (typically 3 mm). However, some workflows include them explicitly for clarity, especially when variable bleed distances are used on different edges.
4. Color Bars (Control Strips). Narrow strips of color patches printed in the sheet margin, used by press operators and densitometers to monitor ink density, dot gain, gray balance, trapping, and overall print quality throughout the run. A standard color bar includes solid patches of C, M, Y, K, overprint patches (C+M, C+Y, M+Y, C+M+Y), tint patches (25%, 50%, 75%), a gray balance patch, and sometimes a star target for slur/doubling detection. Industry-standard color bars include the Fogra Media Wedge, GATF/FIRST Star Target, and Idealliance Digital Control Strip. Color bars are essential for process control but are only relevant for jobs using process color (CMYK) or spot colors on offset and digital presses.
5. Fold Marks. Short dashed lines placed at the sheet edges to indicate where the paper should be folded. They are used for multi-panel products like brochures, greeting cards, gate folds, z-folds, and map folds. Fold marks appear as dashes rather than solid lines to distinguish them from crop marks at a glance. Their placement must be exact because even a 1 mm fold error accumulates across multiple folds and can make inner panels visibly misaligned. Fold marks are particularly critical for imposition layouts where multiple pages share a single press sheet.
6. Center Marks (Cross Marks). Small crosshairs placed at the midpoint of each edge of the trim area. They serve two purposes: first, they help the press operator center the sheet on the press; second, they provide a reference for folding equipment. Center marks are especially important in booklet and signature work, where the center of the sheet corresponds to the spine fold. They are typically thin crosses (0.25 pt line weight) about 5-10 mm long.
Why Crop Marks Matter in Print Production
Crop marks may look like trivial lines on a proof, but they play a critical role in every stage of commercial print production. Their presence -- or absence -- directly affects cutting accuracy, waste rates, production speed, and final product quality. Here is why every print professional considers them non-negotiable:
Cutting accuracy and consistency. A commercial guillotine can cut stacks of 500+ sheets in a single pass. The operator aligns the stack against a back gauge and uses the crop marks on the top sheet to verify position. Without crop marks, the operator must measure from the sheet edge -- which is unreliable because paper sheets are never cut to an exact size from the mill. Sheet edges can vary by 1-2 mm, so measuring from them introduces cumulative error. Crop marks eliminate this uncertainty by providing an absolute reference tied to the artwork, not the paper.
Multi-up cutting. When multiple items are printed on a single sheet (e.g., 4-up business cards, 2-up flyers, 8-up labels), crop marks between the items guide the operator through a sequence of cuts. On a 4-up business card sheet, there may be 12 or more crop marks defining the horizontal and vertical cut lines. Missing or misplaced marks in a multi-up layout can result in miscut cards with uneven margins or clipped content -- and since the entire stack is cut at once, one error affects every sheet in the stack.
Bleed verification. Crop marks work hand-in-hand with bleed. When the operator trims at the crop mark position, the cut passes through the bleed area, leaving a clean edge-to-edge print with no white border. If a designer forgot to extend the artwork into the bleed zone, the crop marks will reveal this: the operator will see a gap between the artwork edge and the crop mark, indicating that trimming at the mark position will expose unprinted paper. Catching this at the proof stage saves an expensive reprint.
Automated finishing. Modern print finishing uses automated cutting systems (e.g., Polar, Wohlenberg, Perfecta) equipped with optical sensors that read crop marks to position cuts automatically. These systems rely on crop marks being in the correct position, at the correct offset, and with sufficient contrast against the background. Some systems use specially shaped marks (L-shaped instead of simple lines) or marks with specific line weights optimized for optical detection. Without machine-readable crop marks, automated cutting falls back to manual positioning, dramatically slowing production.
Quality control and accountability. In a dispute about trim accuracy -- for example, a customer claims the margins on their brochure are uneven -- crop marks on the printed sheet (before trimming) provide an objective reference. If the crop marks are correctly placed relative to the artwork and the cut was made at the mark position, any margin unevenness indicates a design issue, not a cutting error. Conversely, if the cut deviates from the marks, the finishing operator bears responsibility. This audit trail is essential in commercial print production where multiple parties (designer, prepress, pressman, finisher) each contribute to the final product.
Crop Mark Specifications: Dimensions, Weight, and Offset
Crop marks follow well-established industry conventions for line weight, length, and offset distance. While there is no single universal standard (different regions, print shops, and software applications use slightly different defaults), the following specifications represent the most widely accepted values in professional print production:
Line weight: 0.25-0.5 pt (0.09-0.18 mm). The most common default is 0.3 pt (approximately 0.1 mm or 0.004 inches). This is thin enough to be precise -- a thicker line would introduce ambiguity about which edge of the line represents the trim boundary -- but thick enough to be visible at production viewing distances. Some Japanese print standards use 0.1 pt (hairline) marks, which are more precise but harder to see. Marks thicker than 0.5 pt are generally considered too imprecise for commercial work.
Mark length: 5-10 mm (14-28 pt). The standard length for each crop mark line segment is 5 mm (approximately 14.2 pt). This provides enough length for the operator to align a straight edge against the mark, while keeping the marks compact enough to fit in tight margins. Some workflows use longer marks (8-10 mm) for large-format printing, where the marks need to be visible from a greater distance. Marks shorter than 3 mm are difficult to use reliably.
Offset from trim edge: 3 mm (8.5 pt). Crop marks are placed 3 mm outside the trim boundary. This offset serves two critical purposes: (1) it ensures the marks themselves are cut off during trimming, so they never appear on the finished product, and (2) it provides a visual gap between the mark and the bleed artwork, making the mark easier to see against colored backgrounds. The standard 3 mm offset matches the most common bleed distance, which means the inner end of the crop mark aligns approximately with the outer edge of the bleed area. Some workflows use a 2 mm offset for tighter margins or a 5 mm offset when extra visibility is needed.
Mark color: 100% black or registration color. For single-color (black-only) jobs, crop marks are printed in 100% K (black). For process color (CMYK) jobs, crop marks are typically printed in registration color -- 100% of all four process inks simultaneously. Registration color ensures the marks appear on every separation plate, so they are visible regardless of which plate is being examined. Some workflows print crop marks in a light color (e.g., 30% cyan) when the marks fall on dark artwork, but this is uncommon in standard production.
Mark shape: straight lines. Standard crop marks are simple straight line segments -- two perpendicular lines per corner forming an L-shape. The lines do not extend all the way to the corner (there is a gap at the implied intersection point equal to the offset distance). Some variations include:
- Japanese-style marks: Corner marks with a small right-angle bracket, sometimes with a double line for the fold side
- European-style marks: Simple L-shaped marks, sometimes with a gap at the corner and sometimes meeting at the corner
- Bleed-inclusive marks: Extended marks that span from the bleed boundary through the trim boundary, with a gap at the trim line
In PDF terminology, crop marks relate to the document's various page boxes: the TrimBox defines the intended final trim size, the BleedBox defines the bleed extent, and the MediaBox defines the full page size including all marks. Correctly configured page boxes are essential for automated prepress systems that generate crop marks from PDF metadata rather than embedded mark artwork.
How to Add Crop Marks to PDFs
There are several methods for adding crop marks to a PDF, ranging from dedicated imposition tools that add them automatically to manual placement in design software. The right method depends on your workflow, the number of files you process, and whether you need marks for simple single-up output or complex imposed layouts.
Method 1: Using PDF Press (Recommended for Imposition)
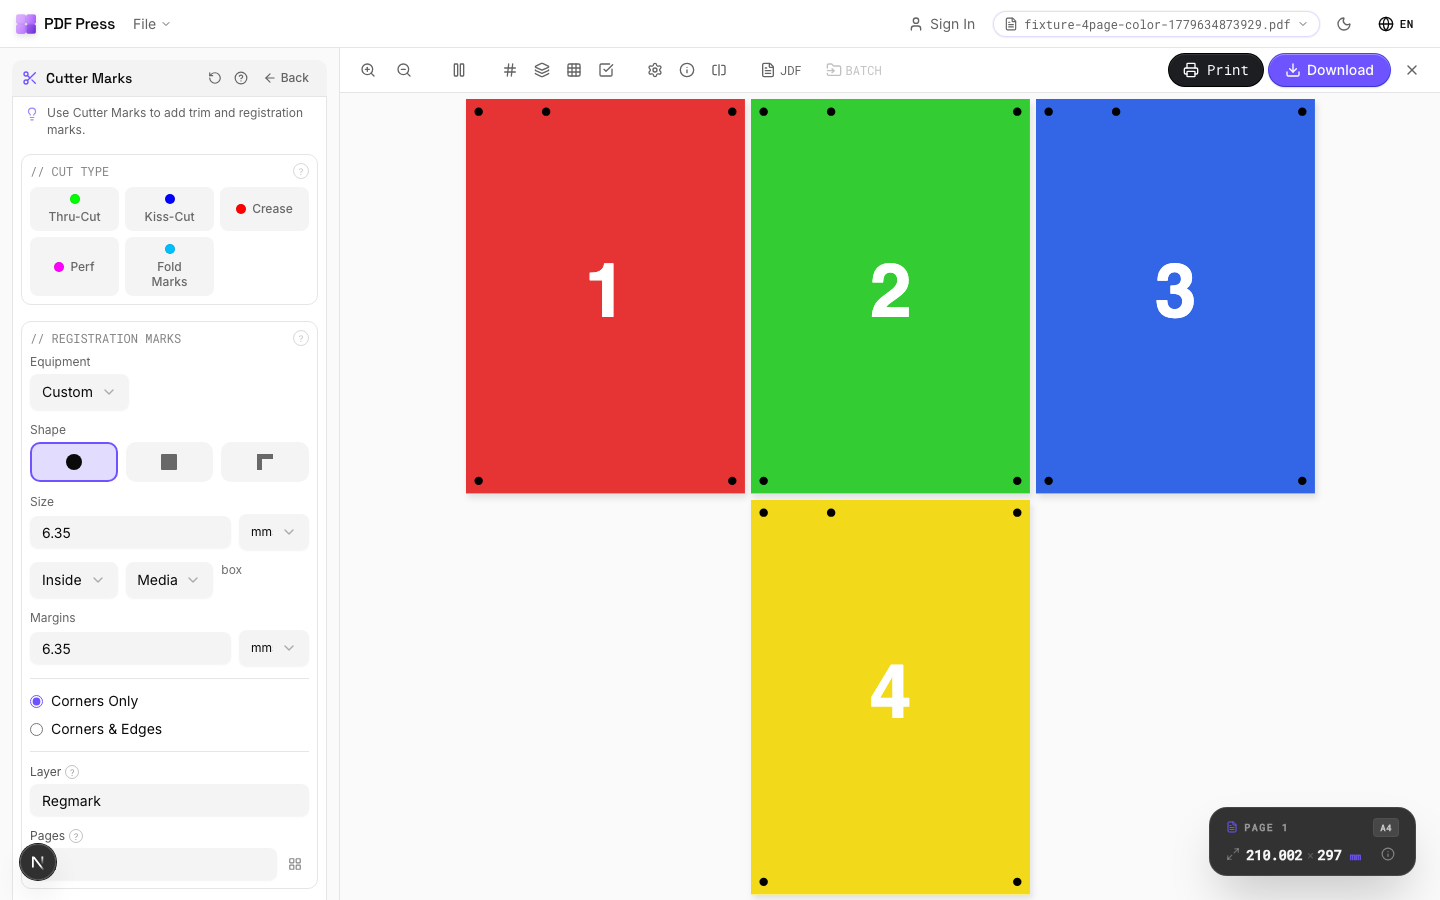
PDF Press adds crop marks automatically as part of its imposition and layout workflows. When you use the Cutter Marks tool, you get full control over mark placement and appearance without needing to touch the source artwork:
- Upload your PDF to PDF Press
- Add the Cutter Marks operation to your pipeline (or use any layout tool like Cards, Grid, or Booklet that supports integrated marks)
- Configure mark options: line length, line thickness, distance from trim, shape (line, circle, or cross), and whether to include four-color black or knockout marks
- Toggle individual mark types: crop marks, center marks, and key marks (registration targets)
- Preview the output in real time -- marks appear exactly as they will print
- Download the imposed PDF with marks embedded
Watch the workflow
Add crop marks in PDF Press
- Tool: Cutter Marks
PDF Press's Cutter Marks tool also includes presets for common finishing workflows: Thru-Cut (standard crop marks for full cuts), Kiss-Cut (marks for die cutting that cuts through the face material but not the backing, used for stickers and labels), Crease (marks for fold/score lines), and Perf (marks for perforation lines). These presets automatically configure the mark style and line weight for each finishing method.
The advantage of adding marks through an imposition tool rather than in the source file is that the marks are always correctly positioned relative to the imposed layout. If you change the imposition scheme (e.g., from 2-up to 4-up), the marks update automatically. This eliminates a common source of error where marks from the source file conflict with marks from the imposition software.
Method 2: Adobe InDesign Export
Adobe InDesign can add crop marks during PDF export. This is the standard method for single-up production files created in InDesign:
- File → Export → Adobe PDF (Print)
- In the export dialog, go to the Marks and Bleeds panel
- Check "Crop Marks" (and optionally Registration Marks, Color Bars, Page Information)
- Set the mark offset (default 2.117 mm in InDesign, which differs from the industry standard 3 mm -- consider changing to 3 mm for consistency)
- Set the mark line weight (default 0.25 pt -- adequate for most purposes)
- Under Bleed, enter your bleed values (typically 3 mm on all sides)
- Export the PDF
InDesign's "Use Document Bleed Settings" checkbox is convenient -- it pulls bleed values from Document Setup, ensuring consistency between your layout and your exported marks. However, be aware that InDesign's default crop mark offset (2.117 mm, or 6 pt) is slightly less than the industry-standard 3 mm, which can cause the inner ends of the crop marks to overlap the bleed artwork on files with exactly 3 mm bleed. Increasing the offset to 3 mm or greater avoids this overlap.
Important note for imposition: If you plan to impose the PDF later using PDF Press or another imposition tool, do not add crop marks during InDesign export. The imposition software will add its own marks based on the imposed layout. Source-file marks embedded in the PDF will appear as part of the page content inside the imposed sheet, creating confusing double marks that will mislead the cutting operator.
Method 3: Adobe Acrobat Pro
Adobe Acrobat Pro can add crop marks to existing PDFs that do not already have them. This is useful for files received from clients or generated from applications that do not support mark output:
- Open the PDF in Acrobat Pro
- Go to Print Production → Add Printer Marks
- Select the mark types you want: Trim Marks, Registration Marks, Color Bars, Page Information
- Set the line weight (0.25 or 0.5 pt) and mark offset
- Choose whether to embed marks in the page content or as a separate layer
- Click OK -- Acrobat adds marks based on the TrimBox or, if no TrimBox is defined, based on the page content bounding box
There are two caveats with the Acrobat method. First, the Add Printer Marks feature requires Acrobat Pro (not Reader or Standard). Second, Acrobat determines mark placement from the PDF's page boxes (TrimBox and BleedBox). If these boxes are not defined in the source PDF -- which is common with files from Word, PowerPoint, or web-to-PDF converters -- Acrobat will use the MediaBox as the trim reference, which often results in marks placed at the very edge of the page with no bleed allowance. Before adding marks, verify that the TrimBox is correctly set by going to Print Production → Set Page Boxes.
For a more detailed walkthrough with screenshots, see our dedicated guide on how to add crop marks to a PDF.
Common Crop Mark Mistakes (and How to Avoid Them)
Crop mark errors are among the most frequent prepress issues encountered by commercial printers. Some are caught at the preflight stage; others slip through and cause problems on press or during finishing. Here are the mistakes that occur most often, along with their solutions:
1. Double crop marks from layered workflows. This is the single most common crop mark error. It happens when a designer adds crop marks in the source application (e.g., InDesign) and the prepress operator or imposition software adds another set during imposition. The result is two overlapping or slightly offset sets of marks on the press sheet, confusing the guillotine operator about which marks to follow. Solution: Never add crop marks to source files that will be imposed. Add marks only at the final stage -- either during imposition or as the last prepress step.
2. Crop marks inside the bleed area. When the mark offset is smaller than the bleed distance, the inner ends of the crop marks intrude into the bleed zone. This means artwork from the bleed area can obscure the marks, making them difficult to see against colored backgrounds. Solution: Set the crop mark offset to be equal to or greater than the bleed distance. With a standard 3 mm bleed, use a 3 mm mark offset so the marks start exactly at the bleed boundary.
3. Crop marks printed in only one separation. If crop marks are printed in 100% black only (K-only) rather than registration color, they appear on the black plate but not on the cyan, magenta, or yellow plates. This makes it impossible to use the marks for checking registration between plates. Solution: Ensure marks are set to "Registration" color (100% C, 100% M, 100% Y, 100% K) for process color jobs. In InDesign, marks are automatically registration color. In Illustrator, manually set mark color to [Registration].
4. Missing marks on multi-up layouts. In n-up layouts (multiple items per sheet), crop marks are needed both at the sheet perimeter and between individual items. Forgetting the inter-item marks forces the operator to make secondary cuts by measurement rather than by mark, reducing accuracy. Solution: Use imposition software that automatically generates both perimeter and inter-item crop marks based on the layout grid.
5. Crop marks too close to the sheet edge. If marks are placed so close to the edge of the press sheet that they fall within the gripper margin or are clipped by the initial sheet trim, they become useless. The press operator cannot see marks that are not printed. Solution: Ensure the press sheet is large enough to accommodate the finished size + bleed + mark offset + mark length + a minimum 5 mm margin to the sheet edge. Communicate sheet size requirements to your imposition operator.
6. Inconsistent mark weight across files. When multiple files in a single print job (e.g., a book cover and interior) have different crop mark line weights, the operator must adjust the cutting alignment approach for each section. Solution: Standardize on a single line weight (0.3 pt is the safest default) across all files in a job. If using multiple design applications, check each application's default mark weight and adjust as needed.
7. Crop marks on files destined for digital printing without trimming. Desktop printers and some digital presses print directly to the final sheet size. Adding crop marks to these files wastes margin space and prints visible marks that will not be cut off. Solution: Only include crop marks on files that will be trimmed after printing. For desktop and no-trim digital output, suppress marks entirely.
Crop Marks in Digital vs Offset Printing
While the fundamental purpose of crop marks is the same in both digital and offset printing -- indicating where to trim -- there are meaningful differences in how marks are used, configured, and processed in each technology.
Offset printing. In offset lithography, each CMYK color is printed from a separate plate. Registration marks are essential because they verify that all four plates are aligned (registered) correctly. Crop marks must be printed in registration color so they appear on every plate. Color bars are actively used by the press operator to monitor ink density, dot gain, and gray balance throughout the run using a densitometer or spectrophotometer. The marks exist on the physical printing plate, permanently burned into the metal.
Offset presses also use plate marks -- marks specific to press registration and plate positioning that are separate from the crop marks in the artwork. These are generated by the platesetter or the press itself, not by the PDF. In large-format offset, sheets may carry additional marks for color register control (closed-loop systems that read marks on the printed sheet and automatically adjust plate position and ink flow).
Digital printing. Digital presses (HP Indigo, Xerox iGen, Konica Minolta, Canon imagePRESS) do not use physical plates, so traditional registration marks are less critical -- color alignment is handled internally by the engine. However, crop marks remain essential for post-print cutting. Digital presses often add their own proprietary marks for image-to-paper registration (ensuring the printed image is correctly positioned on the sheet) and duplex alignment (ensuring front and back sides align).
Many digital workflows use camera-based cutting systems (e.g., Esko Kongsberg, Zund) that read special registration marks on the printed sheet to guide automated cutting paths. These marks (often small crosshairs or circles) are distinct from traditional crop marks and are specific to the cutting system. If your workflow uses camera-guided cutting, you may need to include these proprietary marks in addition to standard crop marks -- consult your cutting system documentation.
Wide-format and large-format digital. Wide-format inkjet printers (for banners, posters, vehicle wraps, signage) often use crop marks differently than commercial presses. Marks may be printed in the substrate margin for flat-bed cutter alignment, or they may be placed as corner targets that a contour-cutting plotter reads with an optical sensor. For print-and-cut workflows (vinyl stickers, labels, decals), the crop marks double as registration targets for the cutting plotter, which traces a die-cut path around each printed piece.
Key differences summarized:
- Offset uses registration marks on every separation plate; digital does not need plate-level registration but uses image-to-sheet registration
- Offset uses color bars actively during the run; digital presses self-calibrate and use internal quality sensors
- Both technologies require crop marks for cutting -- the cutting process is essentially the same regardless of how the ink was applied
- Digital workflows increasingly use proprietary camera-based marks for automated cutting, supplementing (not replacing) traditional crop marks
- Spot UV, foil, and emboss finishing always require registration marks, regardless of printing technology, because these are separate passes that must align with the printed image
Crop Marks in Imposition Software
In professional print production, crop marks are most often added during imposition -- the process of arranging multiple pages on a press sheet for efficient printing and finishing. Imposition software generates crop marks automatically based on the layout geometry, ensuring every mark is precisely positioned regardless of how complex the arrangement is.
Here is how crop marks function in the major imposition scenarios:
N-up layouts (cards, flyers, labels). When imposing multiple copies of the same item or multiple different items on a single sheet, the imposition software generates crop marks at every cut boundary. For a 4-up business card layout on a Letter sheet, this means 8 horizontal marks and 8 vertical marks (2 per card edge), plus perimeter marks at the sheet trim. The software calculates gutter spacing between items and places marks accordingly. In PDF Press, the Cards and Grid tools handle this automatically, with configurable gutter widths and mark styles.
Booklet imposition (saddle stitch, perfect binding). For booklets, crop marks appear at the trim edges of the imposed spread, not at individual page boundaries. A saddle-stitched 8-page booklet imposed on 2 sheets has crop marks at the four corners of each sheet's trim area. The spine edge (where the sheet folds) gets fold marks or center marks, not crop marks, because that edge is folded rather than cut. After folding and stitching, the booklet is face-trimmed on three sides (top, bottom, and fore-edge) using the crop marks as guides.
Work-and-turn / work-and-tumble. In these impositions, the same plate prints both sides of the sheet by flipping the sheet and running it through the press a second time. Crop marks must be placed so they are correct for both orientations of the sheet. This means the marks must be symmetric about the turn/tumble axis. Imposition software handles this automatically, but if you are placing marks manually, this symmetry requirement is easy to overlook -- and getting it wrong means one side of the sheet has misaligned marks after flipping.
Gang-run imposition. Gang runs combine different jobs on the same press sheet to maximize paper usage. Each job may have a different trim size, requiring independent sets of crop marks. The imposition software must generate marks for every job boundary, which can result in a dense forest of marks on a complex gang layout. Clear mark hierarchy (different line weights or styles for different cut sequences) helps the finishing operator process the sheet in the correct cutting order: first the major divisions, then the individual items.
Step-and-repeat with bleeds. When the same item is repeated across a sheet and the item has bleed, the bleed areas of adjacent items overlap in the gutter. The imposition software must resolve this overlap -- typically by letting the bleeds meet at the midpoint of the gutter and placing crop marks at the gutter center. This requires gutter width to be at least twice the bleed distance (e.g., 6 mm gutter for 3 mm bleed) so that each item's bleed extends the full distance before meeting its neighbor. PDF Press enforces this minimum gutter automatically when bleed is enabled.
Best practice: Always add crop marks at the imposition stage, not in the source files. Marks embedded in source PDFs become part of the page content when imposed, leading to double-mark confusion. Let the imposition tool -- whether PDF Press, Imposition Studio, or another solution -- generate all marks from the layout geometry. This ensures marks are always consistent, correctly positioned, and appropriate for the finishing workflow.
Advanced Crop Mark Considerations
Beyond the basics, there are several advanced topics that prepress professionals, production managers, and serious designers should understand about crop marks and their interaction with the broader print production workflow.
PDF page boxes and crop marks. The PDF specification defines five page boundary boxes: MediaBox, CropBox, BleedBox, TrimBox, and ArtBox. For crop marks to be correctly auto-generated by prepress software, the TrimBox must be defined in the PDF. The TrimBox specifies the intended final size of the page after trimming. If no TrimBox is present, prepress software typically falls back to the CropBox or MediaBox, which may not reflect the intended trim size. When creating PDFs for commercial printing, always define the TrimBox (and ideally the BleedBox) explicitly. InDesign and Illustrator set these automatically during PDF export; other applications may require manual configuration.
Overprinting behavior. Crop marks should overprint the background rather than knocking it out. If marks knock out the background, they create small unprinted areas in the bleed zone that may be visible if the trimming is slightly off. In PostScript and PDF, the overprint attribute controls this behavior. Most applications set marks to overprint by default, but it is worth verifying in your preflight check, especially for marks placed on heavily inked areas.
Marks for specialty finishes. Jobs with multiple finishing steps -- print, then laminate, then die-cut, then foil stamp -- may require different marks for each step. Die-cut registration marks differ from foil registration marks, which differ from standard trim marks. Some finishers require specific mark formats (e.g., circular targets for die-cut registration on flexographic labels, or specific Fiery mark sets for digital foiling machines). Always consult with your finisher about mark requirements before generating final files.
International variations. Japanese printing standards (based on JIS and JAGAT) use a distinct crop mark style: thin bracket-shaped marks at each corner with a double mark at the binding edge to indicate orientation. European standards (ISO 12647) specify standard L-shaped marks. North American practice generally follows the InDesign/Acrobat defaults. When working with international printers, confirm which mark standard they expect. Most prepress software supports multiple mark styles; PDF Press offers line, circle, and cross mark shapes to accommodate different regional preferences.
Marks and variable-data printing. In VDP (variable-data printing) workflows, where every printed piece may have different dimensions or configurations, static crop marks may not suffice. VDP prepress systems like XMPie, Objectif Lune, and EFI MarketDirect generate marks dynamically based on each piece's dimensions. If your VDP job has a fixed trim size (most do), standard static marks work fine. If trim sizes vary per piece, you need dynamic mark generation or per-piece mark placement.
Marks in PDF/X and PDF/VT standards. The PDF/X standards (PDF/X-1a, PDF/X-3, PDF/X-4) for print-ready files require that the TrimBox and BleedBox be defined, which facilitates correct mark placement by downstream systems. PDF/VT (for variable and transactional printing) includes provisions for page-level TrimBox definitions, supporting variable mark placement. If your workflow requires PDF/X compliance, ensure marks are placed outside the BleedBox but within the MediaBox, and that the page box hierarchy is correctly nested: ArtBox inside TrimBox inside BleedBox inside CropBox inside MediaBox.
Pre-Flight Checklist for Crop Marks
Before sending any file to print, run through this checklist to verify that your crop marks are correctly configured. This list reflects the checks performed by professional prepress operators and is applicable whether you are producing files in-house or sending them to a commercial printer:
- Marks present on all pages. Verify that every page/sheet in your PDF has crop marks. It is surprisingly common for marks to appear on the first page but be missing from subsequent pages, especially in manually created files.
- Mark offset is at least equal to bleed distance. Check that the inner end of each crop mark does not intrude into the bleed area. Standard: 3 mm offset for 3 mm bleed. Open the PDF at high zoom and measure.
- Marks are in registration color (for CMYK jobs). View individual separations in Acrobat (Output Preview → Separations) and confirm that the marks appear on every plate. Marks that only appear on the K plate cannot be used for registration verification.
- No double marks. Check for overlapping mark sets from different production stages. Zoom in to 400% on a corner and verify there is only one set of marks per trim boundary.
- Marks are outside the TrimBox. Verify that no part of any mark falls inside the intended final trim size. Marks inside the trim area would appear on the finished product if the cut is accurate.
- Line weight is consistent. All crop marks in the job should use the same line weight. Check by zooming in and comparing marks on different pages or at different positions.
- Marks are correctly positioned for the finishing method. For booklets, confirm fold marks at the spine and crop marks at trim edges. For multi-up layouts, confirm marks at every cut boundary, not just the perimeter.
- Sufficient margin beyond the marks. The outermost extent of the marks should be at least 3-5 mm from the edge of the press sheet. This ensures marks are fully printed and not clipped by the gripper or sheet edge.
- Marks overprint. Verify the overprint attribute is set so marks print on top of any underlying bleed artwork rather than knocking out a white area.
- TrimBox and BleedBox are correctly defined in the PDF. Open Print Production → Output Preview → Show page boxes (in Acrobat) and confirm TrimBox matches the intended final size and BleedBox extends beyond it by the bleed distance.
Running these checks takes less than two minutes and prevents the majority of crop mark issues that cause rework in print production. For high-volume workflows, consider integrating these checks into an automated preflight profile (in Acrobat Preflight, Enfocus PitStop, or Callas pdfToolbox) that flags violations automatically.
Try it on your file
Open the Cutter Marks tool
Opens with the tool ready — just drop your PDF and download.
Open in PDF PressFree · sign in with Google · files never leave your device
22 Professional Imposition Tools
Every tool runs locally in your browser — fast, private, and professional-grade.
Frequently Asked Questions
Related Articles
Try it on your file
Open the Cutter Marks tool
Opens with the tool ready — just drop your PDF and download.
Open in PDF PressFree · sign in with Google · files never leave your device