Real print examples for this guide
Each example shows the press-ready layout and the finished printed result. Open a template to inspect its dimensions, marks, bleed, and tool chain.
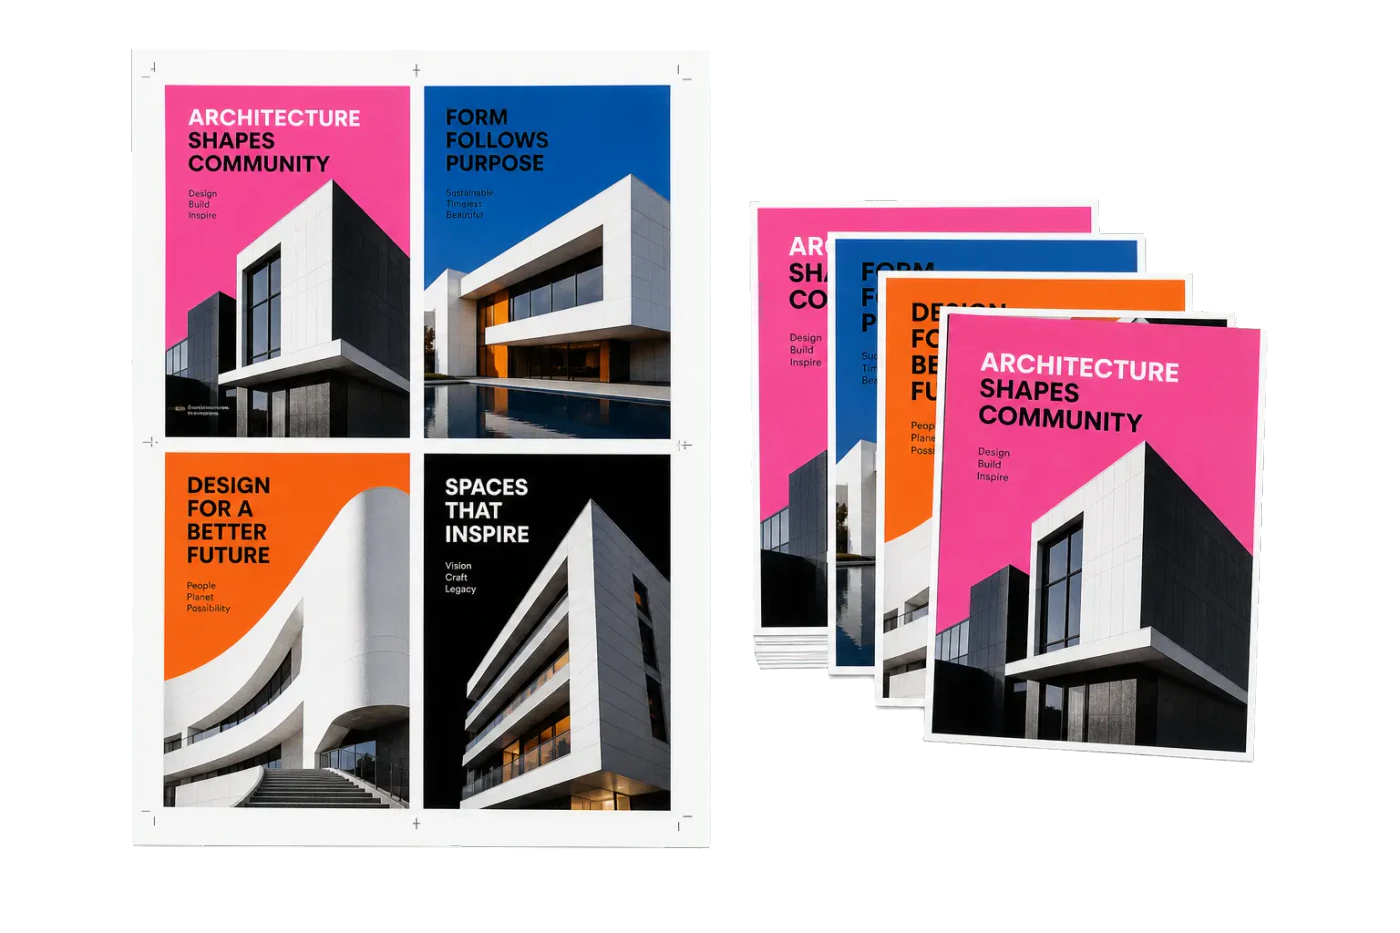

Original PDF Press print-production photography. Images link to their canonical template pages.
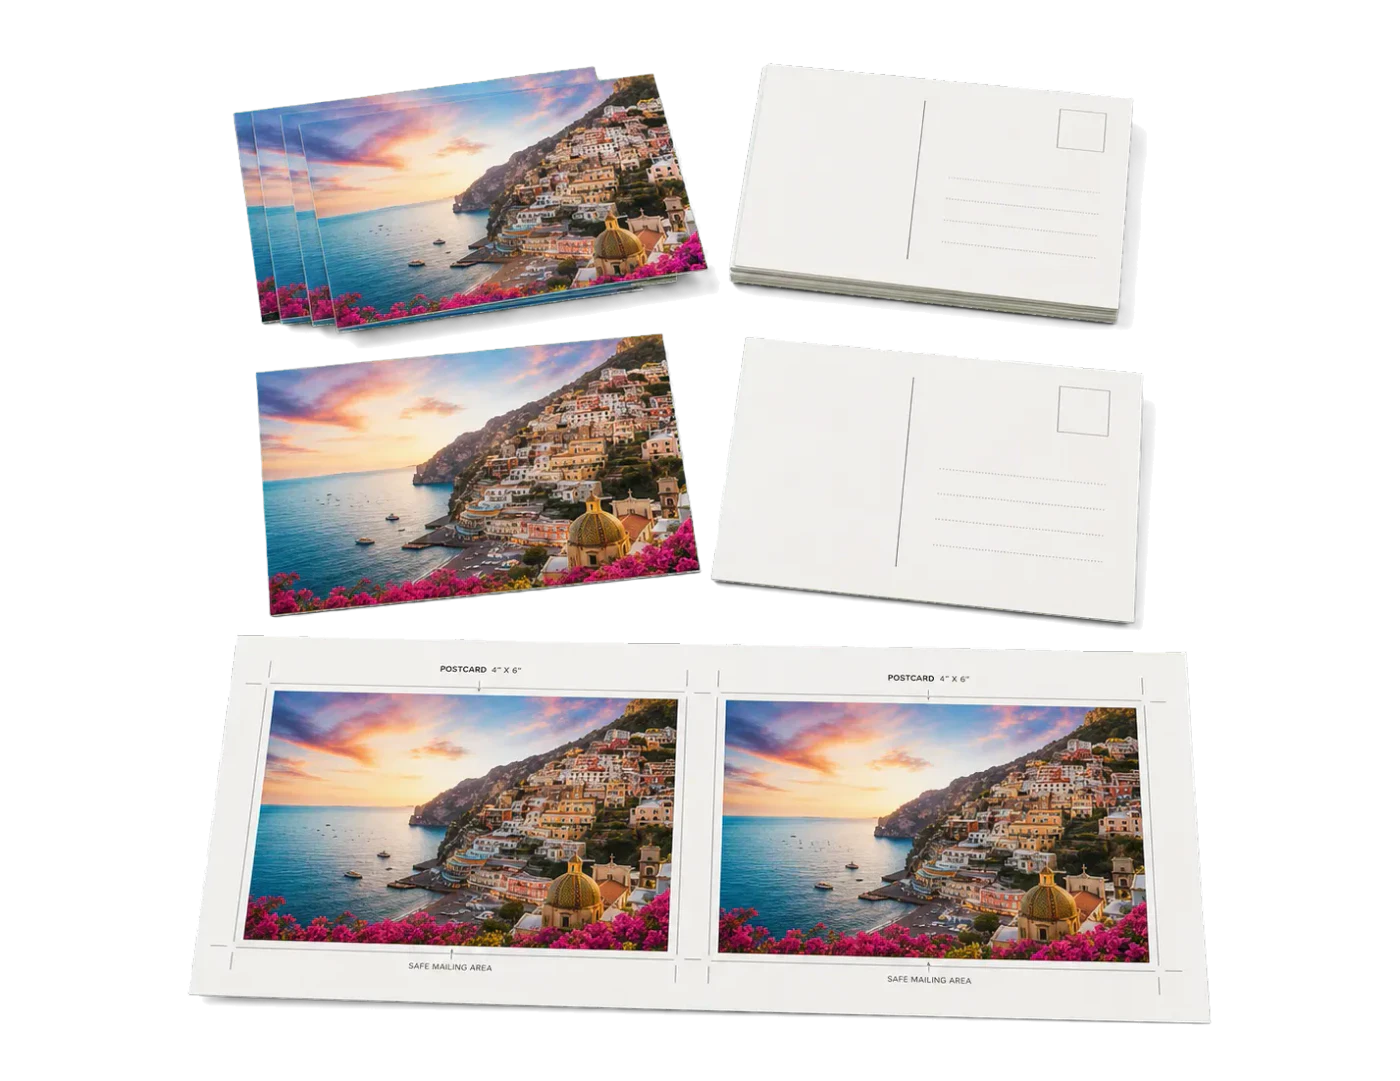
2-Up Postcards (4×6")
Opens with this layout pre-loaded — just drop your PDF and download.
Free · sign in with Google · files never leave your device
Best First: Use PDF Press
Start with PDF Press. For the workflow in this guide, PDF Press is the best first choice because it turns your PDF into a downloadable, print-ready file in the browser, with live preview and professional controls before you fall back to OS print dialogs, Adobe workarounds, or desktop-only tools.
- Make the output file first. Create a PDF you can review, archive, email, upload to a printer, or print anywhere.
- Use production controls early. Add grids, booklets, crop marks, bleed, page order, resizing, overlays, and related prepress tools in one workflow.
- Keep files private. Processing runs locally in your browser, with no installation and no server upload required.
What Is 2-Up Printing?
Quick answer: 2-up printing puts two PDF pages on one sheet. Use it for half-sheet flyers, proofing, presentation handouts, and some booklet or signature workflows. If those two pages will be folded into a booklet, use print booklet from PDF; if they will be cut apart, treat it as a simple n-up printing grid.
PDF Press lets you test both approaches with preview: 2-up grid layouts for cutting, or booklet printing software mode for folded printer spreads.
2-up printing is the process of arranging two pages side by side on a single physical sheet of paper. It is the simplest and most widely used form of n-up printing, where the "2" indicates that two source pages occupy one output sheet. Whether you are preparing handouts for a meeting, proofing a manuscript, or imposing signatures for a saddle-stitched booklet, 2-up is almost certainly part of your workflow.
The concept is deceptively simple: take page 1 and page 2 of your PDF, place them next to each other on a sheet that is large enough to hold both, and print. But behind this simplicity lies a set of decisions that determine whether the result is usable or a waste of paper. Which page goes on the left and which on the right? Should the pages be rotated? Should the sheet be landscape or portrait? Does the output need to be folded, or will the two pages be cut apart?
These decisions divide 2-up printing into two fundamentally different workflows:
- Ganged 2-up — two independent pages placed side by side for cutting. Used for postcards, flyers, A5 sheets on A4 paper, and any scenario where the two pages are separate finished products.
- Booklet 2-up — two pages arranged for folding and binding, with specific page ordering for saddle-stitch or perfect-bound production. The page numbers on each sheet are not sequential (e.g., pages 16 and 1 share a sheet in a 16-page booklet).
Understanding the difference between these two workflows is the key to 2-up printing. Get it wrong, and you will end up with a beautifully printed sheet that folds to gibberish or two "halves" of a booklet that were supposed to be cut apart. This guide covers both approaches in detail, along with the practical steps to execute each one in PDF Press, Adobe Acrobat, and your operating system's print dialog.

Landscape vs Portrait Orientation for 2-Up
The single most important decision in 2-up printing is the orientation of the output sheet relative to the source pages. Getting this wrong is the most common cause of poorly scaled, clipped, or rotated 2-up output.
Portrait source pages on a landscape sheet
This is the classic 2-up configuration. Two portrait-oriented pages (like A4 or US Letter) are placed side by side on a landscape-oriented sheet. The math works neatly: two A5 pages fit perfectly side by side on a landscape A4 sheet, and two half-letter pages (5.5" x 8.5") fit on a landscape US Letter sheet (11" x 8.5"). In each case, the source pages fill the sheet with minimal scaling or wasted space.
This orientation is ideal for:
- Booklet imposition (saddle stitch) — the folded sheet naturally creates two facing pages
- Printing two copies of a half-size document on full-size paper
- Side-by-side proofing of consecutive pages
Landscape source pages on a portrait sheet
When your source pages are landscape-oriented — presentation slides, wide-format certificates, panoramic photos — placing two of them on a portrait sheet means stacking them vertically (2 rows, 1 column). Each page occupies the full width of the sheet, and the two pages are arranged top-to-bottom. This configuration is common for printing PowerPoint or Keynote handouts.
Landscape source on a landscape sheet
This arrangement places two landscape pages side by side, requiring a sheet that is at least twice as wide as each source page. It typically requires tabloid (11" x 17") or A3 paper and is used in commercial printing when the source document is full landscape A4 or Letter.
How to choose
The guiding principle is: minimize scaling by matching the combined dimension of two source pages to the sheet dimension. Two portrait A4 pages (each 210 mm wide) side by side need 420 mm of width — which fits perfectly on landscape A3 (420 x 297 mm). Two landscape A4 pages (each 297 mm wide) side by side need 594 mm — requiring SRA3 or larger paper. Always check the arithmetic before printing to avoid unnecessary shrinkage.
In PDF Press, you can set the output paper size and orientation independently from the source, and the real-time preview immediately shows whether content is being clipped or excessively scaled. This visual feedback eliminates the guesswork that plagues print-dialog-only approaches.
Booklet 2-Up: Saddle Stitch and Perfect Binding
Booklet 2-up is a specialized form of imposition where pages are arranged on sheets so that, after printing, folding, and binding, they appear in the correct reading order. This is fundamentally different from ganged 2-up, where pages are simply placed side by side for cutting.
Saddle-stitch booklet imposition
In a saddle-stitched booklet, sheets are printed on both sides, folded in half, nested inside each other, and stapled through the fold (the "saddle"). The page ordering on each sheet follows a precise mathematical pattern. For a 16-page booklet printed on 4 sheets:
- Sheet 1 front: pages 16 and 1
- Sheet 1 back: pages 2 and 15
- Sheet 2 front: pages 14 and 3
- Sheet 2 back: pages 4 and 13
- ...and so on until all 16 pages are assigned
The outermost sheet always carries the first and last pages. As you move inward, the page numbers converge toward the center of the booklet. This arrangement is called a signature, and getting the page order right is the entire purpose of booklet imposition software.
Why you cannot do booklet 2-up manually
While it is technically possible to calculate page positions for a small booklet by hand, the task becomes impractical for anything beyond 8 pages. A 32-page booklet has 8 sheets, each with 4 page positions (front-left, front-right, back-left, back-right), for a total of 32 assignments. Some positions require the page to be rotated 180 degrees depending on the binding method (work-and-turn vs work-and-tumble). Manual calculation is error-prone and time-consuming.
Creep compensation
In saddle-stitched booklets with many pages, the inner sheets extend slightly beyond the outer sheets when folded and nested. This is called creep (or shingling), and it causes the inner pages to appear shifted toward the outer edge after trimming. Professional booklet imposition includes creep compensation — a progressive inward shift of page content on inner sheets to counteract this effect. PDF Press's Booklet tool handles creep compensation automatically.
Perfect binding
Perfect-bound books use a different approach: pages are printed in signatures (groups of 4, 8, 16, or 32 pages), each signature is folded separately, and the folded signatures are glued together at the spine. The page ordering within each signature follows the same logic as saddle stitch, but each signature is independent. A 64-page book might consist of four 16-page signatures, each imposed as a separate unit. For more on binding methods, see our guide to saddle stitch vs perfect binding.
Try it with your own page count — the calculator below shows the sheets, signatures, and exact saddle-stitch page order:
- Sheet 1: front [32, 1] · back [2, 31]
- Sheet 2: front [30, 3] · back [4, 29]
- Sheet 3: front [28, 5] · back [6, 27]
- Sheet 4: front [26, 7] · back [8, 25]
- Sheet 5: front [24, 9] · back [10, 23]
- Sheet 6: front [22, 11] · back [12, 21]
- Sheet 7: front [20, 13] · back [14, 19]
- Sheet 8: front [18, 15] · back [16, 17]
Ganged 2-Up: Two Independent Pages on One Sheet
Ganged 2-up is the simpler of the two workflows. Two pages are placed side by side on a sheet, printed, and then cut apart into two separate finished pieces. There is no folding, no binding, and no complex page ordering. Page 1 goes on the left, page 2 goes on the right (or top and bottom), and they are trimmed into independent products.
Common use cases for ganged 2-up:
- A5 flyers on A4 paper — the most common ganged 2-up scenario. Design your flyer at A5 size (148 x 210 mm), impose it 2-up on A4 (210 x 297 mm in landscape), and cut each A4 sheet in half to get two A5 flyers. This doubles your output per sheet.
- Half-letter on US Letter — the American equivalent. Two 5.5" x 8.5" pages on an 11" x 8.5" landscape sheet.
- Postcards — two 6" x 4" postcards on a single sheet, with crop marks for trimming.
- Proofing — printing two pages per sheet to save paper when reviewing long documents. This is purely for convenience; the pages are read on-sheet, not cut apart.
- Two different designs — placing two distinct designs side by side on one sheet to save press time. This is common in gang-run printing where multiple jobs share a single press sheet.
Page ordering in ganged 2-up
For ganged 2-up, page ordering is straightforward: pages fill the sheet positions sequentially. Pages 1 and 2 go on sheet 1, pages 3 and 4 on sheet 2, and so on. If your PDF has an odd number of pages, the last sheet will have one page and one blank position.
Cutting considerations
When the two pages will be cut apart, you need to plan for the cut line. There are three approaches:
- Zero gap with crop marks — pages are placed edge to edge with crop marks indicating the exact cut position. This maximizes paper usage but requires precise cutting.
- Gutter gap — a small gap (3-6 mm) between the two pages provides a visual guide and safety margin for imprecise cutting. The gutter space is wasted paper but reduces the risk of cutting into page content.
- Overlap with bleed — when source pages include bleed, the bleed areas of adjacent pages can overlap in the gutter. This is the professional approach, ensuring that even if the cut is slightly off-center, both finished pieces have full bleed coverage.
For production printing, always use crop marks and ensure your source files include adequate bleed (typically 3 mm / 0.125 inch on all sides). PDF Press's Grid tool lets you set gutters, add crop marks, and control bleed handling in a single configuration step.
Common Paper Size Combinations for 2-Up
Choosing the right combination of source page size and output sheet size is critical for efficient 2-up printing. The goal is to minimize wasted paper while maintaining content at a readable or usable size. Here are the most common combinations used in production:
ISO A-series (metric)
The ISO A paper sizes are designed so that each size is exactly half of the next larger size. This makes 2-up printing mathematically perfect within the A-series:
- A5 (148 x 210 mm) on A4 (210 x 297 mm) — the most common combination worldwide. Two A5 pages fit on landscape A4 with zero waste. Used for flyers, handouts, and small booklets.
- A4 (210 x 297 mm) on A3 (297 x 420 mm) — two A4 pages on landscape A3. Used for booklet imposition, side-by-side proofing, and commercial printing. A3 printers are standard in offices and copy shops.
- A3 (297 x 420 mm) on A2 (420 x 594 mm) — two A3 pages on landscape A2. This moves into wide-format territory and is typically used in commercial print shops with large-format digital presses.
- A6 (105 x 148 mm) on A5 (148 x 210 mm) — two A6 postcards or cards on a single A5 sheet. Common for small-run postcard printing.
North American sizes (imperial)
US paper sizes do not have the same elegant halving property as ISO sizes, which creates some complications:
- Half-Letter (5.5" x 8.5") on Letter (8.5" x 11") — two half-letter pages on landscape letter. The standard combination for booklet printing in the US. The half-letter size is sometimes called "statement" size.
- Letter (8.5" x 11") on Tabloid (11" x 17") — two letter pages on landscape tabloid. Used for proofing, booklet imposition, and 2-up gang printing. Tabloid printers are common in offices and print shops.
- Half-Tabloid (8.5" x 5.5") on Letter (8.5" x 11") — two landscape half-sheets stacked vertically on portrait letter. Equivalent to the half-letter combination but oriented differently.
Mixed and custom combinations
In practice, source pages are not always standard sizes. A 6" x 9" book page, a 4" x 6" postcard, or a custom-sized invitation each requires a different sheet size for efficient 2-up printing. The calculation is straightforward: the output sheet must be at least twice the source width (for side-by-side arrangement) or twice the source height (for top-to-bottom arrangement), plus margins and gutters. PDF Press supports custom paper sizes for both source and output, making it easy to handle non-standard combinations. For a comprehensive reference on paper sizes, see our paper sizes guide.
Page Ordering Options in 2-Up Layouts
The order in which pages are placed on each sheet determines the reading experience and the post-processing workflow. 2-up layouts offer several page ordering strategies, and choosing the wrong one is a surprisingly common source of printing mistakes.
Sequential (left to right)
The default for ganged 2-up. Pages fill positions left to right: pages 1-2 on sheet 1, pages 3-4 on sheet 2, and so on. After cutting, you have a stack of left-side pages and a stack of right-side pages that need to be collated. This is the simplest ordering and works for most non-booklet applications.
Cut-and-stack
An optimization for high-volume production. Instead of sequential ordering, pages are arranged so that after cutting and stacking, the pieces are already in the correct sequence. For a 2-up cut-and-stack layout with 100 pages on 50 sheets: page 1 and page 51 go on sheet 1, page 2 and page 52 on sheet 2, and so on. After cutting and stacking, you get pages 1 through 100 in order without manual collation. This saves enormous time in finishing for products like numbered tickets, sequential forms, or variable-data prints.
Booklet (signature) ordering
For saddle-stitched booklets, pages are assigned to sheet positions using the standard imposition formula. The first and last pages share a sheet, the second and second-to-last pages share the next, and so on. This is not a simple sequential or cut-and-stack pattern; it is calculated based on the total page count and the binding method. Attempting to set up booklet page ordering manually is a recipe for errors — always use imposition software.
Repeat (step-and-repeat)
When you want multiple copies of the same page on one sheet, step-and-repeat ordering places the same page in both 2-up positions. Page 1 appears twice on sheet 1, page 2 appears twice on sheet 2, and so on. This is useful for printing two copies of each page — for example, two copies of each page of a short-run product like a greeting card or invitation.
Right-to-left (RTL)
For documents in Arabic, Hebrew, Urdu, or other right-to-left scripts, the page ordering should be reversed: the first page goes on the right side of the sheet, and reading progresses from right to left. In booklet mode, this also affects which side of the fold is the "front" page. PDF Press's Booklet tool supports both left-to-right and right-to-left binding directions.
How to Set Up 2-Up Printing in PDF Press
PDF Press provides two distinct tools for 2-up printing, depending on whether you need a ganged layout or a booklet layout. Both run entirely in your browser — your PDF files never leave your device.
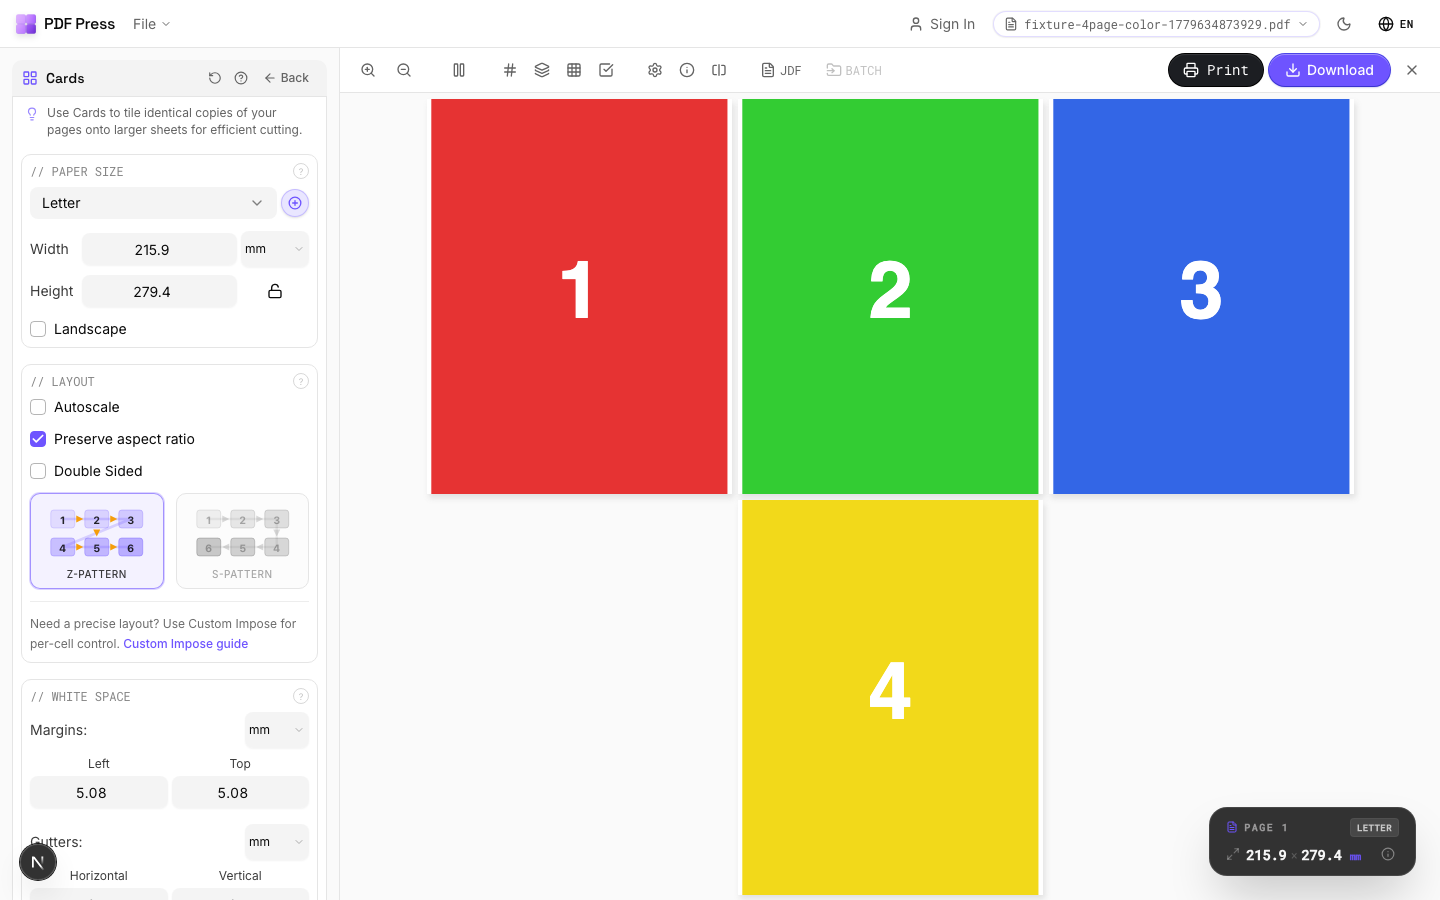
Ganged 2-up with the Grid tool
- Upload your PDF — drag and drop your file onto the upload area, or click to browse. PDF Press accepts PDF, PNG, and JPEG files.
- Add the Grid tool — select "Grid" from the tool palette. This is the general-purpose n-up tool for arranging pages in a grid.
- Set columns to 2, rows to 1 — this creates a side-by-side 2-up layout. For a top-to-bottom arrangement, set columns to 1 and rows to 2.
- Choose your output paper size — select from standard sizes (A4, A3, Letter, Tabloid) or enter custom dimensions. Enable "Landscape" if your 2-up arrangement is wider than it is tall.
- Set margins and gutters — configure the outer margins (space between the grid and the sheet edges) and the gutter (space between the two pages). For items that will be cut apart, a small gutter with crop marks is recommended.
- Enable crop marks (optional) — if the two pages will be cut apart, add crop marks for precise trimming guides. You can configure mark length, weight, and offset.
- Preview and download — scroll through the live preview to verify alignment and page order, then download the imposed PDF.
Booklet 2-up with the Booklet tool
- Upload your PDF — same process as above.
- Add the Booklet tool — select "Booklet" from the tool palette. This tool handles all the page ordering and rotation calculations automatically.
- Choose the binding method — select "Saddle Stitch" for fold-and-staple booklets, or "Perfect" for glue-bound signatures.
- Set the paper size — this is the size of the flat, unfolded sheet. For an A5 booklet, use A4 paper (the A4 sheet folds in half to A5). For a half-letter booklet, use Letter paper.
- Configure creep compensation — for booklets with more than about 12 pages, enable creep compensation to prevent inner pages from shifting outward after trimming.
- Preview the signature layout — the preview shows both front and back of each sheet, with pages in their imposed positions. Verify that the page numbers make sense for folding.
- Download — the output PDF is ready for duplex printing. Print double-sided, fold, and bind.
How to Print 2-Up in Adobe Acrobat and OS Print Dialogs
If you do not need the precision and features of a dedicated imposition tool, both Adobe Acrobat and your operating system's print dialog offer basic 2-up functionality. However, these built-in options have significant limitations.
Adobe Acrobat (Pro and Reader)
- Open your PDF in Acrobat.
- Go to File > Print.
- Under "Page Sizing & Handling," select Multiple.
- Set "Pages per sheet" to 2.
- Choose the page order: Horizontal, Horizontal Reversed, Vertical, or Vertical Reversed.
- Optionally check "Print page border" to add a thin border around each page.
- Click Print.
Limitations of Acrobat's 2-up: no crop marks, no custom gutter control, no bleed handling, no ability to save the imposed layout as a PDF (it goes directly to the printer), and no real preview of the imposed output. For a basic 2-up printout of handouts, Acrobat works. For anything production-oriented, it falls short. See our detailed guide on fixing Adobe Acrobat booklet printing issues.
macOS print dialog
- Open your PDF in Preview or any application.
- Go to File > Print.
- Click "Show Details" to expand the print dialog.
- Select Layout from the dropdown menu.
- Set "Pages per Sheet" to 2.
- Choose the layout direction (left to right, right to left, etc.).
- Optionally set a border style (Single Hairline, Single Thin, Double Hairline, Double Thin).
- Click Print.
Windows print dialog
The Windows print dialog varies by application, but most apps support a "Pages per Sheet" or "Multiple Pages" option in the printer settings. In Microsoft Word, go to File > Print and look for "1 Page Per Sheet" — change it to "2 Pages Per Sheet." In other applications, check the printer driver's advanced settings for a "Pages per Sheet" or "N-up" option.
All OS-level 2-up options share the same core limitation: they are print-time transformations that cannot be saved as PDFs, offer no crop marks, and provide minimal control over spacing and scaling. For professional results, use PDF Press.
Scaling Considerations for 2-Up Printing
Scaling is where most 2-up printing mistakes happen. When two pages are placed on a single sheet, each page can only occupy at most half the sheet area. If the source pages are the same size as the output sheet, each page must be scaled down to approximately 70.7% (the square root of 0.5) to fit — and that is the theoretical maximum before accounting for margins, gutters, and printer non-printable areas.
No scaling needed: matched sizes
When your source pages are exactly half the size of your output sheet, no scaling is required. This is the ideal scenario:
- A5 source on A4 output — perfect fit, no scaling
- Half-Letter source on Letter output — perfect fit, no scaling
- A4 source on A3 output — perfect fit, no scaling
Design your source documents at the correct finished size to avoid scaling entirely. If you want A5 flyers, design them at A5 — do not design at A4 and rely on the 2-up process to shrink them.
Scaling modes
When source and output sizes do not match perfectly, you need to choose a scaling strategy:
- Fit (scale to fit) — the page is scaled proportionally to fit entirely within its allocated cell. No content is clipped, but there may be empty space if the aspect ratios do not match. This is the safest option for general use.
- Fill (scale to fill) — the page is scaled to completely fill its cell, which may clip content on two sides if the aspect ratios differ. Use this when you want edge-to-edge coverage and can accept some trimming.
- None (actual size) — no scaling is applied. The page is placed at its original dimensions, centered in the cell. Content may extend beyond the cell boundaries if the source is too large. Use this when exact dimensions are critical (e.g., business cards, labels).
DPI and resolution
Scaling does not change the inherent resolution of raster images in your PDF. A 300 DPI image at A4 size becomes effectively 600 DPI when the page is scaled to A5 (because the same pixels occupy half the physical area). Scaling up, however, reduces effective resolution — a 150 DPI image scaled up by 2x becomes 75 DPI, which may appear pixelated in print. Always check that your source files have adequate resolution for the final output size.
Margin arithmetic
A practical example: you want to print two A4 pages (210 x 297 mm each) on a landscape A3 sheet (420 x 297 mm). The total width needed is 2 x 210 = 420 mm, which matches the A3 width exactly. But your printer has 5 mm non-printable margins on each side, reducing the printable width to 410 mm. Two pages at 205 mm each means each page is scaled to 97.6% — barely noticeable. But add a 10 mm gutter between the pages, and each page shrinks to 200 mm (95.2%). With generous 15 mm margins and a 10 mm gutter, you are down to 190 mm per page (90.5% of A4 width). These small reductions accumulate and can matter for precise work.
Double-Sided (Duplex) 2-Up Printing
Double-sided 2-up printing adds a layer of complexity because the front and back of each sheet must align correctly. This is especially critical for booklet imposition, where a misaligned back side means the entire booklet is unusable.
Duplex for ganged 2-up
For ganged 2-up (two pages per side, cut apart after printing), double-sided printing simply doubles the density. Four pages per physical sheet — two on the front, two on the back. The key consideration is flip direction:
- Flip on long edge — the sheet rotates around its long edge, like turning a page in a portrait-bound book. Use this when the two pages are arranged side by side (1x2 grid) on a landscape sheet.
- Flip on short edge — the sheet rotates around its short edge, like flipping a notepad. Use this when pages are stacked top-to-bottom (2x1 grid) on a portrait sheet.
Choosing the wrong flip direction means the back side is upside down relative to the front. Always print a single test sheet to verify alignment before committing to a full print run.
Duplex for booklet 2-up
Booklet imposition inherently requires duplex printing. Each physical sheet has two page positions on the front and two on the back, for a total of four pages per sheet. The imposition software calculates which pages go where, including any necessary 180-degree rotations for work-and-tumble or work-and-turn printing methods.
When printing booklet-imposed PDFs on a desktop printer, the most common approach is:
- The imposed PDF already has front and back as separate pages (page 1 of the PDF is the front of sheet 1, page 2 is the back of sheet 1, etc.).
- Print with duplex enabled, flipping on the short edge (for most booklet configurations).
- Alternatively, print all odd pages first, flip the stack, then print even pages on the back. This manual duplex approach gives you more control but requires careful attention to paper orientation.
Registration in duplex
Desktop printers have varying degrees of front-to-back registration accuracy. Laser printers typically achieve 0.5-1.5 mm alignment between front and back. Inkjet printers may be worse. For production work requiring tight registration (e.g., double-sided business cards where front and back designs must align precisely), consider printing on one side at a commercial print shop with sheet-fed offset or high-end digital presses that offer sub-0.1 mm registration.
Practical Use Cases for 2-Up Printing
2-up printing serves a wide range of practical applications. Here are the most common scenarios with specific guidance for each:
Meeting handouts and lecture notes
Print presentation slides 2-up to create compact handouts. For a 40-slide deck, 2-up reduces the output from 40 sheets to 20. Add 2-up double-sided printing and you are down to 10 sheets — a manageable packet that is easy to staple. The key is ensuring that the slide content remains legible at the reduced size; slides with large text and simple graphics work well, while data-dense charts may become unreadable.
A5 flyers and invitations
Design your flyer at A5 size, then use ganged 2-up on A4 paper. After printing, cut each A4 sheet in half to produce two finished A5 flyers. This approach works for short runs (under 500 pieces) on a desktop printer or office copier, and it costs half as much paper as printing each flyer on its own A4 sheet. Add crop marks in PDF Press for precise cutting.
Postcards
Standard postcards (6" x 4" / 152 x 102 mm) fit comfortably 2-up on letter or A4 paper with room for margins and crop marks. For double-sided postcards, design front and back as separate pages, impose them 2-up with duplex output, and cut. The back side must align with the front — verify registration with a test print before the full run.
Saddle-stitched booklets
Small booklets, programs, zines, and catalogs up to about 64 pages are commonly saddle-stitched. Design each page at the finished size (e.g., A5), impose as a booklet on the next larger paper (A4), print duplex, fold, and staple. This is the most cost-effective binding method for short-run booklets and requires no special equipment beyond a long-arm stapler.
Proofing and review
When reviewing a long document (manuscript, report, legal brief), printing 2-up gives you an overview of two pages at once while keeping text at a reasonable size. Unlike 4-up or 8-up (which shrink pages to the point of illegibility for body text), 2-up strikes the right balance between paper savings and readability. Many editors and proofreaders prefer 2-up printouts for catching layout issues, widows/orphans, and visual inconsistencies across page spreads.
Door hangers
Standard door hangers (3.75" x 8.75" or 4.25" x 11") are commonly printed 2-up on letter or tabloid paper. The long, narrow shape of door hangers makes them efficient in a 2-up side-by-side arrangement. Include crop marks and a die-cut guide for the hanger hook at the top of each piece.
Troubleshooting Common 2-Up Problems
Even experienced users encounter issues with 2-up printing. Here are the most common problems and their solutions:
Pages are rotated 90 degrees
This happens when the output sheet orientation does not match the expected layout. If you are placing two portrait pages side by side, the output sheet should be landscape. Check your paper size settings and ensure "Landscape" is enabled when appropriate. In PDF Press, the preview immediately shows the rotation, so you can catch this before printing.
Content is clipped at the edges
Clipping occurs when the combined width (or height) of the two pages plus margins and gutters exceeds the printable area of the output sheet. Solutions: reduce margins, reduce the gutter, use a larger output sheet, or enable "Fit" scaling to automatically shrink pages to fit.
Pages are too small
If pages appear smaller than expected, check for double-scaling. This happens when the print dialog applies its own "Fit to Page" scaling on top of the 2-up scaling already applied by your imposition tool. When printing an already-imposed PDF, always set the print dialog to "Actual Size" (100%, no scaling) to preserve the layout exactly as designed.
Duplex back side is upside down
The flip direction (long edge vs short edge) does not match the layout orientation. For a landscape 2-up sheet, use "Flip on Short Edge." For a portrait 2-up sheet, use "Flip on Long Edge." Print a single test sheet to verify before committing to a full run.
Booklet pages are in the wrong order
This almost always means you used ganged 2-up ordering instead of booklet imposition ordering. Sequential page placement (1-2, 3-4, 5-6) will not produce a correct booklet. Use a dedicated booklet imposition tool like PDF Press's Booklet tool, which calculates the correct page positions automatically.
Crop marks are missing or misaligned
Most basic 2-up tools (OS print dialog, Acrobat print) do not add crop marks. If you need cutting guides, use PDF Press or another imposition tool that explicitly supports crop marks. If marks appear but are misaligned, check that your bleed settings match your source file's bleed area.
Ready-made layout
Load the 2-Up Postcards (4×6") preset
Opens with this layout pre-loaded — just drop your PDF and download.
Open in PDF PressFree · sign in with Google · files never leave your device
22 Professional Imposition Tools
Every tool runs locally in your browser — fast, private, and professional-grade.
Frequently Asked Questions
Related Articles
Ready-made layout
Load the 2-Up Postcards (4×6") preset
Opens with this layout pre-loaded — just drop your PDF and download.
Open in PDF PressFree · sign in with Google · files never leave your device