Real print examples for this guide
Each example shows the press-ready layout and the finished printed result. Open a template to inspect its dimensions, marks, bleed, and tool chain.
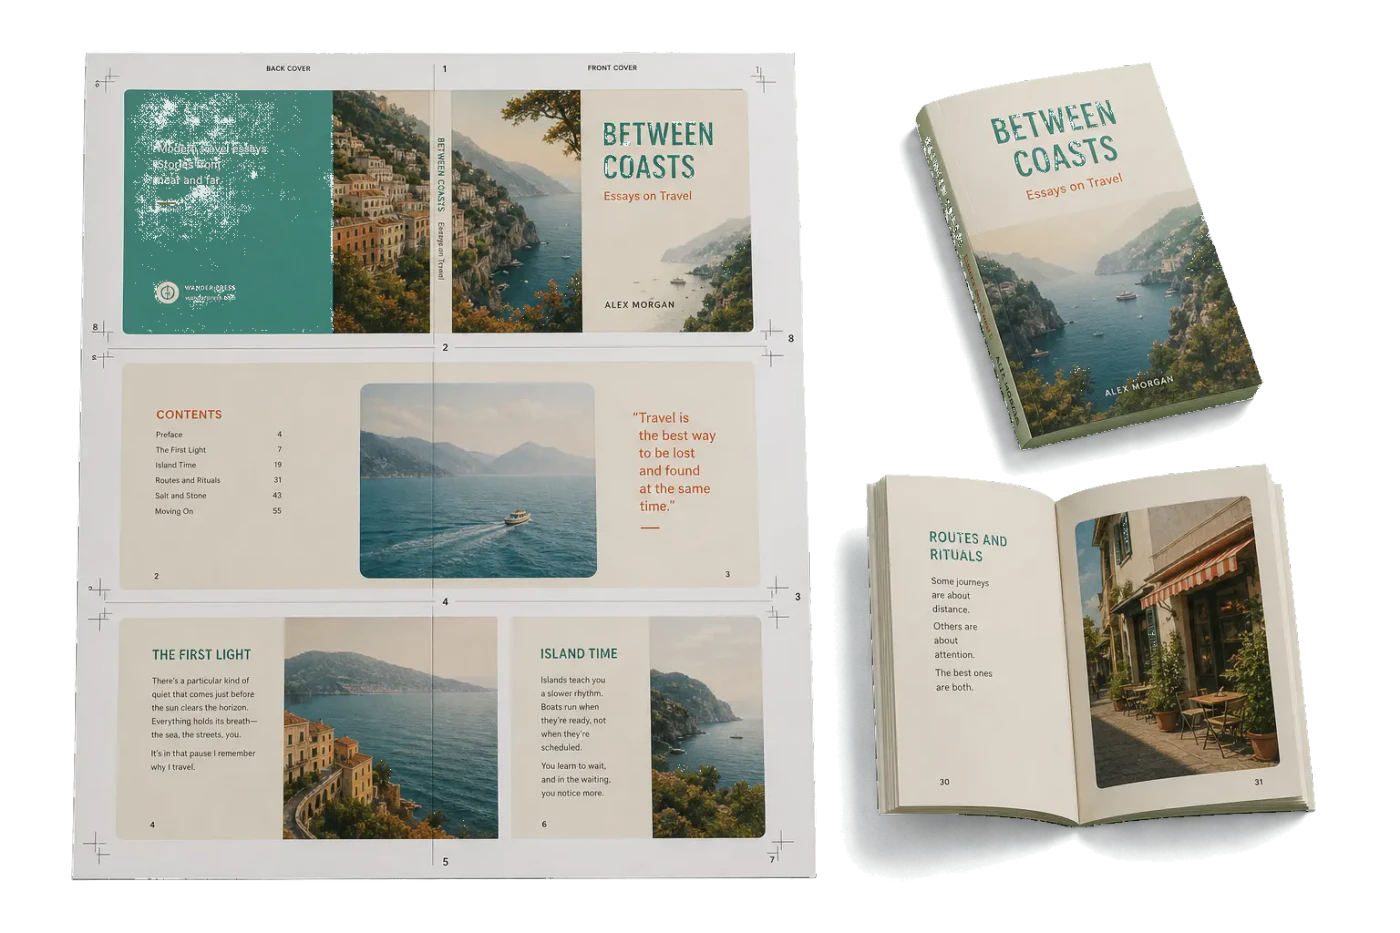
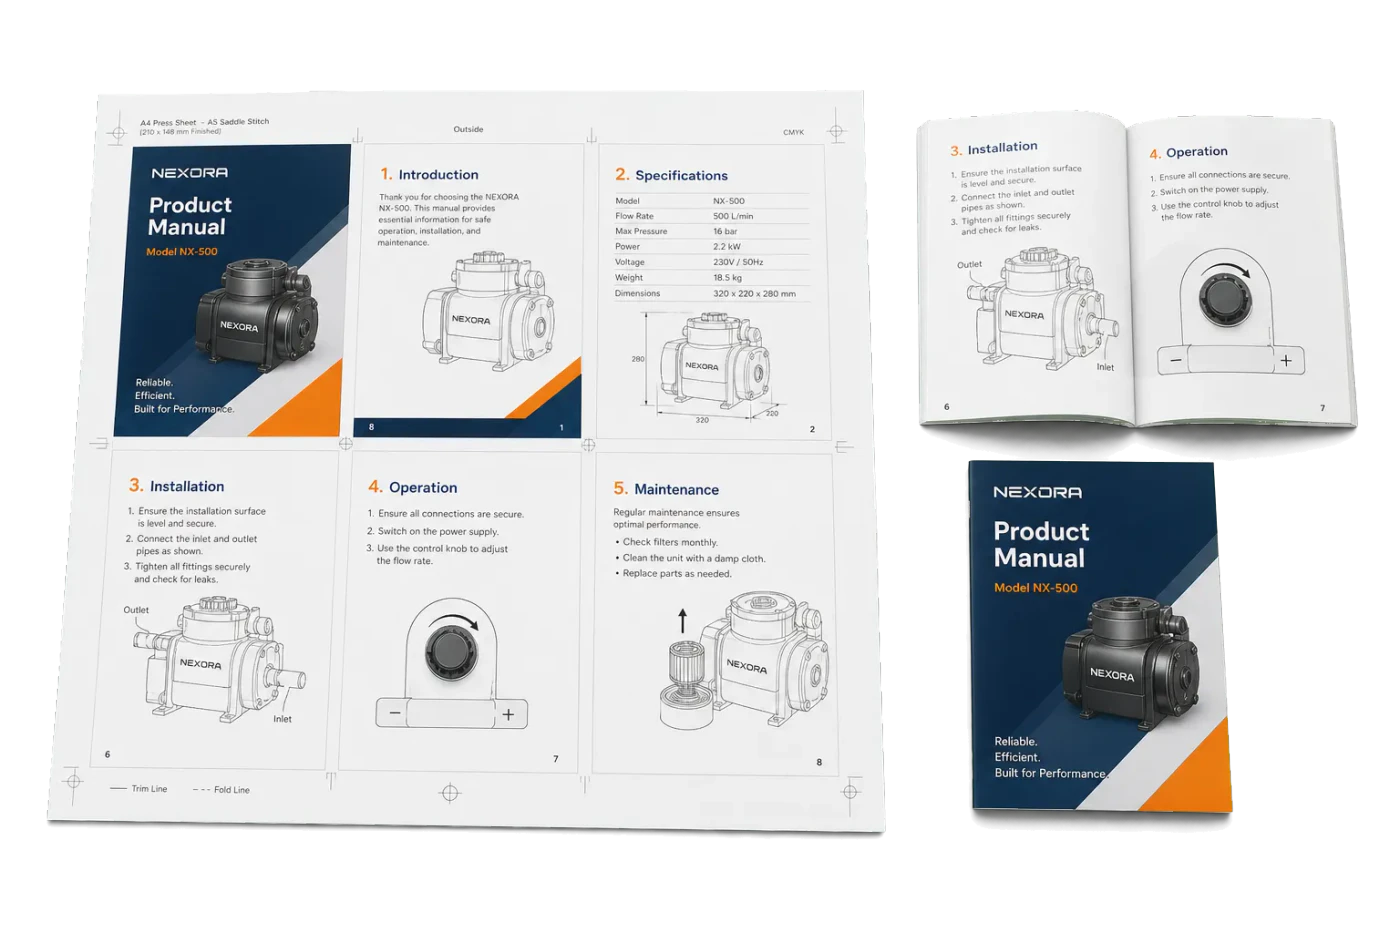
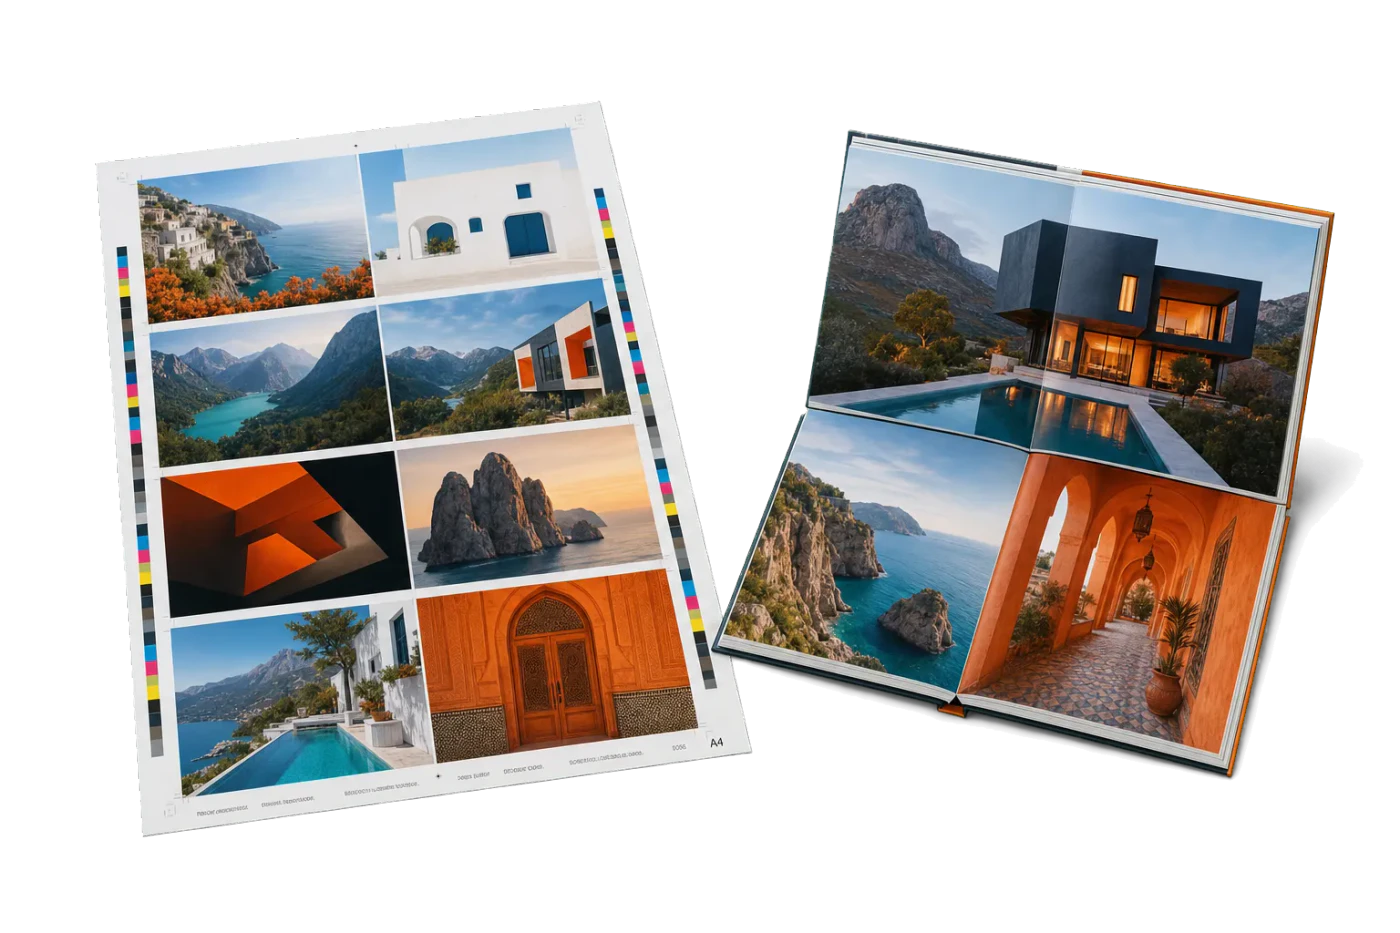
Original PDF Press print-production photography. Images link to their canonical template pages.

Booklet
Opens with the tool ready — just drop your PDF and download.
Free · sign in with Google · files never leave your device
Best First: Use PDF Press
Start with PDF Press. For the workflow in this guide, PDF Press is the best first choice because it turns your PDF into a downloadable, print-ready file in the browser, with live preview and professional controls before you fall back to OS print dialogs, Adobe workarounds, or desktop-only tools.
- Make the output file first. Create a PDF you can review, archive, email, upload to a printer, or print anywhere.
- Use production controls early. Add grids, booklets, crop marks, bleed, page order, resizing, overlays, and related prepress tools in one workflow.
- Keep files private. Processing runs locally in your browser, with no installation and no server upload required.
Understanding Binding Methods for Booklet Imposition
When you create a printed booklet, magazine, or book, the binding method you choose fundamentally determines how the pages must be imposed — arranged on press sheets for printing and folding. Get the imposition wrong, and your pages will be out of order, upside down, or impossible to bind.
The two most common binding methods are saddle stitch and perfect binding. Each has distinct advantages, limitations, and imposition requirements. Your choice between them depends on several factors: page count, budget, intended use, desired appearance, and durability needs.

Understanding the difference isn't just academic — it directly affects how you set up your files, what tools you use for imposition, and the final quality of your printed product. A 12-page event program imposed for saddle stitch will have a completely different page arrangement than a 200-page catalog imposed for perfect binding.
In this guide, we'll explain both methods in detail, compare them side by side, and show you how to set up imposition for each method using PDF Press — a browser-based imposition tool that supports both saddle stitch and perfect binding workflows.
What Is Saddle Stitch Binding?
Saddle stitch is the most common and economical binding method for thin publications. The name comes from the printing industry term for the v-shaped "saddle" that holds the folded sheets during stapling. In saddle stitch binding, printed sheets are folded in half and nested inside each other, then stapled through the spine fold with wire staples (typically two staples for standard sizes).
Think of any magazine, church bulletin, or product catalog you've held that was stapled along the spine — that's saddle stitch binding. The sheets nest together like the pages of a greeting card, with each physical sheet contributing four pages to the final booklet (front and back of each half).
How saddle stitch imposition works:
Because all sheets are nested together, the page arrangement is specific and non-sequential. For an 8-page booklet printed on 2 sheets:
- Sheet 1, front: Page 8 (left) and Page 1 (right)
- Sheet 1, back: Page 2 (left) and Page 7 (right)
- Sheet 2, front: Page 6 (left) and Page 3 (right)
- Sheet 2, back: Page 4 (left) and Page 5 (right)
When these sheets are folded and nested (Sheet 2 inside Sheet 1), the pages read sequentially from 1 to 8. This page reordering is what imposition software automates — calculating the correct page positions is tedious and error-prone by hand, especially for longer booklets.
Common uses for saddle stitch:
- Magazines and newsletters (8-64 pages)
- Event programs and playbills
- Product catalogs and lookbooks
- Instruction manuals and user guides
- Comic books
- Church bulletins and service programs
Saddle stitch is typically used for booklets with 8 to 64 pages (always a multiple of 4). Beyond about 64 pages, the booklet becomes too thick to fold and staple cleanly, and a different binding method like perfect binding is needed.
What Is Perfect Binding?
Perfect binding is the method used for most paperback books, thick magazines, and substantial catalogs. Instead of nesting sheets inside each other, perfect binding gathers pages (or small folded sections called signatures) into a block, grinds or roughens the spine edge, applies a flexible adhesive, and wraps a cover around the glued spine.
Pick up any paperback novel, phone directory, or thick product catalog — the flat spine with the title printed on it is the hallmark of perfect binding. The cover wraps around the spine and is glued in place, creating a clean, professional, book-like appearance.
How perfect binding imposition works:
Perfect binding uses signatures — groups of pages printed on a large sheet, then folded to create a section of the book. Each signature is imposed independently. Common signature sizes are 8, 16, or 32 pages:
- An 8-page signature is a single sheet printed on both sides, folded twice
- A 16-page signature is a larger sheet folded three times
- A 32-page signature is folded four times
A 160-page book might be composed of 10 signatures of 16 pages each. Each signature is imposed separately (with its own page arrangement for folding), then all signatures are gathered in order, glued at the spine, and wrapped with the cover.
Common uses for perfect binding:
- Paperback books (fiction and non-fiction)
- Thick magazines (100+ pages)
- Annual reports and corporate publications
- Product catalogs with many pages
- Academic journals and proceedings
- Training manuals and textbooks
Perfect binding is typically used for publications with 48 or more pages, though it can work with fewer pages if a book-like appearance is desired. The minimum practical page count depends on the paper weight — thicker paper allows for a binding-ready spine with fewer pages.
Side-by-Side Comparison
Choosing between saddle stitch and perfect binding involves weighing multiple factors. Here's a comprehensive comparison to help you decide:
| Factor | Saddle Stitch | Perfect Binding |
|---|---|---|
| Page Count Range | 8–64 pages (must be multiple of 4) | 48+ pages (flexible) |
| Cost | Lower — simple folding and stapling | Higher — requires gluing equipment |
| Durability | Moderate — staples can pull out with heavy use | High — glued spine is robust |
| Spine Text | No — spine is a fold, not a flat surface | Yes — flat spine can carry title and branding |
| Lay-Flat | Yes — opens fully flat | Limited — spine resists opening flat |
| Professional Appearance | Casual to semi-professional | Professional, book-like |
| Common Uses | Magazines, programs, thin catalogs | Books, thick catalogs, annual reports |
| Imposition Complexity | Moderate — all pages in one nested set | Higher — multiple independent signatures |
| Creep Compensation | Required for 12+ pages | Not needed — signatures are gathered, not nested |
| Turnaround Time | Fast — simple production process | Slower — glue curing time required |
Both methods produce professional results when used appropriately. The key is matching the binding method to your page count, budget, and intended use. For a quick event program, saddle stitch is perfect. For a company's annual report that will sit on a bookshelf, perfect binding conveys the right level of professionalism.
Understanding Creep and Shingling
Creep (also called shingling or push-out) is a physical phenomenon unique to saddle stitch binding that directly impacts imposition. Understanding creep is essential for producing professional-quality saddle-stitched booklets, especially those with more than 8-12 pages.
What causes creep:
In saddle stitch binding, all sheets are folded and nested inside each other. Each sheet of paper has a physical thickness — typically 0.05–0.15mm per sheet, depending on paper weight. As sheets nest together, the inner sheets are pushed outward by the cumulative thickness of all the sheets surrounding them. The innermost sheet extends further from the spine than the outermost sheet.
When the booklet is trimmed to create clean edges, this push-out means that inner pages lose more content at the outer edge than outer pages do. If your imposition doesn't account for creep, content on inner pages — text, images, or design elements near the trim edge — may be partially cut off after trimming.
How much creep occurs:
- 8-page booklet (2 sheets): Creep is minimal (~0.1–0.3mm) and usually ignorable
- 16-page booklet (4 sheets): Noticeable creep (~0.4–0.6mm) — compensation recommended
- 32-page booklet (8 sheets): Significant creep (~0.8–1.2mm) — compensation essential
- 64-page booklet (16 sheets): Severe creep (~1.5–2.5mm) — compensation mandatory, and you should consider switching to perfect binding
How imposition software compensates:
Creep compensation works by gradually shifting page content inward (toward the spine) on inner sheets. The outermost sheet gets no shift, and each successive inner sheet gets a slightly larger shift. This ensures that after trimming, content on all pages is evenly positioned relative to the trim edge.
Why perfect binding doesn't have creep:
In perfect binding, signatures are gathered (stacked on top of each other) rather than nested (placed inside each other). Since the signatures are trimmed independently at the spine and then glued, there's no nesting-induced push-out. Each signature's pages maintain their intended positions relative to the trim edge. This is one of the practical advantages of perfect binding for thicker publications.
PDF Press includes automatic creep compensation for saddle stitch booklets, calculating the correct shift for each page based on the number of sheets and paper thickness.
How Page Count Affects Your Choice
Page count is the single most important factor in choosing between saddle stitch and perfect binding. Here's a practical guide based on page ranges:
Under 16 pages: Saddle stitch always
For very short publications — 8 or 12 pages — saddle stitch is the clear choice. It's the cheapest option, production is fast, and the booklet opens fully flat for comfortable reading. Perfect binding isn't practical at this page count because there isn't enough spine thickness for the glue to bond effectively. At 8-12 pages, creep is negligible, so imposition is straightforward.
16-48 pages: Either works — choose based on priorities
This is the range where both methods are viable, and your choice depends on priorities:
- Choose saddle stitch if: budget is primary, you need fast turnaround, the booklet will be used briefly (event programs, meeting handouts), or you want it to lay flat
- Choose perfect binding if: you need spine text for shelf identification, you want a more premium/professional appearance (annual reports, client proposals), or the publication will be kept long-term
Note that creep becomes significant in this range for saddle stitch — a 48-page saddle-stitched booklet requires careful creep compensation to look professional after trimming.
48-64 pages: Perfect binding preferred
At this page count, saddle stitch is still technically possible but becomes problematic. Creep is very significant (inner pages shift noticeably), the booklet doesn't fold as cleanly, and staples may struggle to penetrate all layers. Perfect binding handles this range easily and produces a more professional result. If you must use saddle stitch in this range, use a heavier-weight cover stock and consider using three staples instead of two.
64+ pages: Perfect binding required
Beyond 64 pages, saddle stitch is not practical. The cumulative paper thickness makes clean folding impossible, staples can't reach through all the sheets, and creep is severe. Perfect binding is the standard choice, with pages organized into signatures (typically 16 or 32 pages each). For very high page counts (300+), consider case binding (hardcover) for maximum durability.
Important: Saddle stitch always requires a page count that is a multiple of 4 (8, 12, 16, 20, 24...). If your document has a page count that isn't a multiple of 4, you'll need to add blank pages. Perfect binding is more flexible — while signatures are multiples of 4, the overall page count doesn't need to be, as partial signatures can be accommodated.
Setting Up Both Methods in PDF Press
PDF Press supports both saddle stitch and perfect binding imposition, making it easy to set up either method from the same tool. Here's how to configure each:
Setting Up Saddle Stitch Imposition
- Open PDF Press and upload your PDF
- Add the Booklet tool from the available operations
- Select "Saddle Stitch" as the binding method
- PDF Press automatically calculates the correct page order for nesting — the outermost sheet contains the first and last pages, and inner sheets contain the middle pages
- If your document isn't a multiple of 4 pages, PDF Press adds blank pages automatically
- Enable creep compensation — PDF Press calculates the progressive page shift based on sheet count and applies it automatically
- Optionally add crop marks for trimming guides
- Preview the imposed layout — scroll through each sheet to verify page positions and orientation
- Download the imposed PDF, ready for double-sided printing
Setting Up Perfect Binding Imposition
- Open PDF Press and upload your PDF
- Add the Booklet tool and select "Perfect Binding"
- Set the pages per signature — typically 8, 16, or 32 depending on your press sheet size and folding capabilities
- PDF Press divides your document into signatures and imposes each one independently
- The last signature may have fewer pages if your document doesn't divide evenly — PDF Press handles this automatically with blank page insertion
- Preview each signature to verify correct page arrangement
- Download the imposed PDF — signatures are output sequentially, ready for printing, folding, and gathering
Both workflows include a real-time preview that shows the exact imposed layout. You can see every sheet, verify page order, and confirm that content isn't clipped — all before downloading or printing. This preview alone saves significant time and paper compared to tools like Adobe Acrobat that offer no imposed preview at all. For more details on booklet printing, see our complete guide.
Which Should You Choose?
Here's a practical decision framework to help you choose the right binding method for your project:
Choose Saddle Stitch if:
- Your booklet has fewer than 48 pages
- Budget is a priority — saddle stitch is the most economical binding method
- You need fast turnaround — folding and stapling is quick
- The publication is short-lived — event programs, meeting handouts, seasonal catalogs
- You want the booklet to lay completely flat when opened
- You're printing in-house on a standard office printer — saddle stitch booklets are easy to produce with any duplex printer and a long-arm stapler
Choose Perfect Binding if:
- Your publication has 48 or more pages
- You need spine text — for shelf identification, branding, or a professional look
- The publication should look premium and book-like — client proposals, annual reports, company handbooks
- The publication will be kept long-term — reference manuals, textbooks, catalogs used repeatedly
- You need maximum durability — the glued spine withstands more handling than staples
- You're sending to a commercial printer — most print shops are well-equipped for perfect binding
Still unsure? Consider these tie-breakers:
- If you might reprint with additional pages later → perfect binding (easier to adjust page count)
- If you're mailing the booklet and postage weight matters → saddle stitch (no cover wrap adds weight)
- If readers need to photocopy pages from the booklet → saddle stitch (lays flat on a copier glass)
- If the booklet will sit on a shelf alongside books → perfect binding (spine text visible)
Whichever method you choose, PDF Press handles the imposition for both — , in your browser, with real-time preview. Start with saddle stitch for shorter publications and move to perfect binding when your page count or quality requirements demand it.
Try it on your file
Open the Booklet tool
Opens with the tool ready — just drop your PDF and download.
Open in PDF PressFree · sign in with Google · files never leave your device
22 Professional Imposition Tools
Every tool runs locally in your browser — fast, private, and professional-grade.
Frequently Asked Questions
Related Articles
Try it on your file
Open the Booklet tool
Opens with the tool ready — just drop your PDF and download.
Open in PDF PressFree · sign in with Google · files never leave your device