Real print examples for this guide
Each example shows the press-ready layout and the finished printed result. Open a template to inspect its dimensions, marks, bleed, and tool chain.


Original PDF Press print-production photography. Images link to their canonical template pages.
Step-and-Repeat Flyer
このレイアウトを読み込んだ状態で開きます。PDF をドロップしてダウンロードするだけ。
無料 · Google でサインイン · ファイルはお使いのデバイスから外に出ません
Best First: Use PDF Press
Start with PDF Press. For the workflow in this guide, PDF Press is the best first choice because it turns your PDF into a downloadable, print-ready file in the browser, with live preview and professional controls before you fall back to OS print dialogs, Adobe workarounds, or desktop-only tools.
- Make the output file first. Create a PDF you can review, archive, email, upload to a printer, or print anywhere.
- Use production controls early. Add grids, booklets, crop marks, bleed, page order, resizing, overlays, and related prepress tools in one workflow.
- Keep files private. Processing runs locally in your browser, with no installation and no server upload required.
What Is Step-and-Repeat Imposition?
Quick answer: Step and repeat PDF software duplicates one PDF artwork across a press sheet in a regular grid. Use it for labels, stickers, packaging, cards, coupons, and any job where the same design repeats many times. The critical settings are trim size, bleed, gap, sheet size, margins, crop marks, and yield per sheet.
Step-and-repeat is an imposition technique where a single artwork is duplicated across a press sheet in a regular pattern — rows and columns of identical copies, evenly spaced. The name comes from the production process: the artwork "steps" across the sheet in fixed increments and "repeats" at each position, filling the printable area with as many copies as the sheet allows.
Step-and-repeat is the backbone of packaging, label, wallpaper, and specialty printing. A shampoo bottle label printed 48 times on a single press sheet. A wallpaper pattern tiled across an A0 sheet. A set of business cards repeated 10-up on SRA3 paper. In every case, the imposition math is the same: calculate the maximum number of repeats that fit within the printable area, maintain consistent spacing between repeats, and center the group on the sheet.
Unlike n-up imposition (which arranges different pages), step-and-repeat always copies the same artwork. And unlike true-shape nesting (which positions irregular shapes), step-and-repeat always uses a regular grid. It's the simplest and most predictable imposition method — and it's the foundation on which more complex ganging and nesting workflows are built.
PDF Press provides a dedicated step-and-repeat engine that calculates optimal repeats, manages margins and gaps, and generates press-ready PDFs with registration marks and crop marks.
Step-and-Repeat vs N-Up: What's the Difference?
Although step-and-repeat and n-up imposition both place multiple copies on a sheet, they serve different purposes and produce different output:
N-up imposition arranges different pages from a multi-page document on a single sheet. Page 1 might be next to page 2 on the front of the sheet, and page 3 next to page 4 on the back. The goal is correct reading order after folding and cutting. N-up is fundamentally about page sequencing.
Step-and-repeat arranges identical copies of a single design across a sheet. Every position on the sheet shows the same artwork. The goal is maximum yield per press sheet. Step-and-repeat is fundamentally about quantity optimization.
Key differences:
- N-up pages are different; step-and-repeat copies are identical
- N-up requires page ordering calculations; step-and-repeat requires gap and bleed calculations
- N-up is for books, booklets, and multi-page documents; step-and-repeat is for labels, packaging, and repeated single designs
- N-up may involve work styles for duplex printing; step-and-repeat is typically simplex (one side only)
There is overlap: a 10-up business card layout is both n-up (10 different cards) and step-and-repeat (10 copies of the same card), depending on whether you're imposing 10 unique designs or 10 copies of one design. PDF Press handles both workflows and clearly labels each in the imposition settings.
Packaging Repeats
In packaging prepress, a single package design (aflexo-printed milk carton, a gravure-printed snack wrapper, a label for a cosmetic jar) is repeated across a flexible printing substrate — typically aluminum foil, plastic film, or paperboard web. The repeats must account for:
- Bleed between repeats: Each repeat must have sufficient bleed (typically 2–5 mm) to allow for cutting tolerance. Without bleed, slight misregistration during die-cutting will show white edges on the finished package.
- Color bars and targets: Color control strips and registration marks must fit between the repeats and the sheet edge.
- Grain direction: Paperboard has a grain. Repeats must be oriented so the grain runs parallel to the primary fold direction to avoid cracking and warping.
- Distortion compensation: In flexo and gravure printing, the artwork must be pre-distorted to account for the stretching that occurs when the plate wraps around the printing cylinder.
Package step-and-repeat in PDF Press handles all of these parameters. Enter the package dimensions, bleed, gap, sheet size, and repeat direction, and the engine calculates the maximum yield per sheet while maintaining production-safe spacing.
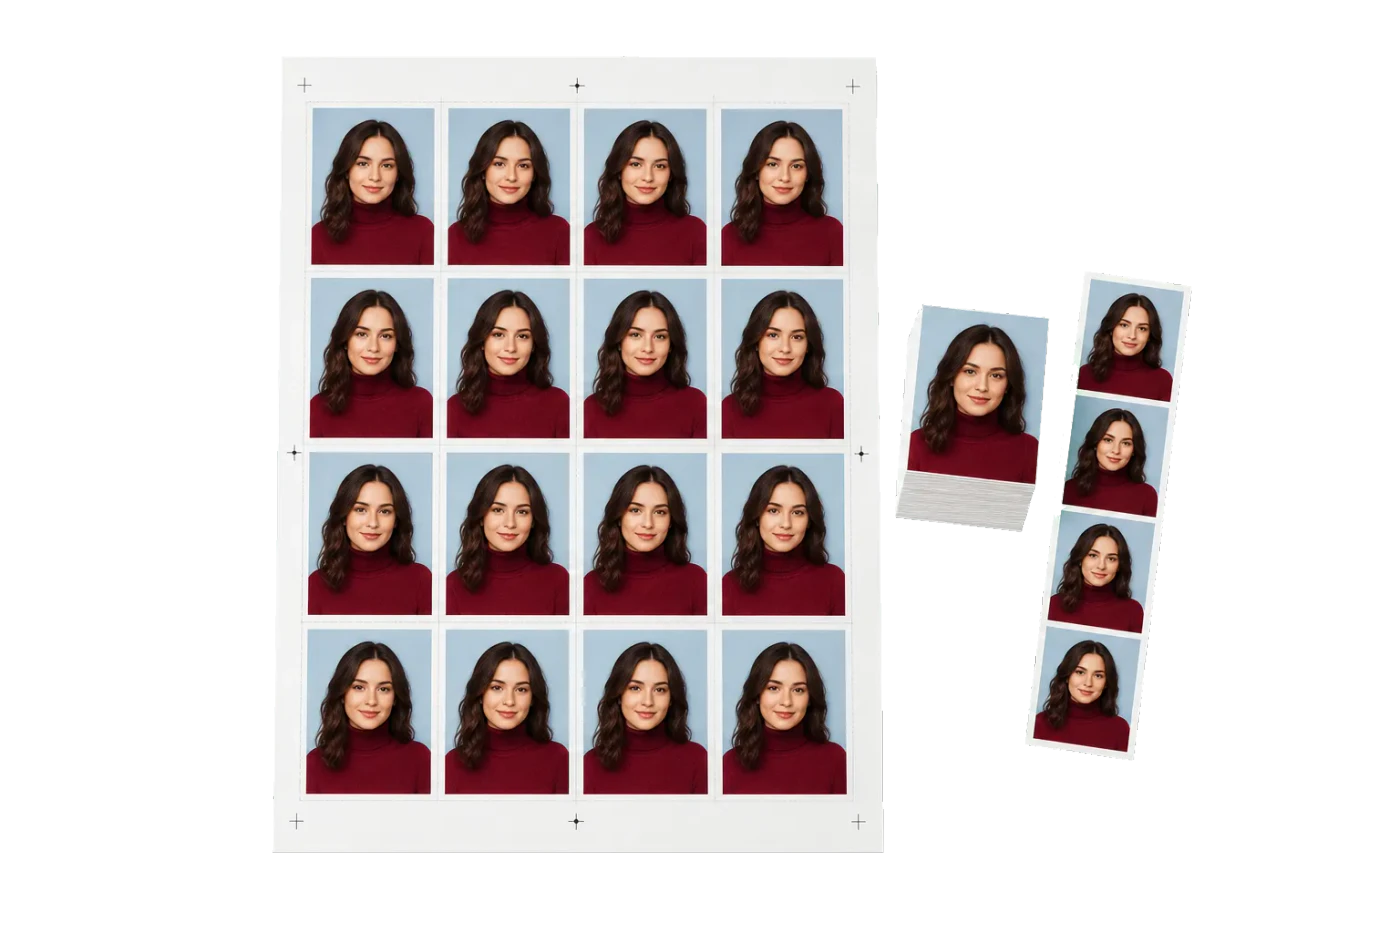
Label Repeats
Label printing is one of the most common applications of step-and-repeat. A single label design is repeated across a press sheet — 20, 40, or 80 times — and the entire sheet is then kiss-cut or die-cut in one pass. The key parameters for label step-and-repeat are:
- Label dimensions: The exact finished size of each label (trim size), including any corner radii for rounded labels.
- Bleed: 1–3 mm beyond the trim size on all sides, to ensure full coverage after die-cutting.
- Gap between labels: Sufficient space for the die-cutting blade — typically 2–3 mm between trim edges of adjacent labels. On flexo presses, this gap may also need to accommodate the die line and an OMR mark.
- Gripper and tail margins: 10–15 mm at the gripper edge and 5–10 mm at the tail for press operator handling and lay marks.
- Side margins: 5–10 mm on each side for registration and color bars.
The yield formula is straightforward: subtract the margins from the sheet dimensions, divide the remaining width by (label width + gap + 2×bleed), and divide the remaining height by (label height + gap + 2×bleed). Round down to the nearest integer for each axis, and multiply for total yield.
PDF Press automates this calculation and shows you the yield in real time as you adjust label dimensions, gap, and bleed. The gang sheet tool extends this to multi-design label sheets where different label shapes share the same press sheet.
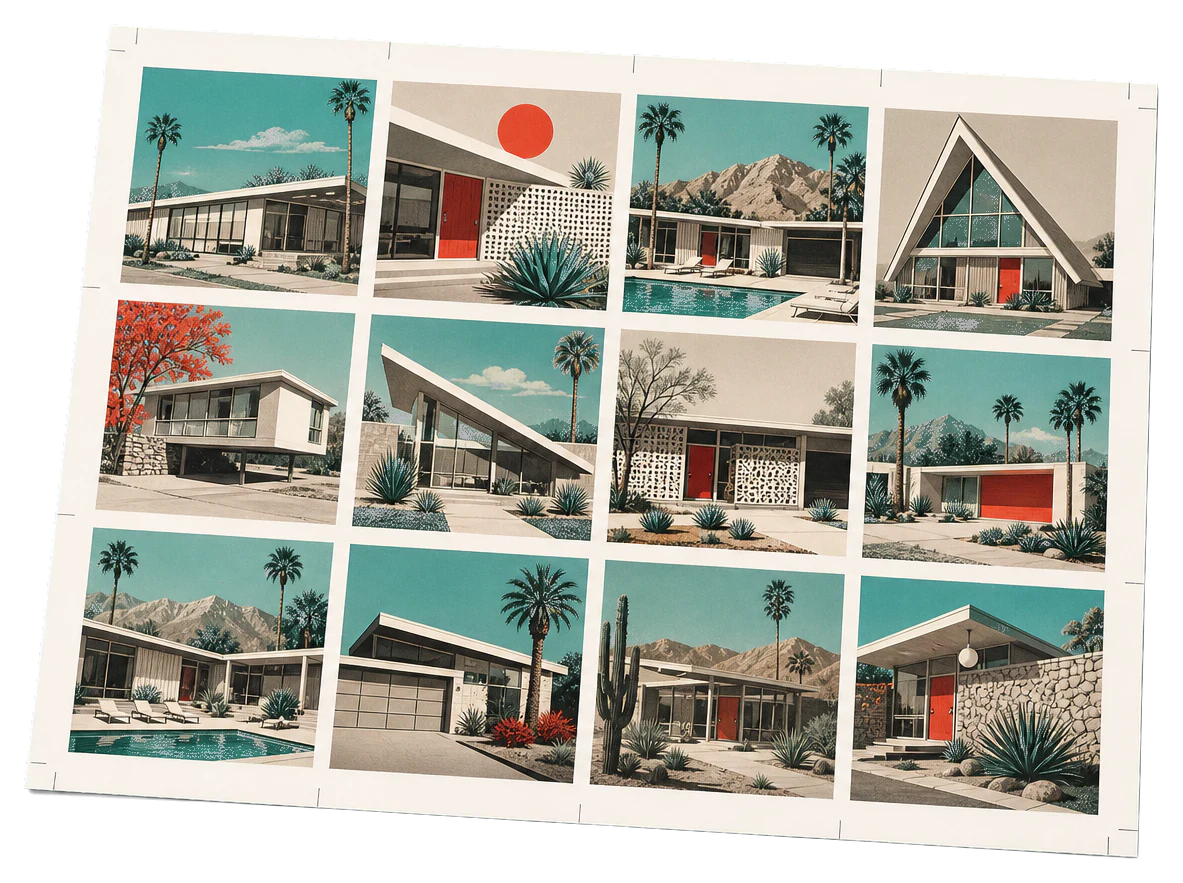
Wallpaper and Textile Repeats
Wallpaper and textile repeats are unique because they require seamless tiling — each repeat must connect perfectly with its neighbors to create a continuous pattern with no visible joins. This is fundamentally different from label or packaging repeats, where each copy is a discrete unit separated by a cutting gap.
Wallpaper repeats must tile horizontally and vertically. The repeat size (called the "drop" or "pattern repeat") is determined by the pattern design and the roller circumference. Traditional wallpaper is printed with a 21-inch (533 mm) drop repeat, but custom patterns can have any repeat length. The imposition must ensure that the last pixel of one repeat connects seamlessly to the first pixel of the next repeat in both dimensions.
Textile repeats follow the same principle but with additional considerations for fabric grain, print method (rotary screen, flatbed, digital), and fabric stretch. Textile repeats often use a "half-drop" or "brick" pattern where each row of repeats is offset by half the pattern width, creating a more natural-looking distribution.
In PDF Press, the step-and-repeat engine supports seamless tiling by allowing you to set the repeat offset independently for each row and column. You can configure zero-offset for simple grid tiling, half-width offset for brick patterns, or custom offsets for complex tessellations.
Calculating Optimal Repeats
The core calculation for step-and-repeat is simple, but getting the optimal result requires attention to several parameters:
Yield formula (simple grid):
Columns = floor((sheet_width − left_margin − right_margin + gap) / (artwork_width + gap + 2×bleed))
Rows = floor((sheet_height − top_margin − bottom_margin + gap) / (artwork_height + gap + 2×bleed))
Total yield = Columns × Rows
Centering offset:
After calculating columns and rows, center the repeat group on the sheet by adjusting the margins. The horizontal centering offset is:
centerX = (sheet_width − (columns × (artwork_width + gap + 2×bleed) − gap)) / 2
And similarly for the vertical centering.
Optimization considerations:
- Increasing the gap by 1 mm might reduce yield by one column — always check whether a smaller gap is production-safe
- Reducing margins by 2 mm on each side might gain one column on wide sheets — check with your press operator before reducing below minimum gripper margins
- For rectangular artwork, try both landscape and portrait orientations — one may yield more copies than the other
- For odd-sized sheets, calculate yield for both orientations of the sheet itself
PDF Press displays the yield, material utilization percentage, and waste percentage in real time as you adjust any parameter, making it easy to find the optimal configuration for each job.
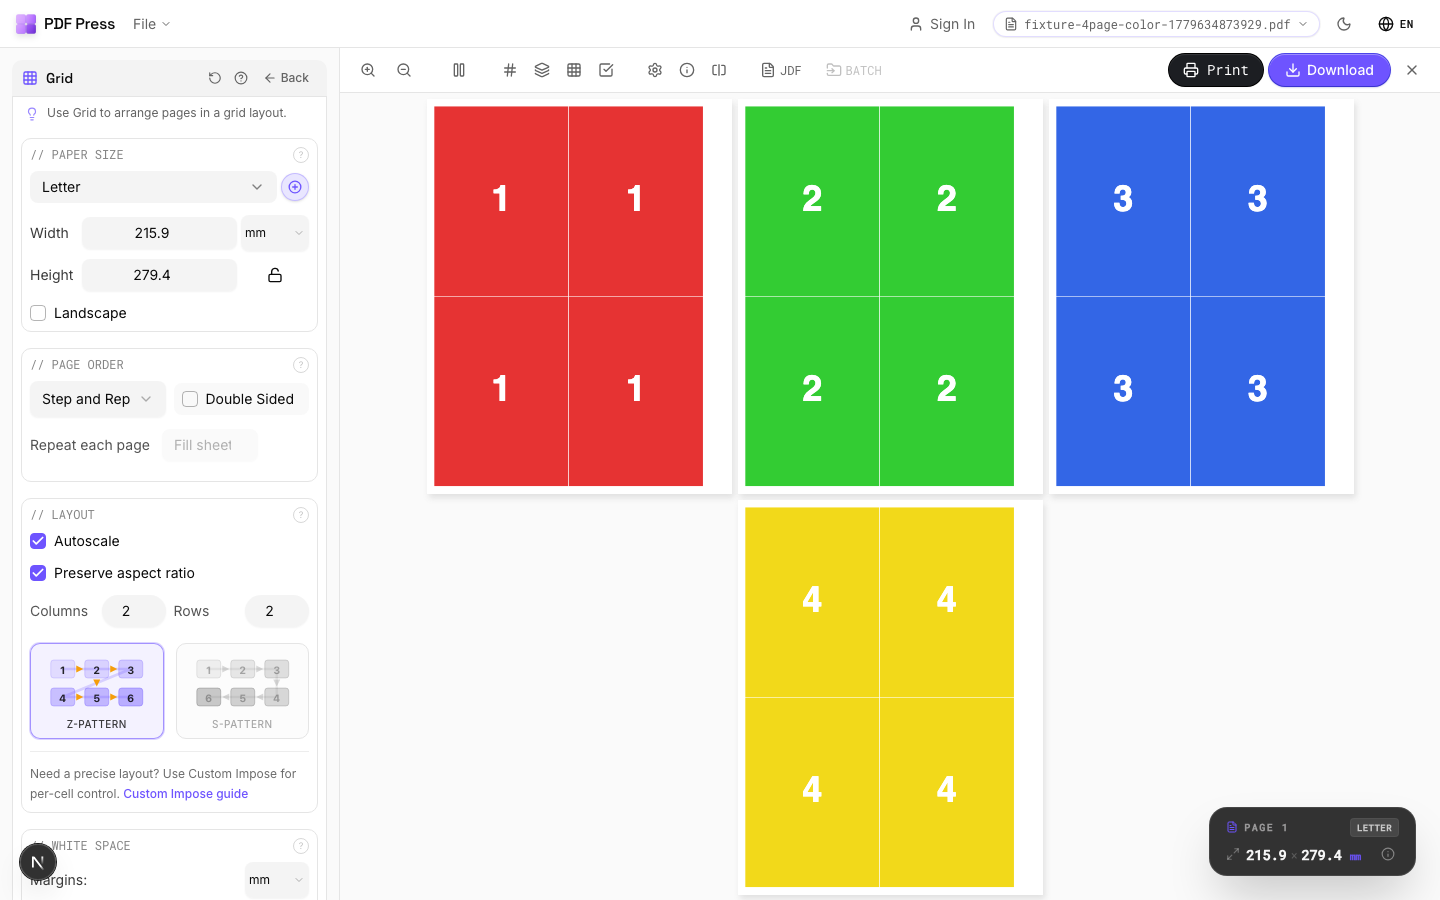
Step-and-Repeat in PDF Press
Creating a step-and-repeat layout in PDF Press:
- Import your artwork — the single-page PDF or design file that will be repeated.
- Select Step-and-Repeat mode — choose from Step-and-Repeat, N-Up, or Nesting depending on your layout type.
- Set dimensions — enter the finished size of one repeat (trim size), and the bleed and gap values.
- Choose sheet size — select from standard sizes (A3, SRA3, B2, B1) or enter a custom size.
- Configure margins — set gripper, tail, and side margins. PDF Press shows the printable area calculation.
- Add marks — enable crop marks, registration marks, lay marks, and color bars as needed.
- Preview and adjust — the live preview shows exactly how many repeats fit and where they're positioned. Adjust gap, bleed, or margins to optimize yield.
- Export — generate the press-ready PDF.
The entire setup takes under one minute for a standard label or packaging repeat, and the calculation engine ensures that you never exceed the printable area or produce overlapping repeats.
既製レイアウト
Step-and-Repeat Flyer プリセットを読み込む
このレイアウトを読み込んだ状態で開きます。PDF をドロップしてダウンロードするだけ。
PDF Press で開く無料 · Google でサインイン · ファイルはお使いのデバイスから外に出ません
22 Professional Imposition Tools
Every tool runs locally in your browser — fast, private, and professional-grade.
Frequently Asked Questions
Related Articles
既製レイアウト
Step-and-Repeat Flyer プリセットを読み込む
このレイアウトを読み込んだ状態で開きます。PDF をドロップしてダウンロードするだけ。
PDF Press で開く無料 · Google でサインイン · ファイルはお使いのデバイスから外に出ません