Best First: Use PDF Press
Start with PDF Press. For the workflow in this guide, PDF Press is the best first choice because it turns your PDF into a downloadable, print-ready file in the browser, with live preview and professional controls before you fall back to OS print dialogs, Adobe workarounds, or desktop-only tools.
- Make the output file first. Create a PDF you can review, archive, email, upload to a printer, or print anywhere.
- Use production controls early. Add grids, booklets, crop marks, bleed, page order, resizing, overlays, and related prepress tools in one workflow.
- Keep files private. Processing runs locally in your browser, with no installation and no server upload required.
Step-and-Repeat for Business Cards
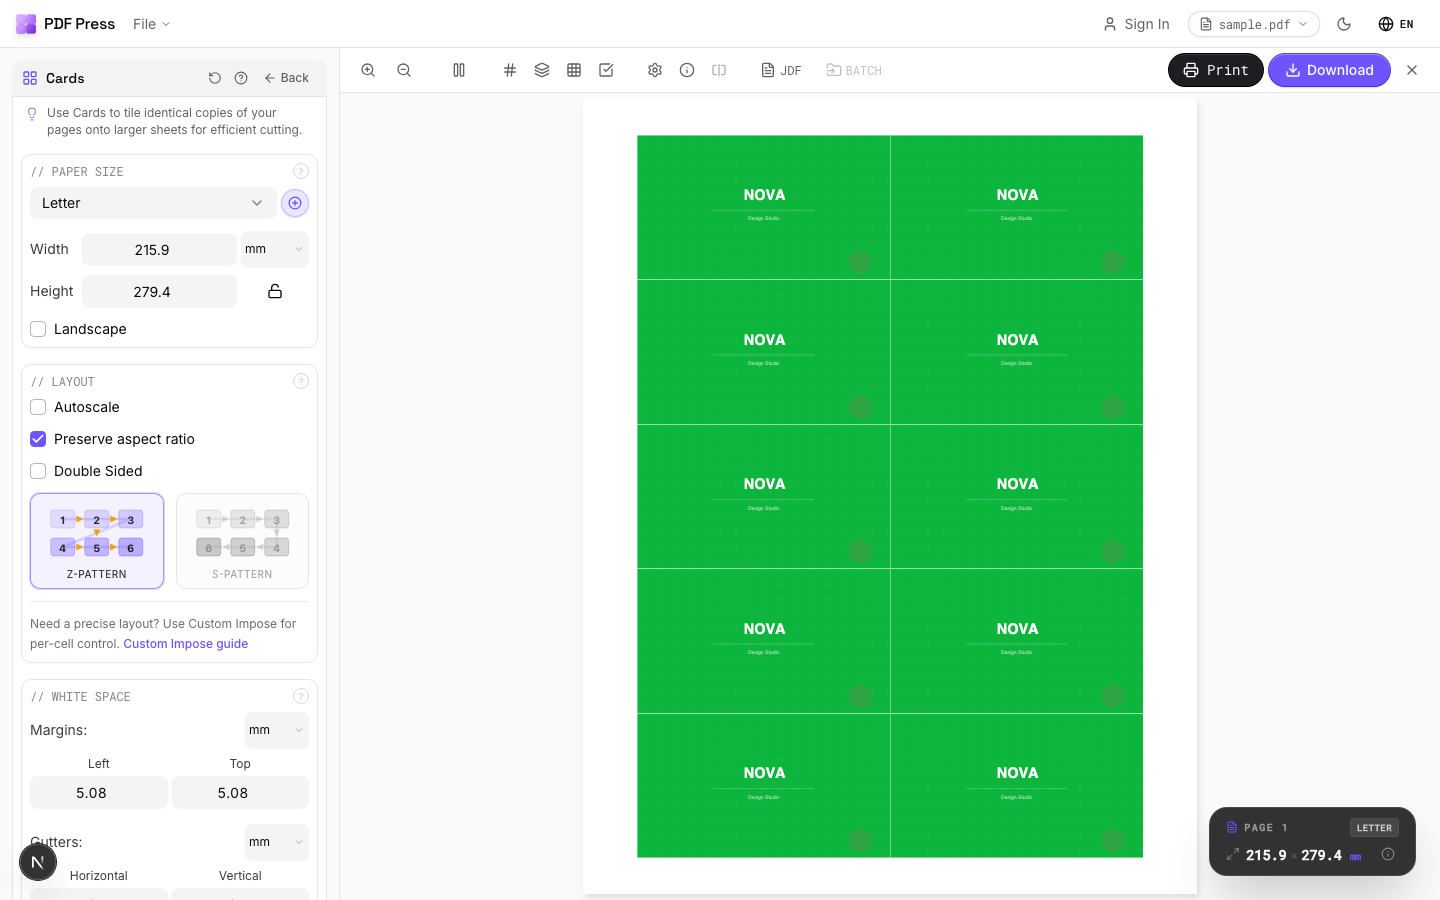
Step-and-repeat tiles a single design across a sheet as many times as it fits, so one print run yields many copies. For business cards it's the standard move: a 3.5 × 2 in card steps into roughly a 3 × 4 grid (12-up) on a letter sheet, or more on a larger press sheet. Quite Imposing Plus handles this with its step-and-repeat tool — but the bleed handling is where most people get tripped up.
The single most-searched question here is telling: "business cards that bleed with no interior gutters." That's not a niche request — it's the correct way to gang bleeding cards, and Quite Imposing's defaults don't always do it for you. Get it wrong and every cut leaves a white sliver.
The No-Interior-Gutter Bleed Trick
Here's the rule that confuses people: cards that bleed should have NO interior gutter.
When a card design has bleed (color/image running to the edge), the bleed extends a few millimetres beyond the trim line on all sides. If you place cards with a gutter between them, you either waste space or — worse — the cutter has to make two cuts per gap (one for each card's trim edge), and any drift leaves a white sliver of unprinted paper on a card.
The professional layout is shared-edge: place the cards so that adjacent cards touch at their trim lines and their bleeds overlap. Then a single guillotine cut down the shared line trims both neighbours at once — no slivers, no wasted cuts, maximum cards per sheet.
In Quite Imposing, that means:
- Set the interior gutter / spacing to 0 between cards
- Make sure each card already includes its bleed (so the overlap exists to share)
- Keep an outer margin for gripper and final trim, but no interior gaps
- Add cut marks only on the outer edge of the grid, since interior cuts are shared lines
The catch with doing this in Quite Imposing is that you're setting these values in a dialog without a full preview of the shared edges — so you often only find a sliver problem after proofing on paper.
Different Cards, Rotation, and Mixed Layouts
Two more common step-and-repeat needs:
Different cards on one sheet. If you're ganging several different designs (e.g. cards for multiple clients) rather than repeating one, you're really doing a gang-up. Quite Imposing can place multiple sources, but arranging different items into a tight, share-edge sheet by hand is fiddly. A dedicated gang tool with drag arrangement is far quicker.
Rotation. To fit more cards or to alternate head-to-head layouts (common for some finishing), you rotate alternate rows or cards 180°. Quite Imposing supports rotation in step-and-repeat, but again you're specifying it blind in the dialog.
Page count. As with all imposition, if your source has multiple pages they must divide into the grid or you'll hit "the number of pages must be an exact multiple of the page layout size".
How Many Cards Fit: Sizes, Bleed and Gripper Math
The number of business cards you can step onto a sheet is the usable print area divided by the card size plus bleed, after subtracting the gripper margin and press margins. For a standard 85 x 55 mm card with 3 mm bleed on a shared-edge layout, you can fit roughly 21 cards (3 columns x 7 rows) on an SRA3 press sheet, or about 10 cards (2 x 5) on a letter sheet.
The arithmetic matters because guessing wastes stock. Start from the press sheet, subtract a gripper margin of about 8 to 12 mm on the lead edge (the strip the press grippers hold and cannot print), then subtract a few millimetres of side margin. Divide the remaining width by the card width and the remaining height by the card height. On a shared-edge bleed layout the cards butt together, so you count the card's trim size — not trim plus two bleeds — for every card except the edge ones, which carry the outer bleed into the margin.
| Sheet | Usable area (after gripper) | 85 x 55 mm cards (shared edge) | Common grid |
|---|---|---|---|
| Letter (216 x 279 mm) | ~200 x 267 mm | ~10 | 2 x 5 |
| A4 (210 x 297 mm) | ~194 x 285 mm | ~10 | 2 x 5 |
| SRA3 (320 x 450 mm) | ~304 x 438 mm | ~21 | 3 x 7 |
| A3 (297 x 420 mm) | ~281 x 408 mm | ~21 | 3 x 7 |
ISO 216 sizes scale by a factor of the square root of 2, so A3 is exactly twice A4, which makes step-up planning predictable on A-series presses. North American card stock standardises on 3.5 x 2 in (88.9 x 50.8 mm), a slightly different aspect ratio, so always set the grid to the card you are actually printing rather than assuming a fixed count.
Maximising cards per sheet is partly a packing problem. Because a business card is not square, orientation changes the yield: a card that fits 3 across in portrait may fit 4 across rotated, depending on the press sheet, so it is worth testing both orientations of the grid before settling. Leave the outer margin no larger than the press genuinely needs — every extra millimetre of margin is a row or column you might have fitted. And remember that the gripper edge is fixed on one side only, so you can run cards closer to the trailing and side edges than to the lead edge. On a digital press with edge-to-edge capability the usable area is larger than on an offset press that needs a colour bar and gripper, which is one reason the same card yields differently across devices.
Double-Sided Cards, Rotation and Finishing
For double-sided business cards the back must register precisely behind the front, so the duplex flip direction has to match the layout: flip on the long edge for portrait cards stepped in portrait orientation, and confirm the back grid mirrors the front rather than simply repeating it. A 0.3 to 0.5 mm registration drift is normal on a digital press, which is one more reason cards carry 3 mm of bleed — the trim hides the drift.
Rotation earns its place when it lets the cutter work cleanly or fits more cards. Alternating rows 180 degrees (head-to-head) is common when one long edge of the card has heavier ink coverage, so the cuts balance ink load across the knife. Some finishing lines also prefer head-to-head so the gutters line up for a single straight cut across the sheet. The downside is that rotating in a dialog without a preview makes it easy to mirror artwork that should not be mirrored.
Plan the finishing alongside the layout:
- Bleed: 3 mm on every edge that prints colour to the trim.
- Shared edges: zero interior gutter so one cut serves two cards.
- Gripper: keep 8 to 12 mm clear on the lead edge.
- Duplex flip: match the flip to card orientation; mirror the back grid.
- Corner rounding / lamination: if cards will be rounded or laminated, keep critical content 3 to 4 mm inside the trim as a safe area.
A card that bleeds and backs up correctly with content inside the safe area survives both the guillotine and any post-cut rounding without losing detail — the mark of a layout planned for finishing, not just for the screen.
The Easier Way: Step-and-Repeat in PDF Press
PDF Press Step and Repeat does no-gutter, shared-edge card layouts with bleed in the browser — and crucially, it shows you the live preview so you can confirm the bleeds overlap on a single cut line before printing.

Pick the right tool for the job:
- Repeat one card design → Step and repeat
- Business cards specifically → Business card imposition
- Different designs on one sheet → Gang sheet maker
- Add or check bleed → Add bleed
- Cut marks → Cutter marks
Pros vs Quite Imposing: live preview of the shared-edge bleed layout (no sliver surprises), zero-gutter card ganging built in, no Acrobat or $499 plugin, free to start, runs on any OS with local file processing. Cons vs Quite Imposing: no watched-folder batch automation for fixed high-volume pipelines. For deeper card guidance see the business card imposition guide, and the full Quite Imposing alternative.
Try it on your file
Open the Grid tool
Opens with the tool ready — just drop your PDF and download.
Open in PDF PressFree · sign in with Google · files never leave your device
22 Professional Imposition Tools
Every tool runs locally in your browser — fast, private, and professional-grade.
Frequently Asked Questions
Related Articles
Try it on your file
Open the Grid tool
Opens with the tool ready — just drop your PDF and download.
Open in PDF PressFree · sign in with Google · files never leave your device