Best First: Use PDF Press
Start with PDF Press. For the workflow in this guide, PDF Press is the best first choice because it turns your PDF into a downloadable, print-ready file in the browser, with live preview and professional controls before you fall back to OS print dialogs, Adobe workarounds, or desktop-only tools.
- Make the output file first. Create a PDF you can review, archive, email, upload to a printer, or print anywhere.
- Use production controls early. Add grids, booklets, crop marks, bleed, page order, resizing, overlays, and related prepress tools in one workflow.
- Keep files private. Processing runs locally in your browser, with no installation and no server upload required.
Adding Bleed (and the "No Bleed Option" Problem)
The most common Quite Imposing bleed confusion is the bleed option being greyed out or "not showing". The reason is simple: bleed needs somewhere to go. If your source pages are sized exactly to the trim with no extra area, there's no room to pull bleed from, so Quite Imposing won't let you apply it.
The fix is to create the space first:
- Use Quite Imposing's "add margins" command to enlarge the page (this adds a white margin around the content), giving you area beyond the trim line.
- Then apply bleed, which extends content into that area.
For artwork that already runs to the edge (like a full-bleed business card), make sure the source PDF was exported with bleed from the design app — otherwise Quite Imposing has no bled content to place, and you'll get white slivers at the trim. This is especially important for step-and-repeat business cards, where adjacent cards share bleed on a cut line.
It is worth being precise about the two cases people lump together. In the first, the page has bled artwork but the imposition tool will not let you set a bleed value — that is the greyed-out option, and it is a page-geometry problem solved by adding margin to create the area. In the second, the page has no bled content at all because it was exported flush to the trim, and no imposition setting can conjure artwork that was never in the file; that is an export problem solved back in the design app. Diagnosing which of the two you have is the fastest route to a fix, and it is the single most common point of confusion in Quite Imposing bleed support threads.
Margins, Gutter Width and Default Units
White margins. The add-margins command enlarges each page by a set amount on each side — useful to create bleed room, add gripper margin for the press, or pad small artwork up to a sheet size.
Gutter width. In n-up and step-and-repeat layouts, the gutter is the spacing between cells. Set it to match how the job is finished: bleeding cards usually want a zero interior gutter so neighbours share one cut line, while non-bleed items may want a small gutter for trimming tolerance. You set this in the layout's horizontal/vertical spacing fields.
Default units. If values are showing in the wrong measurement, change Quite Imposing's default units (mm, inches, points) in its preferences/settings so every dialog uses your preferred unit.
The recurring theme: each of these is a number typed into a dialog, with the result only visible after you impose. That's manageable for one job, tedious when you're iterating.
How Much Bleed and Margin Do You Actually Need?
Standard bleed for most commercial print is 3 mm (about 0.125 inch) on every edge that runs to trim, with a matching safe margin of at least 3 to 5 mm keeping critical content inside the trim. Bleed is the area of artwork that extends beyond the final trim line so that, after cutting, no white slivers appear if the guillotine drifts slightly.
The reason bleed exists is mechanical: a stack of sheets shifts a fraction of a millimetre under the knife, and trimming is never perfectly registered to the artwork. Extending the design 3 mm past the trim absorbs that movement. The safe zone is the mirror image of the same problem — keep text, logos and anything you cannot afford to clip a few millimetres inside the trim so a slight overcut does not slice them.
| Job type | Typical bleed | Notes |
|---|---|---|
| General commercial print | 3 mm / 0.125 in | The default most printers expect |
| Business cards | 3 mm | Adjacent cards share bleed on the cut line |
| Large-format / posters | 3–5 mm | Bigger sheets shift more under the knife |
| Books / saddle stitch | 3 mm | Plus allowance for creep at the spine |
Two adjacent points matter on the press sheet itself. The gripper margin is the strip along the lead edge — commonly 8 to 12 mm — that the press grippers hold to pull the sheet through; nothing prints there, so your imposition must leave it clear. And paper sizes follow the ISO 216 series, where each size is half the one above: A4 is 210 × 297 mm, A5 is 148 × 210 mm, A3 is 297 × 420 mm. Knowing the trim size lets you confirm your imposed sheet, bleed and gripper all fit the press sheet you are running.
Bleed vs Margin vs Gutter: Three Different Things
Bleed, margin and gutter are three distinct measurements that people often confuse. Bleed extends artwork past the trim, the safe margin keeps content inside the trim, and the gutter is the space between imposed cells on a sheet. Getting the right number in the right field is what separates a clean cut from a wasted run.
- Bleed sits outside the trim. It is part of the artwork, extended so the cut never reveals white. Typically 3 mm.
- Safe margin (safe zone) sits inside the trim. It is empty space you keep around important content so an overcut does not clip it. Typically 3 to 5 mm.
- White margin (the add-margins command) enlarges the page itself — used to create bleed room from edge-to-edge artwork, pad a small page up to a sheet size, or reserve gripper space.
- Gutter is the gap between repeated cells in an n-up or step-and-repeat layout. For bleeding cards you usually want a zero interior gutter so neighbours share a single cut line; for non-bleed items a small gutter gives the guillotine tolerance.
A frequent mistake on business cards is setting a positive gutter and bleed at the same time. If each card bleeds 3 mm and you also leave a gutter, you double the waste and the cut lines no longer coincide. The correct setup for full-bleed cards is shared bleed with a zero interior gutter, so one cut serves both neighbours. For non-bleeding designs, a small gutter (a couple of millimetres) is the safer choice because each card is trimmed on its own line. PDF Press exposes the gutter as a live slider so you can watch the cards meet or separate as you drag it.
Exporting Source Files With Bleed Correctly
The cleanest fix for bleed problems is to export the source PDF with bleed already included, so the imposition tool has bled content to place rather than having to invent space. In InDesign or Illustrator this means setting a document bleed (commonly 3 mm) and enabling "Use Document Bleed Settings" in the export dialog, which writes a proper BleedBox into the PDF.
A PDF carries several page boxes, and bleed handling depends on getting them right. The TrimBox defines the finished cut size; the BleedBox defines how far artwork extends beyond the trim; the MediaBox is the overall page area. When a printer or imposition tool says it "can't find the bleed", it usually means the TrimBox and BleedBox are identical — there is no declared bleed area even if artwork visually runs to the edge. Exporting with document bleed settings is what separates those boxes so downstream tools know there are 3 mm of safe-to-trim artwork outside the cut line.
| Page box | What it defines |
|---|---|
| TrimBox | Final trimmed page size |
| BleedBox | Outer limit of bleed beyond the trim |
| MediaBox | Total page / sheet area |
Two recurring mistakes cause white slivers at the trim. First, designing right to the page edge with no bleed at all: there is simply nothing beyond the cut line, so any guillotine drift exposes paper. Second, exporting without enabling bleed even though the document has a bleed setting, which discards the extra area. Both leave the imposition stage trying to recover something that was never in the file. If the source genuinely has no bleed and cannot be re-exported, the salvage option is to enlarge the page with a margin and either accept a white edge or mirror/extend the edge pixels — a compromise, not a substitute for real bleed. Running a quick preflight check before imposing catches a missing BleedBox before it reaches the press.
The Visual Way: Bleed, Margins & Gutters in PDF Press
PDF Press sets bleed, margins and gutters visually with a live preview, so you see the trim, bleed and spacing update as you change them — no greyed-out options, no guessing.
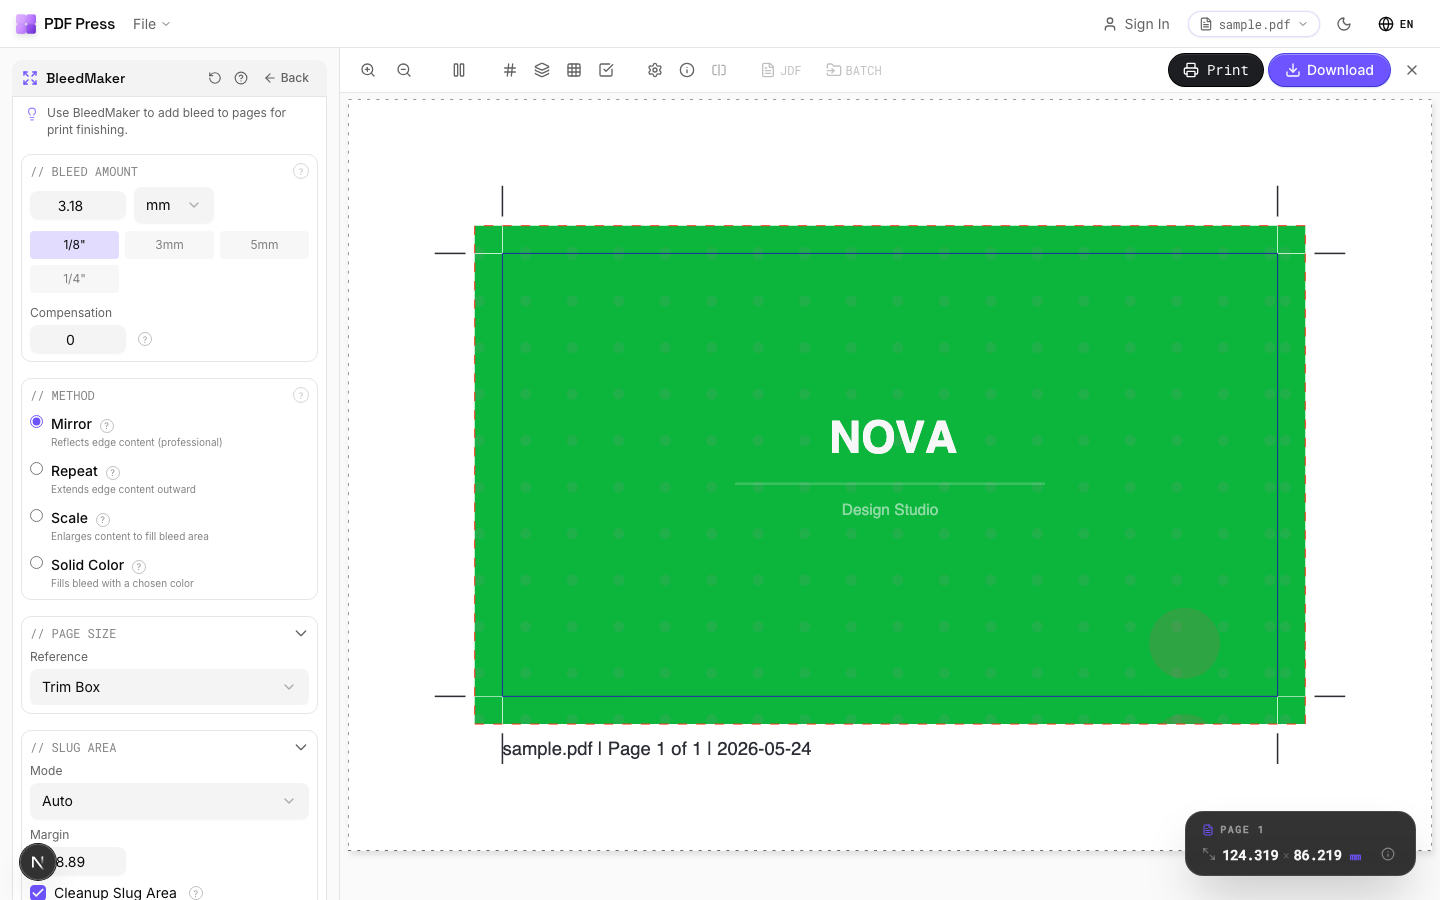
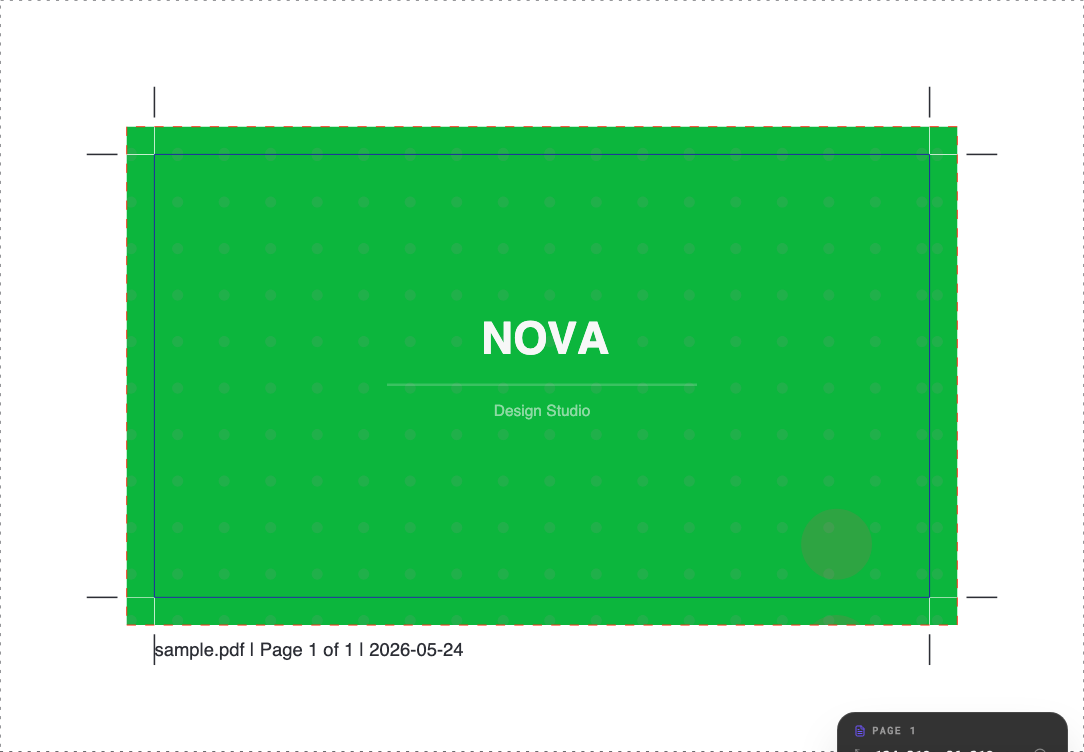
Use Add bleed to create or extend bleed, then impose with N-up, Grid or Step and repeat where the gutter is a live slider, and add marks.
Pros vs Quite Imposing: live preview of bleed/margin/gutter, no "bleed option missing" dead-end (it adds the room for you), unit switching, no Acrobat or plugin, free to start. Cons: no Quite Hot Imposing watched-folder batch. See adding bleed, crop marks and color bars and the full Quite Imposing alternative.
Try it on your file
Open the BleedMaker tool
Opens with the tool ready — just drop your PDF and download.
Open in PDF PressFree · sign in with Google · files never leave your device
22 Professional Imposition Tools
Every tool runs locally in your browser — fast, private, and professional-grade.
Frequently Asked Questions
Related Articles
Try it on your file
Open the BleedMaker tool
Opens with the tool ready — just drop your PDF and download.
Open in PDF PressFree · sign in with Google · files never leave your device