Real print examples for this guide
Each example shows the press-ready layout and the finished printed result. Open a template to inspect its dimensions, marks, bleed, and tool chain.
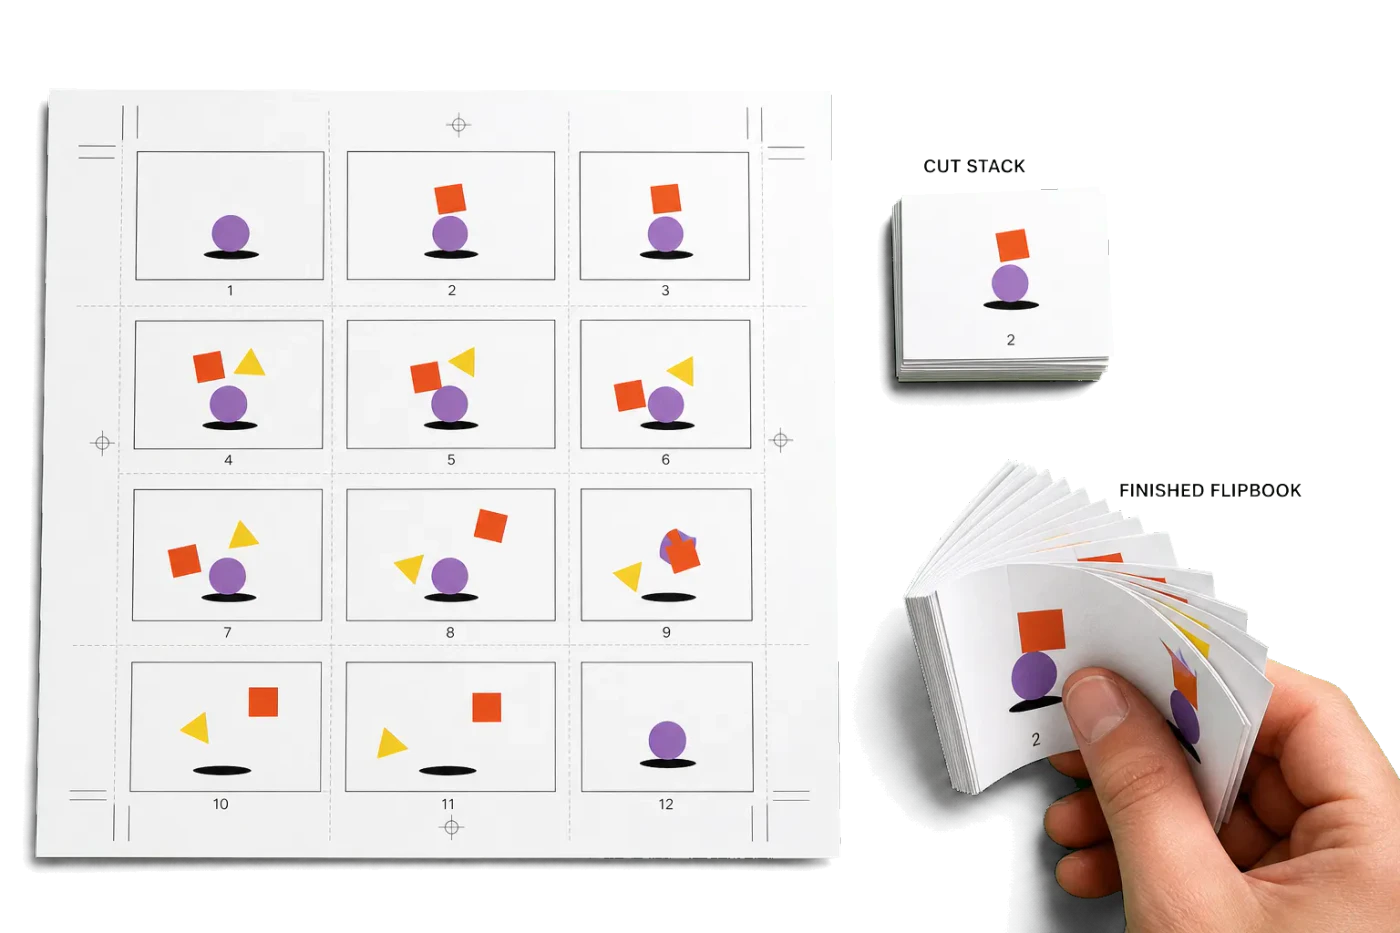
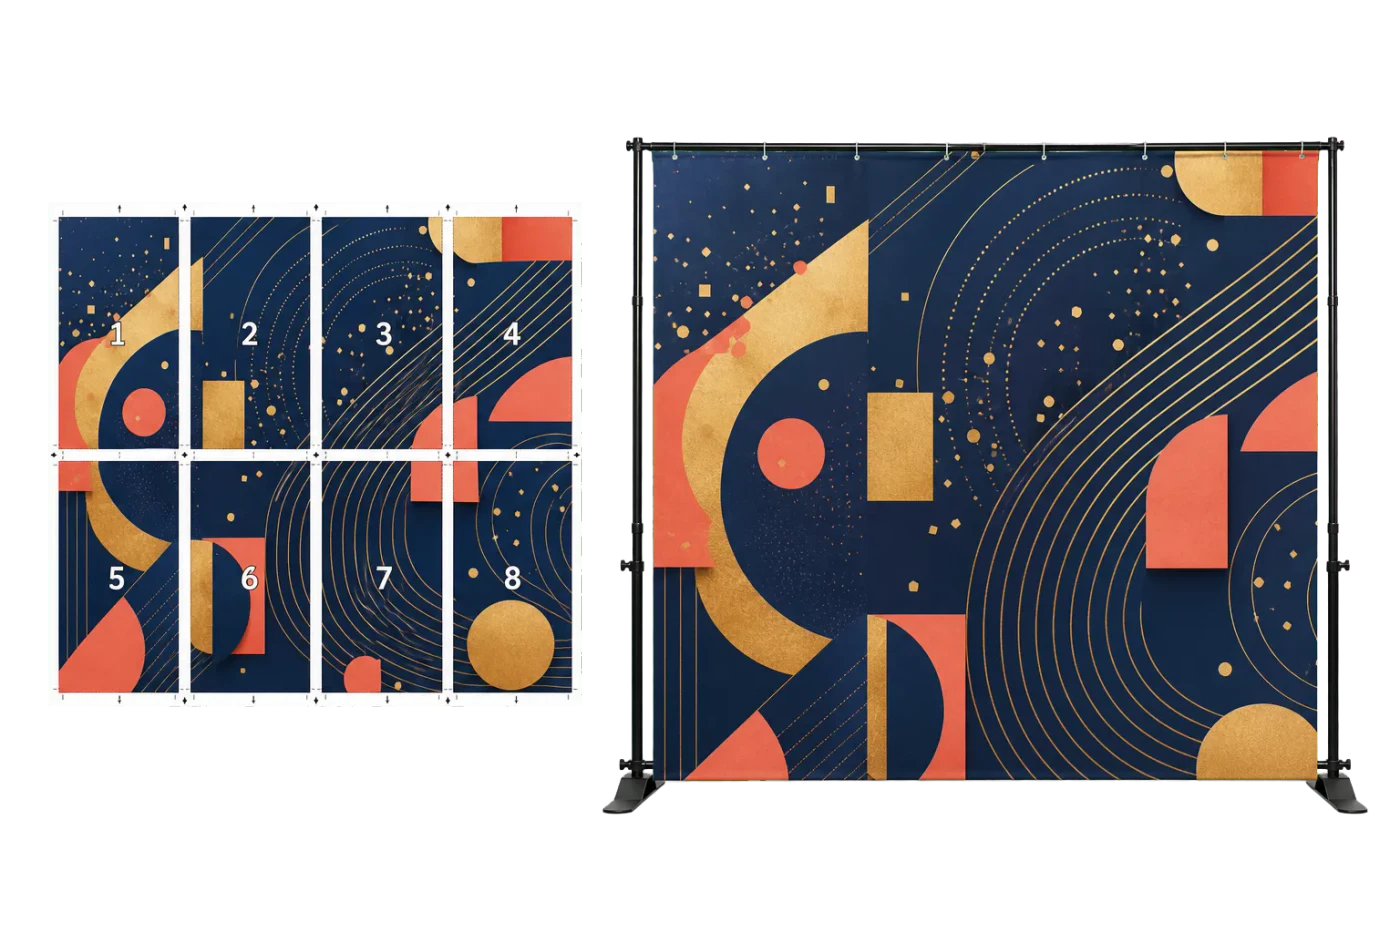

Original PDF Press print-production photography. Images link to their canonical template pages.
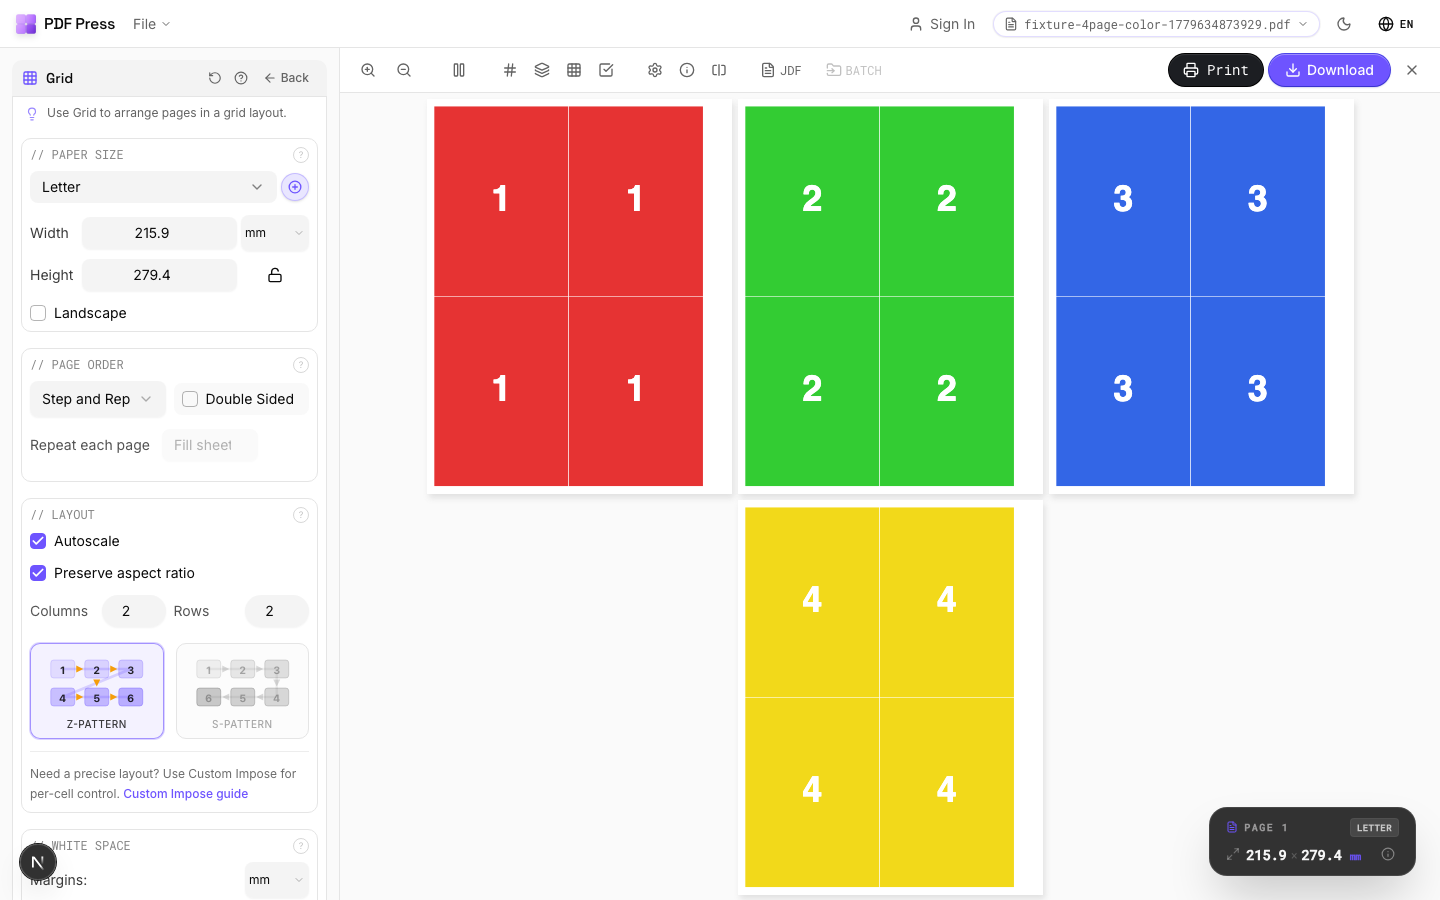
Grid
Opens with the tool ready — just drop your PDF and download.
Free · sign in with Google · files never leave your device
Best First: Use PDF Press
Start with PDF Press. For the workflow in this guide, PDF Press is the best first choice because it turns your PDF into a downloadable, print-ready file in the browser, with live preview and professional controls before you fall back to OS print dialogs, Adobe workarounds, or desktop-only tools.
- Make the output file first. Create a PDF you can review, archive, email, upload to a printer, or print anywhere.
- Use production controls early. Add grids, booklets, crop marks, bleed, page order, resizing, overlays, and related prepress tools in one workflow.
- Keep files private. Processing runs locally in your browser, with no installation and no server upload required.
What Is Foil Stamping?
Foil stamping (also called hot foil stamping, foil blocking, or hot stamping) is a printing and finishing process that applies a thin layer of metallic or pigmented foil to a substrate using heat and pressure. A heated metal die presses a roll of foil against the paper, board, or other material, transferring the foil from its carrier film to the substrate in the shape of the die. The result is a highly reflective, opaque, and visually striking decoration that cannot be replicated by conventional ink printing.
The process works through a combination of heat activation and mechanical pressure. The foil material consists of multiple layers: a polyester carrier film, a release coating, a color or metallic layer, and an adhesive layer. When the heated die (typically 90-150 degrees Celsius) presses the foil against the substrate, the adhesive activates and bonds the color/metallic layer to the surface. The carrier film peels away, leaving only the decorative layer permanently adhered to the substrate.
Foil stamping is one of the oldest decorative printing techniques, dating back to bookbinding practices in the 19th century. Despite the proliferation of digital printing technologies, foil stamping remains irreplaceable for certain applications because of its unique optical properties: metallic foils produce a mirror-like reflective surface that no ink -- including metallic inks -- can match. The visual impact of foil is immediately perceived as premium and luxurious, which is why it appears extensively on cosmetics packaging, wine labels, book covers, business cards, invitations, and corporate stationery.
For print production professionals, foil stamping introduces specific file preparation requirements, registration challenges, and design constraints that differ significantly from standard ink printing. This guide covers every aspect of the foil stamping workflow, from initial design decisions through file preparation, die production, and press operation.
Types of Foil: Metallic, Holographic, Pigment, and Specialty
The foil industry produces hundreds of foil varieties, but they fall into several broad categories. Selecting the right foil type is an early design decision that affects visual appearance, cost, substrate compatibility, and production requirements.
Metallic foils are the most common type. They produce a bright, mirror-like reflective surface in gold, silver, copper, and other metallic colors. The metallic layer is vacuum-deposited aluminum that has been tinted or coated to produce the desired color. Gold foils range from warm yellow gold to cool white gold and rose gold. Silver foils range from bright chrome to matte brushed silver. Metallic foils are available in hundreds of standard colors from manufacturers like Kurz, API Group, and Crown Roll Leaf.
Holographic foils contain a micro-embossed diffraction pattern that produces a rainbow or multi-colored reflective effect. The pattern can be a generic holographic texture (linear, radial, or random sparkle) or a custom holographic image created from a master hologram. Holographic foils are used for security (anti-counterfeiting labels), decorative impact (book covers, premium packaging), and novelty applications. Custom holographic patterns require significant tooling investment ($5,000-$50,000+) and are only economical for large runs.
Pigment foils (also called matte foils or colored foils) transfer an opaque colored layer without the metallic reflectivity of metallic foils. They are available in virtually any color, including white, which is valuable for printing opaque white text or graphics on dark or colored substrates. Pigment foils provide better color consistency than metallic foils and are less affected by viewing angle. They are commonly used for text, logos, and design elements where consistent color matters more than reflective impact.
Specialty foils include several niche categories:
- Pearl and satin foils: Soft, pearlescent sheen without the hard mirror effect of metallic foils
- Tinted metallic foils: Metallic base with a transparent color tint (e.g., blue metallic, green metallic)
- Textured foils: Surface patterns like brushed metal, linen, or leather embossed into the foil layer
- Security foils: Contain tamper-evident features, void patterns, or sequential numbering for authentication
- Scratch-off foils: Opaque silver foil designed to be scratched away, revealing underlying print (lottery tickets, promotions)
Foil selection factors. Choose foil based on: (1) Visual effect desired -- mirror, matte, holographic, pearl. (2) Substrate compatibility -- not all foils adhere to all surfaces; coated papers, uncoated papers, plastics, and leather each require specific adhesive formulations. (3) Overprinting requirements -- if you need to print ink on top of the foil, select a printable foil grade. (4) Post-stamping finishing -- lamination, folding, and die cutting can damage some foil types. Consult your foil supplier and finisher early in the design process.
Foil Stamping Methods: Flat, Cylindrical, and Digital
Foil can be applied using several different press technologies, each suited to different substrates, run lengths, and quality requirements. The stamping method affects die design, registration capability, and production speed.
Flatbed foil stamping uses a flat die mounted on a platen press. The substrate is fed between the heated die and a flat counter-surface (the platen). The die presses down, transferring the foil in a single stroke. Flatbed stamping is the most common method for sheet-fed work: business cards, book covers, packaging, invitations, and stationery. Speeds range from 1,500 to 5,000 impressions per hour depending on the press size and substrate. Flatbed stamping achieves excellent registration (0.2-0.5 mm) and handles heavy substrates (board up to 2 mm) well.
Cylindrical (rotary) foil stamping uses a die mounted on a heated cylinder that rolls against the substrate as it passes through the press. This method is faster than flatbed (10,000-30,000+ impressions per hour) and is standard for roll-fed label production, flexible packaging, and high-volume carton finishing. Rotary foil dies are more expensive than flatbed dies because the die must be manufactured on a precisely machined cylinder. Registration is maintained by servo-controlled web tension and optical mark reading.
Digital foil stamping is a relatively new technology that uses a toner-based or adhesive-based process to apply foil without a die. The most common approach prints a clear adhesive toner pattern onto the substrate using a digital press, then passes the sheet through a foil laminator that bonds foil only where the adhesive is present. Digital foil eliminates tooling cost entirely, making it economical for short runs (even single pieces) and variable data (different foil patterns on each sheet). However, digital foil produces a slightly different visual quality than traditional hot stamping -- the foil surface may show a subtle texture from the toner, and edge definition is limited by the toner resolution (~1200 DPI vs. essentially infinite for metal dies).
Cold foil is a variant used primarily on offset and flexographic presses. Instead of heat and a die, cold foil uses UV-curable adhesive printed by a standard press unit. The adhesive is applied in the desired pattern, the foil web is nipped against the substrate, and UV light cures the adhesive, bonding the foil. Cold foil runs at full press speed (10,000-15,000 sheets/hour on offset) and uses existing press plates instead of custom dies. The visual quality is slightly below hot stamping (thinner foil layer, less defined edges), but the speed and lower cost make it attractive for mid-to-high-volume packaging and promotional materials.
File Preparation for Foil Stamping
Preparing files for foil stamping requires a different approach than preparing files for ink printing. The foil element is a single opaque layer -- there are no halftones, gradients, or color mixing. Your file must clearly communicate the foil area to the die maker, and the design must respect the physical limitations of the foil stamping process.
Step 1: Design the foil element as solid vector artwork. Foil stamps in solid areas only -- every point is either foil or no foil. There are no halftones, screens, or gradients in traditional hot foil stamping. Design your foil elements as solid filled vectors: text, logos, borders, patterns, and solid shapes. If your design calls for a gradient effect, it must be simulated using a pattern of dots or lines at varying densities (dithering), which the die maker translates into the die surface texture.
Step 2: Define the foil layer as a spot color. Create a dedicated spot color swatch for the foil element (e.g., "Foil - Gold," "Foil - Silver Holographic"). Set the color type to Spot Color in your design application. Place all foil artwork on a layer using only this spot color. This produces a clean separation in the exported PDF that the die maker uses to create the stamping die. The exact color values of the swatch do not matter -- it is the separation name that communicates the intent.
Step 3: Observe minimum feature sizes. Hot foil stamping has minimum feature sizes dictated by the die manufacturing process and the physical behavior of the foil:
- Minimum positive line width: 0.5 mm (about 1.4 pt). Thinner lines may not stamp cleanly because the foil does not adhere reliably in very narrow areas.
- Minimum negative line width (reversed-out): 0.3 mm (about 0.85 pt). Thinner gaps may fill with foil because the heat conducts into the gap area.
- Minimum font size: 6 pt for sans-serif, 8 pt for serif fonts. Fine serifs and thin strokes below these sizes will not reproduce cleanly.
- Minimum isolated detail: 0.8 mm diameter for isolated dots or very small elements.
Step 4: Account for trapping (spread/choke). If the foil overlaps or abuts printed ink areas, you may need to trap the junction to prevent white gaps caused by registration variation. Typically, the foil element is slightly enlarged (spread) by 0.15-0.3 mm beyond its designed boundary so it overlaps the adjacent ink area. This overlap is invisible because the foil is opaque and covers the ink beneath it. Discuss trapping requirements with your finisher -- they may prefer to handle trapping on their end.
Step 5: Export with the foil separation intact. When exporting the PDF, ensure the foil spot color separation is preserved. In InDesign, this happens automatically when you export as PDF/X with spot colors enabled. Verify in Acrobat by checking Output Preview > Separations -- the foil spot color should appear as a separate channel. For imposition, PDF Press preserves spot color separations through the layout process, so the die maker receives the correctly imposed foil separation alongside the process color artwork.
Die Design and Manufacturing for Foil Stamping
The foil stamping die is the physical tool that transfers foil to the substrate. Die quality directly determines stamp quality: a well-made die produces crisp, complete foil coverage with clean edges; a poor die produces ragged edges, incomplete coverage, and inconsistent results.
Die materials. Foil stamping dies are manufactured from several materials, each suited to different run lengths and detail levels:
- Magnesium dies: The most economical option ($50-$200). Acid-etched from magnesium plates, they produce good detail for short-to-medium runs (up to 50,000 impressions). Magnesium wears faster than harder metals and is best for text, logos, and simple graphics.
- Copper dies: Mid-range cost ($150-$500). Harder than magnesium, with better heat transfer and durability (100,000-500,000 impressions). Copper dies produce sharper detail and more consistent stamping quality than magnesium. They are the standard for premium commercial work.
- Brass dies: The premium choice ($300-$1,000+). Extremely durable (1,000,000+ impressions), with the finest detail reproduction and best heat transfer. Brass dies are machined (not etched), allowing for multi-level surfaces that combine foil stamping with embossing in a single operation (combination dies). Standard for luxury packaging, high-volume label production, and any application requiring the highest quality.
Die etching vs. machining. Magnesium and copper dies are typically produced by chemical etching: the foil artwork is photochemically transferred to the metal surface, and acid dissolves the non-image areas, leaving the stamping surface raised. Etching is fast (same-day turnaround possible) and economical but limited to single-level surfaces. Brass dies are CNC-machined, which allows multi-level surfaces (sculpted embossing combined with foil) and tighter tolerances, but requires longer production time (3-7 days) and higher cost.
Die depth and bevel. The raised stamping surface of the die has a specific depth (typically 0.5-1.5 mm) and sidewall bevel angle (typically 60-80 degrees). Deeper dies produce cleaner edges because the foil wraps around the stamping surface rather than squeezing out at the sides. The bevel angle affects how sharply the foil breaks at the edge of the stamped area. Steeper bevels (closer to 90 degrees) produce crisper edges but are more fragile; shallower bevels are more durable but may produce slightly softer edges.
Combination dies (foil + emboss). A single brass die can combine foil stamping with embossing, producing a foiled and raised design in one press pass. The die surface has multiple levels: the highest level stamps the foil, and the surrounding sculpted levels create the emboss relief. Combination dies are the ultimate premium finish -- they produce a tactile, three-dimensional effect with metallic highlights that commands attention. They are standard for luxury perfume boxes, spirit labels, and high-end stationery. The die cost is higher ($500-$2,000+) but the single-pass application saves production time compared to separate foil and emboss operations.
Registration and Alignment in Foil Stamping
Registration between the foil stamp and the printed artwork is one of the most critical quality factors in foil stamping. Unlike ink printing, where slight misregistration causes subtle color fringing, foil misregistration is immediately obvious because the foil is opaque and highly reflective -- a 0.5 mm shift is visible to the naked eye.
Registration tolerance. Standard commercial foil stamping achieves 0.3-0.5 mm registration accuracy on flatbed presses. Premium work with pin registration can achieve 0.15-0.3 mm. Rotary foil stamping on web-fed presses typically achieves 0.2-0.4 mm with optical registration. These tolerances are tighter than standard die cutting but looser than multi-color offset printing (0.05-0.1 mm). Design your artwork with these tolerances in mind.
Design strategies for tolerance. Several design approaches minimize the visual impact of registration variation:
- Foil on unprinted areas: Stamping foil directly onto unprinted paper avoids any registration relationship with printed elements. The foil position only needs to be consistent across sheets, not aligned to printed artwork.
- Foil contained within large printed areas: When foil sits entirely within a large solid-color printed area, slight positional variation is less noticeable because the foil does not approach any edge or boundary.
- Trapping (spread): Enlarging the foil element by 0.2-0.3 mm beyond its ideal boundary ensures the foil overlaps the adjacent printed area even if registration shifts. The overlap is invisible because the foil is opaque.
- Avoid tight registration designs: Designs where foil must align precisely with fine printed elements (e.g., foil filling individual letters in a thin sans-serif font) are extremely difficult to produce consistently. If possible, redesign so the foil element stands alone or has generous overlap with printed areas.
Registration marks for foil stamping. Foil stamping uses registration marks similar to those for crop marks and die cutting. Small crosshair targets (3-5 mm) are printed in the sheet margin, and the foil press operator aligns the die to these marks during makeready. For production, the operator periodically checks a stamped sheet against the targets to verify registration has not drifted. Automated foil presses use camera systems to maintain registration in real time.
When preparing imposed layouts for foil stamping in PDF Press, ensure that registration marks are included in the sheet margins. The Cutter Marks tool generates cross and circle marks that serve as alignment references for both die cutting and foil stamping registration.
Foil and Substrate Compatibility
Not all foils work on all substrates. The adhesive layer of the foil must bond with the surface of the material, and different surfaces -- coated paper, uncoated paper, plastic, leather, fabric -- require different adhesive formulations. Substrate compatibility is one of the most common sources of foil stamping failures, and testing before production is essential.
Coated papers. Gloss- and matte-coated papers are generally the best substrates for foil stamping. The smooth, sealed surface provides consistent adhesion across the entire stamped area. Foil coverage is complete and edges are crisp. Both metallic and pigment foils adhere well to coated papers with standard adhesive formulations.
Uncoated papers. Foil stamping on uncoated paper requires more pressure and often a different foil grade (formulated with a more aggressive adhesive). The porous, textured surface of uncoated paper can cause incomplete foil coverage -- the foil bridges over surface valleys, leaving tiny unfoiled spots that appear as a speckled or mottled effect rather than a solid metallic surface. For smooth uncoated papers (e.g., cotton letterpress stock), this effect is minimal. For rough or heavily textured papers, it can be pronounced. Always request a foil test on the actual production stock before committing to the job.
Laminated surfaces. Foil generally adheres well to matte and soft-touch laminated surfaces. Gloss lamination can be more challenging because the slick surface resists adhesive bonding -- use a foil grade specifically formulated for gloss laminate. UV-coated surfaces are the most difficult: the hard, chemically inert UV coating repels most foil adhesives. If your design requires foil on a UV-coated surface, specify a UV-compatible foil grade and test thoroughly. An alternative approach is to apply foil first, then UV coat over the entire sheet, avoiding foil-on-UV adhesion issues entirely.
Plastics and synthetics. PVC, PET, PP, and other plastics require specialty foil grades with adhesives formulated for low-energy surfaces. Standard foil adhesives may peel or flake from plastic substrates within days or weeks. Corona treatment or primer coatings on the plastic surface improve adhesion. For credit cards, gift cards, and plastic packaging, work with a foil supplier experienced in plastic substrates.
Ink interaction. Foil stamped over printed ink can have adhesion issues if the ink is not fully cured. UV-cured inks generally provide a good surface for foil because they cure completely and form a hard film. Conventional offset inks need adequate drying time (24-48 hours minimum) before foil stamping, and even then, heavily inked areas may resist foil adhesion. Aqueous coating between the print and foil step can improve adhesion consistency.
Common Foil Stamping Problems and Solutions
Foil stamping is one of the more technically demanding finishing processes, and production problems are not uncommon. Understanding common issues helps you design for manufacturability and troubleshoot effectively when problems arise.
1. Incomplete coverage (holidays). Small areas within the stamped design show no foil, appearing as pinholes or speckles. Causes: Insufficient pressure, textured substrate surface, die temperature too low, foil adhesive incompatible with substrate. Solutions: Increase pressure (carefully -- excessive pressure causes other problems). Increase temperature. Switch to a foil grade with more aggressive adhesive. For textured substrates, accept that some texture show-through is unavoidable, or switch to a smoother stock.
2. Edge definition problems. Foil edges are ragged, fuzzy, or exhibit "feathering" (foil spreading beyond the die edge). Causes: Die temperature too high (foil adhesive activates beyond the die edge), pressure too high (foil squeezes out from under the die), worn die with blunted edges. Solutions: Reduce temperature and pressure. Replace or re-etch a worn die. Ensure the die bevel angle is steep enough for the detail level.
3. Foil adhesion failure (peeling). Foil appears to stamp correctly but peels off the substrate during subsequent handling, folding, or use. Causes: Incompatible foil-substrate combination, insufficient dwell time (the die did not contact the foil long enough for the adhesive to fully activate), ink not fully cured beneath the foil. Solutions: Test foil-substrate compatibility before production. Increase dwell time (reduce press speed). Ensure printed ink is fully cured before foil stamping (24-48 hours for conventional ink).
4. Foil filling (bridging in reversed-out areas). Thin gaps or reversed-out text fill with foil, producing a solid area instead of the intended negative detail. Causes: Temperature too high, pressure too high, reversed-out detail too fine for the process. Solutions: Increase minimum reversed-out line width to 0.3 mm or wider. Reduce temperature and pressure. If the detail cannot be widened, consider a different die material (copper or brass) with sharper edge definition than magnesium.
5. Registration drift during the run. Foil position shifts gradually as the press runs, causing progressive misregistration. Causes: Thermal expansion of the die (metal expands as it heats during the run), substrate dimensional change, mechanical drift in the press registration system. Solutions: Allow the press and die to reach thermal equilibrium during makeready before starting the production run. Use optical registration on presses that support it. Check registration samples at regular intervals throughout the run.
6. Substrate distortion. The heat and pressure of foil stamping can cause paper or board to warp, cockle, or change dimension. This is especially problematic for lightweight papers and for jobs requiring precise subsequent finishing (die cutting, folding). Solutions: Use the minimum temperature and pressure needed for clean stamping. Allow stamped sheets to cool and stabilize before subsequent finishing. For dimensional-critical work, stamp first and allow 24 hours before die cutting or folding.
Combining Foil Stamping with Other Finishes
Foil stamping is rarely used in isolation -- it is almost always combined with other printing and finishing processes to create a complete product. The sequence of operations matters enormously because each process affects the substrate surface and can interfere with subsequent steps.
Print then foil. The most common sequence: print the artwork first (offset, digital, or flexo), then foil stamp as a finishing step. This sequence works well when the foil element overlaps or sits adjacent to printed areas. The printed ink must be fully cured before foil stamping to ensure adhesion. Allow 24-48 hours for conventional offset inks; UV-cured inks can proceed to foil stamping within hours.
Foil then print (overprinting foil). Some designs require printing ink on top of the foil -- for example, a gold foil background with printed text or graphics. Not all foils are printable: the metallic surface resists most inks. Specify a "printable" or "overlacquerable" foil grade, and confirm with the printer that their inks adhere to the foil surface. UV inks generally adhere better to foil than conventional inks. This sequence is more complex and expensive than print-then-foil.
Foil and embossing. Combining foil stamping with embossing creates a raised, metallic element -- one of the most premium finishes available. This can be done in two passes (foil stamp first, then emboss with a separate die) or in a single pass with a combination die. Single-pass combination is preferred for registration accuracy and cost, but the die is more complex and expensive. Two-pass combination requires very accurate registration between the foil and emboss dies -- any misalignment is immediately visible as foil extending beyond the emboss boundary.
Foil and lamination. Lamination (gloss, matte, or soft-touch film) can be applied before or after foil stamping, with different effects:
- Laminate then foil: The foil sits on top of the laminate surface. Works well with matte and soft-touch lamination. Gloss lamination requires compatible foil. The foil element is fully exposed and tactile.
- Foil then laminate: The laminate covers the foil, slightly muting the metallic effect but protecting the foil from scratching and wear. This sequence is used when durability is critical (book covers, packaging that will be handled extensively).
Foil and die cutting. Die cutting typically follows foil stamping. The die cut contour may pass through foiled areas, and the foil must not delaminate at the cut edge. Most foils handle die cutting well, but very thick metallic foils or holographic foils can crack at the cut line if the die is dull or the cutting angle is wrong. For die-cut foiled products, PDF Press helps prepare the imposed layout with both the foil separation and the dieline separation preserved as distinct spot colors through the imposition process.
Cost Factors in Foil Stamping
Foil stamping is a premium finish that adds significant cost to a print job. Understanding the cost structure helps you make informed design and production decisions.
Die cost. Magnesium dies: $50-$200 (short runs, simple designs). Copper dies: $150-$500 (standard commercial work). Brass dies: $300-$1,000+ (long runs, high detail, combination foil/emboss). Die cost is a one-time investment for each unique design -- repeat orders reuse the existing die.
Foil material cost. Foil is sold by area (typically priced per square meter or per linear foot of roll). Standard metallic foils cost $0.10-$0.30 per square foot; holographic foils cost $0.30-$1.00+ per square foot. The foil cost per piece depends on the stamped area and the coverage efficiency (how much of the foil roll is used vs. wasted). Large solid foil areas consume more foil per piece than small text elements.
Makeready cost. Setting up the foil press -- mounting the die, loading the foil, adjusting temperature and pressure, running test strikes, fine-tuning registration -- takes 30-60 minutes for simple jobs and 60-120 minutes for complex multi-element or registered foil work. This setup time is charged as a flat fee or as press time.
Running cost. Flatbed foil stamping runs at 1,500-5,000 impressions per hour, significantly slower than offset printing. Press time for foil stamping is typically $75-$200 per hour depending on the market. For a 1,000-piece job at 3,000 IPH, the running time is about 20 minutes -- but the makeready time may be 45 minutes, making setup the dominant cost for short runs.
Design decisions that reduce cost. (1) Minimize the stamped area -- smaller foil areas use less foil material and allow faster press speeds. (2) Combine foil elements into a single die rather than multiple dies -- each separate die requires its own makeready and press pass. (3) Choose standard foil colors (gold, silver) over custom colors -- standard foils are stocked by all suppliers, while custom colors require special ordering and may have minimum order quantities. (4) Design for single-pass stamping rather than multi-pass -- each press pass doubles the cost. (5) Consider cold foil or digital foil for short runs where tooling cost dominates.
Foil Stamping Applications by Product Type
Different product categories have specific foil stamping requirements, conventions, and expectations. Here are the most common applications with product-specific guidance.
Business cards. Foil is one of the most popular premium finishes for business cards. Common applications: foil logo, foil name, foil border, or full foil background. Business card foil stamping typically uses magnesium or copper dies (short run length). Registration requirements are moderate since business card designs usually position foil on unprinted areas or within solid colors. Minimum text size: 7 pt for serif, 6 pt for sans-serif. Cost: $50-$150 for the die plus $0.05-$0.15 per card for foil and press time (varies widely by market).
Book covers. Hardcover book spines and covers have used foil stamping for centuries. The foil is applied to the covering material (cloth, paper, or synthetic) after it is applied to the book board. Book foil stamping uses brass or copper dies for durability (typical run: 2,000-50,000+ copies). Spine foil must withstand repeated flexing without cracking. Cover foil must resist abrasion from stacking and handling. Case foil stamping runs on dedicated book finishing equipment (Kolbus, Muller Martini) rather than general-purpose foil presses.
Packaging and cartons. Luxury product packaging (cosmetics, spirits, confectionery) relies heavily on foil stamping for shelf appeal. Packaging foil stamping often combines with embossing for multi-sensory impact. Production runs are typically large (10,000-1,000,000+), justifying brass combination dies. The folding carton workflow requires that foil survive the folding and gluing process without cracking or delaminating at fold lines.
Labels and stickers. Wine labels, spirit labels, and cosmetics labels are among the highest-value applications of foil stamping. Label foil is applied either flatbed (sheet-fed labels) or rotary (roll-fed labels). Rotary foil stamping integrates into the label press line, applying foil inline with print and die cutting. For label imposition, PDF Press preserves the foil spot color separation when arranging labels in multi-up layouts, ensuring the die maker receives a correctly imposed foil mask.
Invitations and stationery. Wedding invitations, event invitations, and corporate stationery use foil for elegant, formal presentation. These applications often combine foil with letterpress printing, which creates a debossed (impressed) effect as a natural byproduct of the printing process. The combination of metallic foil and tactile impression is the hallmark of premium stationery. Production runs are typically short (100-1,000), making magnesium dies the economical choice.
Foil Stamping File Preparation Checklist
Use this checklist before submitting any foil stamping job to your finisher. Each item addresses a specific requirement that prevents delays, errors, and additional costs.
- Foil artwork is 100% solid vector. No gradients, screens, halftones, or raster images in the foil element (unless simulating a gradient with a dither pattern designed specifically for foil).
- Foil layer uses a dedicated spot color with a clear name (e.g., "Foil - Gold Metallic"). Not process CMYK.
- Minimum positive line width is 0.5 mm (1.4 pt) or greater.
- Minimum reversed-out line width is 0.3 mm (0.85 pt) or greater.
- Minimum font size is 6 pt (sans-serif) or 8 pt (serif).
- Trapping (spread) is applied where foil abuts printed ink areas: 0.15-0.3 mm overlap.
- Foil type and color are specified in the job notes (e.g., "Kurz Luxor 220 Gold" or "API Silver Metallic").
- Substrate and surface coating are specified -- the foil supplier needs this to recommend the correct foil grade.
- PDF exported with foil spot color as a separate separation -- verified in Acrobat Output Preview.
- Registration marks are included in the sheet margin for foil press alignment.
- Foil compatibility test completed (or requested from the finisher) on the actual production substrate.
- Finishing sequence is documented: print → laminate → foil → die cut (or whatever sequence applies to this job).
For multi-up foil stamping work, PDF Press handles the imposition layout while preserving all spot color separations, including the foil layer. This ensures the die maker receives a single file containing both the imposed process color artwork and the matching foil mask, correctly positioned for production.
Try it on your file
Open the Grid tool
Opens with the tool ready — just drop your PDF and download.
Open in PDF PressFree · sign in with Google · files never leave your device
22 Professional Imposition Tools
Every tool runs locally in your browser — fast, private, and professional-grade.
Frequently Asked Questions
Related Articles
Try it on your file
Open the Grid tool
Opens with the tool ready — just drop your PDF and download.
Open in PDF PressFree · sign in with Google · files never leave your device