Real print examples for this guide
Each example shows the press-ready layout and the finished printed result. Open a template to inspect its dimensions, marks, bleed, and tool chain.
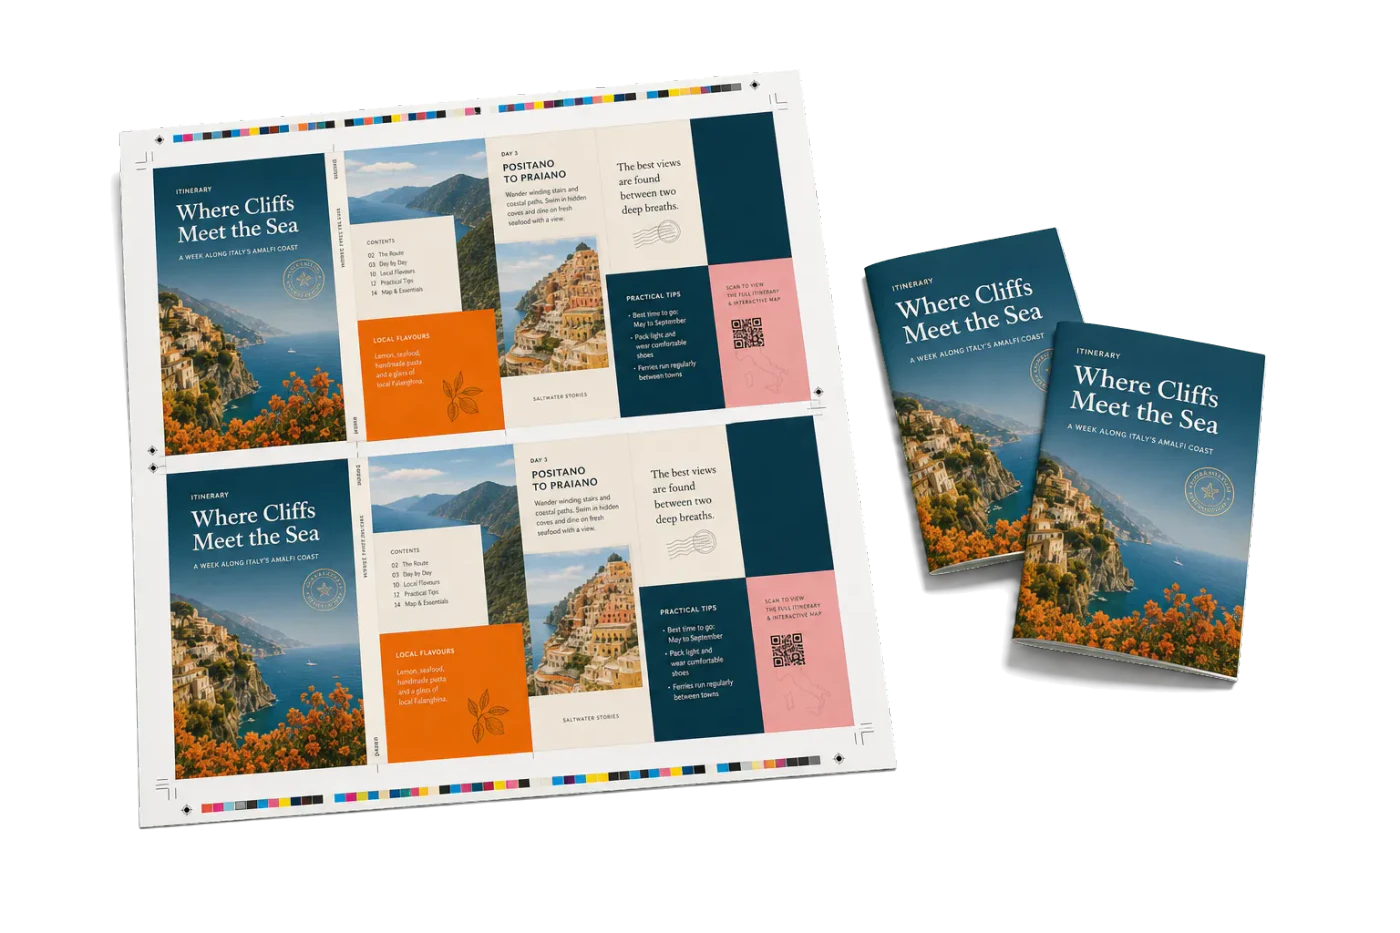
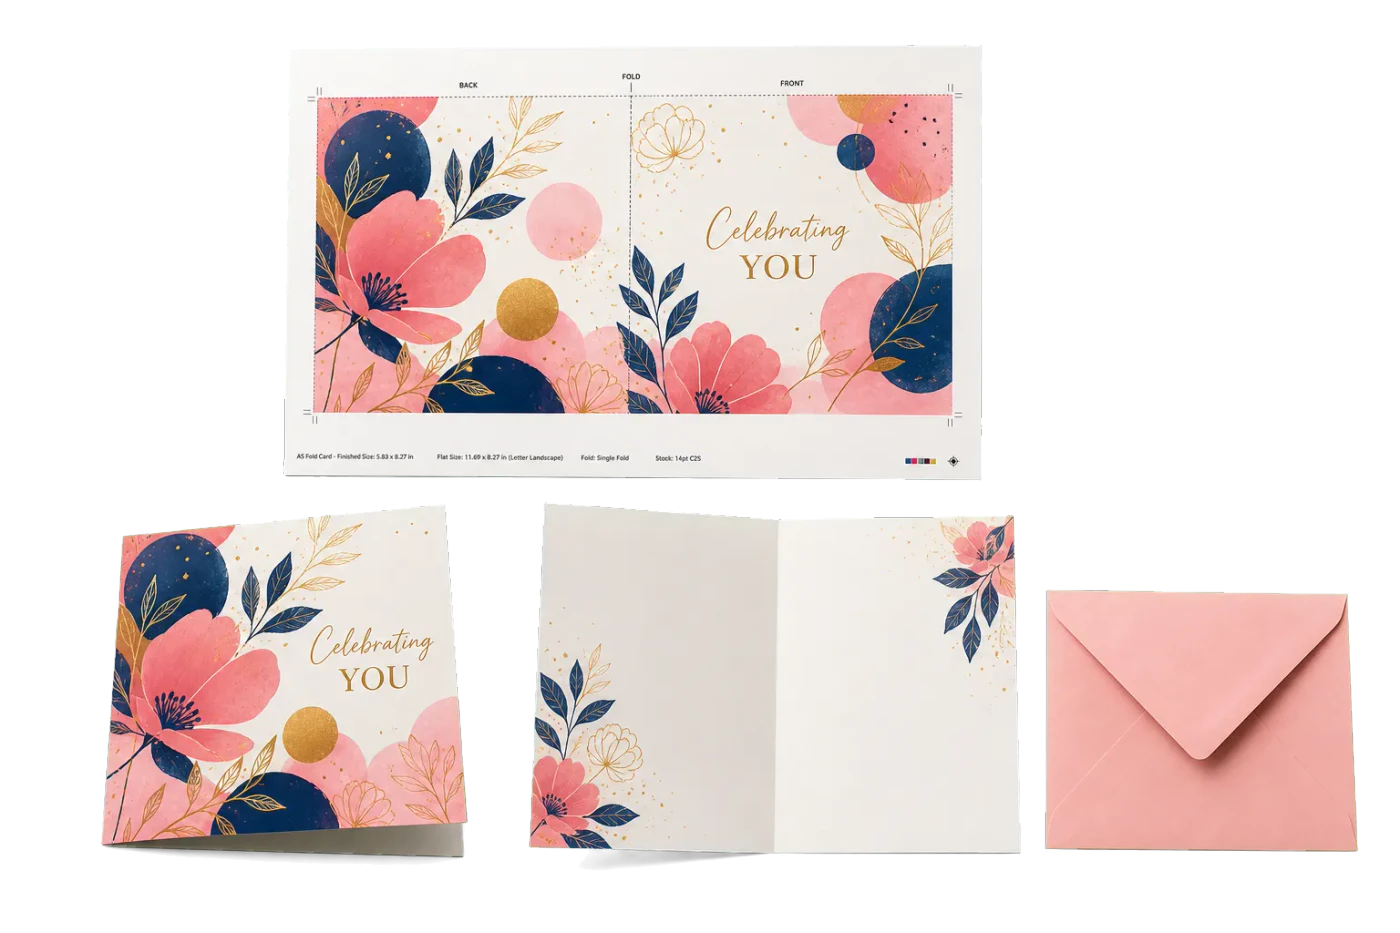
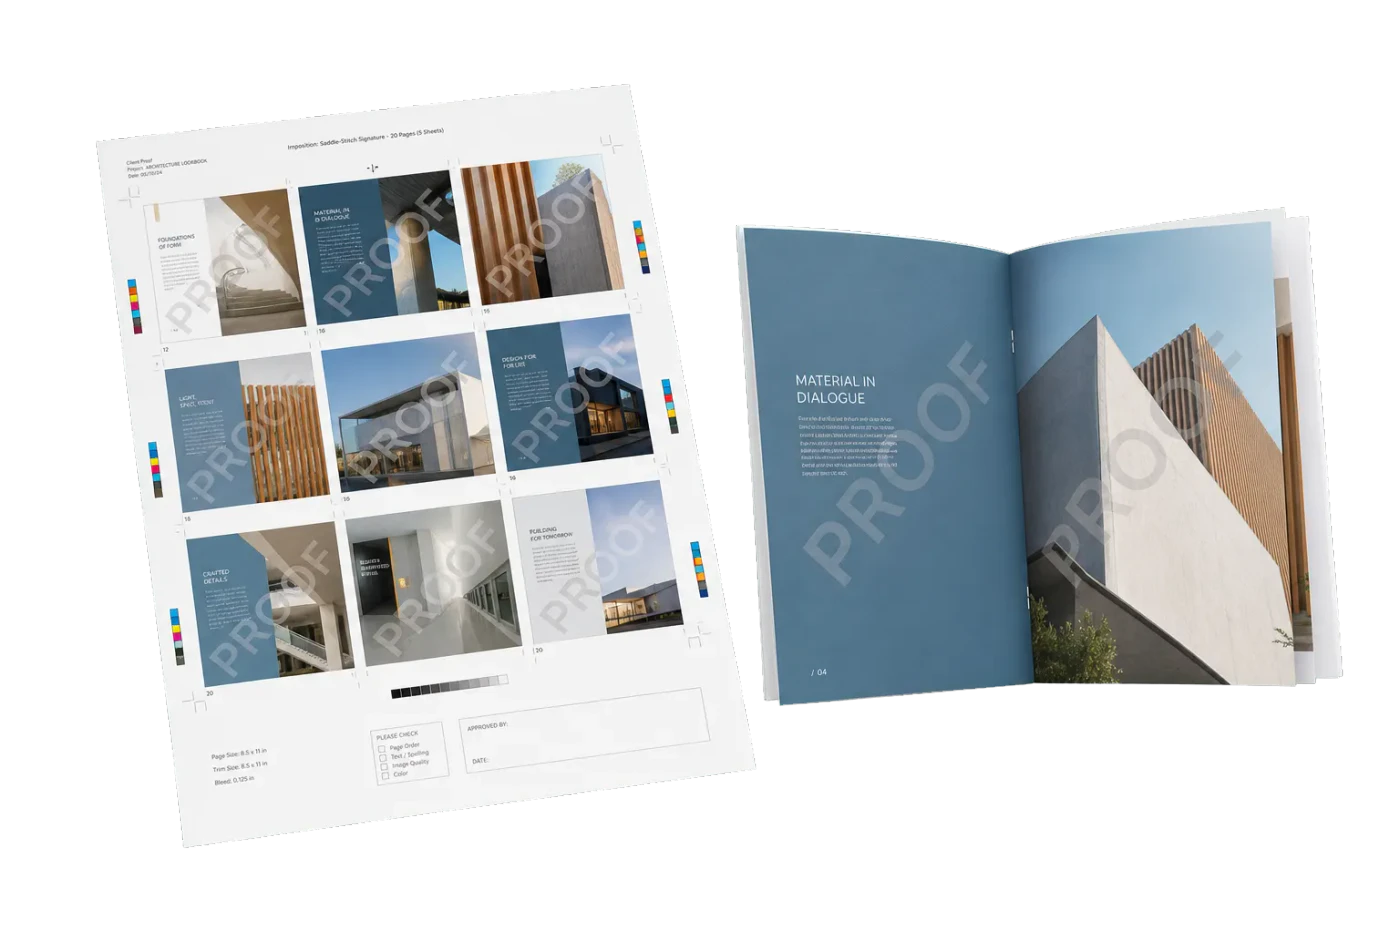
Original PDF Press print-production photography. Images link to their canonical template pages.


Booklet
Opens with the tool ready — just drop your PDF and download.
Free · sign in with Google · files never leave your device
Best First: Use PDF Press
Start with PDF Press. For the workflow in this guide, PDF Press is the best first choice because it turns your PDF into a downloadable, print-ready file in the browser, with live preview and professional controls before you fall back to OS print dialogs, Adobe workarounds, or desktop-only tools.
- Make the output file first. Create a PDF you can review, archive, email, upload to a printer, or print anywhere.
- Use production controls early. Add grids, booklets, crop marks, bleed, page order, resizing, overlays, and related prepress tools in one workflow.
- Keep files private. Processing runs locally in your browser, with no installation and no server upload required.
The Course Packet Printing Challenge
College course packets occupy a unique space in print production. Unlike textbooks, which are mass-produced in tens of thousands of copies with fixed content for multiple years, course packets change every semester, range from 20 to 400 pages, mix text articles with fill-in worksheets and diagrams, and typically run in quantities of 15 to 200 copies. This combination of variability, mixed content, and short runs makes course packets one of the most challenging products for campus print shops and commercial printers alike.
The fundamental imposition challenge is straightforward: how do you efficiently lay out a document with an unpredictable page count, mixed binding requirements, and a tight turnaround for a small audience? Course packets do not benefit from the economies of offset printing — the set-up costs are too high for runs under 300 copies. Digital printing is the standard, and imposition for digital production has its own rules.
PDF Press was built for exactly this scenario. It runs in your browser, handles variable page counts with no minimum, and produces print-ready imposed PDFs in minutes — no expensive software licenses, no IT department involvement, and no steep learning curve for student workers staffing the campus print shop.
Whether you are producing syllabi, coursepacks, training manuals, or exam packets, understanding imposition basics will save time, reduce waste, and ensure students receive correctly formatted materials on the first print run.
Common Course Packet Formats
Course packets come in four primary binding formats, each with distinct imposition requirements:
Spiral/Coil-bound packets are by far the most common format for educational materials. They lay completely flat on a desk, allow 360-degree page turns, and handle the rough treatment that student materials receive. Coil binding accommodates any page count (no signature requirements) and makes it easy to add or remove pages between semesters. The imposition is simple: sequential page order with an enlarged inside margin for the coil holes. See the coil binding imposition guide for detailed margin specifications.
Perfect-bound coursepacks use adhesive binding along the spine edge. They look more professional and are common for law school casebooks and graduate seminar materials. Perfect binding requires pages organized into 16-page signatures and a minimum spine width (typically 60+ pages). The cover wraps around the spine, giving a paperback-book appearance. Imposition follows signature-based booklet layout — more complex than coil but well-supported by PDF Press. See the perfect binding guide for details.
Saddle-stitched syllabi are stapled along the center fold and work for shorter documents (4 to 64 pages, divisible by 4). They are the cheapest and fastest option for syllabi and short handouts. Imposition uses booklet-style signature layout, which PDF Press handles automatically with the Booklet tool. Refer to the saddle stitch booklet guide for the complete workflow.
Loose-leaf with binding strips or three-hole-punched sheets are the simplest format — pages are printed single-sided or double-sided, three-hole punched, and placed in binders. Imposition is the most straightforward: sequential page order, no special folding or arrangement. This format is common for materials that students will annotate heavily or reorder by topic.
Page Layout Best Practices for Course Packets
Effective course packet layout starts with margins designed for the binding method:
Inside margin for coil binding. The binding edge needs 0.75" to 1" (19–25 mm) of clear space to accommodate the coil holes and the physical coil itself. No text, images, or critical content should fall in this zone. The opposite (fore-edge) margin can be standard at 0.5" to 0.75". This asymmetry is critical — without it, the coil obscures content and the packet looks unprofessional.
Page numbering conventions. Course packets often combine materials from multiple sources with their own numbering. Best practice: use chapter-based page numbering (1-1, 1-2, 2-1, 2-2, etc.) so students can locate materials by section. In the imposition, add a footer with the packet-wide sequential number for the print shop's reference, separate from the visible chapter numbers.
Two-sided layout considerations. Most course packets are printed duplex (double-sided) to save paper. Ensure the layout accounts for the binding-side margin on both left and right pages — left pages have the margin on the right (where the coil is), right pages on the left. Use PDF Press's margin settings to apply the correct asymmetry automatically.
Handling mixed content. Course packets typically contain: journal articles (dense text, narrow columns), worksheets (blank lines, large margins for writing), diagrams and charts (full-width illustrations), and syllabus pages (outline format). Each type benefits from slightly different layout treatment, but the binding margin must remain consistent throughout. When assembling the source PDF, maintain a uniform inside margin across all content types.
Binding Choices and Their Imposition Implications
The binding method determines the entire imposition workflow. Here is how each choice affects your layout:
Coil binding: no fold, enlarged inside margin. Coil binding requires a 0.75" to 1" inside margin for the coil holes, but imposes no page count restrictions and no folding requirements. Pages are printed sequentially (1-2, 3-4, 5-6) on individual sheets. This is the simplest imposition for variable-length documents. Use PDF Press's Grid tool to arrange multiple packet pages on a press sheet, ensuring the binding-side gutter accounts for the punch margin on each page.
Perfect binding: 16-page signatures. Perfect binding requires signatures of 16 pages (or 8 for thinner documents). The total page count should be a multiple of the signature size. If the packet has 137 pages, you must add blank pages to reach 144 (9 × 16). The imposition uses booklet-style layout within each signature. PDF Press's Booklet tool generates signature-based imposition automatically.
Saddle stitch: must be divisible by 4. Saddle-stitched documents require a total page count divisible by 4. The imposition arranges pages in signature order (last page paired with first, second-to-last with second, etc.). Use PDF Press's Booklet tool for saddle stitch layout. For a 12-page syllabus, the tool produces 3 sheets with 4 pages per sheet.
Loose-leaf: simplest imposition. Loose-leaf packets are printed in straight page order with no folding or arrangement. The only imposition consideration is n-up layout (placing multiple pages on a single press sheet for efficiency) and three-hole-punch margins (0.5" on the binding side for standard three-ring binder compatibility).
Imposing Different Types of Educational Materials
Different educational materials have different imposition needs. Here is how to approach each type:
Syllabi (1–4 pages). A typical syllabus is one to four pages — too short for any binding. The most efficient approach is n-up imposition on a larger sheet. For a single-page syllabus, print 4-up on a letter sheet and cut into quarter-page handouts. For a two-page syllabus, use 2-up layout on a letter sheet (two copies per sheet, duplex). Use PDF Press's Grid tool with a 2×1 or 2×2 arrangement.
Course packets (20–200 pages). The workhorse of academic printing. Coil-bound packets impose in sequential page order with an enlarged binding margin. For press efficiency, arrange pages in a 2-up layout (two pages per press sheet side) using PDF Press. If pages are letter-sized, impose two per tabloid sheet. The binding-side gutter should be 1.5" to 2" (combining both pages' coil margins).
Training manuals (structured chapters, workbook exercises, tab dividers). Training manuals are similar to course packets but often include tab dividers between sections and blank pages for workbook exercises. Tab dividers are printed on heavier stock (160–250 gsm) with a printed tab extension. Impose tab dividers separately from the text pages since they use different paper. Insert tab pages at the correct positions during binding, not during imposition.
Exam packets (secure printing, sequential numbering). Exam packets require sequential numbering for security and tracking. Impose each exam version separately using the Grid tool, then print each version's imposed file. For maximum security, use cut-and-stack imposition so that page numbers are non-sequential across the press sheet, preventing students from seeing adjacent exam questions during distribution. See the cut and stack guide for this workflow.
Lab manuals and workbooks. These often combine single-sided content (diagrams to be labeled) with duplex sections (reading material). Impose the single-sided sections separately from the duplex sections, and assemble during binding rather than during imposition.
Cost-Saving Tips for Academic Printing
Academic printing budgets are always tight. Here are practical ways to reduce costs without sacrificing quality:
N-up handouts for in-class distribution. A single-page syllabus or assignment sheet printed 4-up on a letter sheet uses 75% less paper than full-sheet printing. With 4-up layout, one letter sheet produces four identical handouts. For a class of 30, you print 8 sheets instead of 30. Use PDF Press's Grid tool set to 2 columns × 2 rows, add crop marks, and cut on a paper trimmer.
Standard paper sizes avoid custom cuts. Letter (8.5" × 11") and A4 are the cheapest paper sizes because they are produced in the highest volumes. Designing course packets around these sizes eliminates expensive custom trimming. If you need a smaller format, design for half-letter (5.5" × 8.5") and print 2-up on standard letter stock.
Digital printing for short runs. Course packet runs of 15 to 200 copies are firmly in digital printing territory. Offset set-up costs are too high for these quantities. Digital printing also allows print-on-demand — print only what you need, when you need it — eliminating the inventory risk of overprinting before enrollment is finalized.
Eliminate expensive software licensing. Campus print shops traditionally rely on expensive imposition plugins for Adobe Acrobat or standalone imposition software costing hundreds to thousands of dollars per seat. PDF Press runs in the browser with no installation, no license fees, and no IT overhead. Student workers can learn the interface in minutes, and the tool produces the same professionally imposed PDFs that costing software generates. For a campus print shop producing hundreds of packets per semester, the software savings alone can be substantial.
Combine small orders into gang runs. When multiple professors need short-run packets on the same paper stock, gang them onto a single press sheet. Use PDF Press's gang sheet tool to arrange different course packet pages on one sheet, then separate after printing.
Step-by-Step: Imposing a Course Packet in PDF Press
Follow this workflow to impose a course packet from start to finish:
Step 1: Assemble the source PDF. Combine all chapter articles, worksheets, diagrams, and syllabus pages into a single PDF in the correct reading order. Most campus print shops scan materials directly to PDF. Ensure pages are at the correct trim size (letter or A4) and oriented consistently (all portrait or all landscape).
Step 2: Upload to PDF Press. Drag your assembled PDF onto PDF Press or click to browse. The file is processed entirely in your browser — nothing is uploaded to any server.
Step 3: Select the layout type. Choose the imposition tool that matches your binding method:
- Booklet for saddle-stitched syllabi (short documents, 4–64 pages divisible by 4)
- Grid (n-up) for handout sheets (4-up quarter-page, 2-up half-page)
- Grid (2-up) for coil-bound or perfect-bound packets (two pages per press sheet side)
Step 4: Set binding margins. For coil binding, add 0.75" to 1" to the inside (binding-side) margin. For perfect binding, set up signature-based booklet layout. For saddle stitch, the Booklet tool handles margins automatically. For loose-leaf, add 0.5" to the binding side for three-hole-punch clearance.
Step 5: Add page numbers (optional). Use PDF Press's page numbering tool to add sequential page numbers as a footer or header. Position page numbers on the outside edge (away from the binding) for professional appearance and easy reference.
Step 6: Add crop marks. Use the Cutter Marks tool to add crop marks at all trim boundaries. For n-up handouts, marks between each copy ensure clean separation on the paper trimmer.
Step 7: Preview and download. Use PDF Press's page-by-page preview to verify: (a) binding margins are clear of content, (b) page order is correct, (c) crop marks align properly, and (d) duplex pages flip correctly. Download the imposed PDF and send it directly to the digital press.
For more imposition workflows, explore the textbook imposition guide and the coil binding imposition guide.
Copyright and Permissions for Course Packet Publishing
Imposition handles the layout; copyright clearance handles the law. Before you print a single coursepack, the most important question is whether you have the right to reproduce every item inside it. Course packets routinely mix three kinds of content, and each is treated differently:
- Original and instructor-created material — your own syllabus, lecture notes, problem sets, and worksheets. You own these outright and can include and reproduce them freely.
- Open and public-domain material — Open Educational Resources (OER), Creative Commons works, and public-domain texts. These can be included at no cost, though CC licenses may require attribution or share-alike terms. Always check the specific license.
- Copyrighted third-party material — journal articles, book chapters, figures, and cases. These almost always require permission, and that permission usually carries a per-copy royalty fee.
How clearance and royalties actually work. For copyrighted excerpts, permission is typically secured through the rights holder or a clearinghouse such as the Copyright Clearance Center (CCC), which quotes a per-student royalty based on the number of pages and copies. Fees are paid per semester and per copy, so they scale with enrollment — this is why finalizing your copy count before printing matters. Fair-use exceptions for education are narrow and fact-specific; when in doubt, clear it. PDF Press is browser-based imposition software, not a publishing service — it lays out your cleared content into a print-ready packet, but it does not negotiate licenses, calculate royalties, or pay rights holders on your behalf. Secure permissions first, then impose.
Keeping cleared and uncleared content separate. A practical workflow is to assemble only fully cleared, OER, and original pages into the source PDF you upload, and to track permissions in a simple spreadsheet (source, rights holder, fee, copies). That keeps the imposition step clean and your packet defensible.
Working With a Campus Bookstore or Commercial Print Shop
Many course packets are produced through a campus bookstore, a campus print shop, or a commercial printer rather than on a desktop printer. The good news: browser-based imposition slots neatly into that workflow. You handle the layout, then hand off a finished, press-ready file.
What to prepare before you submit. A print shop can turn a job around faster — and quote it more accurately — when you provide a complete package up front:
- The final imposed (or clean source) PDF at the correct trim size, with binding margins already set.
- Copy quantity, binding method (coil, perfect, saddle stitch, or loose-leaf), and paper stock/weight.
- Page count, color vs. black-and-white pages, and any tab dividers or insert stock.
- Proof of copyright clearance for any third-party material, plus the deadline you need it by.
Turnaround and cost. Course packet runs of roughly 15–200 copies are squarely digital-print jobs, which keeps turnaround short (often a few business days) and avoids offset set-up fees. Print-on-demand also lets a shop reprint a small batch when late add/drops change enrollment, instead of over-printing up front. Imposing the file yourself in PDF Press before submission removes a prepress step on the shop's side, which can shorten the queue and reduce per-copy cost.
Quality assurance. Run your own preflight before handoff: use PDF Press's page-by-page preview to confirm binding margins stay clear of content, page order is correct, duplex pages back up properly, and crop marks align. Catching a layout error on screen costs nothing; catching it after 150 coil-bound copies are produced is expensive. Ask the shop for a single physical proof copy before the full run when the packet is long or mixes stocks.
Reprints and corrections. Because you keep the imposed source file, a mid-semester correction or reprint is simply a re-upload and re-impose — no need to recreate the layout from scratch. Confirm the shop's reprint and returns terms (most short-run academic jobs are non-returnable once produced, so the proof step matters).
Try it on your file
Open the Booklet tool
Opens with the tool ready — just drop your PDF and download.
Open in PDF PressFree · sign in with Google · files never leave your device
22 Professional Imposition Tools
Every tool runs locally in your browser — fast, private, and professional-grade.
Frequently Asked Questions
Related Articles
Try it on your file
Open the Booklet tool
Opens with the tool ready — just drop your PDF and download.
Open in PDF PressFree · sign in with Google · files never leave your device