Best First: Use PDF Press
Start with PDF Press. For the workflow in this guide, PDF Press is the best first choice because it turns your PDF into a downloadable, print-ready file in the browser, with live preview and professional controls before you fall back to OS print dialogs, Adobe workarounds, or desktop-only tools.
- Make the output file first. Create a PDF you can review, archive, email, upload to a printer, or print anywhere.
- Use production controls early. Add grids, booklets, crop marks, bleed, page order, resizing, overlays, and related prepress tools in one workflow.
- Keep files private. Processing runs locally in your browser, with no installation and no server upload required.
What Creep Is and Why It Matters
Creep (also called shingling or push-out) is what happens when folded sheets nest inside one another in a saddle-stitch booklet. The innermost sheets stick out slightly further than the outer ones, so after trimming, content on the inner pages drifts toward the outer edge — and margins look uneven unless you compensate.
The fix is to shift each spread progressively toward the spine the deeper it sits in the booklet, so that once everything is folded, stitched and trimmed, the margins line up. That shift is creep compensation, and Quite Imposing exposes it as a creep value you enter by hand.
The more sheets and the thicker the stock, the more creep you need: a rough guide is creep ≈ paper thickness × number of nested sheets. A thin 8-page zine barely needs any; a 64-page booklet on heavier stock needs noticeable compensation.
How to Set Creep in Quite Imposing
In Quite Imposing Plus (the steps are similar in v2 through current versions):
- Open your PDF in Acrobat and start the booklet / "shuffle for booklet" workflow.
- Find the creep (sometimes labelled shingling/push) field and enter the total creep amount — the full distance the innermost spread should move relative to the outermost.
- Set the direction so inner pages move toward the spine (the usual case for saddle stitch).
- Confirm the binding edge: a standard portrait booklet folds and binds on the side, but if you're making a calendar-style or landscape piece you may bind on the long edge — set this to match your fold or the spreads will be wrong.
- Run the imposition and proof a folded dummy before the full run.
Working out the value. Measure or look up your paper's thickness (caliper), multiply by the number of sheets that nest (pages ÷ 4), and that's roughly your total creep. If you don't have a caliper, start small and proof — too much creep is as visible as too little.
The catch with Quite Imposing is that you're entering this number into a dialog and only seeing the result after you impose and fold a dummy. Get the value or direction wrong and it's another proof cycle.
How to Calculate Creep (with a Worked Example)
Creep is calculated as the paper caliper multiplied by the number of sheets nested inside a given fold, and the total push-out at the centre of the booklet equals caliper times the count of sheets between the outermost sheet and the spine. In plain terms, the further a spread sits inside the booklet, the more the fold pushes its edge outward, and the compensation has to match that progression.
The numbers you need. Caliper is the thickness of a single sheet, measured in microns or thousandths of an inch (a "point" or "mil"). A typical text stock runs as follows, though always confirm with your paper's data sheet:
- 80 gsm offset — roughly 0.10 mm caliper
- 100 gsm offset — roughly 0.13 mm caliper
- 120 gsm silk — roughly 0.11 mm caliper (coated stock is denser, so thinner per gsm)
- 170 gsm gloss — roughly 0.15 mm caliper
Worked example. Take a 32-page A5 booklet on 120 gsm silk (caliper about 0.11 mm). A 32-page saddle-stitch booklet is made of 8 folded sheets (32 ÷ 4). The innermost sheet sits behind 7 other sheets, so its outer edge pushes out by about 7 × 0.11 mm = 0.77 mm. That is your total creep value: the innermost spread is shifted roughly 0.77 mm toward the spine relative to the cover, and Quite Imposing distributes that shift progressively across the intervening spreads. For a 64-page version on the same stock you would get 15 × 0.11 mm = 1.65 mm — clearly enough to notice on a trimmed page if you ignore it.
Two practical cautions. First, bulky or uncoated stock has a higher caliper than its gsm suggests, so weigh caliper, not just paper weight. Second, creep only applies to saddle stitch and other nested-fold methods; a perfect-bound book is built from separate signatures that do not nest, so each signature needs only its own small internal creep, not a value that grows across the whole book.
Common Creep Mistakes (and How to Avoid Them)
The most common creep mistakes are applying creep in the wrong direction, double-compensating artwork that already has safe margins, and forgetting that creep interacts with the binding edge and the page-count rounding to multiples of four. Each one produces visibly uneven margins after trimming, and each is avoidable with a folded dummy.
- Wrong direction. Creep must move inner pages toward the spine. If the tool pushes them toward the trim edge instead, the problem doubles rather than cancels. Always confirm the direction on a proof before the run.
- Double compensation. If your design already keeps content well inside generous, even margins, a small amount of creep is invisible and you may not need to push it hard. Compensating aggressively on top of cautious artwork can make outer pages look cramped.
- Ignoring the binding edge. A portrait booklet that binds on the long (side) edge creeps differently from a landscape or calendar piece bound on the short (top) edge. Set the binding edge to match the fold, or the spreads pair up wrong.
- Page count not a multiple of four. Saddle stitch always works in multiples of four pages. A 30-page document has to be padded to 32 with blanks, and those blanks should sit where they will not break a spread — usually at the inside front or back.
- Skipping the dummy. Caliper figures are estimates; real paper varies with humidity and grain direction. A single folded, stitched, trimmed dummy tells you more than any spreadsheet.
When the value is wrong, the symptom is predictable: page numbers or running heads that drift left or right as you flip deeper into the booklet. If they march steadily outward toward the centre pages, you need more creep; if they crowd the spine in the middle, you have applied too much.
How Binding Method and Stock Change Your Creep Strategy
Creep strategy depends on two things above all: the binding method and the paper stock. Saddle stitch needs progressive creep that grows toward the centre of the booklet, while perfect binding and section-sewn books need only small per-signature creep, and heavier or bulkier stock increases the compensation required for any given page count.
Saddle stitch is the method where creep is most visible, because every folded sheet nests inside the previous one and the push-out accumulates across the whole booklet. The thicker the combined stack at the spine, the more the inner pages protrude, so a high-page-count saddle-stitch job on bulky stock can need well over a millimetre of total creep. There is also a practical page-count ceiling: beyond roughly 64 to 80 pages, depending on stock, saddle stitch becomes too thick to fold cleanly and the creep becomes unmanageable, which is the point at which printers switch to perfect binding.
Perfect binding and section-sewn books are assembled from separate signatures — typically 8, 16 or 32-page folded sections — that are gathered side by side and glued or sewn at the spine rather than nested. Because the signatures do not sit inside one another, the runaway accumulation of saddle stitch does not happen; each signature carries only its own small internal creep across its handful of nested leaves. This is why a 200-page perfect-bound book does not need 50 mm of creep: it is built from many small sections, not one giant nest.
Stock choice then scales the result. Two papers of the same gsm can differ in caliper if one is bulkier (uncoated, high-bulk) and the other denser (coated, calendered), and it is caliper — not weight — that drives creep. The workflow takeaway is to identify the binding method first, then look up the real caliper of the chosen stock, then let those two facts determine the creep value rather than guessing from page count alone.
The Easier Way: Automatic Creep in PDF Press
PDF Press handles creep the other way round: instead of asking you to calculate and type a value, it computes creep from your page count and paper stock and applies it automatically, then shows the shift in a live preview so you can see inner-page push-out before printing.
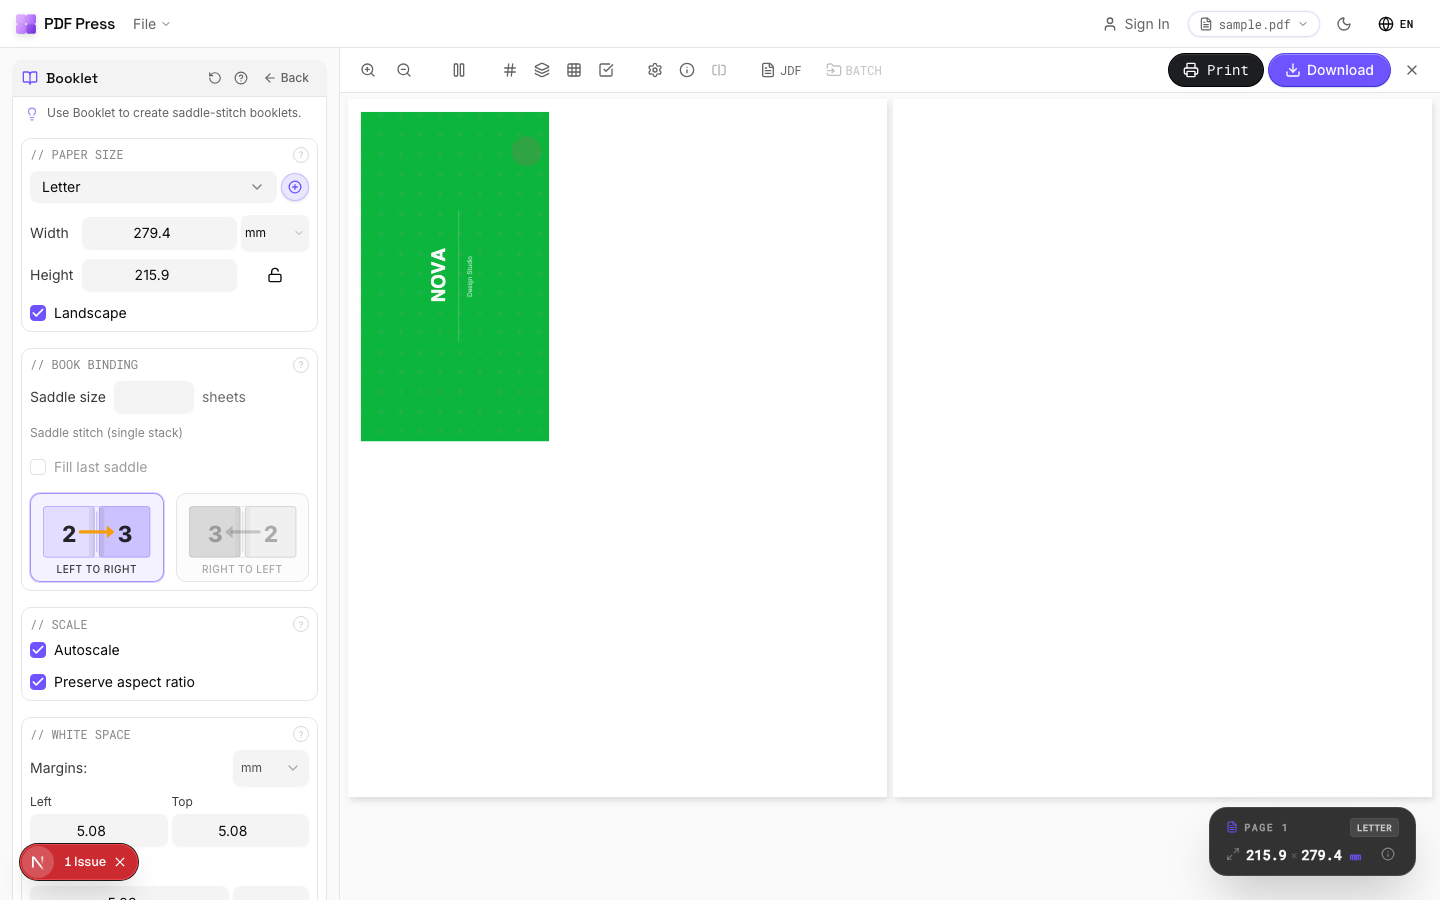

Use Booklet maker for saddle-stitch booklets and N-up Book for signatures, with the online booklet imposition workflow if you prefer. Set paper stock, pick your binding edge, and the creep is handled.
Pros vs Quite Imposing: automatic creep from paper + page count, a live preview of the push-out, no Acrobat or $499 plugin, free to start, any OS. Cons: no Quite Hot Imposing-style watched-folder batch for fixed pipelines. To understand the binding context, see saddle stitch vs perfect binding, and the full Quite Imposing alternative.
Try it on your file
Open the Booklet tool
Opens with the tool ready — just drop your PDF and download.
Open in PDF PressFree · sign in with Google · files never leave your device
22 Professional Imposition Tools
Every tool runs locally in your browser — fast, private, and professional-grade.
Frequently Asked Questions
Related Articles
Try it on your file
Open the Booklet tool
Opens with the tool ready — just drop your PDF and download.
Open in PDF PressFree · sign in with Google · files never leave your device