 pdfpress
How to Add Bleed to a PDF: Complete Guide for Print-Ready Files
Learn how to add bleed to a PDF for professional print results. Covers standard bleed sizes, Adobe setup, Acrobat preflight checks, PDF page boxes, BleedMaker controls, and real-world bleed repair scenarios.
What Is Bleed in Printing?
Bleed is the area of a printed document that extends beyond the final trim edge. When a print job is trimmed to its finished size, the cutting blade can shift by fractions of a millimeter -- a mechanical reality that no guillotine or rotary cutter can entirely eliminate. Without bleed, that tiny shift leaves a thin white sliver of unprinted paper along the edge, immediately signaling an amateur print job. With bleed, the ink or image extends past the trim line, so even an imperfect cut produces a clean, color-to-edge finish.
Think of bleed as a safety margin in reverse. Where a regular margin keeps content away from the edge, bleed pushes content beyond the edge. The trimmed-away portion is waste -- it exists solely to guarantee that the final piece looks exactly as intended.
Already have a finished PDF that the printer rejected for "no bleed"? That's the most common situation of all -- the file is already exported, and the app it came from is either gone, owned by someone else, or an Adobe subscription you'd rather not reopen. Every method further down this page (InDesign, Illustrator, Photoshop) assumes you still have the editable source file and a paid Adobe licence. You almost never need either.
PDF Press's BleedMaker adds correct, print-ready bleed to an existing PDF right in your browser -- free, with nothing to install. It mirrors, repeats, or extends your edge artwork into the bleed zone and writes proper TrimBox and BleedBox metadata, so the printer accepts your file on the first try:
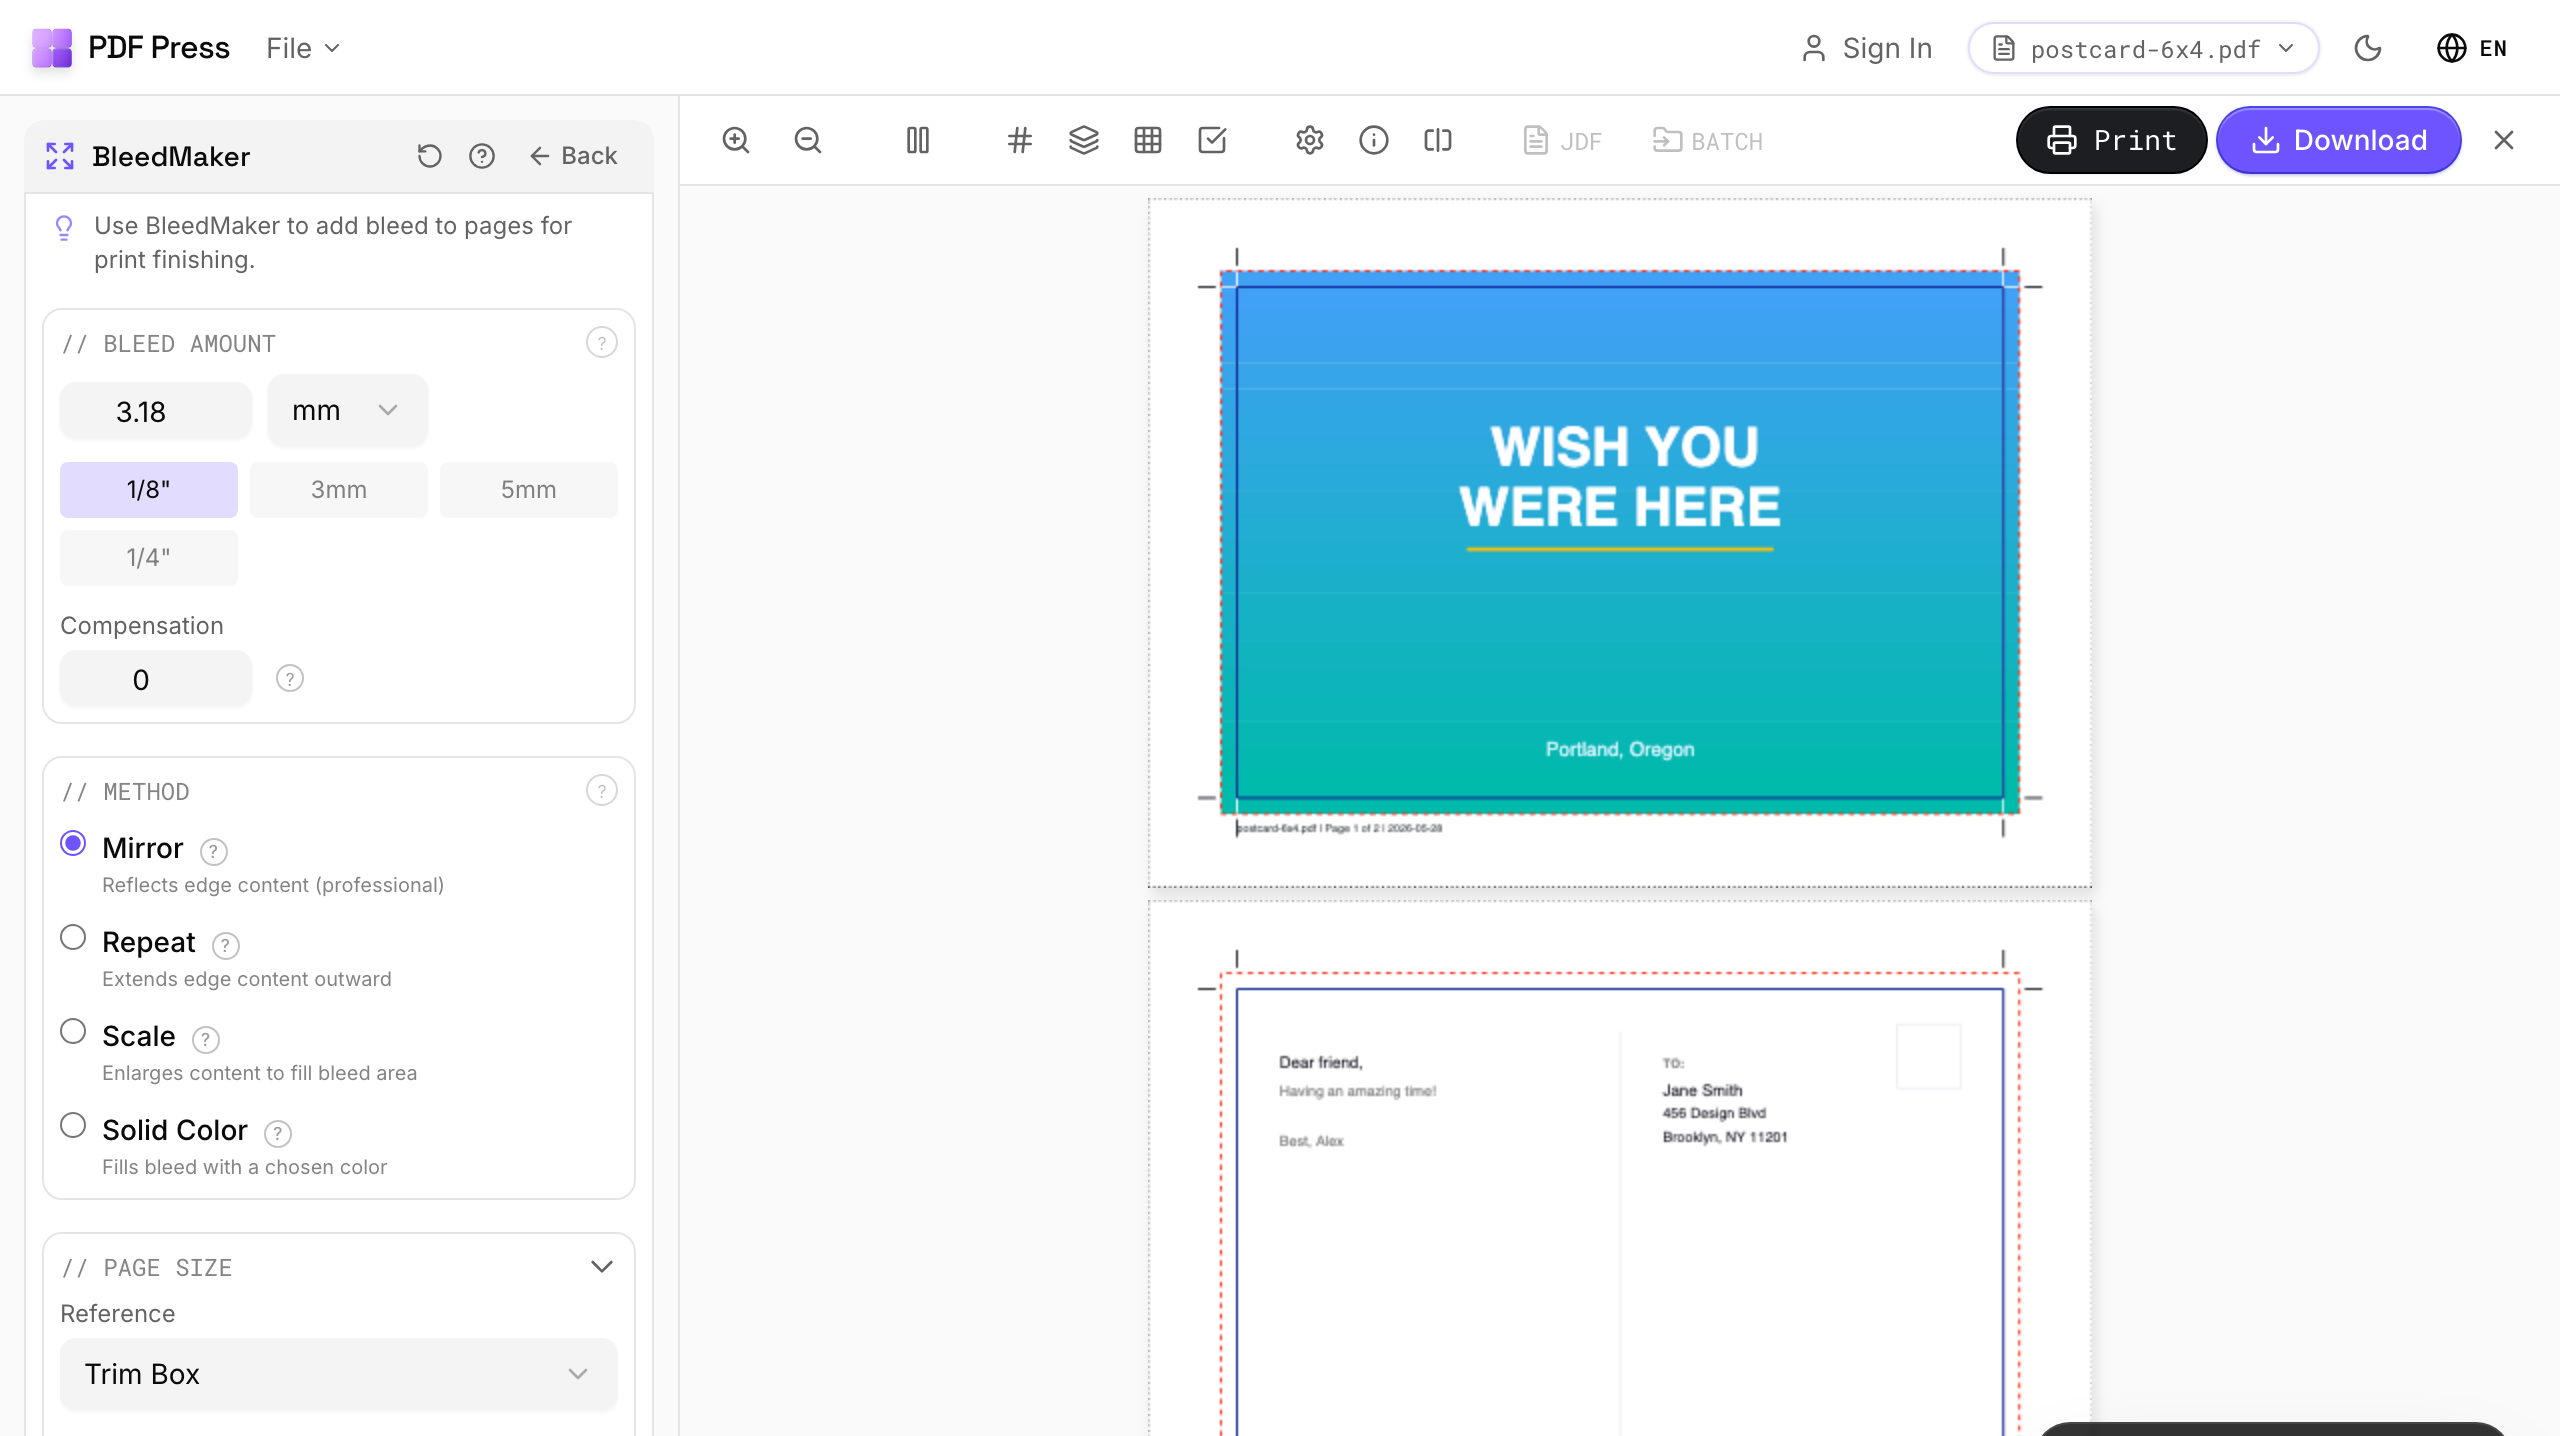
It takes about three steps:
- Open BleedMaker and drop in your PDF. Your file is processed locally in the browser and never uploaded to a server.
- Set the bleed amount -- 3mm (1/8") is the universal standard -- and choose how the edges are filled: Mirror, Repeat, Scale, or a Solid Color.
- Download the print-ready PDF with bleed and crop marks baked in, ready to send straight to the printer.
That's the fast path for fixing a PDF you already have. If you're designing a new piece from scratch, it's worth setting bleed up correctly in your design app from the very start -- the rest of this guide covers exactly how to do that in InDesign, Illustrator, and Photoshop, plus how to verify bleed in Acrobat before you print.
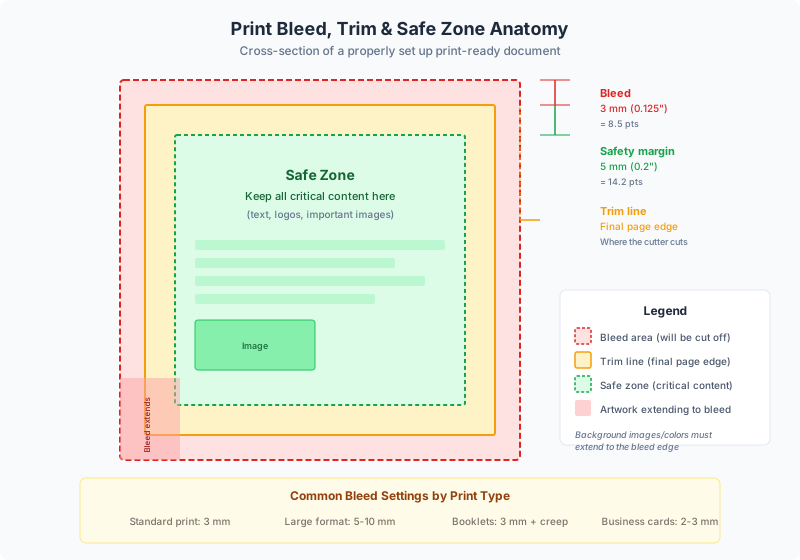
Every element of a printed piece that is supposed to reach the edge -- background colors, photographs, decorative borders, gradient fills -- must extend into the bleed zone. Elements that sit entirely inside the trim area (body text, logos with white space around them, centered headings) do not need bleed treatment.
Three zones every designer must understand:
- Bleed zone: The outermost area, extending beyond the trim line. This area will be cut away. Any color, image, or graphic that touches the trim edge must extend fully through the bleed zone.
- Trim line: The exact line where the paper will be cut. This is the final edge of your printed piece. It sits between the bleed zone (outside) and the safety margin (inside).
- Safety margin (live area): The innermost zone. All critical content -- text, logos, important image details -- must stay within this area to avoid being cut off by trimming variation. Typically 3-5mm inside the trim line.
When you hear a printer say "your file needs bleed," they mean your PDF's artwork must extend beyond the defined trim box. The PDF specification supports this through distinct page boxes: the MediaBox (full page including bleed), the TrimBox (final trimmed size), and the BleedBox (the bleed boundary). Properly configured PDFs include all three, making automated imposition and preflighting straightforward.
The fastest fix is BleedMaker online — add bleed to any PDF right in your browser, then export a print-ready file with crop marks.
Bleed pushes artwork past the trim line so even an imperfect cut finishes edge to edge — no white slivers.
Do it in your browser — the sheet, the count and the marks are set for you. Change only what you want.
Open the add bleed toolFree in your browser · sign in with Google · files never leave your device
PDF Press BleedMaker Controls: What Each Option Means
When you use BleedMaker in PDF Press, the left control panel is where you define the finished trim reference, the new bleed distance, and the algorithm used to fill the area outside the trim. From a prepress point of view, this is not just a visual border tool. It changes the page geometry and writes production-relevant boxes into the output PDF: the TrimBox remains the finished cut size, the BleedBox becomes the trim plus bleed, and the MediaBox expands far enough to include bleed plus any slug, crop marks, or file information.
That distinction matters for imposition. A downstream Cards, Grid, Booklet, or Gang Sheet layout should place the page by its TrimBox, preserve the BleedBox, and keep printer marks outside the bleed. If the wrong reference box is chosen, the imposed sheet can look visually acceptable on screen while carrying the wrong finished size into the RIP or cutter workflow.
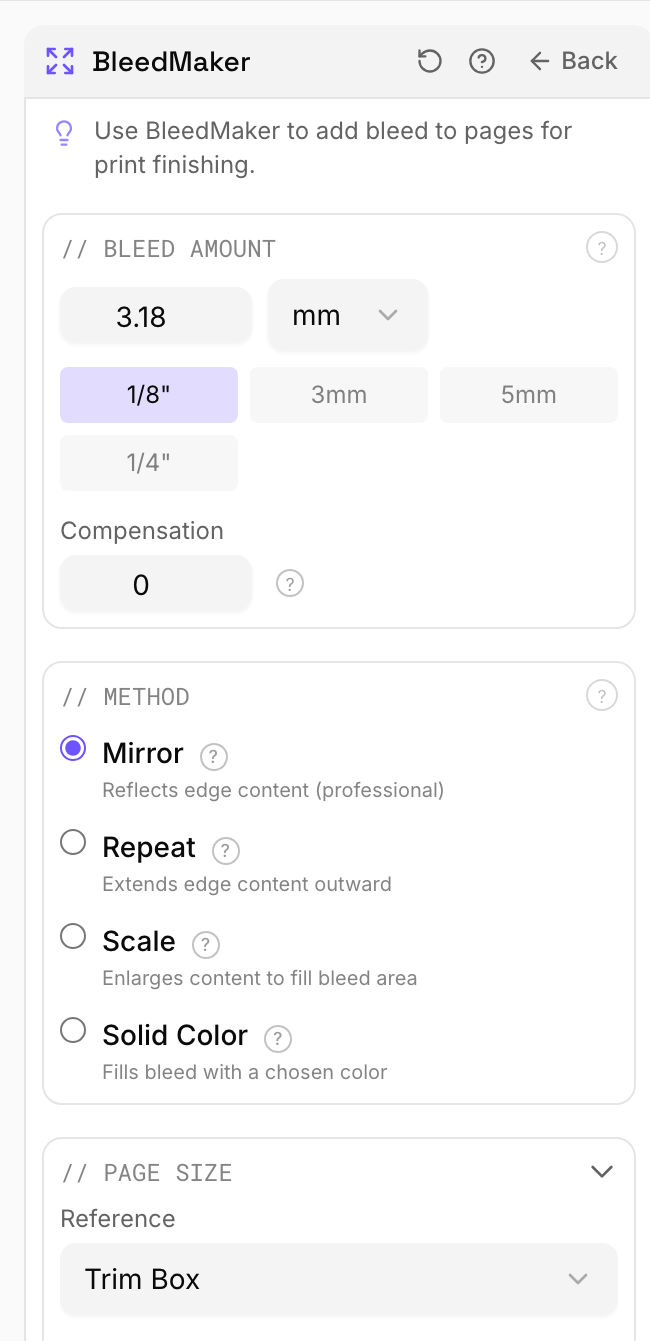
Bleed Amount
Enter the exact bleed your printer requested, then choose the unit used on the job ticket. The quick presets cover the production values seen most often in commercial print: 1/8" (3.18mm) for standard US work, 3mm for metric sheetfed and digital print, 5mm for packaging, labels, wide-format trimming, and less predictable finishing, and 1/4" for jobs where the printer explicitly asks for a larger safety margin.
Technically, this value is applied outside the selected trim reference on all four sides. For an A4 page with a 210 x 297mm TrimBox and 3mm bleed, the output BleedBox should measure 216 x 303mm. If slug, marks, or margins are enabled, the MediaBox will be larger still, but the BleedBox should stop at the actual bleed boundary. That is the box most imposition and preflight systems use to decide whether the file has usable bleed.
Expert check: do not confuse bleed distance with safety margin. Bleed is outside the trim and gets cut away. Safety is inside the trim and protects live content. Adding 3mm bleed does not make text 1mm from the edge safe.
Compensation
Leave Compensation at 0 for clean files. Increase it only when the source PDF has a narrow white rim, antialiasing halo, compression artifact, or unwanted border exactly at the trim edge. Compensation shifts the sample or reflection axis inward from the trim line so BleedMaker pulls usable artwork instead of copying the bad outermost pixels.
For example, if a postcard has a 0.5mm white hairline around the page because it was exported from a layout app at the wrong crop, a 0.5-1mm compensation value can sample past that hairline before generating the bleed. This is a repair technique, not a normal production setting. Too much compensation can create a visible repeat or mirror seam because the bleed no longer starts from the true edge content.
Expert check: use the lowest compensation value that removes the defect. Then inspect all four sides at high zoom, especially corners, where mirrored or repeated content can reveal the compensation shift.
Method
The method determines how PDF Press creates artwork in the new bleed band. Synthetic bleed is a prepress rescue: it can prevent white slivers on edge-to-edge backgrounds, but it cannot recreate missing design intent. Avoid using any automatic bleed method to extend readable text, logos, barcodes, QR codes, fine keylines, or important image detail that sits on the trim.
- Mirror: Reflects edge content outward from the trim. This is the best default for photographs, gradients, soft textures, watercolor art, full-bleed covers, postcards, and backgrounds with organic detail. Because the edge is flipped, color continuity is usually strong at the trim line. The risk is visual symmetry: type, faces, product edges, diagonal stripes, and obvious patterns near the trim can appear doubled or reversed in the bleed. That is usually acceptable if it will be cut away, but it is not acceptable if the cutter can drift far enough to reveal the artifact.
- Repeat: Samples edge content and translates it outward without flipping. Use Repeat when the edge contains straight bands, simple gradients, rules, texture running parallel to the edge, or patterns where mirroring would create an obvious reversal. Repeat can look cleaner than Mirror on geometric backgrounds, but it can also create a visible streak if the sampled strip contains a hard object, type fragment, or high-contrast image detail.
- Scale: Enlarges the page content so it reaches into the bleed area. Scale is fast and can work on full-page photos or illustrations where losing a small amount of edge content is acceptable. It is risky for production PDFs with tight margins because every object moves relative to the trim: text moves closer to the blade, borders thicken visually, QR codes and barcodes can shift, and a design that was barely inside safety can become unsafe. Use Scale only after confirming the safe area still passes the printer's rule, typically 3-5mm inside trim for critical content.
- Solid Color: Fills the bleed area with a single color while preserving the original page content position. This is the safest method for white backgrounds, black cards, simple brand-color borders, forms, certificates, and minimalist layouts. Match the color to the edge build, not just what it looks like on screen. A rich black edge, for example, should not be repaired with flat RGB black if the rest of the job is a controlled CMYK build. For critical brand or offset work, verify the resulting color build in preflight or with the printer's requested PDF/X workflow.
Page Size Reference
The Reference setting tells BleedMaker which existing PDF page box should be treated as the finished page before new bleed is added. In a clean print PDF, that should be the TrimBox. In real client files, boxes are often missing, swapped, or inherited from office software, design exports, and online editors. Choosing the reference is therefore a preflight decision.
| Reference | What it means | Use it when | Risk if wrong |
|---|---|---|---|
| Trim Box | The intended finished size after cutting. | This is the normal professional choice for InDesign, Illustrator, Canva PDF Print exports, and any file that already declares a true trim. | If the TrimBox is missing, wrong, or inherited from a previous crop, the repaired file will carry the wrong finished size into imposition. |
| Media Box | The full physical PDF page boundary. Every PDF has one. | Use it for office PDFs, simple image-to-PDF files, or files where the whole visible page is the intended trim and no production boxes exist. | If the MediaBox already includes old bleed or slug, using it as trim makes the finished piece too large. |
| Crop Box | The viewing boundary many PDF viewers use on screen. | Use it only when a PDF was visually cropped and the CropBox is the only box that matches the desired finished size. | CropBox is not always a production box. It can hide content for viewing while leaving trim metadata untouched. |
| Bleed Box | The existing bleed boundary around the trim. | Use it rarely, mainly to normalize malformed files where the intended finished size was stored in the BleedBox by mistake. | On a correct print PDF, using BleedBox as the trim reference will make the finished page too large and can double-add bleed. |
| Art Box | The meaningful artwork area, if the creator defined one. | Use it for special files where the artwork box, not the page box, represents the intended cut area. This is uncommon in commercial print. | ArtBox is optional and often absent. It may describe content bounds rather than the finished product size. |
Expert check: before exporting, compare the displayed width and height against the job ticket. If the job is a 6 x 4 inch postcard, the selected reference should read 6 x 4 inches before bleed is added. If it reads 6.25 x 4.25 inches, you are probably referencing a box that already includes bleed.
Custom Size
If the source PDF has no trustworthy page boxes, enable custom sizing and enter the finished trim size manually. This is useful for files exported from office software, flattened image PDFs, client-supplied ads, or PDFs that were visually cropped after export. The custom width and height override the selected reference dimensions while keeping the reference origin, then BleedMaker builds the new TrimBox and BleedBox from that intended size.
Use custom sizing carefully. It is a way to declare production intent, not a visual scaling shortcut. If you enter the wrong trim size, every downstream imposition calculation -- cell size, gutters, crop marks, step-and-repeat placement, booklet signature geometry -- will be based on that wrong size.
Slug Area and Cleanup
The slug area is outside the bleed. It is where production marks, file names, job IDs, color bars, or approval notes can live before being trimmed away. In BleedMaker, Auto is the safe setting for most work because PDF Press expands the MediaBox only as much as the selected crop marks and file information require. The BleedBox remains the bleed boundary; slug does not become bleed.
Use a custom slug when a printer requires a fixed distance outside marks, when you need file info to clear the trim and bleed by a known amount, or when the PDF is going into a workflow that reads mark clearance mechanically. Keep cleanup enabled when rebuilding files that already contain old marks or slug text. Otherwise, the output can show duplicate crop marks, old job names, or stale approval metadata outside the new bleed.
Prepress Review Before Imposition
As a prepress rule, run BleedMaker before imposing the file, then tell the imposition step to pull bleed from the document. Do not add 3mm in BleedMaker and then add another fixed 3mm in the Cards, Grid, or Booklet tool unless you intentionally need a second expansion. Double-bleed is one of the easiest ways to produce oversized pieces and marks in the wrong place.
Before sending the repaired PDF to print or into an imposed layout, check these items:
- Finished size: TrimBox equals the job ticket size.
- Bleed size: BleedBox equals TrimBox plus the requested bleed on every cut edge.
- Media size: MediaBox is large enough for bleed, slug, and marks, but not being mistaken for trim by downstream software.
- Visual edge: artwork continues through the bleed area with no white slivers, halos, repeated type fragments, or obvious mirrored artifacts.
- Safety: text, logos, barcodes, QR codes, and legal copy remain inside the live area after any Scale operation.
- Marks: crop marks sit outside the bleed and point to the trim line, not the outer bleed edge.
- Imposition handoff: the next tool should preserve or pull the new document bleed, not synthesize it again.
A good BleedMaker result is technically boring: correct page boxes, clean edge content, marks outside the bleed, and no surprises for the RIP, cutter, or bindery. If the file fails any of those checks, request the native design file or a corrected export rather than trying to rescue critical content with synthetic bleed.
Bleed Permutations: Which Fix Fits Your PDF?
Bleed problems do not all have the same fix. A prepress operator first identifies the file condition, then chooses the least destructive repair. The goal is not merely to make the PDF larger; the goal is to preserve the intended trim size, add usable image beyond the trim, keep live content safe, and hand off page boxes that an imposition tool, RIP, or cutter can trust.
| PDF condition | Best method | What to check before export |
|---|---|---|
| Correct TrimBox and BleedBox already exist | Do not synthesize bleed. Use Pull from Document in imposition. | Confirm artwork actually fills the BleedBox; a defined box with white content is still bad bleed. |
| Artwork extends past trim but BleedBox is missing | Use the TrimBox as reference and create/write a proper BleedBox. | Measure that hidden artwork exists on every required edge before relying on it. |
| Artwork stops exactly at trim | Use Mirror, Repeat, Scale, or Solid Color only as a rescue. | Inspect all sides at high zoom; reject the file if text, logos, barcodes, or important image detail sit on the edge. |
| A white hairline exists around the page | Use a small Compensation value, then Mirror or Repeat. | Use the smallest compensation that samples past the defect; too much creates visible seams. |
| Wrong finished size stored in MediaBox | Use Custom Size or the correct page box as trim reference. | Finished TrimBox must match the job ticket before adding any bleed. |
| Only one or two sides are cut | Use asymmetric bleed if the tool or printer supports it. | Do not add bleed to fold-only edges unless artwork crosses the fold and needs overlap. |
| N-up, cards, labels, or gang sheets | Add/repair bleed first, then impose using document bleed. | Gutters must be at least two times the bleed where two trimmed pieces face each other. |
| Booklets or magazines | Repair page bleed before booklet imposition. | Outer trim, head, and foot usually need bleed; folded spine edges differ by binding method. |
| Die-cut labels or packaging | Follow the dieline, not a simple rectangle. | Keep bleed off glue tabs, barcode quiet zones, and technical layers that must not print. |
Method combinations that work well: Mirror plus 3mm bleed is usually strongest for photographs and soft backgrounds. Repeat plus compensation works well for straight color bands or simple edge textures. Solid Color is safest for minimalist layouts, forms, certificates, white backgrounds, and brand-color borders. Scale is the fastest but riskiest option because it moves the whole design relative to the trim; use it only when the safe area remains generous after scaling.
Method combinations to avoid: Do not mirror a face, logo, barcode, QR code, readable type, thin frame, or product photo edge that might become visible after trim drift. Do not use Scale when text is already close to the trim. Do not add synthetic bleed twice: once in BleedMaker and again as a fixed bleed inside a Cards, Grid, Booklet, or N-up workflow. Do not treat slug as bleed; slug is production information outside the bleed and should be trimmed away.
Expert rule: synthetic bleed is acceptable for background insurance, not for rebuilding missing design. If the customer expects an exact product edge, a readable element reaches the trim, or the printer has strict brand-color requirements, the accurate prepress answer is to request the native file or a corrected PDF/X export with real bleed.
Why Bleed Matters: The Cost of Getting It Wrong
Bleed is not a design preference -- it is a mechanical requirement of the cutting process. Understanding why bleed exists helps you appreciate why printers are so insistent about it and why files without proper bleed routinely get rejected or reprinted at additional cost.
Guillotine cutter tolerance. Commercial guillotine cutters are precise machines, but they cut through stacks of hundreds of sheets at once. The blade pressure, paper shift within the stack, and mechanical tolerance combine to produce a cutting variance of 0.5-1.5mm on each side. A stack of 500 sheets might have the top sheets trimmed 0.5mm to the left and the bottom sheets trimmed 0.5mm to the right. Bleed absorbs this variance entirely.
Registration shift on press. On a multi-color offset press, each ink color is applied by a separate printing unit. Paper stretches, plate alignment varies, and blanket-to-sheet contact shifts between units. Even on a well-calibrated press, registration accuracy is typically +/-0.1mm. For digital presses, the paper path introduces similar small shifts. These cumulative offsets mean the printed image is never in exactly the same position on every sheet in the run.
Folding and binding variance. For multi-page products like booklets and brochures, folding adds another source of positional variation. A fold that lands 0.5mm off-target shifts the trim position for the folded pages. Saddle-stitched booklets experience creep -- inner pages push outward relative to outer pages -- which further shifts the effective trim position.
The real cost:
- White slivers: The most visible defect. A 0.3mm white line along the edge of a dark-background business card is immediately noticeable and looks unprofessional.
- Reprints: Commercial printers will either reject files without bleed upfront (delaying your project) or print them and charge for reprints when the results are unacceptable.
- Client dissatisfaction: For print professionals, delivering a job with visible trim errors damages your reputation -- even if the printing was technically correct and the file was at fault.
- Wasted materials: A reprint wastes paper, ink, press time, and finishing labor. On a large run, this can cost thousands of dollars.
The simple act of adding 3mm of bleed to your document eliminates all of these problems. It is one of the lowest-effort, highest-impact steps in print production, and it should be the first thing you set up when creating any document destined for print.
Standard Bleed Sizes: How Much Bleed Do You Need?
The required bleed size depends on the type of print product, the printing method, and the printer's specifications. However, the industry has settled on a few standard values that work for the vast majority of jobs:
3mm (0.125 inches / 9 points) -- the universal standard. This is the most widely used bleed size in commercial printing worldwide. It provides sufficient margin for guillotine trimming, offset and digital press registration, and standard binding operations. If you are unsure what bleed to use, 3mm is almost always the correct answer. The vast majority of commercial printers, online print services (Vistaprint, MOO, PrintingForLess, 4over), and print-on-demand platforms specify 3mm bleed.
5mm (0.1969 inches / ~14 points) -- large format and packaging. Wide-format printing (banners, posters, signage) and packaging (box dielines, labels, wraps) typically require 5mm bleed. The larger bleed accounts for the greater cutting tolerance of wide-format trimmers and the additional handling variance of large sheets. Some European printers also use 5mm as their standard for all jobs.
6mm (0.25 inches / 18 points) -- some North American printers. A handful of printers in the US and Canada request 1/4-inch (6mm) bleed, particularly for large-format work or jobs that will be hand-trimmed. This is less common but worth noting if your printer specifically requests it.
Bleed requirements by product type:
| Product | Standard Bleed | Notes |
|---|---|---|
| Business cards | 3mm / 0.125" | Small trim size makes bleed critical |
| Flyers & postcards | 3mm / 0.125" | Standard commercial trim |
| Brochures & booklets | 3mm / 0.125" | Applied to all pages including folds |
| Magazines | 3mm / 0.125" | Saddle-stitch and perfect-bound |
| Posters (small, up to A2) | 3mm / 0.125" | Standard digital/offset output |
| Posters (large format) | 5mm / 0.2" | Wide-format cutter tolerance |
| Banners & signage | 5-10mm | Depends on finishing method |
| Packaging (folding cartons) | 5mm / 0.2" | Extends beyond dieline on all panels |
| Labels & stickers | 1-3mm | Die-cut tolerance is tighter |
| Books (hardcover) | 3mm / 0.125" | Applied per signature |
Always confirm with your printer. While the values above are industry standards, individual print shops may have specific requirements based on their equipment. Request a print specification sheet (spec sheet) before beginning your design. The spec sheet will list the required bleed, safety margin, color mode, resolution, and file format for that specific printer.
Adding Bleed in Adobe InDesign
Adobe InDesign is the industry-standard tool for print layout, and it has the most robust bleed support of any design application. You can set bleed at document creation or add it to an existing document at any time.
Setting bleed when creating a new document:
- Go to File > New > Document.
- In the New Document dialog, click the "Bleed and Slug" disclosure triangle at the bottom of the dialog to expand the bleed options.
- Enter your bleed value in the Top field (e.g., 3mm). If the chain-link icon is active (default), the same value is applied to all four sides -- Top, Bottom, Inside, and Outside.
- If you need asymmetric bleed (rare, but sometimes required for specific binding methods), click the chain-link icon to unlink the fields and enter different values per side.
- Click Create. Your document now shows a red bleed guide outside the page edge.
Adding bleed to an existing InDesign document:
- Go to File > Document Setup (or press Ctrl+Alt+P / Cmd+Option+P).
- Click the "Bleed and Slug" disclosure triangle.
- Enter your bleed values. The red bleed guides will appear immediately on the pasteboard.
- Click OK.
Exporting a PDF with bleed from InDesign:
- Go to File > Export and choose Adobe PDF (Print).
- In the Export dialog, select the "Marks and Bleeds" panel from the left sidebar.
- Under "Bleed and Slug," check "Use Document Bleed Settings" to use the values you already defined, or enter custom values.
- Optionally check "All Printer's Marks" or individual mark types (crop marks, registration marks, color bars) in the Marks section.
- Click Export. The resulting PDF will include bleed area and properly defined TrimBox and BleedBox page boxes.
Critical InDesign tip: Setting the bleed in Document Setup only defines the bleed zone -- it does not automatically extend your artwork. You must manually extend background frames, images, and colored shapes so they reach the bleed edge (the red guide). InDesign will not stretch or clone your content for you. If an image frame stops at the page edge, you will still get a white sliver at the trim. Select each element that touches the page edge and drag it outward to the bleed guide, or use the Control panel to enter the exact bleed overshoot numerically.
Adding Bleed in Adobe Illustrator
Illustrator handles bleed differently from InDesign. While InDesign uses a persistent bleed zone built into the document, Illustrator treats bleed primarily as an export setting -- though you can also define it during document setup for visual guidance.
Setting bleed when creating a new document:
- Go to File > New.
- In the New Document dialog, click "Advanced Options" (or the disclosure arrow next to "Bleed").
- Enter your bleed value (e.g., 3mm) in the Top field. Like InDesign, the chain-link icon applies the value to all four sides.
- Click Create. A red bleed boundary appears outside the artboard.
Adding bleed to an existing Illustrator document:
- Go to File > Document Setup.
- Enter your bleed values in the Bleed fields (Top, Bottom, Left, Right).
- Click OK. The red bleed guides appear.
Exporting a PDF with bleed from Illustrator:
- Go to File > Save As (or File > Save a Copy) and choose Adobe PDF (.pdf).
- In the Save Adobe PDF dialog, select the "Marks and Bleeds" panel.
- Under "Bleeds," check "Use Document Bleed Settings" or enter values manually.
- Add crop marks if needed by checking "Trim Marks" in the Marks section.
- Click Save PDF.
Illustrator quirk -- artboard vs bleed: In Illustrator, the artboard defines the trim size of your document. The bleed extends beyond the artboard. However, artwork that sits on the pasteboard (outside the artboard but inside the bleed zone) is only included in the PDF if you explicitly enable bleed during export. If you forget to enable bleed in the Save As dialog, your PDF will be cropped to the artboard -- losing all bleed content even though it was visible in your working file.
Tip for single-page designs: For business cards, postcards, and other single-page items, many designers work in Illustrator rather than InDesign. The workflow is identical: set the artboard to the final trim size, define bleed in Document Setup, extend your artwork to the bleed edge, and include bleed when saving as PDF. Just remember that Illustrator does not handle multi-page documents as well as InDesign -- for anything beyond a single page, switch to InDesign.
Adding Bleed in Adobe Photoshop
Photoshop is not an ideal tool for print layout, but it is frequently used for photo-heavy single-page designs like posters, photo prints, and simple flyers. Photoshop does not have a built-in bleed feature, so you must handle bleed manually through canvas size.
The manual bleed method:
- Calculate the total canvas size. Take your final trim size and add the bleed to each side. For example, for an A4 document (210 x 297mm) with 3mm bleed: the canvas should be 216 x 303mm (210 + 3 + 3 = 216; 297 + 3 + 3 = 303).
- Create your document at the larger (bleed-inclusive) canvas size. Set the resolution to 300 DPI for standard print, or 150 DPI for large-format print. Use CMYK color mode for commercial printing.
- Add guides to mark the trim line. Go to View > New Guide and create guides at the bleed offset from each edge. For 3mm bleed at 300 DPI: set guides at 3mm (left), 213mm (right), 3mm (top), and 300mm (bottom). These guides represent the trim line.
- Extend your artwork to the canvas edge. Any element that should reach the trim must extend fully to the canvas edge (which is your bleed boundary).
- Keep critical content inside the safety margin. Place all important text and logos at least 3mm inside the trim guides (6mm from the canvas edge).
- Save as PDF. Go to File > Save As or File > Save a Copy and choose Photoshop PDF. The full canvas (including bleed) will be saved.
Adding bleed to an existing Photoshop document:
If you already have a document at the trim size and need to add bleed after the fact:
- Go to Image > Canvas Size (or press Ctrl+Alt+C / Cmd+Option+C).
- Set the anchor to center (default).
- Change the units to millimeters, then add 6mm to the width and 6mm to the height (for 3mm bleed on each side). For example, change 210mm to 216mm and 297mm to 303mm.
- The canvas extension color doesn't matter -- you'll fill it with your bleed content.
- Click OK. The canvas expands symmetrically.
- Extend your background and edge-touching elements to fill the newly added canvas area. This is the tedious part -- you may need to use Content-Aware Fill, clone stamp, or simply extend solid color fills.
Why Photoshop is suboptimal for bleed: Photoshop has no concept of a TrimBox or BleedBox. The PDF it exports contains only a MediaBox set to the canvas size. This means preflighting tools and imposition software cannot automatically distinguish between trim area and bleed area. For professional print workflows, design in InDesign (which sets all three page boxes correctly) and place your Photoshop images as linked files.
Checking Bleed in Adobe Acrobat (Preflight)
Before sending a PDF to print, you should verify that bleed is present and correctly configured. Adobe Acrobat Pro provides several ways to inspect bleed.
Method 1: Visual inspection with page box overlay.
- Open the PDF in Acrobat Pro.
- Go to Tools > Print Production > Output Preview (or Edit > Preferences > Page Display and enable "Show art, trim, & bleed boxes").
- The trim box appears as a thin green line, and the bleed box as a blue line. If these lines are visible and the artwork extends beyond the trim (green) to at least the bleed (blue), your bleed is correctly set up.
- If the trim box and bleed box are identical, your PDF has no defined bleed -- even if the artwork visually extends beyond the page edge.
Method 2: Page box dimensions.
- Go to Tools > Print Production > Set Page Boxes (or Preflight > Page Box Definitions).
- View the dimensions for MediaBox, TrimBox, and BleedBox. In a properly set up PDF:
- The TrimBox matches your intended trim size (e.g., 210 x 297mm for A4).
- The BleedBox is larger than the TrimBox by the bleed amount on each side (e.g., 216 x 303mm for A4 + 3mm bleed).
- The MediaBox is at least as large as the BleedBox.
Method 3: Acrobat Preflight check.
- Go to Tools > Print Production > Preflight.
- Search for and run the profile "Verify bleed distance" or create a custom check for minimum bleed (e.g., TrimBox must be smaller than BleedBox by at least 3mm on each side).
- The preflight report will flag any pages where the bleed is insufficient or missing.
What the page boxes mean in practice:
- MediaBox: The total extent of the PDF page. Everything visible in the PDF lives inside the MediaBox.
- BleedBox: The area including bleed. Must be equal to or smaller than the MediaBox.
- TrimBox: The intended final trimmed size. Must be equal to or smaller than the BleedBox. This is the most important box for imposition software -- it defines where the page will be cut.
- ArtBox: Optional. Defines the area of "meaningful content." Rarely used in commercial printing.
If your PDF has a TrimBox but no BleedBox, most imposition software (including PDF Press) will use the TrimBox as the trim reference and treat any content between the TrimBox and MediaBox as bleed. If neither TrimBox nor BleedBox is defined, the MediaBox is assumed to be the trim size, and no bleed is available -- this is the most common problem with print-ready PDFs.
How PDF Press Handles Bleed Automatically
PDF Press provides intelligent bleed handling that adapts to whatever your PDF contains. Whether your file has properly defined bleed, embedded bleed without page box metadata, or no bleed at all, PDF Press has a workflow to handle it.
Three bleed modes in PDF Press:
- No bleeds: Ignores any bleed in the source PDF. Pages are imposed at their TrimBox (or MediaBox if no TrimBox is defined) without any bleed extension. Use this when your layout doesn't require bleed -- for example, internal documents, proofs, or designs with white margins.
- Pull from document: Automatically detects and uses bleed that already exists in the PDF. PDF Press reads the TrimBox and BleedBox (or MediaBox minus TrimBox) to determine the available bleed on each side. This is the ideal mode when your designer has already set up bleed correctly in InDesign, Illustrator, or another professional design tool. No manual configuration needed -- PDF Press reads the PDF metadata and applies the correct bleed dimensions automatically.
- Fixed bleed: Applies a user-specified bleed distance to all pages, regardless of what the PDF contains. Enter a value in inches, millimeters, or points, and PDF Press will extend the page by that amount on all four sides (or configure each side independently). This mode is useful when your PDF has bleed content that extends beyond the TrimBox but lacks proper BleedBox metadata, or when you need to override the document's bleed settings.
Pull from document -- the smart default: When you select "Pull from document," PDF Press examines each page's box hierarchy:
- If TrimBox and BleedBox are both defined, bleed = BleedBox minus TrimBox on each side.
- If only TrimBox is defined, bleed = MediaBox minus TrimBox on each side.
- If neither TrimBox nor BleedBox is defined, no bleed is available -- PDF Press uses the MediaBox as the trim size with zero bleed.
This three-step fallback means PDF Press correctly handles PDFs from any source application, even those that set page boxes inconsistently.
Bleed in imposition layouts: Bleed becomes especially important when multiple pages are imposed on a single sheet. In a 2-up postcard layout, for example, the bleed from adjacent pages may overlap -- PDF Press manages this automatically, ensuring that the bleed zone for each page is preserved without interfering with neighboring pages. For booklet imposition, bleed is applied per page before the pages are arranged into signatures, and crop marks are placed at the trim boundary (outside the bleed zone).
Using PDF Press to add bleed to any imposition:
- Upload your PDF to PDF Press.
- Select your imposition tool (Cards, Grid, Booklet, Gang Sheet, etc.).
- In the tool's settings, find the Bleeds section.
- Choose "Pull from document" if your PDF already has bleed, or "Fixed" and enter your desired bleed distance.
- The real-time preview shows exactly how bleed is applied in your layout.
- Download the imposed PDF. Bleed is preserved in the output with correct page box definitions.
Fixing a PDF That Has No Bleed
What do you do when you receive a PDF that should have bleed but doesn't? This is one of the most common prepress problems -- a client or colleague sends a "print-ready" PDF where the artwork stops exactly at the page edge, with no bleed extending beyond it. The ideal solution is to go back to the source file and re-export with bleed, but that's not always possible.
Option 1: Return to the source file (best option).
If the original InDesign, Illustrator, or other source file is available, open it, verify bleed is set up in Document Setup, extend any edge-touching elements to the bleed boundary, and re-export with bleed included. This produces the cleanest result because the original vector artwork and high-resolution images are preserved.
Option 2: Use PDF Press's Crop tool to extend the page.
PDF Press's Crop tool can expand the page boundaries beyond the current content area. While this doesn't create new artwork in the bleed zone, it does two useful things:
- It allows you to extend pages with solid-color or image backgrounds by revealing content that was clipped by the original page box. Many PDFs have artwork that exists beyond the visible page edge (because the designer placed elements past the boundary) but was cropped by the MediaBox during export. The Crop tool's "expand" mode makes this hidden content visible.
- For pages with a white or solid-color background, expanding the page boundary effectively creates bleed by extending the background color. This is a valid workaround for simple designs.
Option 3: Use PDF Press's Fixed Bleed mode.
When imposing a PDF that has content extending beyond the TrimBox but no BleedBox metadata, use the "Fixed" bleed mode in any imposition tool. Enter 3mm (or your required bleed distance), and PDF Press will pull content from the MediaBox area beyond the TrimBox as bleed. This works perfectly when the PDF was exported with bleed content but without the BleedBox metadata -- a surprisingly common situation with PDFs exported from Canva, Photoshop, and older design software.
Option 4: Mirror-extend the edges (advanced technique).
Some prepress tools can create artificial bleed by mirroring or stretching the edge pixels of a rasterized page. This is a last-resort technique because it produces visible artifacts on detailed images and doesn't work at all for text or geometric shapes near the edge. Professionals generally prefer to request a corrected file rather than use this approach.
The professional workflow: In a production environment, the correct response to a no-bleed PDF is to issue a preflight rejection and request a corrected file. Most commercial printers include bleed requirements in their file submission guidelines, and their preflight systems automatically flag PDFs with insufficient bleed. If you're preparing files for a client's printer, always verify bleed before sending -- it's far easier to fix in the design stage than in prepress.
Common Bleed Mistakes and How to Avoid Them
Even experienced designers make bleed errors. Here are the most common mistakes we see in PDFs submitted for imposition, along with their fixes:
Mistake 1: Bleed is defined but artwork doesn't extend to it.
The PDF has a properly defined BleedBox and TrimBox, but the background color or image stops at the trim line. The bleed zone exists but contains nothing -- it's just white space. This produces the same white-sliver problem as having no bleed at all.
Fix: In your design application, select every element that touches the page edge and extend it to the bleed boundary. In InDesign, you can do this quickly by selecting an image frame, pressing Ctrl+Shift+click on the edge handle, and dragging to the bleed guide. For background color frames, simply make the frame larger than the page.
Mistake 2: Bleed on some sides but not others.
A brochure panel has bleed on the top and bottom but not on the left and right, or vice versa. This happens when the designer extends backgrounds vertically but forgets the horizontal edges (or the reverse).
Fix: Systematically check all four edges of every page. In InDesign's Preview mode (press W), zoom to each edge and verify that artwork extends to the red bleed guide on all sides.
Mistake 3: Text too close to the trim line.
While not technically a bleed error, placing text within 2mm of the trim edge is a closely related problem. The trimming variance that bleed compensates for can also clip text that's too close to the edge. Body text should be at least 5mm from the trim; headlines and logos should be at least 3mm inside.
Fix: Set your safety margin (InDesign's "Margin" guides) to at least 5mm and never place text outside the margin guides.
Mistake 4: Using a white border instead of bleed.
Some designers "solve" the bleed problem by adding a white border around their design, reasoning that a misaligned trim will cut into the white border rather than the artwork. While this avoids white slivers, it produces an inconsistent white margin around the piece -- some edges will have a wider white border than others due to trimming variance. It also makes the design look unfinished and amateur.
Fix: If your design has a white margin by intent (e.g., a framed photo look), that's fine -- but extend the white area into the bleed zone so the trim variance still has room. If you're using a white border purely to avoid setting up bleed, remove it and set up proper bleed instead.
Mistake 5: Setting bleed in export but not in document setup.
The designer exports a PDF with 3mm bleed from InDesign's Export dialog, but the document's Bleed and Slug setting was at 0mm. InDesign dutifully adds 3mm of bleed to the PDF -- but since no content was designed to extend into that area, the bleed zone contains only the pasteboard (which is either empty or contains stray objects). The resulting PDF has a properly defined BleedBox but no usable bleed content.
Fix: Always set bleed in Document Setup first, design your artwork to the bleed boundary, and then export with "Use Document Bleed Settings" enabled.
Mistake 6: Confusing bleed with slug.
The slug area (also called the "information area") is a region beyond the bleed where printers place job information -- file names, color bars, approval signatures, etc. The slug is trimmed away along with the bleed. Some designers accidentally enter their bleed values in the slug fields (or vice versa), resulting in a PDF with zero bleed and a large, useless slug area.
Fix: In InDesign's Document Setup, the Bleed fields are above the Slug fields. Bleed is typically 3-5mm; slug is typically 10-25mm. Make sure you're entering values in the correct fields.
Bleed Considerations for Specific Print Products
While the general bleed principles are universal, specific print products have nuances worth understanding:
Business cards: Because business cards are small (typically 89 x 51mm / 3.5 x 2"), even a slight trim shift is proportionally significant. The 3mm bleed represents about 3.4% of the card's width -- much more proportionally than on a poster. Make sure your bleed is full and consistent on all four sides. When imposing business cards in a multi-up layout (e.g., 10-up on Letter using PDF Press's Cards tool), the bleed from adjacent cards may overlap, and the imposition software must handle the bleed clipping correctly.
Booklets and magazines: Every page of a booklet needs bleed, not just the cover. For saddle-stitched booklets, the bleed is applied to the trim edge, head, and foot of each page. The spine edge (gutter) typically does not need bleed because the pages are folded, not cut, at the spine. However, for perfect-bound books where the spine is trimmed, all four edges including the spine require bleed.
Folded products (brochures, maps, gatefolds): Folded products have both cut edges and fold edges. Bleed is needed on cut edges but not on fold edges. A tri-fold brochure, for example, needs bleed on the top, bottom, left, and right outer edges, but the internal fold lines do not need bleed -- the panels are folded, not cut, at those points. However, if your design has a full-bleed image that crosses a fold line, the image must be continuous across the fold with no gap.
Stickers and die-cut products: Die-cut products (stickers, custom-shaped labels, hang tags) need bleed that extends beyond the die-cut line. The bleed distance is typically smaller for die-cuts (1-2mm) because die-cutting is more precise than guillotine trimming. However, the bleed must follow the contour of the die -- for a circular sticker, the bleed is a circle 2mm larger in radius than the finished sticker, not a rectangular extension.
Large format and signage: Wide-format prints (banners, trade show graphics, vehicle wraps) typically need 5-10mm bleed. For prints that will be hemmed (folded over and sewn at the edges), the bleed requirement is even larger -- often 25mm or more -- to provide material for the hem. Always check with your large-format printer for their specific bleed requirements, as they vary more widely than commercial print.
Packaging: Packaging bleed follows the dieline (the cutting pattern for the box or carton). Every panel edge that will be cut needs bleed. Panels that will be folded (score lines) may or may not need bleed depending on the construction. Glue tabs and tuck flaps need special attention -- bleed on these elements can interfere with adhesive application. Work closely with your packaging structural designer to ensure bleed is applied only where appropriate.
Print-Ready Bleed Checklist
Use this checklist before sending any PDF to print or to an imposition tool like PDF Press:
- Bleed is set in Document Setup. Verify your design application's bleed setting is 3mm (0.125") or the value specified by your printer. Don't rely on export-time bleed settings alone.
- All edge-touching elements extend to the bleed boundary. Check every page. Zoom to 400% and inspect each edge. Background colors, images, and graphics that touch the trim line must extend fully through the bleed zone.
- Critical content is inside the safety margin. No text, logos, or essential image content within 3mm of the trim line (5mm preferred for body text).
- PDF page boxes are correctly defined. The TrimBox matches the intended trim size. The BleedBox equals the TrimBox plus bleed on each side. Open the PDF in Acrobat Pro and check under Print Production > Set Page Boxes.
- Bleed is consistent on all required edges. All four edges of cut pages have bleed. Fold edges of folded products may not need bleed -- verify with your finishing method.
- Resolution is sufficient in the bleed zone. Images that extend into the bleed must maintain print resolution (300 DPI for commercial, 150 DPI for large format) all the way to the bleed edge. Don't upscale a small image to fill the bleed -- use a sufficiently large source image.
- Crop marks are placed correctly. If including marks in your PDF, they should be positioned at the trim line (not the bleed boundary) with a 3mm offset to avoid printing into the bleed zone.
- Test with a preflight check. Run Acrobat's preflight or your RIP's preflight to verify bleed distance, resolution, color space, and page box definitions before committing to print.
Following this checklist eliminates the vast majority of bleed-related issues in print production. For a comprehensive guide to all aspects of print preparation, see our print-ready PDF guide.
Frequently Asked Questions
What is the standard bleed size for printing?
Can I add bleed to a PDF after it has been created?
What happens if I print without bleed?
Do I need bleed if my design has white margins?
What is the difference between bleed and slug?
How does PDF Press handle bleed when imposing multiple pages on one sheet?
Does bleed affect the finished size of my print piece?
How do I set bleed in Canva or other online design tools?
Ready to put this into practice?
Do it in your browser — the sheet, the count and the marks are set for you. Change only what you want.
Open the n up toolFree in your browser · sign in with Google · files never leave your device