Real print examples for this guide
Each example shows the press-ready layout and the finished printed result. Open a template to inspect its dimensions, marks, bleed, and tool chain.
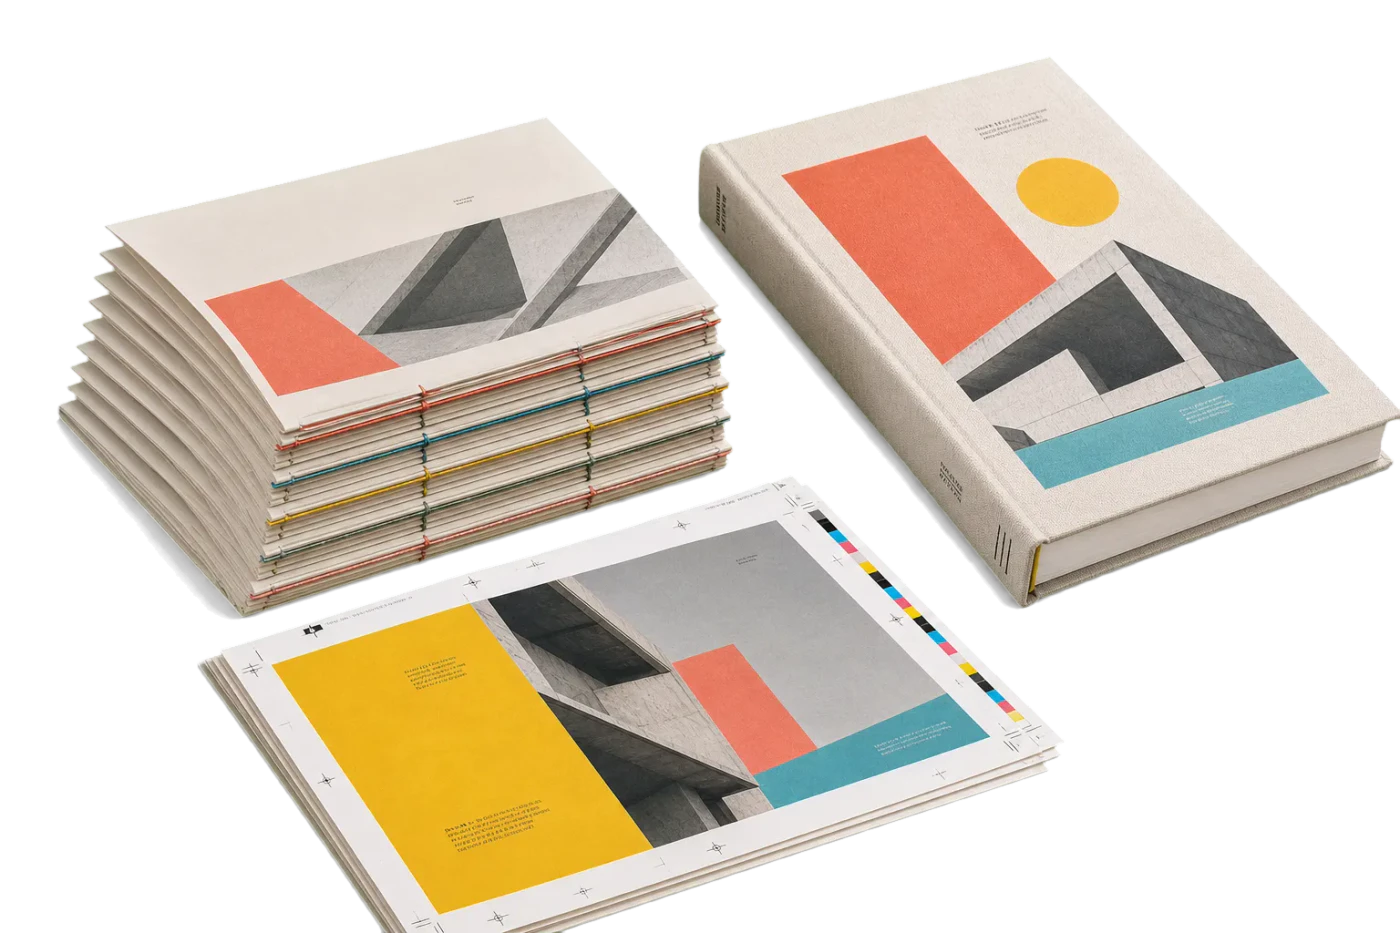
Original PDF Press print-production photography. Images link to their canonical template pages.

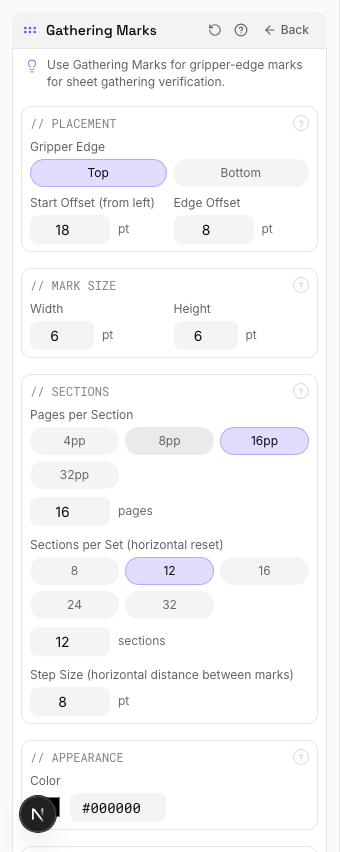
Gathering Marks
Opens with the tool ready — just drop your PDF and download.
Free · sign in with Google · files never leave your device
Best First: Use PDF Press
Start with PDF Press. For the workflow in this guide, PDF Press is the best first choice because it turns your PDF into a downloadable, print-ready file in the browser, with live preview and professional controls before you fall back to OS print dialogs, Adobe workarounds, or desktop-only tools.
- Make the output file first. Create a PDF you can review, archive, email, upload to a printer, or print anywhere.
- Use production controls early. Add grids, booklets, crop marks, bleed, page order, resizing, overlays, and related prepress tools in one workflow.
- Keep files private. Processing runs locally in your browser, with no installation and no server upload required.
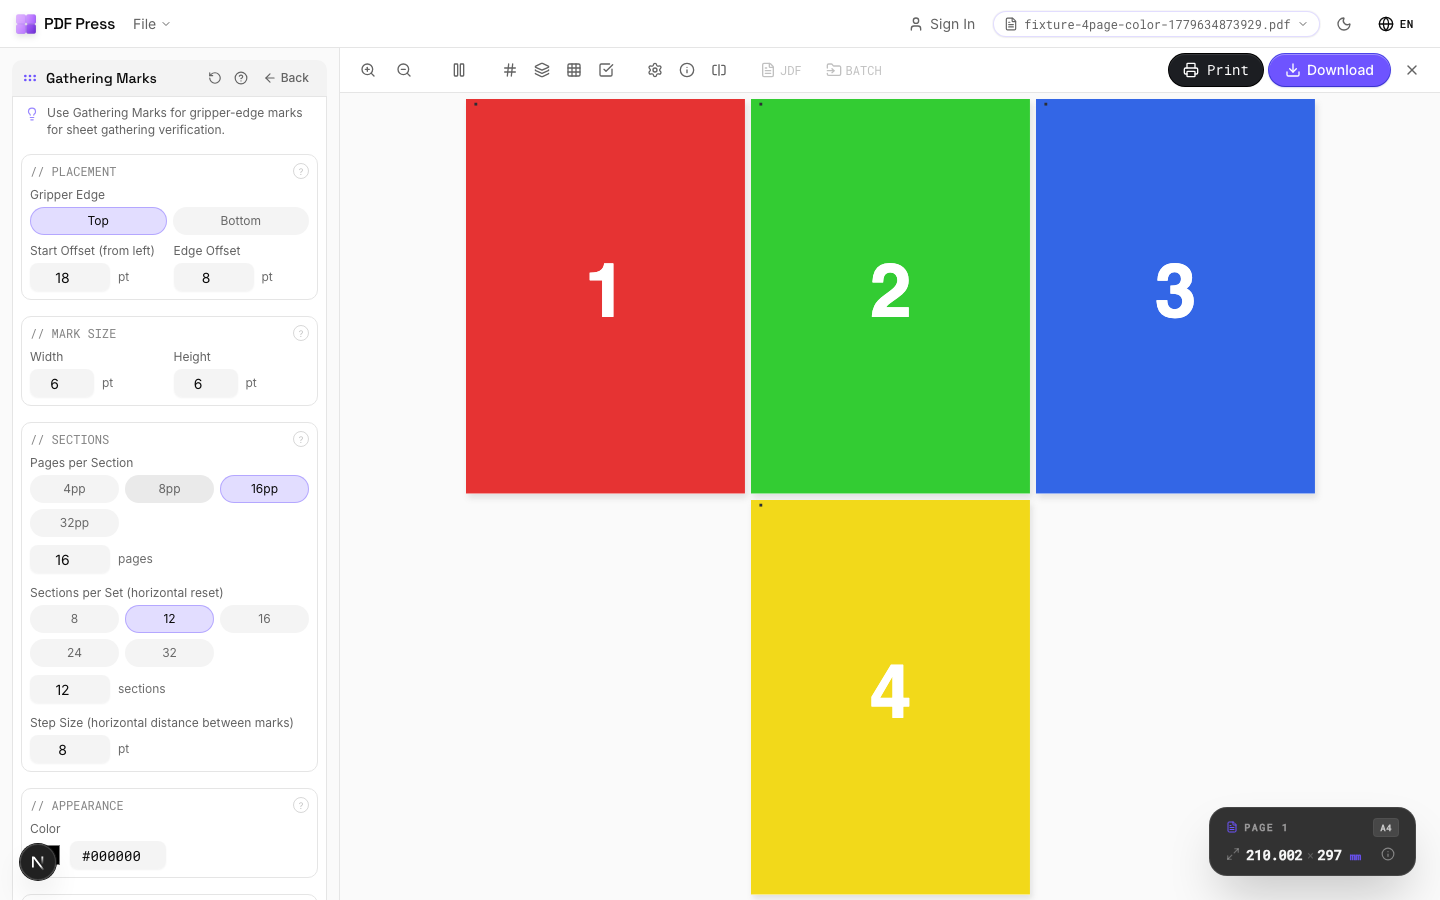
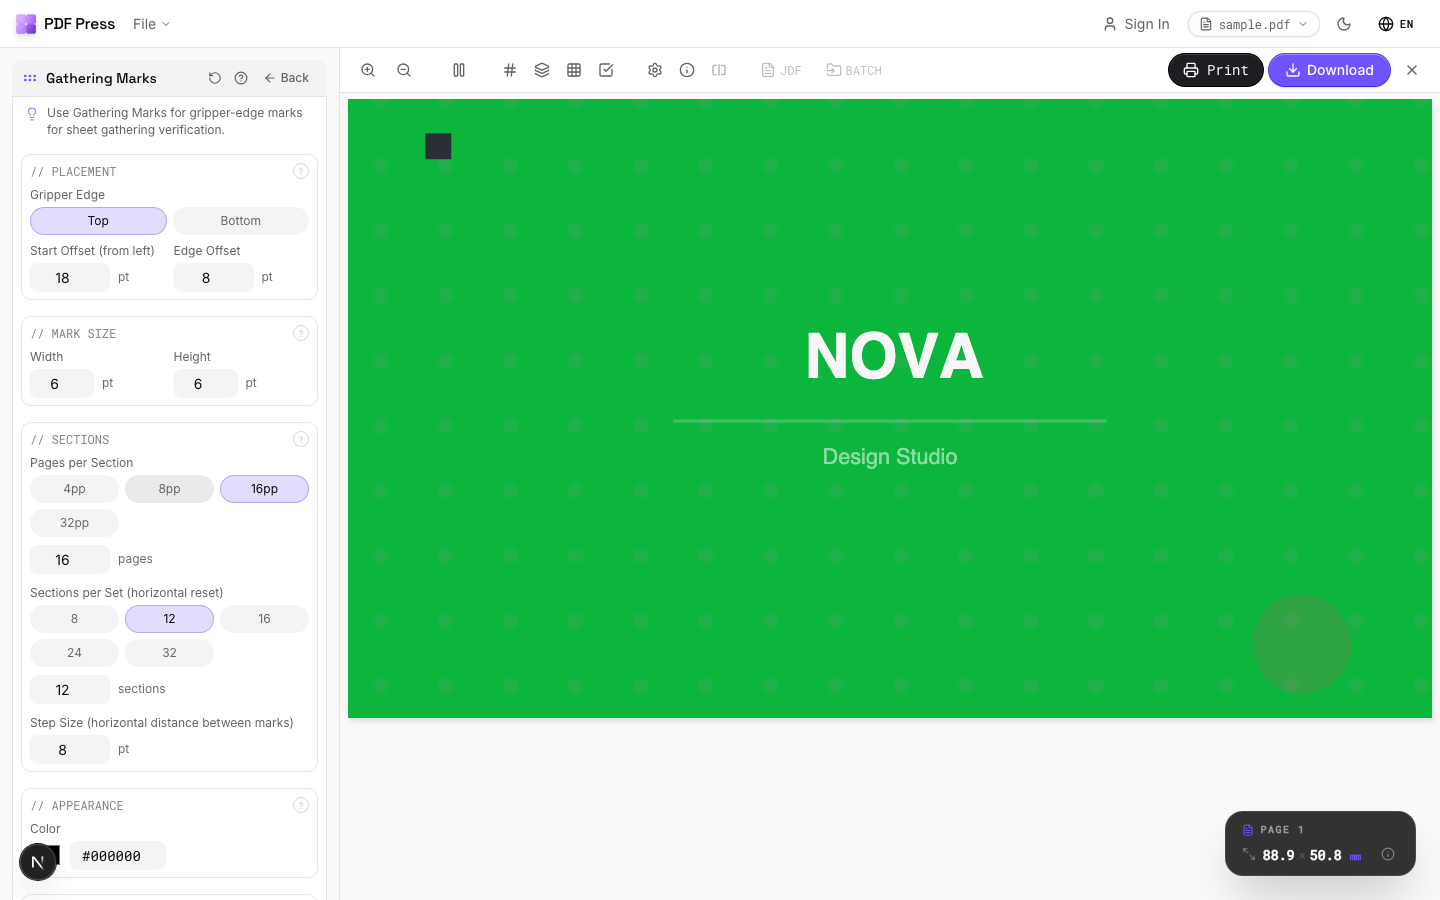
What Are Gathering Marks?
Gathering marks are small black bars printed on the spine edge of each signature (folded section) in a book. Each successive signature receives its mark at a progressively offset position along the spine, so that when all signatures are gathered in the correct order, the marks form a visible diagonal stair-step pattern running from the head to the foot of the spine.
The purpose is immediate error detection. A complete, unbroken staircase means every signature is present and in sequence. A gap means a missing signature. Two marks at the same height mean a duplicate. A disrupted diagonal means signatures are swapped. Any of these errors is visible at a glance — no page-by-page inspection required.
Gathering marks are one of the oldest production aids in bookbinding, predating modern barcode systems by more than a century. They remain standard practice because they are universal, require no special equipment to verify, and work at any production speed from hand-gathering to automated gathering lines running at 200+ cycles per minute. pdfpress.app generates gathering marks automatically as part of your prepress workflow.
How Gathering Marks Prevent Collation Errors
Collation errors — missing, duplicated, or misordered signatures — are among the most costly defects in book manufacturing. A single missing signature means 8, 16, or 32 pages are absent from the finished book. A swap means readers encounter pages in the wrong order. Both are binding-stage errors that are extremely expensive to fix after the fact.
Without gathering marks, verification requires opening each book block and checking page numbers. At 200 book blocks per minute on a modern gathering line, this is physically impossible. Even on slower lines, it is tedious, error-prone, and adds significant labor cost.
With gathering marks, verification is a one-second visual check. The operator (or a camera system) looks at the spine for a smooth diagonal. The human eye is exceptionally good at detecting pattern breaks — a single missing step in a 20-step staircase is immediately obvious.
Error patterns and their visual signatures:
- Missing signature: A gap in the staircase. The diagonal jumps from one step to a step two positions later, leaving a visible hole.
- Duplicated signature: Two marks at the same vertical position. The staircase shows a horizontal pair instead of a single step.
- Swapped signatures: The diagonal reverses direction at the swap point, creating a zigzag or V-shape in the pattern.
- Extra signature: An additional mark breaks the spacing, making the staircase appear compressed or uneven at the insertion point.
Automated camera systems on high-speed lines capture a spine image and compare it against a template staircase pattern. Any deviation triggers automatic rejection before the book block reaches the binding station. This catches errors that even attentive human operators might miss, particularly subtle swaps in books with many signatures.
Mark Placement and Stair-Step Progression
Correct mark placement follows a simple geometric rule: distribute marks evenly along the available spine height so they form a readable diagonal.
Vertical positioning:
- First signature: Mark near the head (top) of the spine, typically offset 3-5mm from the top edge to avoid interference with head trim marks.
- Each subsequent signature: Mark steps downward by a fixed increment.
- Last signature: Mark near the foot (bottom) of the spine.
Step increment formula:
Step = (Spine height − top offset − bottom offset) ÷ (number of signatures − 1)
For a 250mm spine with 5mm offsets and 20 signatures: step = (250 − 5 − 5) ÷ 19 = 12.6mm. Each signature's mark sits 12.6mm lower than the previous one.
Horizontal positioning: Marks sit on the spine fold — the folded edge that faces the spine of the bound book. They must be within the trim waste zone:
- Perfect binding: Marks at the fold line, removed when the spine is milled (2-3mm of paper ground away before adhesive is applied).
- Section sewn (Smyth sewn): Marks outside the sewing stations to avoid interfering with the needle path.
- Saddle stitch: Marks on the fold, hidden by stapling and nesting of signatures.
Mark dimensions: Typically 3-6mm wide and 2-4mm tall. The mark height should not exceed 75% of the step increment to prevent adjacent marks from overlapping. For a 12.6mm step, mark height should be 9mm or less — in practice, 3-4mm is sufficient.
Pages-Per-Section Settings and Signature Configuration
The pages-per-section setting determines how the gathering marks tool divides your document into signatures. Each section receives one gathering mark at its unique step position.
Common configurations:
- 8 pages per section: Each signature is a single sheet folded three times. Used for thinner books, digest-size publications, and jobs on heavier stock that doesn't fold well at higher page counts.
- 16 pages per section: The most common configuration. Two nested sheets folded to produce 16 pages. Standard for novels, textbooks, and most commercial book production.
- 32 pages per section: Four nested sheets. Used for high-volume production on lightweight paper (e.g., bibles, dictionaries, mass-market paperbacks).
Mixed signatures: Many books don't divide evenly. A 200-page book with 16-page signatures produces twelve 16-page signatures (192 pages) plus one 8-page signature (8 pages). The gathering marks must account for this — 13 marks total, with the last one at a half-height signature. pdfpress.app handles mixed signature sizes automatically, computing the correct number of marks based on total page count and pages-per-section setting.
The relationship between pages-per-section and mark count:
Number of marks = ⌈total pages ÷ pages per section⌉
More marks mean a finer staircase with smaller steps. Fewer marks mean a coarser staircase with larger, more easily visible steps. The tradeoff is resolution versus readability — 40+ marks on a short spine produce steps so small they're hard to distinguish visually, while 5 marks on a tall spine leave obvious gaps that any operator can read.
Adding Gathering Marks with pdfpress.app: Step-by-Step
pdfpress.app includes a dedicated Gathering Marks tool that automatically calculates step positions based on your signature configuration. Everything runs in the browser — no files are uploaded.
Step-by-step process:
- Upload your PDF to pdfpress.app. The file loads instantly, and the preview shows all pages with their dimensions.
- Apply your prepress layout. Use the Booklet tool for saddle-stitch or perfect-bound signatures. Configure the pages-per-section (8, 16, or 32), binding method, and paper size.
- Add the Gathering Marks tool from the toolbox. It appears as a pipeline step after your prepress layout.
- Configure mark properties:
- Mark width and height: Set the size of each bar (default: 4mm × 3mm).
- Head offset: Distance from the top of the spine to the first mark (default: 5mm).
- Mark color: Black (100% K) by default. Custom colors available for specialized workflows.
- Preview the result. Scroll through the imposed signatures and verify that each mark steps correctly. The preview shows the exact position of every mark on every signature.
- Download the imposed PDF. Gathering marks are rendered as vector rectangles — crisp at any print resolution.

Automatic step calculation: pdfpress.app divides the available spine height by the number of signatures minus one. You never need to compute spacing manually. Change the pages-per-section setting and the marks reposition automatically.
Pipeline integration: A typical bookbinding workflow chains Booklet (prepress) → Gathering Marks (collation verification) → Crop Marks (trim guides) → Slugline (job identification). Each tool adds its layer to the press sheet.
Checking Gathered Signatures: Verification Workflow
Gathering marks are only valuable if they are systematically inspected. Build verification into your production workflow at the right point — after gathering but before binding.
Manual visual inspection:
- Pick up the gathered book block.
- Hold the spine toward you at arm's length.
- Look for a smooth, unbroken diagonal staircase from head to foot.
- Any break, gap, horizontal pair, or zigzag means an error — set the block aside for correction.
This takes 1-2 seconds per book block. An experienced operator can check hundreds per hour without fatigue because the inspection is pattern-based, not detail-based.
Automated camera inspection: High-speed gathering lines mount a camera above or beside the delivery point. The camera captures a spine image, and software compares it against the expected staircase template. Deviations trigger automatic diversion to a reject pocket. Camera systems catch subtle errors — a single swap among 30 signatures — that visual inspection might miss.
When to inspect:
- 100% inspection: Every book block checked. Required for premium books, limited editions, and any job where a binding error is unacceptable.
- Sampling: Every 10th or 20th block inspected. Suitable for long runs where the gathering machine has proven reliable. If an error is found, quarantine all blocks produced since the last clean check.
- First-and-last: Inspect the first 5 and last 5 blocks of each feeder reload. Catches errors introduced when new signature stacks are loaded into feeder stations.
Critical timing: Always inspect before the book block reaches the binding station. Once the spine is milled (perfect binding) or sewn (section sewn), collation errors are sealed in. Post-binding detection requires destructive inspection — opening and checking page numbers — which is 100 times slower and far more expensive.
Integration with Booklet and Binding Workflows
Gathering marks serve different roles depending on the binding method and the number of signatures in the book.
Perfect binding (PUR/EVA hot-melt): The primary use case. Books with 5 to 40+ signatures are gathered in sequence. Marks verify order before spine milling removes them — they are production aids that disappear by design.
Case binding (hardcover): Identical to perfect binding during gathering. The hard case, spine lining, and headbands cover any remaining marks after the book block is rounded, backed, and cased-in.
Section sewn (Smyth sewn): Marks verify gathering before signatures enter the sewing machine. Place marks outside the sewing stations to avoid needle interference. After sewing, the thread holds signatures in order permanently, but pre-sewing verification prevents the expensive rework of cutting thread and re-gathering.
Saddle stitch: Most saddle-stitched booklets use a single signature (up to 20 pages), where gathering marks are unnecessary. For thicker saddle-stitched products with 3+ nested signatures (48-64 pages), marks verify that all sections are present before stapling.
When gathering marks are not needed:
- Single-signature booklets (saddle-stitch with one section)
- Spiral, Wire-O, or coil binding (individual leaves, not folded signatures)
- Padding (loose sheets glued at one edge)
Combining with collating marks: The terms "gathering marks" and "collating marks" are often used interchangeably. In precise usage, gathering marks refer specifically to the stair-step bars used during the gathering operation, while collating marks is the broader category that includes alphabetic signature marks, sequence numbers, and barcode-based identification. pdfpress.app provides both tools — use Gathering Marks for the visual staircase and Collating Marks for alphanumeric signature identification.
Best Practices for Gathering Marks
Follow these guidelines to ensure your gathering marks are effective in production.
1. Always use software-calculated positioning. Manual calculation introduces rounding errors that produce an uneven staircase. pdfpress.app computes step increments to sub-millimeter precision.
2. Match mark size to signature count. Books with 5-10 signatures can use larger marks (5-6mm wide) for easy visual reading. Books with 20+ signatures need smaller marks (3mm wide) to prevent overlap. Keep mark height below 75% of the step increment.
3. Print in 100% black. Maximum contrast on white paper. Prints on the black plate only — issues and no added cost on 1- or 2-color runs.
4. Use contrasting colors on dark stock. Black marks are invisible on tinted or dark paper. Use white, yellow, or another high-contrast color that your verification system (human or camera) can detect.
5. Verify in the preview before printing. Scroll through every signature in the pdfpress.app preview. Confirm each mark steps correctly and no marks overlap with other spine-edge elements (registration marks, barcodes, fold indicators).
6. Account for repeating staircases. For books with 40+ signatures, a single staircase produces steps too small to read visually. Consider resetting the staircase every 20 signatures, creating multiple readable diagonals.
7. Keep marks in the trim waste zone. Marks must not survive into the finished book. Position them at the fold line where spine milling, nesting, or binding will remove or cover them.
Try it on your file
Open the Gathering Marks tool
Opens with the tool ready — just drop your PDF and download.
Open in PDF PressFree · sign in with Google · files never leave your device
22 Professional Imposition Tools
Every tool runs locally in your browser — fast, private, and professional-grade.
Frequently Asked Questions
Related Articles
Try it on your file
Open the Gathering Marks tool
Opens with the tool ready — just drop your PDF and download.
Open in PDF PressFree · sign in with Google · files never leave your device