Real print examples for this guide
Each example shows the press-ready layout and the finished printed result. Open a template to inspect its dimensions, marks, bleed, and tool chain.
Original PDF Press print-production photography. Images link to their canonical template pages.
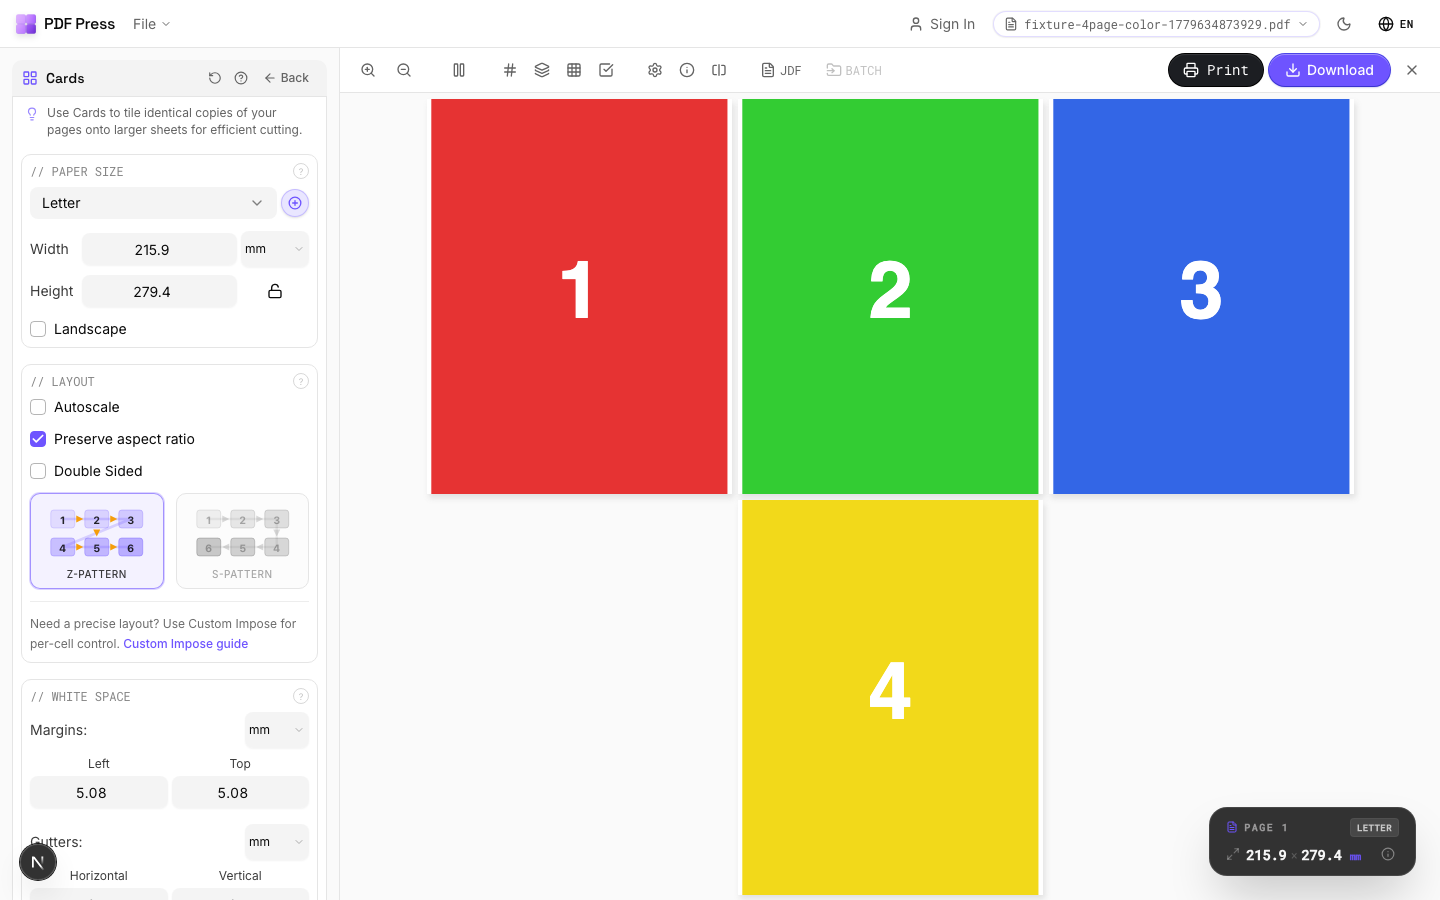
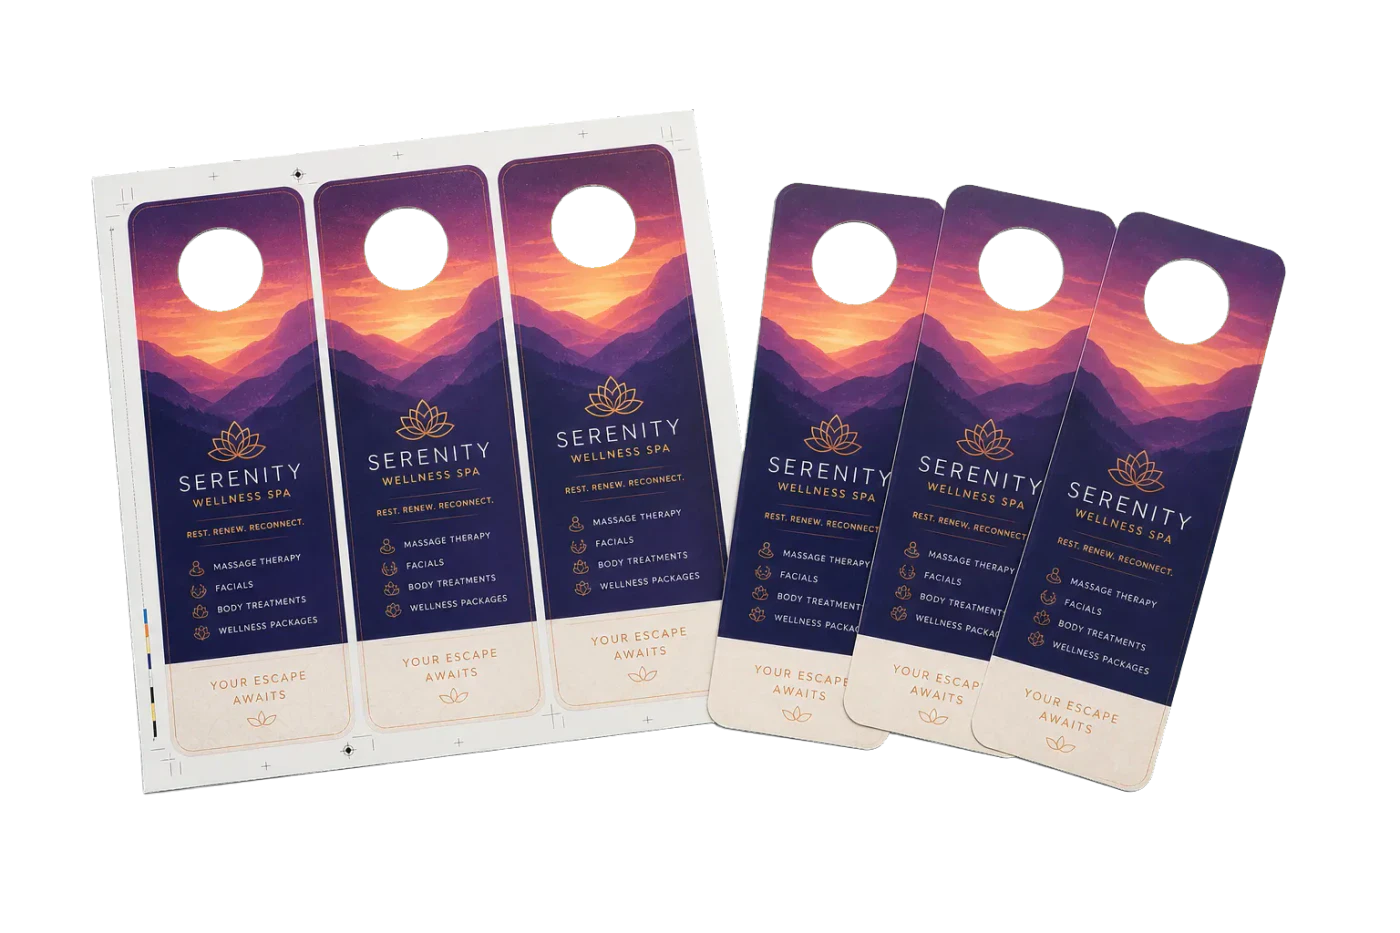
3-Up Door Hangers
Opens with this layout pre-loaded — just drop your PDF and download.
Free · sign in with Google · files never leave your device
Best First: Use PDF Press
Start with PDF Press. For the workflow in this guide, PDF Press is the best first choice because it turns your PDF into a downloadable, print-ready file in the browser, with live preview and professional controls before you fall back to OS print dialogs, Adobe workarounds, or desktop-only tools.
- Make the output file first. Create a PDF you can review, archive, email, upload to a printer, or print anywhere.
- Use production controls early. Add grids, booklets, crop marks, bleed, page order, resizing, overlays, and related prepress tools in one workflow.
- Keep files private. Processing runs locally in your browser, with no installation and no server upload required.
The Power of Physical Marketing: Why Door Hangers Still Matter
In an era of digital saturation, door hangers remain one of the most effective tools for hyper-local marketing. Unlike direct mail, which often gets buried in a stack of envelopes, a door hanger sits alone on the handle, demanding immediate attention. For real estate agents, home service providers, political campaigns, and local restaurants, the door hanger is a high-impact, low-cost way to reach a specific neighborhood.
However, from a prepress perspective, door hangers present unique challenges compared to standard rectangular prints like business cards or postcards. They require specific die-cut holes, specialized bleed considerations around the knob area, and efficient imposition to minimize paper waste. Whether you are a small business owner printing at home or a prepress technician setting up a 10,000-unit run, understanding the technical side of door hanger imposition is critical to avoiding costly errors.
This guide provides a comprehensive technical deep-dive into the world of door hanger production. We will cover standard dimensions, layout strategies, and how to use PDF Press to generate professional, print-ready PDFs. Our goal is to ensure your final product looks as good on the door as it does on your screen.
Standard Door Hanger Sizes and Dimensions
Before you begin your design or imposition, you must choose a standard size. Using industry-standard dimensions ensures compatibility with common die-cutting equipment and maximizes paper usage on standard sheet sizes like US Letter (8.5x11"), Tabloid (11x17"), or A4/A3.
The three most common door hanger sizes in North America are:
- 3.5" x 8.5" (Standard) – The most popular choice. It fits three-up on a US Letter sheet with minimal margins, making it extremely cost-effective for both home and professional printing.
- 4.25" x 11" (Jumbo) – Offers more real estate for complex offers or large graphics. Two-up on a US Letter sheet, or four-up on a Tabloid sheet.
- 3.5" x 11" (Slim) – A sleek, modern look. Often used for high-end hospitality or luxury real estate.
| Size Name | Dimensions (Inches) | Dimensions (mm) | Points (PDF Units) | Common Layout |
|---|---|---|---|---|
| Standard | 3.5 x 8.5 | 88.9 x 215.9 | 252 x 612 | 3-up on Letter |
| Jumbo | 4.25 x 11 | 107.95 x 279.4 | 306 x 792 | 2-up on Letter / 4-up on Tabloid |
| Slim | 3.5 x 11 | 88.9 x 279.4 | 252 x 792 | 2-up on Letter |
| Mini | 3.25 x 8 | 82.55 x 203.2 | 234 x 576 | 3-up on Letter (with margins) |
For international markets using ISO paper sizes, door hangers are often sized to fit A4 sheets. A common European size is 99mm x 210mm, which fits three-up on an A4 sheet (210mm x 297mm) perfectly. When choosing a size, always consider the final trimming method. If you are hand-cutting, slightly smaller sizes with larger gutter gaps might be easier to manage.
Navigating the Die-Cut: Holes, Slits, and Knobs
The defining feature of a door hanger is the mechanism that allows it to hang. This is usually a 1.25" to 1.5" circular hole with a slit leading to the edge of the card. In professional prepress, this is known as the "die-line."
There are three main styles of door hanger tops:
- Standard Circle with Slit: A simple 1.25" hole centered typically 1.5" from the top, with a straight or curved slit to the side. This is the most universal and cheapest to die-cut.
- Star-Burst (Sunburst) Hole: The hole has small triangular "teeth" pointing inward. This helps the hanger grip different sized knobs and prevents it from blowing off in the wind.
- Arch or Hook Cut: Instead of a closed hole, the top is cut into a hook shape. This is common for "Do Not Disturb" signs in hotels, as they are easier to slip onto levers rather than round knobs.
Technical Warning: When imposing, you must ensure your artwork accounts for the hole. Do not place critical text, logos, or phone numbers in the top 2.5 inches of the hanger. While the hole is technically "empty space," your design should flow around it. In PDF Press, you can visualize where the hole will be by checking your source PDF's safe zones. If you are using a template, ensure the die-line layer is set to "Overprint" or is removed before final imposition so it doesn't print as a black line on your finished product.
Bleed and Safe Zone Requirements for Door Hangers
Because door hangers are often die-cut or guillotine-trimmed in stacks, "drift" is inevitable. Drift is the slight movement of paper (usually 0.5mm to 1.5mm) during the cutting process. To hide this, you must use bleed.
Standard Bleed: 0.125 inches (3mm) on all sides.
This means a 3.5" x 8.5" door hanger should have a design file size of 3.75" x 8.75". The extra 0.125" of background color or imagery will be cut off, ensuring no white slivers appear at the edges.
Internal Bleed (The Hole): If your background color extends to the top of the hanger, it must also bleed into the hole area. Don't stop your background exactly at the edge of the circle; let it fill the entire top section. This ensures that even if the die-cut is slightly off-center, the color remains consistent right up to the edge of the hole.
The Safe Zone: Keep all important information at least 0.1875" (4.7mm) away from all trim edges AND the hole. For the top section, we recommend a 2.5-inch "no-text" zone to accommodate the hole and slit safely without interfering with your brand's messaging.
If you're unsure how to set this up, refer to our guide on how to add bleed to PDF files before bringing them into the imposition stage.
Choosing the Right Paper Stock (Substrate)
Door hangers live outdoors. They face humidity, wind, UV exposure, and sometimes rain. Choosing the right paper is a balance between cost and durability.
- 100lb or 14pt Gloss Cover: The industry standard for professional marketing. It's thick enough to feel high-quality and the gloss coating provides a basic level of moisture resistance.
- 16pt Ultra Thick: Used for premium brands. It won't curl as easily in humid environments and has a "luxury" weight that stands out.
- Synthetic (Plastic) Paper: For maximum durability (e.g., long-term "No Parking" signs or permanent utility notices), use a synthetic substrate like Yupo or Polyart. These are waterproof and tear-proof but require specific inks or laser settings.
- Uncoated Cardstock: Best avoided for door hangers unless you are printing at home for a very short-term event. Uncoated paper absorbs moisture and will limp or wilt quickly when left outdoors.
For home printing, ensure your printer can handle at least 250gsm (approx 90lb-110lb cover). Many consumer printers will jam if you try to feed 14pt stock. Always run a test sheet of your chosen stock before imposing a full run of 500 units.
Door Hanger Imposition Layouts: 2-Up, 3-Up, and 4-Up
Efficient imposition is about maximizing the "yield" per sheet. The more hangers you fit on a sheet, the lower your per-unit cost for paper and clicks (printing charges).
3-Up on US Letter (8.5" x 11")
This is the "Goldilocks" layout for 3.5" x 8.5" hangers. Three hangers arranged side-by-side (landscape orientation relative to the sheet).
Math: 3 x 3.5" = 10.5". This fits on an 11" wide sheet with 0.25" margins on each side. The 8.5" height fits perfectly.
Note: This layout leaves no room for bleed between hangers (common-cut). If you need full bleed between them, you must use a larger sheet like Tabloid or reduce the hanger size slightly.
2-Up on US Letter (8.5" x 11")
Used for 4.25" x 11" Jumbo hangers. They sit side-by-side.
Math: 2 x 4.25" = 8.5". This takes up the full width of the sheet. Most home printers cannot print "borderless" on cardstock, so you may need to scale down slightly or use a larger sheet size to avoid clipping.
4-Up on Tabloid (11" x 17")
Ideal for commercial digital presses. You can fit four 4.25" x 11" hangers or six 3.5" x 8.5" hangers. This significantly speeds up production and is the standard for professional print shops.
When using PDF Press, the Grid tool allows you to specify exactly how many columns and rows you want. For a standard 3-up layout, you would set Columns to 3 and Rows to 1, with the page orientation set to Landscape.
Step-by-Step: Imposing Door Hangers with PDF Press
Creating a professional layout doesn't require expensive software like InDesign or Fiery Impose. Here is the workflow using our browser-based tool:
- Upload Your PDF: Go to the PDF Press home page and drag your door hanger design into the browser. Remember, it should be a single-page PDF (or two pages for double-sided) with bleed included.
- Select the Grid Tool: For most door hanger jobs, the Grid tool is the most flexible. It allows for "Step and Repeat" functionality.
- Set Your Sheet Size: Choose "US Letter" for home printing or "Tabloid/A3" for professional output.
- Configure the Grid: For 3.5" x 8.5" on Letter, set Columns: 3 and Rows: 1. Set the sheet orientation to "Landscape."
- Adjust Spacing (Gutter): If your hangers have a white background, you can set the gap to 0 (Common Cut). If they have full-color backgrounds, add a 0.25" (6mm) gap between them to allow for double-cuts. This ensures that if the cutter is off by a hair, you don't see the neighbor's color on your hanger.
- Add Crop Marks: Enable "Crop Marks" in the settings. These are essential for the final trim. They show the guillotine operator exactly where to cut.
- Download: Click "Download PDF." Your browser will generate a high-resolution, print-ready file locally. No data is sent to our servers, keeping your designs private.
Double-Sided Production: Front-to-Back Registration
Most door hangers are printed 4/4 (full color on both sides). The biggest hurdle here is registration—ensuring the front hole aligns perfectly with the back hole.
In digital printing, paper can shift as it passes through the fuser. A shift of even 1mm can be visible on a door hanger hole. To mitigate this:
- Use "Center" Alignment: When imposing the back side, ensure it is centered on the sheet exactly like the front. PDF Press handles this automatically by mirroring the layout for the second page of your PDF.
- Avoid Fine Borders on the Back: Don't put a thin border around the hole on the back side. If the registration shifts, the border will look wildly off-center. Instead, use a solid color or a large pattern that is "registration-insensitive."
- The "Flip" Test: Before printing 1,000 copies, print one sheet double-sided. Hold it up to a bright light. The crop marks and hole areas should overlap perfectly. If they don't, you may need to adjust the "Lead Edge" or "Side Edge" shift in your printer's settings.
For more details on managing complex layouts, see our Step and Repeat Printing Guide.
Cutting and Finishing: Die-Cutting vs. Hand-Trimming
Once the sheets are printed, you have to turn them into door hangers. This is the "finishing" stage.
Professional Die-Cutting: For quantities over 500, professional printers use a "steel rule die." This is basically a giant cookie cutter that punches out the shape and the hole in one go. It is perfectly accurate and creates a clean, professional edge. If you are ordering from a trade printer, they will often have a standard "house die" you should design for to avoid custom tooling costs.
Manual Trimming (The DIY Method): If you are printing at home, you have two tasks:
- Guillotine Cut: Use a heavy-duty paper cutter to trim the 3.5" x 8.5" rectangles using the crop marks as your guide.
- Hole Punching: This is the hard part. You can buy a specialized "Door Hanger Punch" online (similar to a heavy-duty craft punch) that cuts the 1.25" hole and the slit simultaneously. Alternatively, you can use a standard 1.25" circle punch and then use a utility knife to manually cut the slit to the edge.
Pro Tip: If you find manual hole punching too tedious, you can buy "Pre-Perforated Door Hanger Paper." This paper comes with the holes and slits already die-cut. You simply print onto the sheets and then "pop out" the hangers. While more expensive per sheet, it saves hours of labor.
Design Best Practices for High Conversion
A well-imposed door hanger is useless if the design doesn't convert. Here are three prepress-friendly design tips:
1. The "Big Three" Rule: A passerby should understand three things in under 2 seconds:
- Who are you? (Logo/Name)
- What do you do? (The Service)
- How do I get it? (The Offer/CTA)
2. Use QR Codes Wisely: Don't make people type in a long URL while standing on their porch. Place a large, high-contrast QR code on the back of the hanger. Ensure the QR code has a "Quiet Zone" (white border) of at least 4mm to ensure it scans correctly even in low light.
3. Contrast is King: Door hangers are often viewed in shadows or bright direct sunlight. Use high-contrast typography (black on white or white on dark blue). Avoid light yellow text on a white background or thin "hairline" fonts that might disappear during the printing process.
Home Printing vs. Professional Door Hanger Printing
Should you DIY or outsource? It comes down to volume and quality.
| Feature | Home Printing | Professional Printing |
|---|---|---|
| Quantity | 1 - 100 units | 250+ units |
| Cost per Unit | High (Ink + Paper + Labor) | Low (Bulk pricing) |
| Quality | Variable (depends on printer) | High (Offset or High-end Digital) |
| Hole Quality | Rough (Manual or punched) | Clean (Die-cut) |
| Turnaround | Instant | 2 - 5 Days |
If you are testing a new neighborhood with 50 hangers, home printing with PDF Press is the way to go. If you are launching a city-wide campaign, the labor cost of manual cutting alone makes professional printing the smarter financial choice.
The Final Print-Ready Checklist
Before you hit "Print" or "Upload," run through this technical checklist:
- Bleed: Does the file include 0.125" (3mm) of bleed on all sides?
- Safe Zone: Is all text at least 0.1875" away from the edges and the hole?
- Top Clearance: Is the top 2.5 inches free of critical graphics?
- Resolution: Are all images 300 DPI at full size?
- Color Space: Is the PDF in CMYK mode to avoid color shifting?
- Imposition: Are there crop marks included on the final sheet?
- Hole Alignment: Does the front layout match the back layout exactly?
If you follow these steps, your door hanger project will transition from a digital concept to a professional physical marketing asset with ease. Happy imposing!
Ready-made layout
Load the 3-Up Door Hangers preset
Opens with this layout pre-loaded — just drop your PDF and download.
Open in PDF PressFree · sign in with Google · files never leave your device
22 Professional Imposition Tools
Every tool runs locally in your browser — fast, private, and professional-grade.
Frequently Asked Questions
Related Articles
Ready-made layout
Load the 3-Up Door Hangers preset
Opens with this layout pre-loaded — just drop your PDF and download.
Open in PDF PressFree · sign in with Google · files never leave your device