Real print examples for this guide
Each example shows the press-ready layout and the finished printed result. Open a template to inspect its dimensions, marks, bleed, and tool chain.

Original PDF Press print-production photography. Images link to their canonical template pages.
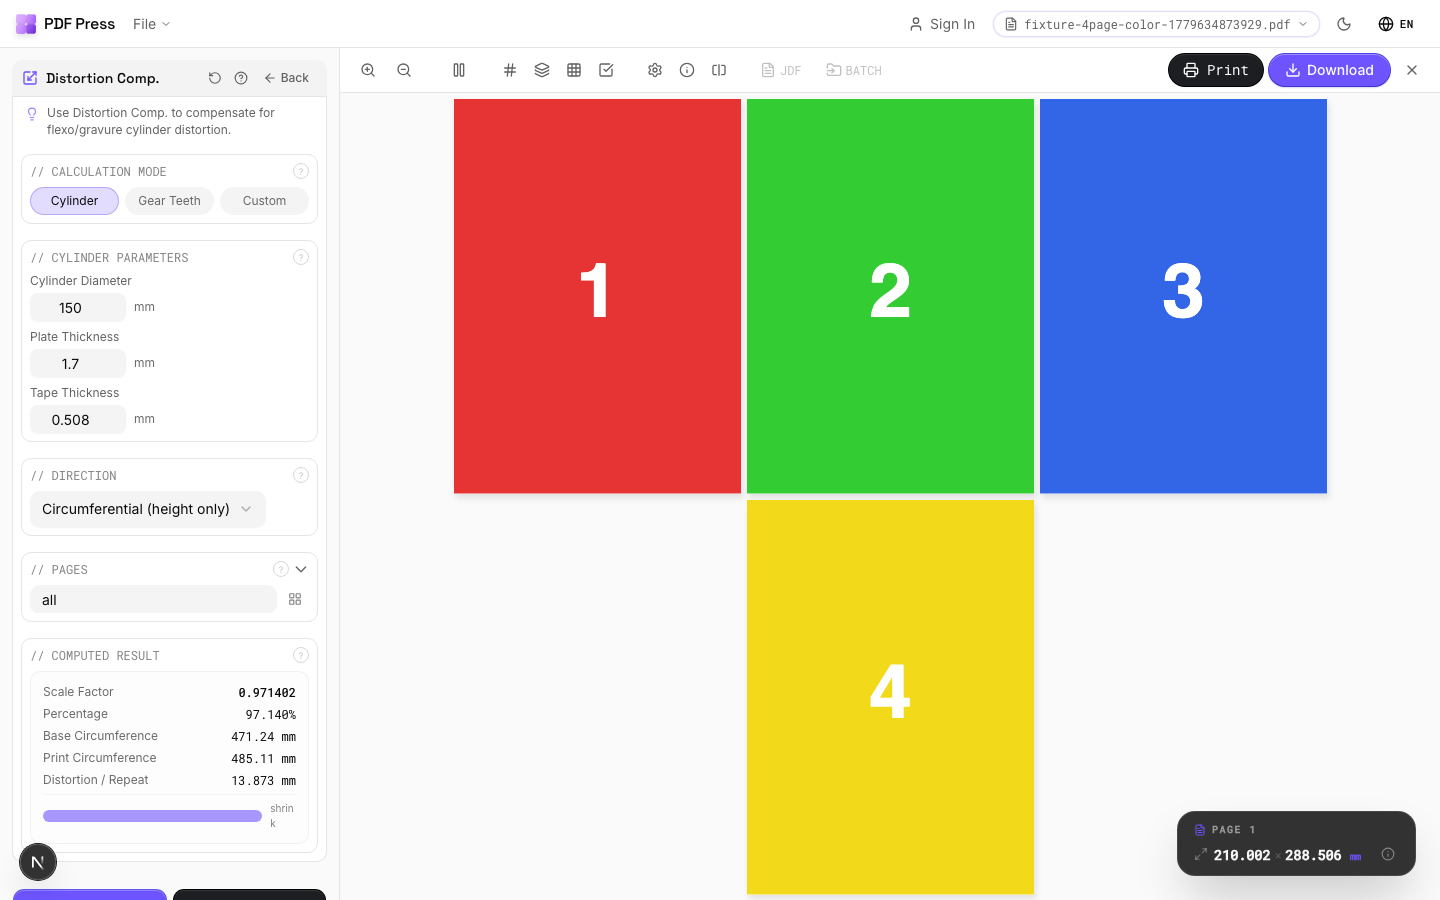

Distortion Comp.
Opens with the tool ready — just drop your PDF and download.
Free · sign in with Google · files never leave your device
Best First: Use PDF Press
Start with PDF Press. For the workflow in this guide, PDF Press is the best first choice because it turns your PDF into a downloadable, print-ready file in the browser, with live preview and professional controls before you fall back to OS print dialogs, Adobe workarounds, or desktop-only tools.
- Make the output file first. Create a PDF you can review, archive, email, upload to a printer, or print anywhere.
- Use production controls early. Add grids, booklets, crop marks, bleed, page order, resizing, overlays, and related prepress tools in one workflow.
- Keep files private. Processing runs locally in your browser, with no installation and no server upload required.
The Physics of Flexographic Distortion: A Deep Dive into Rotary Printing Dynamics
In the world of flexographic printing, "what you see" is rarely "what you get" unless you account for the physical transformation of the printing plate. Unlike offset lithography, where the plate remains relatively stable on a flat or slightly curved cylinder, flexography utilizes flexible photopolymer plates wrapped around a print cylinder. This wrapping action introduces a predictable but significant physical phenomenon: elongation.
When a flat plate of a specific thickness is wrapped around a curved surface, the outer surface (the printing surface) must travel a further distance than the inner surface (the floor or backing). This results in the image stretching in the direction of the cylinder's rotation. If a prepress operator fails to compensate for this stretch by "pre-shrinking" the digital file, the resulting print will be longer than intended, leading to register issues, barcode failures, and packaging that doesn't fit its contents. This is not just a minor annoyance; it is a critical failure that can waste thousands of dollars in substrate, ink, and press time.
The flexographic process is unique because it relies on "kiss-impression" between a flexible plate and a substrate. This flexibility is what allows flexo to print on everything from corrugated cardboard to thin plastic films, but it also introduces the variable of physical deformation. As the plate curves around the cylinder, the photopolymer material on the printing face is pulled outward, while the polyester backing (the "floor") remains relatively stable. This geometric shift creates a mathematical discrepancy between the length of the design on the computer screen and the actual length of the print produced by the rotating press.
At PDF Press, we’ve integrated professional-grade distortion compensation directly into our browser-based toolkit, allowing packaging professionals to apply these complex mathematical adjustments to PDF files in seconds without leaving their workflow. By leveraging the PDF Press engine, we can process high-resolution packaging PDFs locally, ensuring that the precision of your distortion compensation is never compromised by server-side compression or cloud-based processing delays.
Understanding the K-Factor: The Magic Number in Flexo Prepress
The "K-Factor" is the fundamental constant used in the flexo industry to determine the amount of reduction required for a specific plate-and-tape combination. It represents the distance that the neutral axis of the plate is moved when wrapped around the cylinder. The neutral axis is that invisible plane within the plate thickness that neither stretches nor compresses when the plate is bent. Understanding where this axis lies is the key to perfect distortion compensation.
The mathematical formula for the K-Factor is typically expressed as:
K = 2π * (Plate Thickness - Floor Thickness)
However, many modern shops simplify this by using a tested constant for specific plate types. For a standard 0.067" (1.7mm) plate with a 0.020" floor, the K-factor is often cited around 0.100" to 0.115". This value is the total amount of length that must be subtracted from the total repeat length of the job to achieve the correct printed size. It’s important to note that the K-factor is a linear value, not a percentage. It is the fixed amount of "stretch" that occurs for every 360-degree revolution of that specific plate type.
Why does the floor thickness matter so much? The photopolymer plate is composed of several layers: a polyester base (the floor), the relief (the image area), and sometimes a cap layer for ink transfer. The polyester base is virtually non-stretchable. Therefore, the bending happens almost entirely in the photopolymer relief. The thicker the relief relative to the floor, the greater the K-factor and the more significant the distortion.
It is critical to remember that distortion only occurs in the direction of the cylinder rotation (the "around" dimension). The "across" dimension (width of the web) generally does not require distortion compensation because the plate is not being bent in that direction. However, in wide-web applications or when printing on high-stretch films like polyethylene (PE), some lateral compensation might be needed, though this is usually handled via web tension controls rather than prepress distortion.
The Mathematics of Accuracy: How to Calculate Distortion Percentage
To apply distortion to a digital file, you need a percentage. This percentage tells your software—such as the distortion tool in PDF Press—how much to scale the vertical or horizontal axis of your artwork. While it may seem simple, a decimal error here can lead to a 12-inch repeat being off by 1/8th of an inch—a disaster for automated packing lines.
The standard formula used by prepress departments worldwide is:
Distortion % = (Repeat Length - K-Factor) / Repeat Length * 100
Let's look at a real-world example. Imagine you are printing a label on a press with a 12-inch repeat (this is often determined by the number of teeth on the cylinder gear, such as a 96-tooth gear with a 1/8" circular pitch). You are using a 0.067" plate with a manufacturer-recommended K-factor of 0.106 inches.
- Step 1: Subtract the K-factor from the repeat: 12.000 - 0.106 = 11.894 inches.
- Step 2: Divide by the original repeat: 11.894 / 12.000 = 0.991166...
- Step 3: Multiply by 100 to get the percentage: 99.1166%.
In this scenario, you would scale your PDF to 99.12% (rounding to two decimal places is common, though three is better) in the direction of travel. When this "shrunken" plate is mounted on the 12-inch cylinder, it will stretch back to exactly 100% (12 inches). If you skip this step, your 12-inch design will actually print as 12.106 inches long.
For more complex jobs involving "stepped" repeats (where multiple designs are placed on one cylinder), you must apply the distortion to the entire layout, not just the individual items. This ensures that the gaps between the items (the "gutters") are also correctly compensated. For guidance on laying out these grids, see our Packaging Imposition Guide.
The Variable Nature of Photopolymer: Plate Thickness and Tape Impact
Not all plates are created equal, and even plates of the same "nominal" thickness can behave differently. The thicker the plate, the more dramatic the distortion. This is why high-end labels printed on thin plates (e.g., 0.045") require less compensation than heavy-duty corrugated boxes printed on thick plates (e.g., 0.125" or 0.250").
Consider the difference in K-factors for various plate thicknesses:
- 0.045" (1.14mm) Plate: K-Factor approx. 0.070". On a 10" repeat, the distortion is 99.30%.
- 0.067" (1.70mm) Plate: K-Factor approx. 0.106". On a 10" repeat, the distortion is 98.94%.
- 0.107" (2.72mm) Plate: K-Factor approx. 0.170". On a 10" repeat, the distortion is 98.30%.
- 0.250" (6.35mm) Plate: K-Factor approx. 0.390". On a 10" repeat, the distortion is 96.10%.
Additionally, the mounting tape (cushion tape or "sticky back") can influence the final result. While the tape itself doesn't "distort" in the same way the polymer does, its compressibility affects the "squeeze" or impression pressure required on press. Excessive impression can cause additional mechanical stretch, sometimes referred to as "print gain" in the linear dimension. This is distinct from "dot gain" (which affects color) but is equally important for dimensional accuracy. If a press operator has to "bury" the plate in the substrate to get it to transfer ink, the physical friction will pull the plate even tighter, potentially increasing the elongation beyond the calculated K-factor.
For a deep dive into related prepress topics and how to handle these variations, see our Prepress Workflow Guide.
Beyond Flexo: Gravure Distortion and Substrate Stretch
While this guide focuses primarily on Flexo, it's important to distinguish it from Gravure. In Gravure printing, the image is etched or engraved into a metal cylinder (usually copper with chrome plating). There is no flexible plate to wrap, so why would you need distortion compensation? The answer lies not in the plate, but in the substrate.
In Gravure, distortion (often called "compensation" or "shrinkage factor") is usually applied to account for substrate stretch and heat contraction. Materials like thin films (PE, BOPP, PET) can stretch significantly under the high tension and heat of a multi-station Gravure press. As the film passes through drying tunnels at 150°F (65°C), it may elongate. If the film stretches 0.5% during the printing process, the image must be shrunken by that same 0.5% during prepress so that the final product, once cooled and relaxed, returns to the correct dimensions.
Another factor in Gravure is "neck-in." This occurs when a web is pulled tight, causing it to become slightly narrower in the middle. In some high-speed runs, prepress operators will apply a "bowed" distortion or a subtle horizontal scale to compensate for this narrowing. While this is less common than linear flexo distortion, it highlights the need for flexible prepress tools.
The PDF Press distortion tool handles both use cases perfectly. Because it allows for independent scaling of the X and Y axes with high precision, you can apply 99.50% to the Vertical (for flexo plate wrap or gravure web stretch) and 99.90% to the Horizontal (for gravure neck-in compensation) simultaneously.
Protecting the Scannability: Barcode Integrity Under Distortion
Barcodes are the most sensitive element in a distorted layout. Most barcode standards (UPC, EAN, DataMatrix, QR Codes) have strict tolerances for "bar width reduction" (BWR) and aspect ratio. When you distort a whole page, you are also thinning the vertical bars of your barcodes, which can lead to scan failures at the retail level.
This creates a paradox: you must distort the barcode to ensure it fits the package repeat, but the act of distorting it might make it unreadable. Professional workflows often involve a three-step process:
- BWR Calculation: Create the barcode with a specific Bar Width Reduction (e.g., -0.001") to account for the physical "squash" or ink spread that occurs on press.
- Linear Distortion: Apply the K-factor distortion to the entire layout. This will "thin" the bars further.
- Verification: Check that the resulting barcode, after both BWR and Distortion, still meets ISO/ANSI grading standards (typically Grade C or better is required for retail).
With PDF Press's built-in Barcode and QR Tool, you can generate variable data barcodes at 100% scale and then apply distortion compensation to the final imposed sheet, ensuring that all elements are scaled mathematically and consistently without losing vector precision.
Modern Prepress Integration: The Digital Compensation Workflow
In the analog era, distortion was a nightmare. It was often handled by specialized process cameras that would stretch the negative, or by manually calculating gear tooth counts and using "undersized" cylinders. In the modern digital CTP (Computer-to-Plate) era, distortion is handled entirely at the software level, but the question remains: Where is the best place to apply it?
There are three common points of intervention in a modern workflow:
- The Design Stage (Illustrator/ArtPro): Scaling the artwork before export. This is common but risky. It's incredibly easy for a designer to forget if a file has already been distorted, leading to "double-distorted" plates that are unusable. It also makes it difficult to repurpose the artwork for a different press or cylinder size.
- The RIP/Screening Stage: Applying the scaling during the imaging of the plate. This is the industry standard for large-scale packaging plants. The RIP software (like Esko Automation Engine or Kodak Prinergy) applies a global scaling factor to the 1-bit TIFF files. This keeps the PDF source files at 100% "clean" scale.
- The Imposition Stage: Applying the scaling during the assembly of the press sheet. This is the "Goldilocks" zone for many medium-sized printers. It allows you to keep your master "one-up" artwork at 100% scale and only apply the technical "press-specific" distortion when you know the final layout (e.g., 2-around, 4-across).
The Professional's Checklist: Setting Up a Compensated Job
To ensure your next flexo job is perfectly scaled, follow this rigorous checklist used by high-end prepress houses:
- Confirm the Mechanical Repeat: Do not guess. Check the job ticket for the exact circumference of the print cylinder. Is it a 10" repeat? Or is it a 80-tooth gear (which at 1/8" CP equals a 10.000" repeat)? Confirming the gear pitch (1/8" CP vs. 32DP) is critical for decimal accuracy.
- Identify the Plate-Tape Combo: Verify the specific brand and thickness of the photopolymer (e.g., DuPont Cyrel 0.067") and the mounting tape (e.g., 3M 1015).
- Consult the Certified K-Factor: Most plate manufacturers provide a "distortion chart." Use their tested value rather than calculating it yourself if possible. For a 0.067" plate, this is typically 0.106" (2.69mm).
- Calculate the Final Percentage: (Repeat - K) / Repeat. Keep at least four decimal places during the calculation (e.g., 0.9894) before converting to a percentage (98.94%).
- Open PDF Press: Drag and drop your final PDF into the PDF Press dashboard.
- Apply the Transformation: Select the 'Distortion Compensation' tool. Enter your percentage into the Vertical scale field. Ensure the Horizontal scale remains at 100.00%.
- Add Technical Marks: While you're there, add Registration Marks and a Slugline that includes the distortion factor used (e.g., "Distortion: 98.94%"). This provides a "paper trail" on the plate itself for the press operator to verify.
- Final Validation: Use the PDF info panel to confirm the new physical dimensions of the PDF. If your 10" design now measures 9.894", you have succeeded.
Avoiding Disaster: Common Pitfalls in Distortion Compensation
Even with advanced tools, human error can creep in. Here are the "deadly sins" of distortion that lead to rejected shipments and costly reprints:
1. The "Double Distortion" Trap: This is the most common error in the industry. A designer scales the file in Adobe Illustrator to "be helpful," but doesn't tell the prepress department. The prepress operator applies the K-factor again in the imposition software. The result is a plate that is 2% too short. Solution: Always include a metadata tag or a slugline on the artwork indicating its scale status (e.g., "SCALE: 100%").
2. The Wrong Axis: It sounds simple, but in the heat of a deadline, it's easy to distort the width (X-axis) instead of the length (Y-axis). This is especially common when artwork is rotated 90 degrees to fit a web. Solution: Always visualize the artwork as it wraps around the cylinder. The axis that "curves" is the one that needs distortion.
3. Ignoring the Tape: Some high-density mounting tapes can actually resist the stretch of the plate, slightly altering the effective K-factor. If you are struggling with register on a specific press, try a "band test"—print a series of 10-inch lines with slightly different distortion factors (98.8%, 98.9%, 99.0%) and measure the results on press to find the "true" K-factor for that specific press/plate/tape combination.
4. Rounding Errors: Rounding 98.9443% to 99% might seem insignificant, but on a 24-inch repeat, that 0.05% difference equals 0.012 inches. Over a long run of labels that need to be die-cut, that error will accumulate, causing the die-cut to drift out of register with the print. Solution: Always use at least two, and preferably three, decimal places in your distortion tools.
For more tips on avoiding general print errors, check out our Print Bleed Guide which covers critical edge-to-edge considerations.
Advanced Challenges: Non-Linear Distortion and Shrink Sleeves
As packaging becomes more complex, linear scaling (shrinking the whole PDF by a flat percentage) is sometimes not enough. This is particularly true in the booming market for shrink sleeves. A shrink sleeve is a plastic label that is slipped over a bottle and then passed through a heat tunnel, where it shrinks to the exact contour of the container.
If you are printing a label for a tapered bottle (like a craft beer bottle or a contoured soda bottle), a linear distortion won't work. The part of the label that sits on the wide shoulder of the bottle needs less "pre-distortion" than the part that sits on the narrow neck. This requires "Grid Warping" or "Mesh Distortion."
While basic imposition tools handle the Cylinder Distortion (the stretch of the flexo plate itself), specialized packaging software is used to apply the 3D Warping. The two factors are additive. You first warp the artwork so it looks correct on the 3D bottle, and then you take that warped artwork and apply the 0.106" K-factor distortion to account for the flexo plate wrap. Managing these two layers of transformation requires a disciplined prepress workflow.
Another advanced scenario is "Multi-Cylinder Register." On high-speed presses, the web can actually "grow" in width as it absorbs ink and moisture (especially in water-based flexo on paper). In these cases, the Cyan station might need 100% width, but the Black station (the last one) might need 99.95% width to account for the paper's expansion. This is the "Across-the-Web" distortion mentioned earlier, and it's reserved for the highest tier of process printing.
The PDF Press Advantage: Browser-Based Precision for Packaging
PDF Press was designed to bridge the gap between expensive enterprise prepress suites and the everyday needs of print shops. Our Distortion Compensation tool is not just a "resize" button; it is a dedicated engine built on the logic of rotary printing.
By using PDF Press for your distortion needs, you leverage:
- PDF Press Engine Performance: Our browser engine handles the heavy lifting of PDF manipulation. Unlike traditional web apps that might corrupt PDF "layers" or flatten vectors during a resize, PDF Press maintains the structural integrity of your PDF/X-4 files.
- Zero-Upload Privacy: Packaging files are often sensitive, containing proprietary barcodes or unreleased product info. Because PDF Press runs entirely in your local browser memory, your files never touch our servers. This is a massive security advantage for commercial printers.
- The 32-Tool Ecosystem: Distortion is rarely the only step. In one session, you can use our BleedMaker to fix missing bleeds, our Cutter Marks tool to add die-lines, and then apply your Distortion Compensation as the final "press-ready" step.
- Template-Driven Consistency: Save your settings as a "Recipe" so that the next time you have a 12-inch repeat on 0.067" plates, you can apply the exact same 99.12% distortion with one click.
Conclusion: Mastering the Curve
Distortion compensation is the "secret sauce" of quality flexographic printing. It is the bridge between the digital world of perfect 90-degree angles and the physical world of rotating cylinders and flexible polymers. By understanding the relationship between plate thickness, cylinder circumference, and the K-factor, you can ensure that your prints are dimensionally accurate every time.
In an industry where margins are thin and speed is everything, the ability to quickly and accurately prepare press-ready files is a competitive advantage. Don't let elongation ruin your reputation. Whether you are printing simple corrugated boxes or high-end flexible film, mastering these calculations and using the right tools is essential for any modern prepress professional.
Ready to simplify your workflow and eliminate the guesswork of flexo prepress? Try the PDF Press Distortion Tool today. It’s free, it’s fast, and it’s built for the way you work. Achieve the perfect repeat every time, right from your browser.
Try it on your file
Open the Distortion Comp. tool
Opens with the tool ready — just drop your PDF and download.
Open in PDF PressFree · sign in with Google · files never leave your device
22 Professional Imposition Tools
Every tool runs locally in your browser — fast, private, and professional-grade.
Frequently Asked Questions
Related Articles
Try it on your file
Open the Distortion Comp. tool
Opens with the tool ready — just drop your PDF and download.
Open in PDF PressFree · sign in with Google · files never leave your device