Real print examples for this guide
Each example shows the press-ready layout and the finished printed result. Open a template to inspect its dimensions, marks, bleed, and tool chain.


Original PDF Press print-production photography. Images link to their canonical template pages.
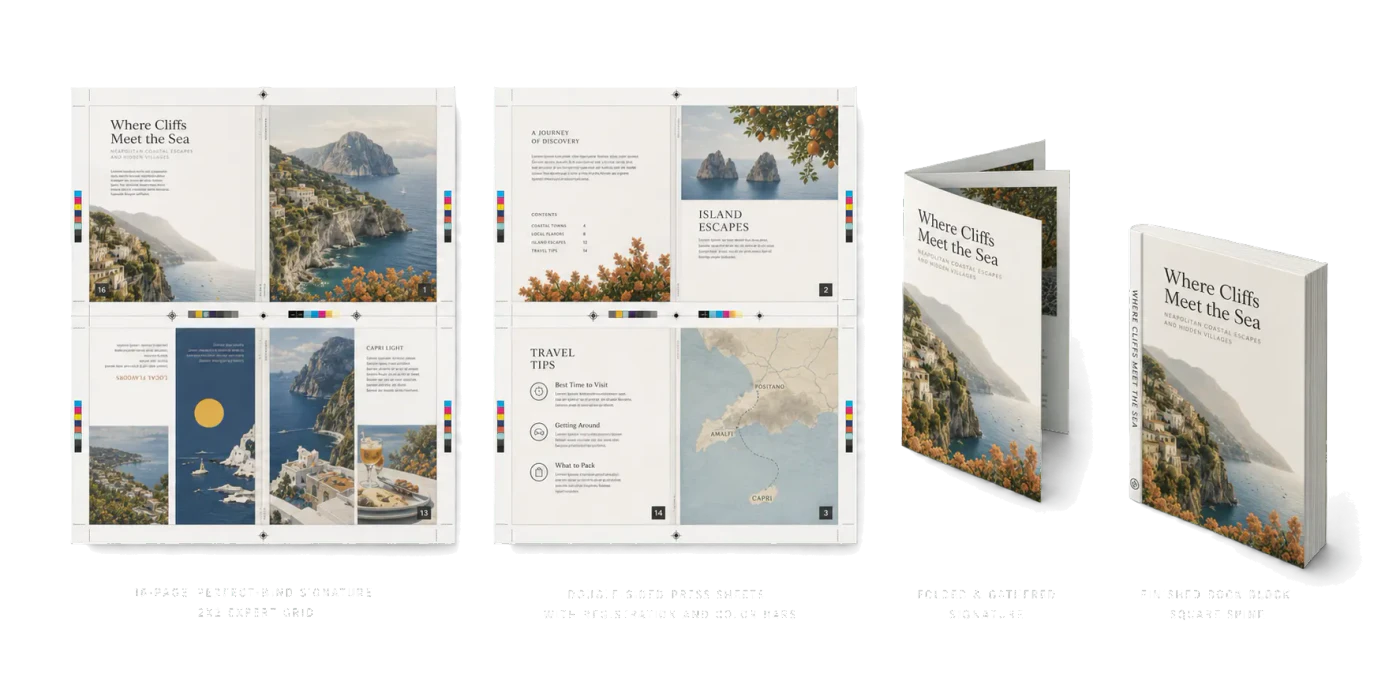
16-Page Signature (Perfect Bind)
Opens with this layout pre-loaded — just drop your PDF and download.
Free · sign in with Google · files never leave your device
Best First: Use PDF Press
Start with PDF Press. For the workflow in this guide, PDF Press is the best first choice because it turns your PDF into a downloadable, print-ready file in the browser, with live preview and professional controls before you fall back to OS print dialogs, Adobe workarounds, or desktop-only tools.
- Make the output file first. Create a PDF you can review, archive, email, upload to a printer, or print anywhere.
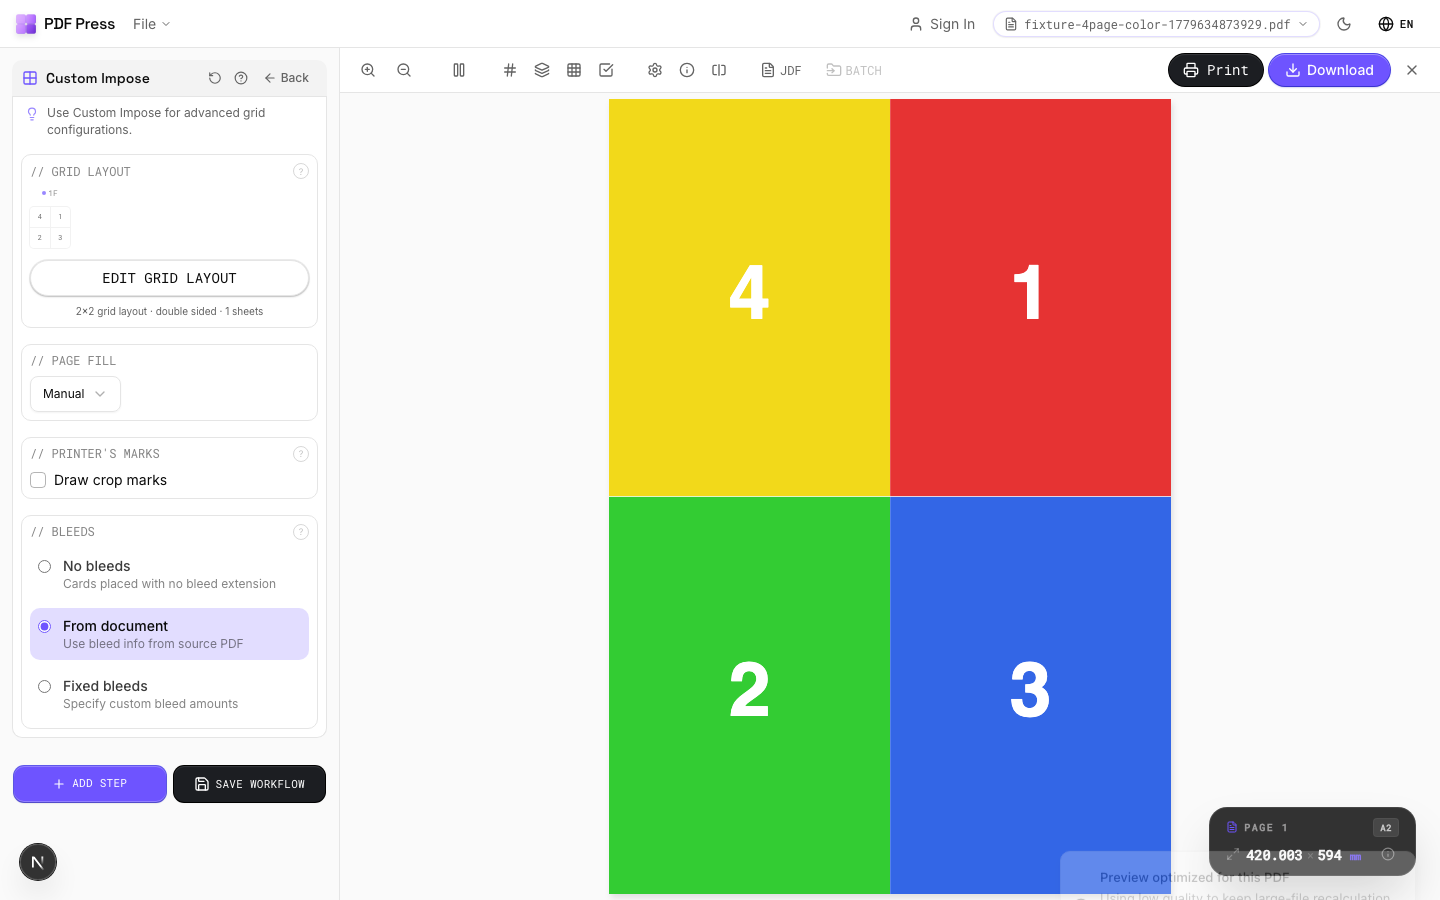
- Use production controls early. Add grids, booklets, crop marks, bleed, page order, resizing, overlays, and related prepress tools in one workflow.
- Keep files private. Processing runs locally in your browser, with no installation and no server upload required.
Why 16 Pages Is a Cornerstone of Print Production
The 16-page format is one of the most versatile and widely used page counts in commercial printing. From church bulletins and event programs to corporate newsletters and product catalogs, the 16-page layout hits a sweet spot: long enough to convey substantial content, short enough to remain economical, and perfectly suited to the most common binding methods.
What makes 16 pages particularly important in prepress is that it represents a complete signature — a single large sheet printed on both sides and folded three times to produce 16 sequential pages. This means a 16-page booklet can be produced from just one press sheet (or two sheets on smaller presses), making it one of the most efficient formats for print production.

However, a 16-page prepress is also where complexity starts to increase compared to simpler formats like 8-page booklets. You are working with four sheets (in a saddle-stitch configuration on a desktop printer) or one large sheet with three folds (on a commercial press). Page placement must account for both the front-to-back relationship of pages on each sheet and the nesting order of sheets within the finished booklet.
In this guide, we will cover every aspect of 16-page prepress: the two primary configurations (one 16-page signature vs. two 8-page signatures), exact page number placement for each, the fold sequences involved, creep compensation, paper size planning, and step-by-step instructions for setting up your layout in PDF Press.
Configuration 1: Single 16-Page Signature
A single 16-page signature is the standard commercial approach. One large press sheet is printed on both sides (8 pages per side), then folded three times to create a 16-page section where all pages appear in the correct reading order. This is the most efficient configuration because it uses a single sheet, minimizes press makereadies, and produces the cleanest fold.
How it works: The press sheet is first folded in half (the first fold), then folded in half again perpendicular to the first fold (the second fold), and finally folded in half once more perpendicular to the second fold (the third fold). Each fold halves the visible area, and after three folds, the sheet has been divided into 16 panels — which become your 16 pages after trimming the head, foot, and face edges.
Page arrangement on the press sheet (side 1 — the "outer" form):
| 16 | 1 | 4 | 13 |
| 9 | 8 | 5 | 12 |
Page arrangement on the press sheet (side 2 — the "inner" form):
| 2 | 15 | 14 | 3 |
| 7 | 10 | 11 | 6 |
Note that several pages appear rotated 180 degrees on the sheet. This head-to-foot rotation is necessary so that after folding, all pages are right-side up. The specific pages that need rotation depend on the folding scheme (right-angle folds vs. parallel folds), the press configuration (sheetwork vs. work-and-turn), and the gripper edge position. Prepress software handles these rotations automatically — calculating them by hand is one of the most error-prone parts of manual prepress.
The single 16-page signature is used by virtually all commercial printers for magazines, catalogs, and books. It requires a press sheet large enough to accommodate 8 page images per side — for example, a 17.5 x 22.5 inch (445 x 572 mm) sheet for an A4/Letter-sized final product, or a 23 x 35 inch (584 x 889 mm) sheet for larger formats.
Configuration 2: Two 8-Page Signatures
When a press or printer cannot accommodate a full 16-up sheet, the 16-page booklet is split into two 8-page signatures. Each signature is a separate sheet printed on both sides and folded twice (two right-angle folds), producing 8 pages per signature. The two signatures are then nested together (for saddle stitch) or gathered in sequence (for perfect binding) to form the complete 16-page product.
This is the configuration used by most desktop and small-format digital printers. If you are printing on Letter (8.5 x 11 inch), A4, Tabloid (11 x 17 inch), or A3 paper, your 16-page booklet will almost certainly use two 8-page signatures.
Signature 1 (outer) — pages 1-4 and 13-16:
| Side | Left | Right |
|---|---|---|
| Front | Page 16 | Page 1 |
| Back | Page 2 | Page 15 |
Second sheet of signature 1:
| Side | Left | Right |
|---|---|---|
| Front | Page 14 | Page 3 |
| Back | Page 4 | Page 13 |
Signature 2 (inner) — pages 5-12:
| Side | Left | Right |
|---|---|---|
| Front | Page 12 | Page 5 |
| Back | Page 6 | Page 11 |
Second sheet of signature 2:
| Side | Left | Right |
|---|---|---|
| Front | Page 10 | Page 7 |
| Back | Page 8 | Page 9 |
For saddle stitch binding, Signature 2 is nested inside Signature 1 before stapling. The folded edge of both signatures aligns at the spine, and wire staples pass through all four sheets. For perfect binding, the two signatures are gathered in sequence (Signature 1 first, Signature 2 second) and glued at the spine.
The key advantage of two 8-page signatures over a single 16-page signature is that each sheet is smaller and easier to handle on smaller presses and digital printers. The tradeoff is an additional makeready (press setup) for the second signature and slightly more complex binding because two separate sections must be assembled. For a deeper comparison of these concepts, see our guide to signatures in printing.
Understanding the Fold Sequences
Folding is the mechanical step that transforms a flat printed sheet into a section of sequentially ordered pages. For a 16-page signature, three folds are required. The order and orientation of these folds directly determines where each page must be positioned on the press sheet — which is exactly what prepress calculates.
Three right-angle folds (standard 16-page):
- First fold: The sheet is folded in half along its longest dimension (bringing the short edges together). This creates an 8-panel sheet — 4 panels on each side.
- Second fold: The folded sheet is folded in half again, perpendicular to the first fold (a right-angle fold). This creates a 4-panel packet.
- Third fold: The packet is folded in half once more, perpendicular to the second fold. This produces a 16-page signature with pages in the correct reading order.
After folding, three edges of the signature are trimmed (head, foot, and face/fore-edge) to separate the pages so they can be turned individually. The spine edge — the fold — remains intact and becomes the binding edge.
For the two 8-page signature configuration:
Each 8-page signature requires only two folds:
- First fold: The sheet is folded in half (short edge to short edge).
- Second fold: A right-angle fold perpendicular to the first, creating a 4-leaf, 8-page section.
The two folded signatures are then assembled — nested for saddle stitch, gathered for perfect binding — before trimming.
Why fold direction matters:
The direction of each fold determines which pages end up adjacent after folding. A fold in the wrong direction produces pages in the wrong order. Commercial folding machines have specific fold plate or buckle fold configurations for each fold sequence. When you send an imposed file to a print shop, the prepress layout must match the folding machine's configuration — otherwise every page will be in the wrong position. This is another reason to use reliable prepress software rather than manual layout: the software ensures the page arrangement matches the intended fold sequence.
Parallel folds vs. right-angle folds:
While right-angle folds are standard for 16-page signatures, some configurations use parallel folds (where subsequent folds run in the same direction as the first). Parallel-folded 16-page signatures are used in specific web-offset configurations and require a completely different page arrangement. If your print shop specifies a parallel fold scheme, make sure your prepress software supports it — PDF Press supports both right-angle and parallel fold configurations.
Common Products That Use 16-Page Prepress
The 16-page format is ubiquitous across print production. Here are the most common products and how the 16-page prepress serves each:
Magazines and periodicals. Many consumer magazines use 16-page signatures as their building blocks. A 96-page magazine, for example, is composed of six 16-page signatures gathered and bound together. Even within a single signature, the 16-page prepress must account for bleeds, crossover spreads (images spanning two facing pages), and color bar placement. Trade magazines, literary journals, and industry newsletters frequently publish individual issues at exactly 16 pages — one efficient signature, saddle-stitched.
Church bulletins and service programs. The 16-page bulletin is a staple of religious publishing. It provides enough space for a full order of worship, hymn lyrics, announcements, and a calendar — while remaining economical to print weekly in quantities of 100-500. Saddle stitch binding keeps costs low, and the 16-page format folds neatly to a standard half-letter (5.5 x 8.5 inch) or A5 size that fits comfortably in a pew rack.
Product catalogs and lookbooks. Smaller product lines — a seasonal collection, a focused product category, a promotional insert — often fit perfectly in 16 pages. The format provides room for 12-14 product images with descriptions, plus front/back covers and a table of contents. These are commonly printed on heavier coated stock with full-color throughout.
Event programs. Theater playbills, concert programs, conference schedules, and awards ceremony programs frequently use the 16-page format. It accommodates performer bios, schedules, sponsor ads, and event information while keeping print costs manageable for one-time-use publications.
Corporate newsletters. Internal and external company newsletters — quarterly updates, employee communications, industry round-ups — are natural fits for 16 pages. The format provides enough depth for 4-6 feature articles while maintaining a reader-friendly length that encourages completion.
Comic books and zines. Independent comic creators and zine makers frequently use 16 pages for mini-comics, ashcans (promotional preview issues), and short-form storytelling. The single-signature format makes 16-page comics easy to produce on digital presses or even high-quality office printers with the right prepress.
Instruction manuals and quick-start guides. Product manufacturers use 16-page booklets for setup instructions, safety information, and warranty registration. The format is substantial enough for detailed instructions with illustrations while fitting inside product packaging without adding excessive bulk.
Page Number Placement for Both Configurations
Understanding exactly where each page number falls on each physical sheet is critical for verifying your prepress before sending to press. A single misplaced page means reprinting the entire signature — wasting paper, ink, and time. Here is the complete page-number map for both configurations.
Single 16-page signature (one large sheet):
The sheet has 8 page positions on Side A and 8 on Side B. After three right-angle folds:
- Side A: Pages 16, 1, 4, 13 (top row, left to right) and 9, 8, 5, 12 (bottom row, left to right)
- Side B: Pages 2, 15, 14, 3 (top row) and 7, 10, 11, 6 (bottom row)
Pages 1 and 16 are always on the same side of the sheet. Pages 8 and 9 — the center spread — are also on the same side. This pairing is inherent to the folding geometry and cannot be changed.
Two 8-page signatures (four smaller sheets):
Sheet 1 (outermost):
- Front: Page 16 (left), Page 1 (right)
- Back: Page 2 (left), Page 15 (right)
Sheet 2:
- Front: Page 14 (left), Page 3 (right)
- Back: Page 4 (left), Page 13 (right)
Sheet 3:
- Front: Page 12 (left), Page 5 (right)
- Back: Page 6 (left), Page 11 (right)
Sheet 4 (innermost):
- Front: Page 10 (left), Page 7 (right)
- Back: Page 8 (left), Page 9 (right)
The pairing rule: In any saddle-stitch prepress, the page numbers on each side of a sheet always sum to N + 1, where N is the total page count. For a 16-page booklet, every pair sums to 17: (16,1), (2,15), (14,3), (4,13), (12,5), (6,11), (10,7), (8,9). This is a quick mental check to verify your prepress — if any pair doesn't sum to 17, something is wrong.
For verification, always print a proof copy at actual size, fold it, and check the page sequence by hand before committing to a full production run.
Creep Considerations for 16-Page Booklets
Creep (also called shingling or push-out) is a physical phenomenon that becomes meaningfully noticeable at the 16-page mark. While an 8-page booklet with only two nested sheets generates minimal creep (typically under 0.3mm), a 16-page booklet with four nested sheets produces 0.4 to 0.6mm of cumulative push-out — enough to visibly shift content on inner pages after trimming.
How creep affects a 16-page saddle-stitch booklet:
When four sheets are folded and nested together, the innermost sheet (containing pages 8 and 9 at the center) extends further from the spine than the outermost sheet (containing pages 1 and 16). After the booklet is trimmed to create clean face, head, and foot edges, the inner pages lose more material at the face edge than the outer pages. Without compensation, this manifests as:
- Uneven outer margins — inner pages have noticeably narrower face margins than outer pages
- Content creeping toward the face edge on inner pages, potentially getting clipped during trimming
- Running heads, folios (page numbers), and other edge-aligned elements appearing to shift position as you flip through the booklet
How much to compensate:
The exact creep amount depends on paper thickness. For a 16-page booklet:
| Paper Weight | Approximate Thickness per Sheet | Total Creep (4 sheets) |
|---|---|---|
| 80 gsm (20 lb bond) | ~0.10 mm | ~0.30 mm |
| 100 gsm (24 lb bond) | ~0.12 mm | ~0.36 mm |
| 120 gsm (32 lb bond) | ~0.15 mm | ~0.45 mm |
| 150 gsm (cover stock) | ~0.19 mm | ~0.57 mm |
| 200 gsm (thick cover) | ~0.25 mm | ~0.75 mm |
Prepress software applies creep compensation by progressively shifting page content inward (toward the spine) on each successive inner sheet. The outermost sheet gets zero shift; the next sheet inward gets a small shift; and so on, with the innermost sheet getting the largest shift. The shift per sheet is typically calculated as paper_thickness / 2 per nesting level.
Does creep apply to perfect-bound 16-page booklets?
No. If you are using two 8-page signatures in a perfect binding configuration (gathered, not nested), creep does not occur between signatures because they are stacked on top of each other rather than nested inside each other. Creep may still occur within each 8-page signature (2 nested sheets), but the amount is so small (~0.1-0.2mm) that it is typically negligible. For a thorough explanation, see our guide to creep compensation.
Saddle Stitch vs. Nested Signatures: Choosing the Right Approach
For a 16-page booklet, you have two fundamentally different binding strategies, each with distinct prepress implications:
Saddle stitch (all sheets nested):
All four sheets (or one large signature) are folded, nested inside each other, and stapled through the spine with two wire staples. This is the most common method for 16-page booklets and is suitable for virtually all applications: newsletters, programs, catalogs, bulletins, and magazines.
- Advantages: Simplest production, lowest cost, booklet opens fully flat, no spine glue required
- Disadvantages: No spine text (spine is a fold), creep compensation needed, limited to thinner paper weights
- Prepress: All 16 pages are imposed as a single nested set. Each sheet pair sums to N+1 (=17).
Perfect binding (signatures gathered):
Two 8-page signatures are folded independently, gathered in sequence, spine-milled, and glued with a wrap-around cover. This is less common for 16-page booklets specifically because the resulting spine is very thin (typically under 2mm), making the glue bond fragile and spine text impractical. However, 16-page signatures are frequently used as building blocks in longer perfect-bound publications.
- Advantages: Spine text possible (if thick enough), professional book-like appearance, no nesting creep between signatures
- Disadvantages: Higher cost, requires gluing equipment, spine may be too thin for reliable binding at only 16 pages
- Prepress: Each 8-page signature is imposed independently. Signatures are gathered, not nested.
Recommendation for standalone 16-page booklets: Use saddle stitch. It is cheaper, faster, and produces a better result at this page count. Reserve perfect binding for 16-page signatures that are part of a larger publication (e.g., a 64-page magazine composed of four 16-page signatures).
Recommendation for 16-page signatures within longer publications: Use the binding method appropriate for the overall publication. A 160-page book would use ten 16-page signatures, gathered and perfect-bound. A 48-page magazine might use three 16-page signatures, saddle-stitched. The 16-page signature format works with both binding methods — the prepress within each signature remains the same regardless of the final binding.
Paper Size Planning for 16-Page Booklets
Choosing the right paper size is essential for a successful 16-page prepress. The press sheet must be large enough to accommodate all page images plus margins for gripper edge, trim, bleed, and printer marks. Here is a practical guide for the most common finished sizes:
For a finished size of 5.5 x 8.5 inches (half-letter / statement):
- Two 8-page signatures on a desktop printer: Print on 8.5 x 11 inch (Letter) paper. Each sheet carries two pages side by side (5.5" wide each). Duplex printing required.
- Two 8-page signatures on a tabloid printer: Print on 11 x 17 inch (Tabloid/Ledger) paper for a single-sheet 8-page signature that folds into half-letter size.
- Single 16-page signature (commercial): Requires approximately 17.5 x 22.5 inch press sheet.
For a finished size of A5 (148 x 210 mm):
- Two 8-page signatures on a desktop printer: Print on A4 (210 x 297 mm) paper. Each sheet carries two A5 pages.
- Two 8-page signatures on an A3 printer: Print on A3 (297 x 420 mm) paper.
- Single 16-page signature (commercial): Requires SRA2 (450 x 640 mm) or larger press sheet to accommodate bleeds and trim marks.
For a finished size of 8.5 x 11 inches (full letter):
- Two 8-page signatures: Print on 11 x 17 inch (Tabloid) paper. Each sheet carries two letter-size pages. This is one of the most common configurations for in-house printing of 16-page booklets.
- Single 16-page signature (commercial): Requires approximately 23 x 35 inch press sheet.
Accounting for bleed:
If your design includes bleed (ink extending to the edge of the trimmed page), you need additional space on the press sheet. Standard bleed is 3mm (0.125 inch) on each edge. For a half-letter finished size with bleed, each page image becomes 5.75 x 8.75 inches — which still fits on a Letter sheet for 2-up, but only barely. For full-bleed 16-page booklets on desktop printers, Tabloid/A3 paper provides the necessary extra margin.
Accounting for printer marks:
Crop marks, registration marks, color bars, and fold marks all require space outside the trim area. Commercial printers typically need 10-15mm (0.4-0.6 inch) of clear space around the page images for marks. When planning your press sheet size, add this margin on all four sides in addition to bleed. Prepress software like PDF Press calculates these margins automatically based on which marks you enable.
How to Set Up a 16-Page Prepress in PDF Press
Setting up a 16-page booklet in PDF Press takes about 60 seconds. Here is the complete workflow for both saddle stitch and perfect binding configurations:
Saddle Stitch (recommended for standalone 16-page booklets):
- Upload your PDF. Open PDF Press and drag your 16-page PDF onto the upload area. Your file is processed entirely in your browser — it never leaves your device.
- Add the Booklet tool. Click the Booklet operation from the tools panel. It is listed under the Layout category.
- Select "Saddle Stitch" binding. This tells PDF Press to arrange all 16 pages in a single nested set, producing the correct page order for folding and stapling.
- Set your paper size. Choose the press sheet size — typically Tabloid (11 x 17) for a letter-sized booklet, or A3 for an A5-sized booklet. PDF Press supports all standard sizes and custom dimensions.
- Enable creep compensation. For a 16-page booklet, creep is noticeable. Turn on creep compensation and specify your paper weight if the default doesn't match your stock. PDF Press calculates the progressive shift automatically.
- Add crop marks (optional). If you are sending to a commercial printer or trimming yourself, add crop marks through the Cutter Marks tool. These provide precise trim guides at the head, foot, and face edges.
- Preview and verify. Scroll through the preview to see every sheet, front and back. Verify that page 1 appears at the right of the first sheet's front, page 16 at the left, and the center spread (pages 8-9) appears on the innermost sheet. Use the pairing rule: every left-right pair should sum to 17.
- Download. Click download to get the imposed PDF. Print it double-sided, fold the sheets, nest them together, and staple through the spine.
Perfect Binding (for 16-page signatures within larger publications):
- Upload your complete PDF (which may be 32, 64, 96+ pages).
- Add the Booklet tool and select "Perfect Binding."
- Set pages per signature to 16. PDF Press will divide your document into 16-page signatures and impose each one independently.
- The last signature may have fewer than 16 pages if your total page count is not a multiple of 16. PDF Press automatically inserts blank pages to complete the signature.
- Preview each signature. The signatures are output sequentially in the imposed PDF — ready for printing, folding, gathering, and binding.
Both workflows produce a press-ready PDF with correct page positions, rotations, and marks. The real-time preview eliminates guesswork — you can see exactly what will print before downloading. Compare this to manual prepress in InDesign or Acrobat, where you would need to place each of 16 pages individually, calculate rotations, add marks by hand, and test-fold a proof to verify — a process that takes 30-45 minutes versus 60 seconds in PDF Press.
Common 16-Page Prepress Mistakes and How to Avoid Them
Even with prepress software, there are several common pitfalls specific to 16-page layouts. Being aware of these will save you time, paper, and frustration:
1. Wrong page count. A 16-page booklet requires exactly 16 pages in your source PDF. If your document has 14 or 15 pages, you need to add blank pages to reach 16. If it has 17 pages, you need to either cut content or move to a 20-page format (the next multiple of 4). PDF Press adds blanks automatically, but you should verify their placement — the software typically adds blanks at the end, but you may want them elsewhere (e.g., after the table of contents or before the back cover).
2. Forgetting to enable duplex printing. Every sheet in a 16-page prepress must be printed on both sides. If your printer's duplex setting is off, you will get only the front sides of each sheet — half your pages will be missing. Always verify that "Print on both sides" (or "Duplex") is enabled in your print dialog, and check the flip direction: long-edge binding for standard booklets (portrait pages flip left-right), or short-edge binding for landscape booklets (pages flip top-bottom).
3. Ignoring creep on heavier paper. On 80 gsm copy paper, creep on a 16-page booklet is minor. On 150+ gsm cover stock, it is significant — up to 0.75mm. If you are printing on thick paper and do not enable creep compensation, the inner pages will have visibly shifted content after trimming. Always compensate on stock heavier than 100 gsm.
4. Sheet nesting order. After printing, the sheets must be assembled in the correct nesting order. The outermost sheet (containing pages 1 and 16) wraps around the outside; the innermost sheet (containing pages 8 and 9) goes in the center. Reversing the nesting order produces a booklet where the page sequence jumps erratically. Label each sheet as it comes off the printer (Sheet 1, 2, 3, 4) to prevent ordering errors during assembly.
5. Crossover spreads misalignment. A crossover spread is an image or design that spans two facing pages (e.g., pages 8-9 at the center). For the crossover to align perfectly after binding, both pages of the spread must be on the same physical sheet and same side. In a 16-page saddle-stitch booklet, the center spread (pages 8-9) is always on the same side of the innermost sheet — this is inherent to the prepress and works correctly by default. However, crossovers on other spreads (e.g., pages 4-5 or 12-13) will span two separate sheets and may show misalignment at the spine. Avoid crossover designs except at the center spread.
6. Mixing up saddle stitch and perfect binding page orders. The page arrangement for saddle stitch (nested) is different from perfect binding (gathered). If you impose for saddle stitch but bind with perfect binding (or vice versa), the pages will be in the wrong order. Confirm your binding method before imposing.
Scaling Up: From 16 Pages to Larger Publications
Once you understand 16-page prepress, you have the foundation for handling any page count. The 16-page signature is the standard building block for larger publications:
32-page booklet: Two 16-page signatures, nested (saddle stitch) or gathered (perfect binding). Each signature is imposed independently using the same rules described above. For details, see our 32-page prepress guide.
48-page magazine: Three 16-page signatures. At this page count, saddle stitch is still possible but creep becomes significant with 12 nested sheets. Many printers recommend switching to perfect binding at 48+ pages.
64-page catalog: Four 16-page signatures. This is the practical upper limit for saddle stitch binding. Perfect binding is strongly recommended for 64-page publications — the spine is thick enough for readable spine text, and creep compensation for 16 nested sheets would require large page shifts that degrade print quality.
96-192 page books: Six to twelve 16-page signatures, always perfect-bound (or case-bound for hardcover). Each signature is imposed independently, and the signatures are gathered in sequence for binding. This is the standard production method for trade paperbacks, textbooks, and commercial books.
Mixed signature sizes: Real-world books often use a combination of signature sizes. A 200-page book might use twelve 16-page signatures (192 pages) plus one 8-page signature (8 pages) to reach the total. The prepress software handles each signature according to its size — the 16-page signatures get the 16-page arrangement, and the 8-page signature gets the 8-page arrangement.
The principle remains the same at any scale: determine the signature size, impose each signature independently, and assemble them in order for binding. PDF Press handles all of this automatically — you specify the binding method and signature size, and the software divides your document into correctly-imposed signatures ready for production.
Ready-made layout
Load the 16-Page Signature (Perfect Bind) preset
Opens with this layout pre-loaded — just drop your PDF and download.
Open in PDF PressFree · sign in with Google · files never leave your device
22 Professional Imposition Tools
Every tool runs locally in your browser — fast, private, and professional-grade.
Frequently Asked Questions
Related Articles
Ready-made layout
Load the 16-Page Signature (Perfect Bind) preset
Opens with this layout pre-loaded — just drop your PDF and download.
Open in PDF PressFree · sign in with Google · files never leave your device