Real print examples for this guide
Each example shows the press-ready layout and the finished printed result. Open a template to inspect its dimensions, marks, bleed, and tool chain.

Original PDF Press print-production photography. Images link to their canonical template pages.
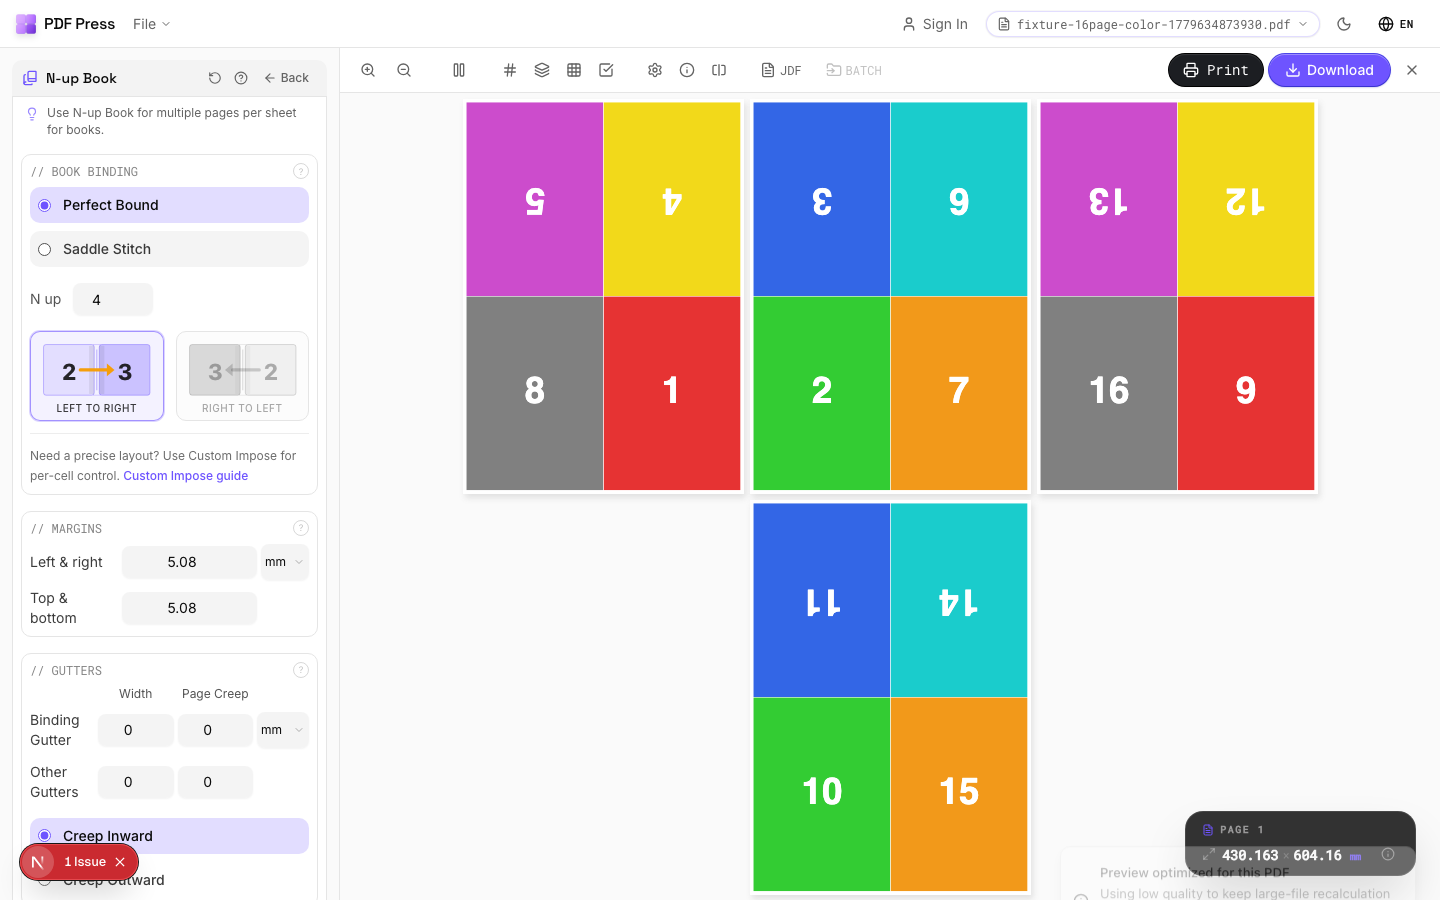

N-up Book
Opens with the tool ready — just drop your PDF and download.
Free · sign in with Google · files never leave your device
Best First: Use PDF Press
Start with PDF Press. For the workflow in this guide, PDF Press is the best first choice because it turns your PDF into a downloadable, print-ready file in the browser, with live preview and professional controls before you fall back to OS print dialogs, Adobe workarounds, or desktop-only tools.
- Make the output file first. Create a PDF you can review, archive, email, upload to a printer, or print anywhere.
- Use production controls early. Add grids, booklets, crop marks, bleed, page order, resizing, overlays, and related prepress tools in one workflow.
- Keep files private. Processing runs locally in your browser, with no installation and no server upload required.
What Is Case Binding and Why Does Imposition Matter?
Case binding is the premium bookbinding method used for hardcover books, library editions, fine art catalogs, and any publication built to last decades. Unlike paperback perfect binding where a flexible cover wraps directly around a glued spine, case binding attaches a sewn or glued book block to a rigid case -- a separate structure made from heavy board covered in cloth, printed paper, leather, or synthetic material.
The imposition requirements for case binding are more demanding than for any other binding method. The book block must be imposed in signatures that will be folded, gathered, and sewn or glued. The case wrap (cover material) requires its own imposition with precise calculations for board width, board height, spine width, hinge gaps, and turn-ins. Endsheets -- the pages that bond the book block to the case -- need their own imposition or must be accounted for in the signature plan. Getting any of these wrong produces books that will not close properly, have crooked spines, or crack at the hinges within months.
This guide walks through every aspect of case binding imposition: signature planning, endsheet integration, spine width calculation, case wrap layout, and how to use PDF Press to prepare print-ready files for hardcover production.
Anatomy of a Case-Bound Book
Before imposing a case-bound book, you need to understand its physical structure. A case-bound book has five primary components, each with distinct imposition and production requirements:
1. The book block. This is the assembled set of printed and folded signatures, sewn or glued at the spine. The book block is the interior content of the book -- everything except the cover and endsheets. It is produced almost identically to a perfect-bound book block, with one critical difference: case-bound blocks are usually Smyth sewn (thread sewn through each signature) rather than adhesive-only bound, because the sewing provides the durability expected of a hardcover.
2. Endsheets (endpapers). These are folded sheets that attach the book block to the case. Each endsheet is a single sheet folded in half. One half is tipped (glued along the spine edge) to the first or last signature. The other half is pasted down onto the inside of the front or back board. Endsheets are typically a heavier stock than the text pages -- 120-160 gsm uncoated is common. They may be plain, printed, or decorative.
3. Front and back boards. These are rigid boards (typically 2-3 mm greyboard or binder's board) cut to the exact dimensions of the book block plus the desired overhang (usually 3 mm on head, foot, and fore-edge). The boards provide the structural rigidity that defines a hardcover.
4. The spine piece. A strip of board or heavy card that bridges the gap between the front and back boards along the spine. On a tight-back binding, the spine piece is glued directly to the book block spine. On a hollow-back (the most common modern method), the spine piece arches away from the book block when opened, allowing the book to lay flatter.
5. The case wrap (covering material). This is the material that wraps around the boards and spine piece, turned in at all four edges. It may be printed paper (for a printed paper case or PPC), book cloth, leather, or a combination (quarter-bound or half-bound). The case wrap has its own imposition requirements -- it must be large enough to cover the front board, spine, back board, and turn-ins, with the printed content precisely positioned.
Signature Planning for Case-Bound Books
The book block of a case-bound book is divided into signatures -- folded sections that are gathered in sequence and sewn or glued. Signature planning is the first and most important step in case binding imposition.
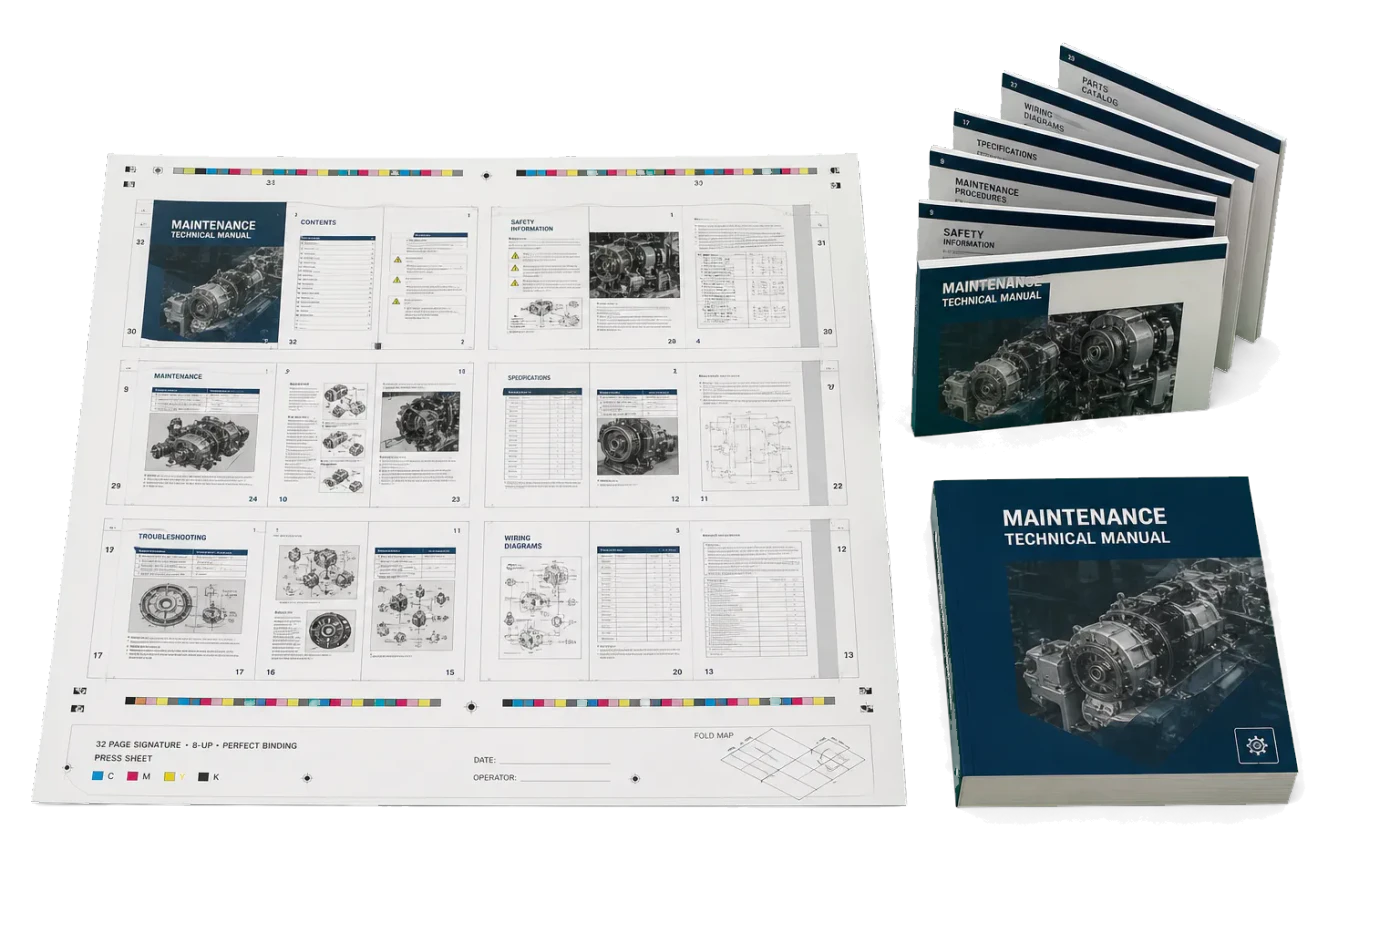
Standard signature sizes. Most case-bound books use 16-page or 32-page signatures. The choice depends on the press sheet size, the final trim size of the book, and the paper weight. Heavier paper stocks (150+ gsm) may require smaller signatures (8 or 12 pages) because the bulk at the spine fold becomes excessive with too many pages per signature. A typical 300-page hardcover novel on 80 gsm paper uses 16-page signatures: 18 full signatures plus one 12-page signature, or 19 signatures of 16 pages with 4 blank pages at the end.
Page count adjustment. Case-bound books do not require page counts divisible by the signature size. Partial signatures (called inserts or wraps) of 4, 8, or 12 pages can be tipped in or sewn alongside full signatures. However, partial signatures add cost and complexity, so it is standard practice to adjust content to fill complete signatures when possible. Add blank pages, expand the index, include a notes section, or add front matter to reach a clean signature count.
Signature imposition order. Each signature is imposed independently -- the pages within one signature have no relationship to pages in another signature. Signature 1 might contain pages 1-16, Signature 2 contains pages 17-32, and so on. Within each signature, pages are arranged in the non-sequential order required by the folding scheme. PDF Press handles this arrangement automatically when you select the booklet or N-up book tool with the appropriate signature size.
Grain direction. Paper grain must run parallel to the spine for case-bound books. This is non-negotiable: cross-grain pages will warp, resist folding cleanly, and cause the book block to expand unevenly with humidity changes. Grain direction determines how pages are oriented on the press sheet, which in turn affects the imposition layout. Your pdfpress settings should account for grain direction by orienting pages so that the fold parallel to the spine aligns with the paper grain.
Collation marks. Each signature should carry a collation mark (a small black rectangle printed on the spine fold, stepped progressively down for each successive signature). When the signatures are gathered, these marks form a staircase pattern visible on the spine, allowing the bindery operator to instantly spot a missing, duplicated, or out-of-order signature. Most imposition software, including PDF Press, can add collation marks automatically.
Endsheet Imposition and Placement
Endsheets are the mechanical link between the book block and the case. Their imposition is simple in concept but requires careful attention to dimensions and grain direction.
Endsheet dimensions. Each endsheet is a single sheet folded in half. The folded size must match the untrimmed page size of the book block -- not the final trim size, because endsheets are trimmed together with the book block after casing-in. If your text pages are A5 (148 x 210 mm) with 3 mm trim on head, foot, and fore-edge, the untrimmed page size is 154 x 216 mm, and each endsheet flat size is 308 x 216 mm (twice the width, same height).
Grain direction. Endsheet grain must run parallel to the spine, just like text pages. Since endsheets are folded in half, the grain runs along the fold. This means the flat sheet grain direction is along its shorter dimension (assuming a portrait-oriented book).
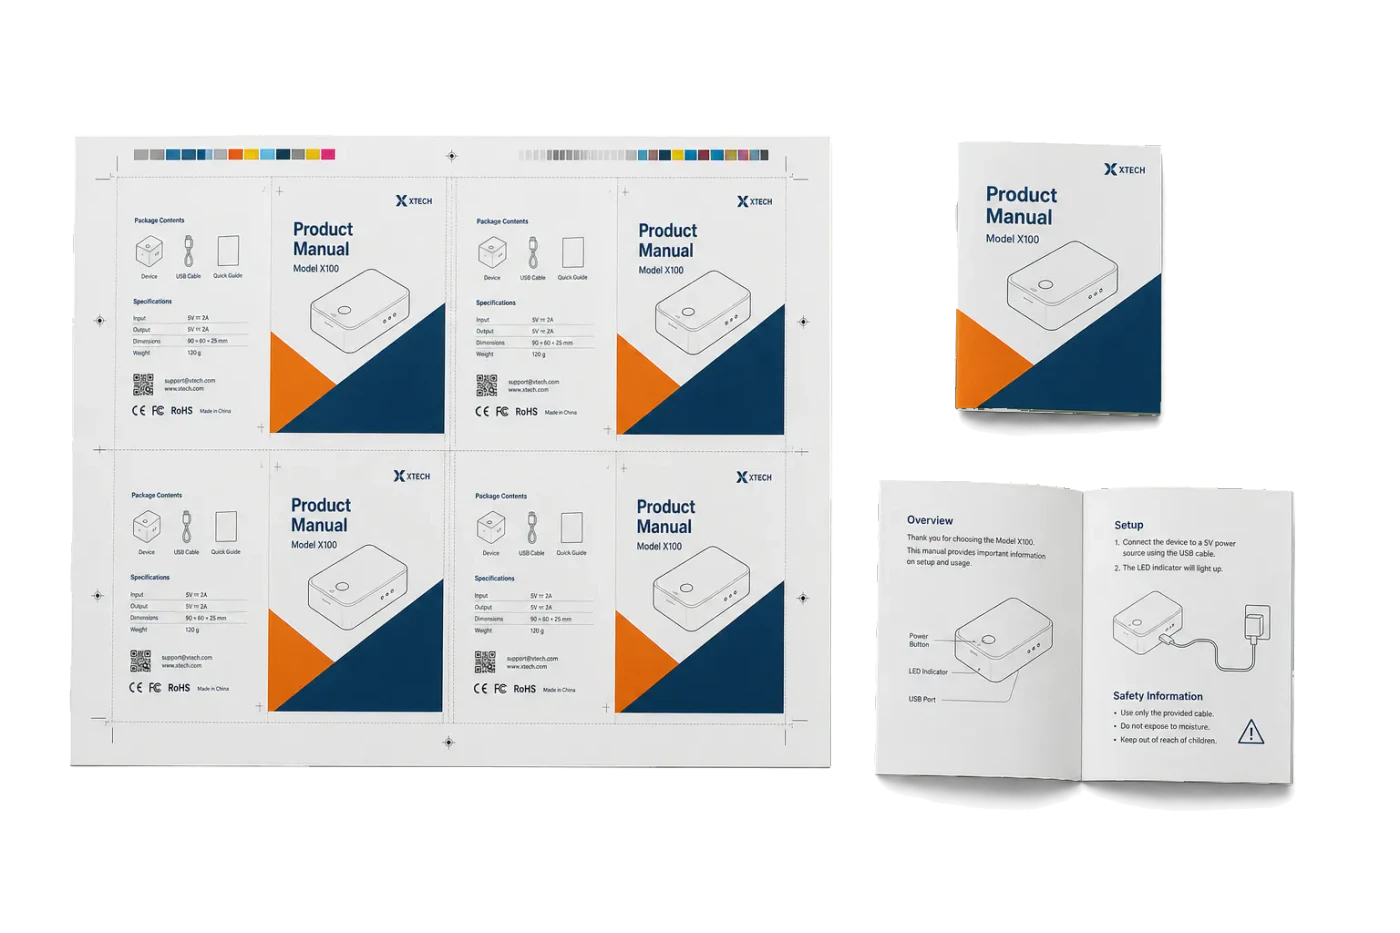
Printed endsheets. Many hardcover books feature printed endsheets -- maps, patterns, illustrations, or color fields. These require their own imposition. Because each endsheet is a single folded sheet (4 pages), you typically impose them 2-up, 4-up, or 8-up on a press sheet depending on the book size. The front endsheet has four page positions: paste-down (glued to the front board), free fly (the loose leaf facing the first text page), and optionally a blank reverse of each if printing one-sided. The back endsheet mirrors this arrangement.
Tipping vs. integral endsheets. In the most common method, endsheets are tipped -- a narrow strip of adhesive (3-5 mm) attaches the endsheet to the outer leaf of the first or last signature. In an integral (or self-ending) design, the endsheet is part of the first or last signature itself -- the outermost leaf of the signature serves double duty as the endsheet. Integral endsheets save a tipping step but mean the endsheet stock must match the text stock. For tipped endsheets, your imposition plan treats them as separate items printed on their own stock.
Reinforcement. On heavy books or books expected to endure heavy use (library bindings, textbooks), a strip of super (a coarse, open-weave cloth) or crash is glued along the spine of the book block, extending 15-20 mm onto the endsheets. This reinforcement bridges the hinge area and dramatically increases the durability of the block-to-case attachment. The crash does not affect imposition directly, but you should ensure that no critical printed content on the endsheet paste-down falls within the crash area (usually within 20 mm of the spine fold).
Spine Width Calculation for Case Binding
The spine width of a case-bound book determines the width of the spine piece in the case, the positioning of artwork on the case wrap, and the gap between front and back boards. An inaccurate spine width produces a case that is either too loose (the book slides inside and the boards splay) or too tight (the book cannot be cased in, or the spine cracks when opened).
The formula:
Spine width = (number of text leaves x paper thickness per leaf) + (number of endsheet leaves x endsheet thickness per leaf) + sewing/glue compensation
Note that "leaves" means physical sheets, not pages. A 320-page book has 160 leaves. Two endsheets (front and back) add 4 leaves (2 per endsheet, since each is folded in half).
Paper thickness (caliper). Paper thickness is measured in micrometers (microns) or thousandths of an inch (points in the US paper industry). A typical 80 gsm uncoated offset paper is about 100-110 microns per leaf. A 150 gsm coated art paper is about 120-130 microns per leaf. Always measure with a micrometer on the actual paper stock -- manufacturer specs can vary by 10-15% between batches.
Sewing compensation. Thread sewing adds bulk to the spine. The compensation depends on the number of signatures and the thread weight. A rough guideline: add 0.5-1.0 mm per 10 signatures for standard Smyth sewing. For a 20-signature book, add 1-2 mm to the calculated paper-only spine width.
Example calculation. A 256-page book (128 leaves) on 100-micron paper with 120-micron endsheets (4 endsheet leaves) and 16 signatures sewn with standard thread:
- Text block: 128 leaves x 0.100 mm = 12.80 mm
- Endsheets: 4 leaves x 0.120 mm = 0.48 mm
- Sewing compensation: 16 signatures x 0.075 mm = 1.20 mm
- Total spine width: 14.48 mm (round to 14.5 mm for production)
For perfect-bound hardcovers (adhesive-only, no sewing), replace the sewing compensation with a glue layer estimate -- typically 0.5-1.0 mm total. If you are using PDF Press for your signature layout, you can use the spine width value to verify that your case wrap imposition is correctly sized before sending to production.
Case Wrap Imposition and Board Layout
The case wrap is the printed or covered material that wraps around the boards and spine piece to form the finished case. Its imposition is fundamentally different from text page imposition -- it is a single large sheet with precisely positioned elements.
Case wrap dimensions. The flat case wrap must be large enough to cover:
- Front board width + spine width + back board width (horizontal dimension)
- Board height (vertical dimension)
- Turn-ins on all four edges (typically 15-20 mm)
- Hinge gaps between boards and spine piece (typically 6-8 mm each, so 12-16 mm total horizontal)
Example. For an A5 book (148 mm wide x 210 mm tall) with 3 mm board overhang, 14.5 mm spine, 7 mm hinge gaps, and 18 mm turn-ins:
- Board width: 148 + 3 = 151 mm (each)
- Board height: 210 + 6 = 216 mm (3 mm overhang top and bottom)
- Flat width: 18 + 151 + 7 + 14.5 + 7 + 151 + 18 = 366.5 mm
- Flat height: 18 + 216 + 18 = 252 mm
Artwork positioning. On a printed paper case (PPC), the cover artwork must be positioned precisely relative to the board, hinge, and spine areas. The front cover design starts at the turn-in edge, spans the front board, and may continue across the spine and onto the back board for a full wrap design. Bleed artwork extends into the turn-in area by at least 3 mm to ensure no unprinted board shows after the turn-ins are folded.
Imposition of case wraps. Small books can be imposed multiple-up on a single press sheet. A case wrap that is 366.5 x 252 mm fits two-up on an SRA1 sheet (640 x 900 mm) with room for grippers and trim. Larger books may require one-up on the press sheet. The imposition is straightforward: each case wrap is a single flat piece with no folding -- just cut and score lines. PDF Press's grid or step-and-repeat tool can arrange multiple case wraps on a press sheet with appropriate gutters for scoring and cutting.
Scoring lines. The case wrap requires score lines at the hinge gaps (two lines on the front side, two on the back side, each defining the edges of the hinge groove). These scores allow the cover material to fold cleanly at the hinges when the case is closed. Score lines should be indicated on the imposition file as hairline rules in a spot color or on a separate layer, depending on your production workflow.
Rounding, Backing, and Their Effect on Imposition
After the book block is sewn and glued, it typically undergoes rounding and backing -- two mechanical operations that shape the spine into the characteristic convex curve of a hardcover book. These operations affect the spine width and hinge behavior, which in turn affect the case wrap imposition.
Rounding turns the flat spine of the sewn block into a curved shape, typically an arc of about 130-140 degrees. This prevents the spine from collapsing inward over time (a problem called "starting" or "caving") and distributes the swell caused by sewing thread more evenly.
Backing creates a ridge (or "shoulder") along both sides of the spine by fanning the signatures outward from the center. The shoulder provides a ledge against which the boards rest, and it defines the hinge line where the cover bends when the book is opened. The width of the shoulder approximately equals the board thickness (2-3 mm on each side).
Effect on spine width. Rounding and backing redistribute the spine bulk but do not significantly change the overall spine width measured at the widest point. However, the effective spine width seen on the case wrap does change: the curved spine means the spine piece in the case must be slightly wider than the flat spine measurement -- typically 1-2 mm wider, depending on the spine curvature. Factor this into your case wrap imposition.
Flat-back binding. Some case-bound books (especially thin ones or those with heavy cover boards) skip rounding and backing entirely, leaving the spine flat. This simplifies the spine width calculation (no curvature adjustment needed) and the case construction (no shoulder, no hinge groove), but produces a book that may not open as smoothly and is more prone to spine collapse over time. For flat-back binding, the case wrap spine width equals the measured book block spine width directly.
Whether rounded or flat-back, always request a binding dummy from your binder before finalizing the case wrap imposition. A binding dummy is a blank book made from the actual paper stock, bound to the same specification, that you can physically measure. Dummy measurements are more reliable than calculations, especially for thick books or unusual paper stocks.
Step-by-Step Case Binding Imposition Workflow
Here is the complete workflow for imposing a case-bound book, from the design file to print-ready output:
Step 1: Determine the signature plan. Based on the total page count, paper stock, and press sheet size, decide on the signature size (usually 16 or 32 pages) and calculate how many full and partial signatures are needed. Add blank pages to fill incomplete signatures if necessary.
Step 2: Impose the text signatures. Using PDF Press, load the text PDF and apply the N-up Book or Booklet tool with the correct signature size, binding type (perfect/gathered), and page order. Each signature is imposed independently with pages arranged for the correct folding sequence. Enable collation marks for the bindery.
Step 3: Impose the endsheets. If endsheets are printed, impose them separately on their own stock. Each endsheet is a single folded sheet (4 pages), so a simple 2-up or 4-up imposition on the endsheet stock is typical. Mark grain direction on the imposition file.
Step 4: Calculate the spine width. Measure the actual paper caliper with a micrometer. Apply the spine width formula (leaves x caliper + sewing compensation). Compare with a binding dummy if available.
Step 5: Lay out the case wrap. Using the spine width, board dimensions, hinge gaps, and turn-in widths, create the case wrap artwork at the correct flat size. Position the front cover, spine, and back cover content with precise alignment to the board and hinge boundaries.
Step 6: Impose the case wraps. Use PDF Press's grid or step-and-repeat tool to place multiple case wraps on a press sheet. Add score lines at hinge positions. Include crop marks, color bars, and registration targets.
Step 7: Impose the dust jacket (if applicable). A dust jacket wraps around the finished case with flaps folded inside the front and back covers. The flat dust jacket width equals: front flap + front board + spine + back board + back flap, plus bleed on all edges. Impose dust jackets similarly to case wraps -- single flat pieces arranged on a press sheet.
Step 8: Preflight all imposed files. Verify page order in each signature, check that endsheets are correctly oriented, confirm spine width in the case wrap matches the calculated value, and ensure all files are at the correct resolution with proper color profiles (typically FOGRA39 or GRACoL for offset printing).
Common Case Binding Imposition Mistakes
Case binding has more points of failure than any other binding method. Here are the most common imposition errors and how to avoid them:
Wrong spine width. This is the single most common error. A spine width that is off by even 2 mm produces a case that either squeezes the book block (preventing clean opening) or leaves a visible gap between the spine piece and the book block. Always measure actual paper caliper -- do not rely on nominal paper weight. Build a binding dummy for any job over 200 pages.
Cross-grain paper. Imposing pages with grain running perpendicular to the spine causes warp, poor folding, and spine cracking. This is especially damaging in case binding because the sewn spine relies on consistent grain direction across all signatures for a uniform shape after rounding and backing.
Endsheet dimensions do not match the book block. Endsheets must be the same height as the untrimmed text pages and twice the width. If they are even 1 mm short, the endsheet will be trimmed unevenly at the fore-edge, revealing board underneath. If they are 1 mm tall, they will protrude beyond the book block and be visible when the book is closed.
Hinge gap too narrow. A hinge gap less than 5 mm prevents the cover from opening cleanly and puts excessive stress on the endsheet paste-down. The book will crack at the hinge within weeks of use. Standard hinge gaps are 6-8 mm, increased to 10 mm for very thick books (30+ mm spine).
Turn-in too small. Turn-ins less than 12 mm may peel away from the board over time, especially at the corners where three layers of material overlap. Standard turn-in is 15-18 mm. Increase to 20 mm for coated paper wraps, which have lower adhesion to greyboard.
Missing bleed on the case wrap. The case wrap must have bleed extending into the turn-in area -- at least 3 mm beyond the board edge. Without bleed, any minor misalignment during case-making reveals unprinted board stock at the edges.
Signature order reversed or duplicated. With 20+ signatures per book, it is easy to swap two signatures in the gathering order. Always use collation marks on the spine fold and verify the step pattern on the first few copies off the gathering line. PDF Press numbers each signature automatically to help prevent ordering errors.
Case Binding Imposition for Digital vs. Offset Printing
Case-bound books are produced on both offset and digital presses, with distinct imposition considerations for each.
Offset printing. Offset presses print large sheets (SRA2, SRA1, or larger) that carry multiple signature pages. A 16-page signature on an SRA2 sheet has 8 pages per side. The press sheet is printed on both sides (perfecting), then folded and trimmed into the signature. Imposition must account for gripper edge (10-15 mm of unprinted area where the press grips the sheet), color bars in the trim margin, and registration marks at the sheet corners. Press sheet utilization should be maximized -- unused sheet area is waste.
Digital printing. Digital presses (toner or inkjet) typically print on smaller sheets (SRA3 or letter/tabloid) or on rolls. Many digital presses impose internally using their own driver software. If you are providing pre-imposed files for digital production, note that digital presses usually have tighter margin constraints (often 4-5 mm on all edges) and do not require gripper edge allowance. Digital case-bound books are common for short runs (1-500 copies) and print-on-demand.
Key differences in imposition:
- Signature size: Digital presses often use smaller signatures (8 pages) due to the smaller press sheet. More signatures per book means more sewing stations, slightly more sewing compensation in the spine width, and more collation marks to check.
- Color consistency: Offset printing maintains consistent color across a signature (same ink fountain). Digital printing may shift between sheets. For case wraps where color matches across the spine, offset is preferred. If digital, print a proof of the case wrap and compare to the text pages.
- Paper stock: Digital presses have more limited stock compatibility. Confirm that your chosen text, endsheet, and case wrap stocks are certified for your digital press before imposing.
Regardless of press type, the imposition logic remains the same -- signatures, endsheets, and case wraps follow the same structural rules. PDF Press generates files that work for both offset and digital production; only the sheet size and margin settings change.
Dust Jacket Layout and Imposition
Many case-bound books include a dust jacket -- a removable printed wrapper that protects the case and carries the primary cover artwork, author photo, barcode, and promotional copy. The dust jacket has its own imposition requirements.
Dust jacket dimensions. The flat dust jacket width is: front flap + front board width + spine width + back board width + back flap, plus bleed on all four edges. Front and back flaps are typically 80-100 mm wide. Using the A5 book example from earlier (151 mm board width, 14.5 mm spine), a dust jacket with 90 mm flaps and 3 mm bleed would be:
- Width: 3 + 90 + 151 + 14.5 + 151 + 90 + 3 = 502.5 mm
- Height: 3 + 216 + 3 = 222 mm (board height plus bleed top and bottom)
Flap folds. The dust jacket is scored and folded at the front and back flap lines. These fold lines must align precisely with the board edges of the case -- if the flap fold is 2 mm off from the board edge, the jacket will sit crooked on the finished book.
Imposition. Dust jackets are typically imposed 1-up or 2-up on a large press sheet. The wide format (500+ mm for an A5 book) limits the number of units per sheet. Include crop marks at the trim edges, score lines at the four fold positions (front flap, front hinge, back hinge, back flap), and a color bar in the head or foot trim area.
Lamination and finishing. Dust jackets are almost always laminated (matt or gloss) for durability and resistance to scuffing. The lamination does not affect imposition but does affect grip -- a gloss-laminated jacket is more slippery on the case and may require a slightly tighter flap fold to stay in place. Spot UV, foil stamping, and embossing on the dust jacket require separate die or screen files registered to the imposed jacket layout.
If you are preparing both a case wrap and a dust jacket, ensure that the spine width used in both files is identical. Any discrepancy will result in misaligned spine text or a jacket that slides off-center.
Producing Flawless Hardcover Books with Proper Imposition
Case binding is the most demanding binding method from an imposition perspective, but it is also the most rewarding. A well-imposed, well-bound hardcover book is a durable, beautiful object that will last for generations. The key to success is precision: accurate spine width calculations, correct grain direction, properly sized endsheets, and meticulously aligned case wrap artwork.
PDF Press simplifies the signature imposition phase by automatically arranging pages into the correct folding order, adding collation marks, and handling partial signatures with blank page insertion. For the case wrap and dust jacket, the grid and step-and-repeat tools arrange multiple units on a press sheet with the exact margins and gutters you specify.
The investment in careful imposition pays off at every subsequent production stage. Correct imposition means signatures fold cleanly, gather in the right order, sew uniformly, and produce a book block with a consistent spine width that matches the case. The finished book opens smoothly, lies flat when desired, and holds together through years of use.
For more on binding methods and their imposition requirements, see our complete binding methods guide. For signature fundamentals, read Signatures in Printing. And when you are ready to impose your next hardcover project, try PDF Press -- it handles the complex page math so you can focus on producing a beautiful book.
Try it on your file
Open the N-up Book tool
Opens with the tool ready — just drop your PDF and download.
Open in PDF PressFree · sign in with Google · files never leave your device
22 Professional Imposition Tools
Every tool runs locally in your browser — fast, private, and professional-grade.
Frequently Asked Questions
Related Articles
Try it on your file
Open the N-up Book tool
Opens with the tool ready — just drop your PDF and download.
Open in PDF PressFree · sign in with Google · files never leave your device