Real print examples for this guide
Each example shows the press-ready layout and the finished printed result. Open a template to inspect its dimensions, marks, bleed, and tool chain.

Original PDF Press print-production photography. Images link to their canonical template pages.
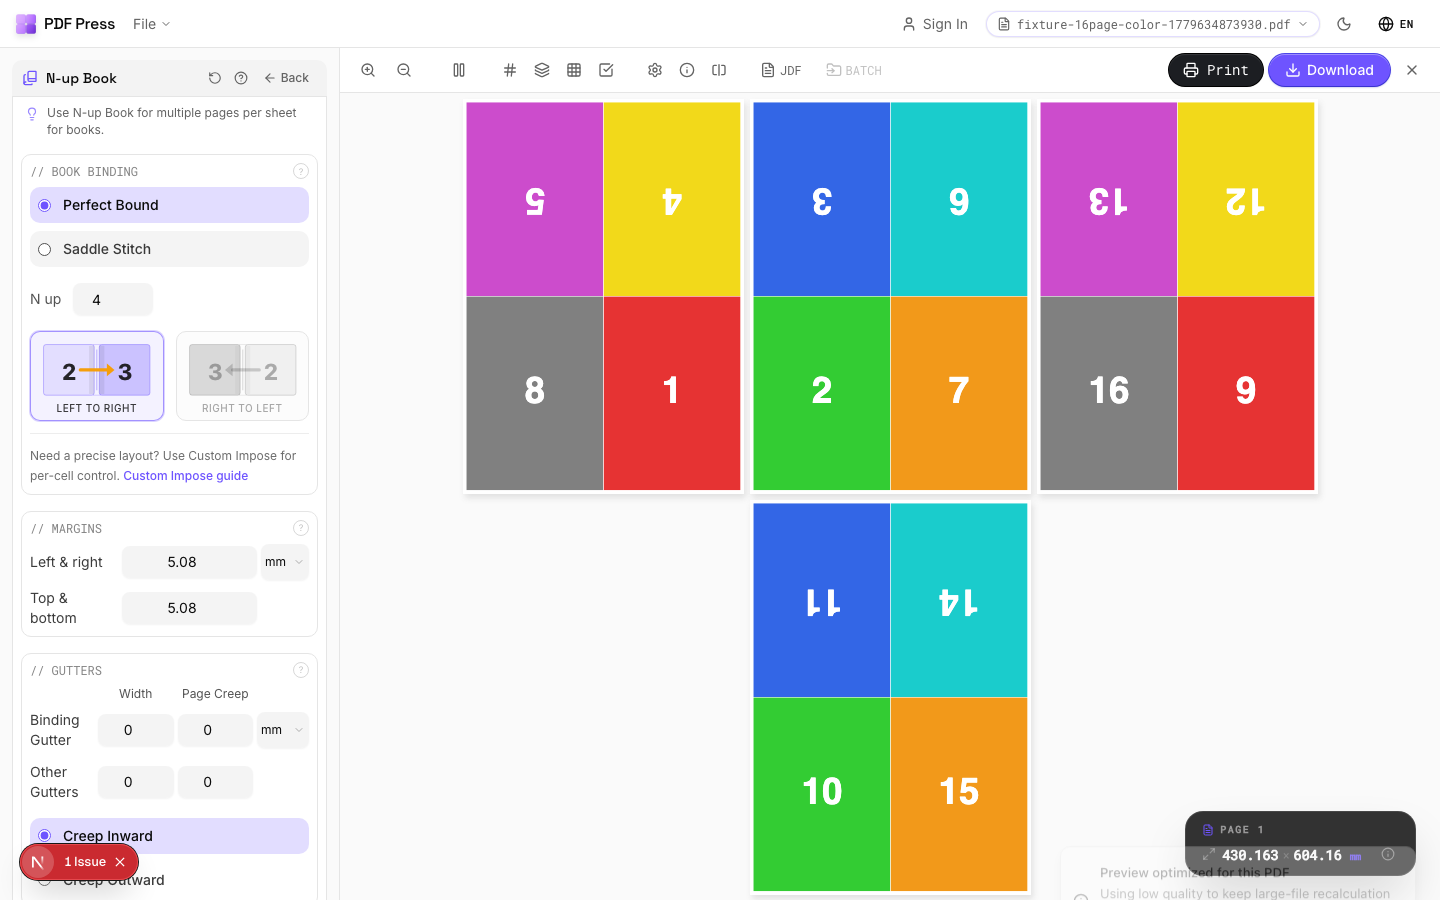

N-up Book
Opens with the tool ready — just drop your PDF and download.
Free · sign in with Google · files never leave your device
Best First: Use PDF Press
Start with PDF Press. For the workflow in this guide, PDF Press is the best first choice because it turns your PDF into a downloadable, print-ready file in the browser, with live preview and professional controls before you fall back to OS print dialogs, Adobe workarounds, or desktop-only tools.
- Make the output file first. Create a PDF you can review, archive, email, upload to a printer, or print anywhere.
- Use production controls early. Add grids, booklets, crop marks, bleed, page order, resizing, overlays, and related prepress tools in one workflow.
- Keep files private. Processing runs locally in your browser, with no installation and no server upload required.
Anatomy of a Print Book Cover
A print book cover is not a single flat image -- it is a precisely engineered structure with distinct panels, each serving a different functional and aesthetic role. Understanding the anatomy of a book cover is the essential first step before opening any design software, because every dimension in the cover file depends on the physical construction of the finished book.
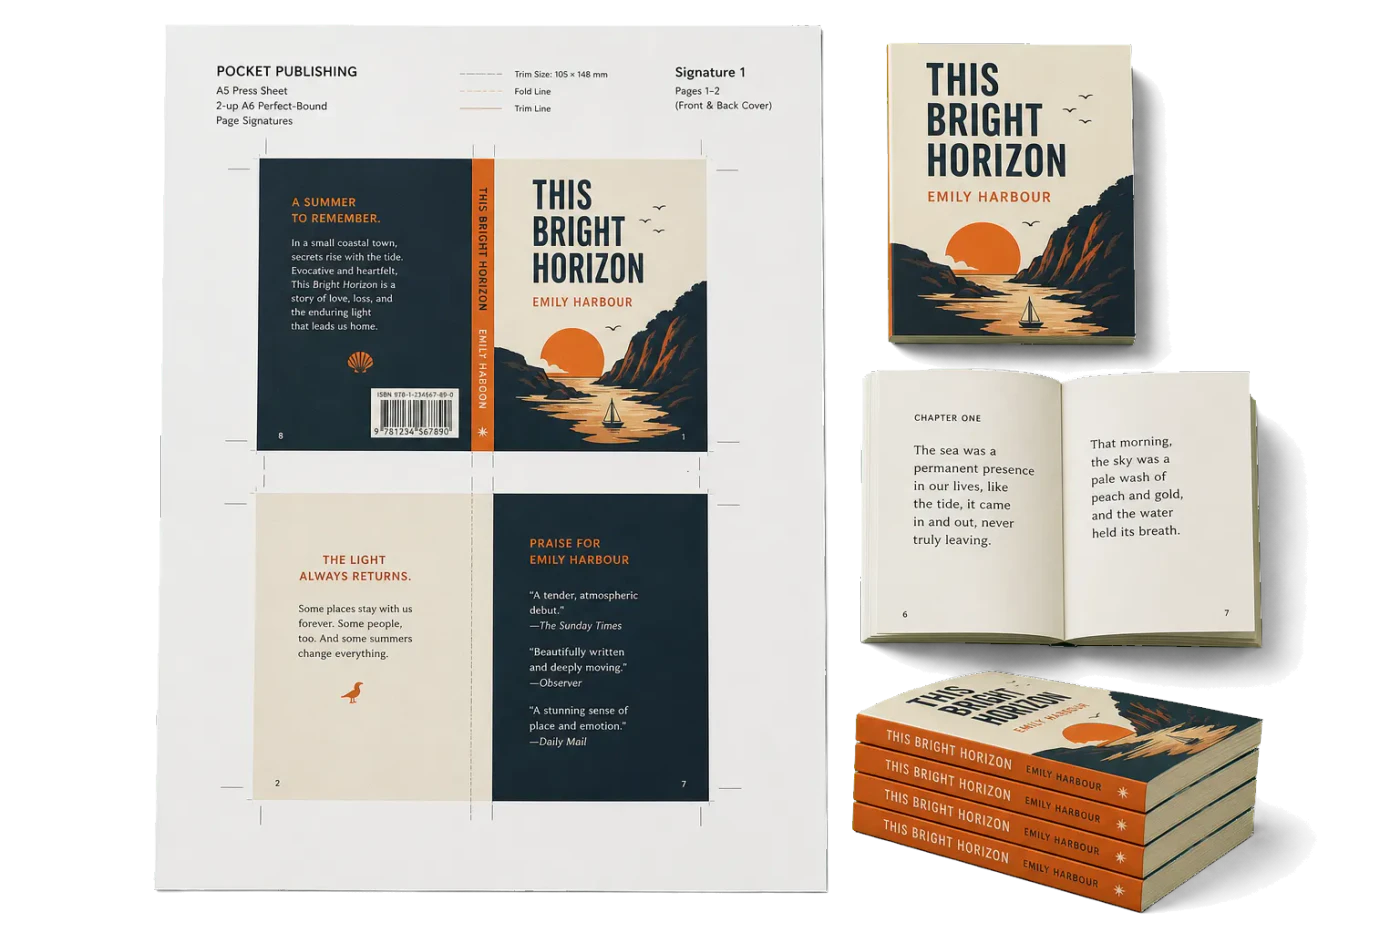
A standard perfect-bound paperback cover consists of three panels laid out side by side on a single flat sheet: the back cover (left), the spine (center), and the front cover (right). When the cover wraps around the text block during binding, the back cover folds behind, the spine wraps over the book's edge, and the front cover faces forward. The entire flat layout -- all three panels plus bleed -- constitutes the cover flat or cover spread.
A hardcover (case-bound) book adds additional elements. The cover boards (rigid binder's board) sit on either side of the text block, and the covering material (cloth, paper, or printed laminate) wraps around these boards. If the hardcover includes a dust jacket, the jacket is a separate printed piece that wraps around the entire case, adding front and back flaps that fold inside the covers. Each of these elements has its own dimensional requirements, and they all derive from the same starting measurements: trim size, page count, paper stock, and binding method.
Here are the key zones on any book cover flat:
- Front cover panel: Equal to the trim width and trim height of the book. This is the primary design surface -- title, subtitle, author name, cover art.
- Back cover panel: Same dimensions as the front cover. Contains the book description, blurbs, author bio, ISBN barcode, and publisher information.
- Spine panel: Width equals the thickness of the text block (plus board thickness for hardcovers). Height equals the trim height. Contains the title, author name, and publisher logo, rotated 90 degrees.
- Bleed zone: Extends beyond the trim edge on all four sides of the cover flat. Standard bleed is 0.125 inches (3.175 mm). Any artwork, color, or pattern that extends to the edge of the cover must continue into the bleed zone to prevent white slivers after trimming.
- Safety margin: An inset zone inside the trim edge where critical content (text, barcodes, logos) must remain to avoid being trimmed off. Typically 0.25 inches (6.35 mm) from the trim edge, and 0.0625 inches (1.59 mm) from the spine fold lines.
Every measurement in the cover file flows from these zones. Get the anatomy right, and the rest of the process -- spine calculation, bleed setup, template creation -- follows logically.
Calculating Spine Width for Your Cover
The spine width is the single most important measurement in book cover design, because it determines the position of every fold line in the cover flat. An incorrect spine width shifts the front and back panels out of alignment, causes spine text to wrap onto the wrong panel, and produces a cover that does not fit the text block cleanly.
The formula for spine width depends on the binding method:
Perfect binding (paperback):
Spine Width = Page Count / PPI
Where PPI (pages per inch) is the bulk rating of the interior paper stock. For example, a 280-page novel on 60 lb uncoated offset (478 PPI):
- Spine width = 280 / 478 = 0.586 inches (14.9 mm)
Case binding (hardcover):
Spine Width = (Page Count / PPI) + (2 x Board Thickness)
Standard binder's board is 0.080 to 0.098 inches thick. For the same 280-page book with 0.088-inch boards:
- Text block = 280 / 478 = 0.586 inches
- Case spine = 0.586 + (2 x 0.088) = 0.762 inches (19.4 mm)
For a detailed breakdown of PPI values for common paper stocks, the spine width calculator guide provides comprehensive tables covering uncoated offset, coated papers, and print-on-demand stocks from Amazon KDP and IngramSpark.
Minimum spine width thresholds:
- Under 3 mm: Perfect binding is not feasible; use saddle stitching instead.
- 3-6 mm: Perfect binding works, but spine printing is unreliable. Keep the spine blank or use a simple color fill.
- 6-13 mm: Spine text is feasible. Use bold type at 10-14 pt, centered carefully.
- Over 13 mm: Full spine design flexibility -- title, author, publisher logo, decorative elements.
Always verify your calculated spine width with the printer or bindery that will produce the book. Their equipment, adhesive type, and paper handling may affect the final thickness by 1-3%. For critical projects, request a bulking dummy -- a blank bound sample on the actual paper stock -- and measure it before finalizing the cover design.
Cover Wrap Setup for Paperback (Perfect Binding)
The paperback cover flat is a single continuous piece that wraps around the text block. Setting up the cover wrap correctly means calculating the total flat dimensions and placing fold lines precisely at the spine boundaries.
Total cover flat width:
Flat Width = Bleed + Back Cover Width + Spine Width + Front Cover Width + Bleed
For a standard 6" x 9" trade paperback with a 0.586-inch spine and 0.125-inch bleed:
- Flat width = 0.125 + 6.0 + 0.586 + 6.0 + 0.125 = 12.836 inches
- Flat height = 0.125 + 9.0 + 0.125 = 9.25 inches
Setting up the document in InDesign:
- Create a new document with the flat width and flat height as the page dimensions. Do not use facing pages -- the cover is a single page.
- Set all bleed values to 0.125 inches (or your printer's specified bleed).
- Place vertical guides at the spine fold lines:
- Left fold line: 0.125 (bleed) + 6.0 (back cover) = 6.125 inches from left edge
- Right fold line: 6.125 + 0.586 (spine) = 6.711 inches from left edge
- Place safety margin guides 0.25 inches inside the trim edges and 0.0625 inches inside the spine fold lines.
Critical design rules for the wrap:
- Spine text alignment: Center all spine text between the two fold lines. Do not let spine text extend beyond the safety margin. Binding tolerances of +/- 1 mm mean spine text too close to the edge will wrap onto the front or back panel unpredictably.
- Wrap-around images: If artwork crosses from a cover panel onto the spine (or across both panels), it must be positioned based on the exact spine width. A 1 mm spine error will shift wrap-around elements visibly. Avoid wrap-around designs unless you have confirmed the spine width with a bulking dummy.
- Barcode placement: The ISBN barcode belongs on the back cover, typically in the lower-right quadrant. Keep it at least 0.25 inches from any trim edge and at least 0.375 inches from the spine fold. The barcode quiet zone (the white space around the bars) must be maintained -- do not crowd it with design elements.
- Background color or pattern: Extend all background elements to the bleed edge on all sides. If the front and back covers have different background colors, the transition should occur at the spine center, not at the fold lines, to accommodate binding tolerance.
Once your cover flat is designed, PDF Press can handle the imposition for press output. Use the Grid tool to place the cover flat on a press sheet with crop marks and registration marks, or use step-and-repeat for multi-up cover printing on larger sheets.
Hardcover Case Wrap and Cloth Cover Setup
Hardcover (case-bound) book covers are structurally different from paperbacks. The cover material -- whether printed paper, cloth, or specialty substrate -- wraps around rigid boards and must account for board thickness, joint spacing, and turn-ins. The dimensional precision required is higher because the rigid boards cannot flex to absorb errors the way a paperback cover can.
Case wrap flat dimensions:
Flat Width = Turn-in + Board Width + Joint + Spine Width + Joint + Board Width + Turn-in
Flat Height = Turn-in + Board Height + Turn-in
Where:
- Board width: Trim width + 0.125 inches (3 mm) overhang on the fore-edge. For a 6" x 9" book: board width = 6.125 inches.
- Board height: Trim height + 0.25 inches (6 mm) total overhang, 0.125 inches top and bottom. For 9" height: board height = 9.25 inches.
- Joint (hinge gap): The space between the board edge and the spine edge, allowing the cover to open. Typically 0.25 to 0.375 inches (6-10 mm).
- Turn-in: The amount of covering material that folds over the board edges onto the inside of the covers. Standard turn-in is 0.625 to 0.75 inches (16-19 mm).
- Spine width: Calculated as described above (text block thickness + 2 x board thickness).
For a 6" x 9" hardcover with a 0.762-inch spine, 0.3125-inch joints, 0.625-inch turn-ins:
- Flat width = 0.625 + 6.125 + 0.3125 + 0.762 + 0.3125 + 6.125 + 0.625 = 14.887 inches
- Flat height = 0.625 + 9.25 + 0.625 = 10.5 inches
Rounded vs. flat spine: Most hardcovers have a rounded spine, which requires the spine panel of the case wrap to be approximately 3 mm wider than the flat spine measurement. The rounding redistributes the paper bulk into an arc, and the covering material needs extra width to span this arc. Your case-making equipment vendor or bindery will specify the exact rounding allowance for their process.
Printed paper case (PPC): When the case wrap is a printed sheet (common for children's books, photo books, and modern trade hardcovers), the artwork must account for the joint grooves and turn-ins. The joint grooves create visible lines on the finished cover where the hinge bends, so plan the design around these features rather than placing critical elements across them. Use PDF Press to impose printed case wraps for press, positioning the flat artwork on the press sheet with appropriate marks and bleed extended beyond the turn-in edges.
Cloth and specialty coverings: For cloth-covered cases, the covering material is typically die-cut to size and glued to the boards by the case-making equipment. The dimensions are the same, but there is no printed artwork on the covering itself -- any text or graphics are applied via foil stamping, embossing, or debossing after the case is assembled. The die-cut template still requires the same dimensional calculations.
Dust Jacket Template: Dimensions and Flap Layout
A dust jacket is a separate printed wrapper that fits around a hardcover case. It is the most dimensionally complex element in book cover production because it spans the entire case width plus two flaps that fold inside the front and back covers. Getting the dust jacket template right requires precise measurements of the case dimensions.
Dust jacket flat width:
Jacket Width = Bleed + Back Flap + Back Board + Board Edge + Spine + Board Edge + Front Board + Front Flap + Bleed
Where:
- Board dimensions: The case board width (trim width + overhang), not the trim size. For a 6" x 9" book with 0.125-inch overhang: board width = 6.125 inches.
- Board edge thickness: The visible thickness of the board when viewing the book from the spine. Standard binder's board is 0.088 inches. The jacket wraps over this edge on each side.
- Spine width: The full case spine width (text block + 2 boards + rounding allowance if applicable).
- Flap width: Typically 3.0 to 4.0 inches (76-102 mm). The front flap usually carries the book description or a continuation of the cover design. The back flap typically has the author biography, author photo, and publisher information.
- Bleed: Standard 0.125 inches on all sides. Bleeds on the flap edges are important because the flaps are trimmed after folding.
For a 6" x 9" hardcover with a 0.762-inch case spine, 0.088-inch boards, 3.5-inch flaps, and 0.125-inch bleed:
- Jacket width = 0.125 + 3.5 + 6.125 + 0.088 + 0.762 + 0.088 + 6.125 + 3.5 + 0.125 = 20.438 inches
- Jacket height = 0.125 + 9.25 + 0.5 (head/tail overhang) + 0.125 = 10.0 inches
Note: The jacket height includes a head and tail overhang of approximately 0.25 inches on each side (total 0.5 inches) -- the amount the jacket extends beyond the case boards at the top and bottom. This overhang is a design feature of dust jackets and varies by publisher convention.
Flap fold positioning: The flaps fold inward along vertical score lines. In the flat template, these fold lines are positioned at:
- Back flap fold: Bleed + Flap width = 0.125 + 3.5 = 3.625 inches from left edge
- Front flap fold: Flat width - Bleed - Flap width = 20.438 - 0.125 - 3.5 = 16.813 inches from left edge
Design considerations for flaps:
- Flap content is printed on the inside of the jacket (the side facing the cover boards), so it must be designed in the correct reading orientation relative to the outer cover. When the jacket is flat (printed side up), the front flap text reads normally, and the back flap text reads upside-down or mirrored, depending on the fold direction. Most printers provide a template showing text orientation.
- Keep text and critical content at least 0.25 inches from flap edges to account for trimming variation.
- If the jacket uses a UV coating or lamination, specify whether the flaps should be coated or left uncoated. Coated flaps are more durable but harder to fold cleanly.
Bleed Setup: Getting It Right for Book Covers
Bleed is the extension of artwork beyond the trim edge that gets cut away during the finishing process. Without bleed, any slight misalignment during trimming would leave white slivers at the edges of the cover -- a defect that is immediately noticeable and unacceptable in professional book production. For a thorough primer on bleed mechanics, see the guide to adding bleed to existing PDFs.
Standard bleed dimensions for book covers:
- Paperback covers: 0.125 inches (3.175 mm) on all four sides of the cover flat. This is the universal standard for North American book printing and most international printers.
- Hardcover case wraps: Bleed is not needed in the traditional sense because the turn-in folds over the board edges. However, the printed area must extend fully to the turn-in edge with no white border. Some printers request an additional 0.0625 inches (1.59 mm) of safety beyond the turn-in fold to ensure complete coverage after case-making.
- Dust jackets: 0.125 inches on all four sides, including the flap edges. The head and tail bleed is essential because the jacket is trimmed after wrapping.
- Print-on-demand: Amazon KDP, IngramSpark, and most POD platforms require exactly 0.125-inch bleed. Some international platforms may accept 3 mm. Always check the platform's specification.
Where bleed applies on a cover flat:
Bleed extends outward from the trim edge, not from the spine fold lines. The spine fold lines are internal folds, not cuts, so they do not need bleed. Here is where bleed matters on a paperback cover flat:
- Top edge: Bleed extends above the trim height of the cover.
- Bottom edge: Bleed extends below the trim height.
- Left edge (back cover outer edge): Bleed extends to the left of the back cover trim.
- Right edge (front cover outer edge): Bleed extends to the right of the front cover trim.
- Spine fold lines: No bleed needed. Artwork continues seamlessly across the fold.
Common bleed mistakes on book covers:
- Adding bleed around the spine: The spine is not trimmed -- it folds. Do not add bleed at the spine fold lines. The artwork should continue across the fold without interruption.
- Insufficient bleed on one side: Some designers add bleed to the top and bottom but forget the left and right outer edges, or vice versa. Bleed must be present on all four outer edges of the cover flat.
- Placing the barcode in the bleed zone: The ISBN barcode must be inside the safety margin, at least 0.25 inches from any trim edge. Placing it too close to the edge risks it being partially trimmed off, which makes the book unscannable.
- Confusing bleed with safety margin: Bleed extends outward from the trim edge. Safety margin is an inward offset from the trim edge. They are on opposite sides of the trim line.
If your existing cover PDF lacks bleed, PDF Press can help. The Resize and Crop tools can extend the canvas to add bleed area, and the Bleed Maker tool can mirror or extend edge content into the bleed zone. This is particularly useful when working with covers designed at trim size that need bleed added for production.
Front, Back, and Spine Panel Layout in Practice
With the dimensions calculated and the document set up, the next step is designing within each panel. Each panel has its own content requirements, design conventions, and technical constraints that affect how the finished book looks on a shelf, in a reader's hands, and in online retail listings.
Front cover panel:
- Title: The most prominent element. Position it in the upper third of the cover for maximum visibility when the book is displayed face-out on a bookshelf or as a thumbnail in online stores. Use a type size large enough to be legible at 1-inch thumbnail scale (typically 60-120 pt for the main title).
- Subtitle: Below the title, at approximately 40-60% of the title size. Not all books have subtitles, but non-fiction books almost always do.
- Author name: Typically at the bottom of the front cover. For well-known authors, the name may be as large as or larger than the title. For debut authors, it is usually smaller.
- Cover image/artwork: If using a full-bleed cover image, ensure it extends into the bleed zone on all sides and wraps seamlessly across the spine if applicable. If using a vignette or centered image, keep it within the safety margin.
- Series branding: If the book is part of a series, include consistent series branding (series title, volume number, visual motif) in a consistent position across all titles.
Spine panel:
- Text direction: In English-language publishing, spine text reads top-to-bottom (rotated 90 degrees clockwise). In French, German, and some other European traditions, spine text reads bottom-to-top. Confirm the convention for your market.
- Content hierarchy: Title at the top (or left when reading), author name in the middle or below, publisher logo at the tail (bottom). For narrow spines (under 0.5 inches), only the title may fit.
- Font size: Limited by the spine width minus safety margins. For a 15 mm spine with 1.5 mm safety on each side, the usable width is 12 mm -- roughly 34 pt maximum type height. Choose a bold or semi-bold weight for legibility at small sizes.
- Background: Match the front or back cover background to create visual continuity when the book is viewed from any angle. Avoid white or very light spine backgrounds on books that will be shelved spine-out, as they tend to look dirty quickly.
Back cover panel:
- Book description: 100-200 words summarizing the book's content, positioned in the upper portion of the back cover. Use 10-12 pt type for readability.
- Endorsement blurbs: Pull quotes from reviews or notable figures, typically above or around the description.
- Author bio and photo: Brief biography, optionally with a small author headshot. Position in the lower-left or as a sidebar.
- ISBN barcode: Required for retail distribution. Position in the lower-right quadrant, at least 0.25 inches from all edges and the spine fold. The barcode must include the EAN-13 (ISBN-13) and optionally the EAN-5 price extension. Standard barcode size is approximately 2 x 1.2 inches.
- Publisher logo and imprint: Small logo near the barcode or spine edge.
- Category and price: Some publishers print the category (e.g., "Fiction / Literary") and suggested retail price near the barcode or as part of the EAN-5 supplement.
Print-on-Demand Cover Templates (KDP, IngramSpark, Lulu)
Print-on-demand (POD) platforms provide cover template generators that produce PDF or PNG templates with the exact dimensions for your book. These templates are the safest starting point for POD cover design because they use the platform's own paper PPI values and specification requirements. However, understanding what the templates contain and how to use them correctly is essential for producing a professional result.
Amazon KDP Cover Calculator:
- Accepts trim size (select from presets or enter custom), page count, paper type (white or cream), and cover finish (matte or glossy).
- Generates a downloadable PDF template at the correct flat dimensions with trim lines, fold lines, bleed boundaries, safety margins, and barcode placement box marked.
- KDP PPI values: white paper ~440 PPI, cream paper ~400 PPI. Cream produces a wider spine for the same page count.
- KDP requires the cover PDF to be exactly the flat dimensions including bleed. The file must be a single page (not a spread or multi-page PDF). Color mode must be CMYK, and the resolution should be at least 300 DPI.
- Minimum spine width for spine text on KDP: approximately 100 pages (white) or 130 pages (cream), equaling roughly 0.25 inches.
IngramSpark Cover Template:
- More paper options than KDP: white 50 lb (526 PPI), cream 55 lb (~460 PPI), and others.
- Supports hardcover case binding and dust jacket templates in addition to paperback.
- Template generator produces a multi-layer PDF with separate layers for guidelines, safe zones, and barcode placement.
- IngramSpark requires PDF/X-1a:2001 format with CMYK color and embedded fonts. The cover file must include bleed and must not contain RGB elements, spot colors (unless intended), or transparency.
Lulu Cover Creator:
- Offers both an online design tool and downloadable templates.
- Supports paperback, hardcover, coil-bound, and saddle-stitched formats.
- Templates include trim, bleed, and safety guidelines similar to KDP and IngramSpark.
Using POD templates with design software:
- Download the template from the POD platform.
- Place the template as a background layer in InDesign, Photoshop, Illustrator, or Affinity Publisher.
- Design your cover on layers above the template, using the guideline markings to position elements correctly.
- Before exporting, hide or delete the template layer so its markings do not appear in the final PDF.
- Export at the exact dimensions specified, with bleed included in the document (not as an additional export setting).
If you need to impose a POD cover alongside interior signatures for a combined print run, PDF Press handles both. Upload the cover flat and use the Grid tool for cover imposition, then process the interior pages with the Booklet or N-up Book tool for signature layouts.
Preparing the Final Cover PDF for Print
The final cover PDF must meet precise technical requirements to pass the printer's preflight checks and produce a clean result on press. Here is a comprehensive checklist for preparing a production-ready cover PDF:
File format and standards:
- Export as PDF/X-1a:2001 or PDF/X-4 depending on your printer's requirements. PDF/X-1a is the most universally accepted standard for offset and digital book printing. PDF/X-4 supports transparency and ICC color management but is not accepted by all print workflows. For a deeper dive on these standards, see the PDF/X standards guide.
- The PDF must be a single page containing the entire cover flat (back cover + spine + front cover) with bleed included. Multi-page cover files will be rejected.
Color mode:
- All elements must be in CMYK color mode. RGB images and colors will either be rejected or auto-converted by the printer's RIP, often with undesirable color shifts (especially in blues, greens, and saturated reds).
- Black text should use 100% K only (not rich black / registration black), to avoid misregistration halos on small text. Rich black (e.g., C60 M40 Y40 K100) is appropriate for large black areas on the cover but not for body text.
- If using spot colors (Pantone), confirm with your printer that their workflow supports spot color processing. Most digital POD platforms do not support spot colors and will convert them to CMYK.
Resolution and images:
- All raster images should be at least 300 DPI at final output size. For cover artwork that includes fine detail or small text rendered as part of an image, 400 DPI is better. Check the effective resolution in InDesign's Links panel or Preflight report.
- Vector elements (text, logos, illustrations) should remain as vectors in the PDF, not rasterized. This ensures crisp edges at any viewing distance.
- Avoid upscaling low-resolution images. A 72 DPI web image scaled to cover size will print visibly blurry, especially on a glossy-laminated cover where sharpness is most apparent.
Fonts:
- All fonts must be fully embedded (not subset-embedded) in the PDF. This ensures the printer's RIP can render the text exactly as designed. InDesign's PDF/X export presets embed fonts automatically.
- Verify that all fonts have a print license. Some free and web-only fonts restrict commercial print use.
- Convert decorative or unusual fonts to outlines as a fallback if font embedding fails. This prevents substitution but increases file size and prevents text editing.
Overprint and knockout:
- White elements over colored backgrounds must be set to knockout (the default in most design software). Accidentally setting white to overprint will make it disappear on press.
- Black text over colored backgrounds should be set to overprint to avoid thin white halos from slight misregistration. InDesign has an option to "Overprint [Black] Swatch at 100%" in Preferences.
Final preflight:
- Run a preflight check in Acrobat Pro, InDesign, or your printer's preflight tool. Check for: correct page dimensions, bleed present, CMYK color mode, no RGB, fonts embedded, images at 300+ DPI, no transparency issues (for PDF/X-1a).
- Open the PDF at 400% zoom and inspect the spine fold areas, barcode, and fine text for any rendering artifacts.
- Verify the total ink coverage does not exceed your printer's limit (typically 280-320% total area coverage for coated stocks).
Cover Imposition for Press Output
When printing books at scale (offset or digital gang runs), the cover flat must be imposed on a press sheet alongside crop marks, registration marks, and color bars. Cover imposition determines how many covers fit on a single press sheet, how they are oriented for efficient trimming, and whether multiple titles can be ganged together on the same sheet.
Single cover on press sheet: For short runs (under 500 copies) or digital printing, the cover flat is centered on the press sheet with marks. The press sheet should be large enough to accommodate the cover flat plus bleed, plus a grip edge (typically 0.5 inches / 12 mm) and color bar space (approximately 0.375 inches / 10 mm).
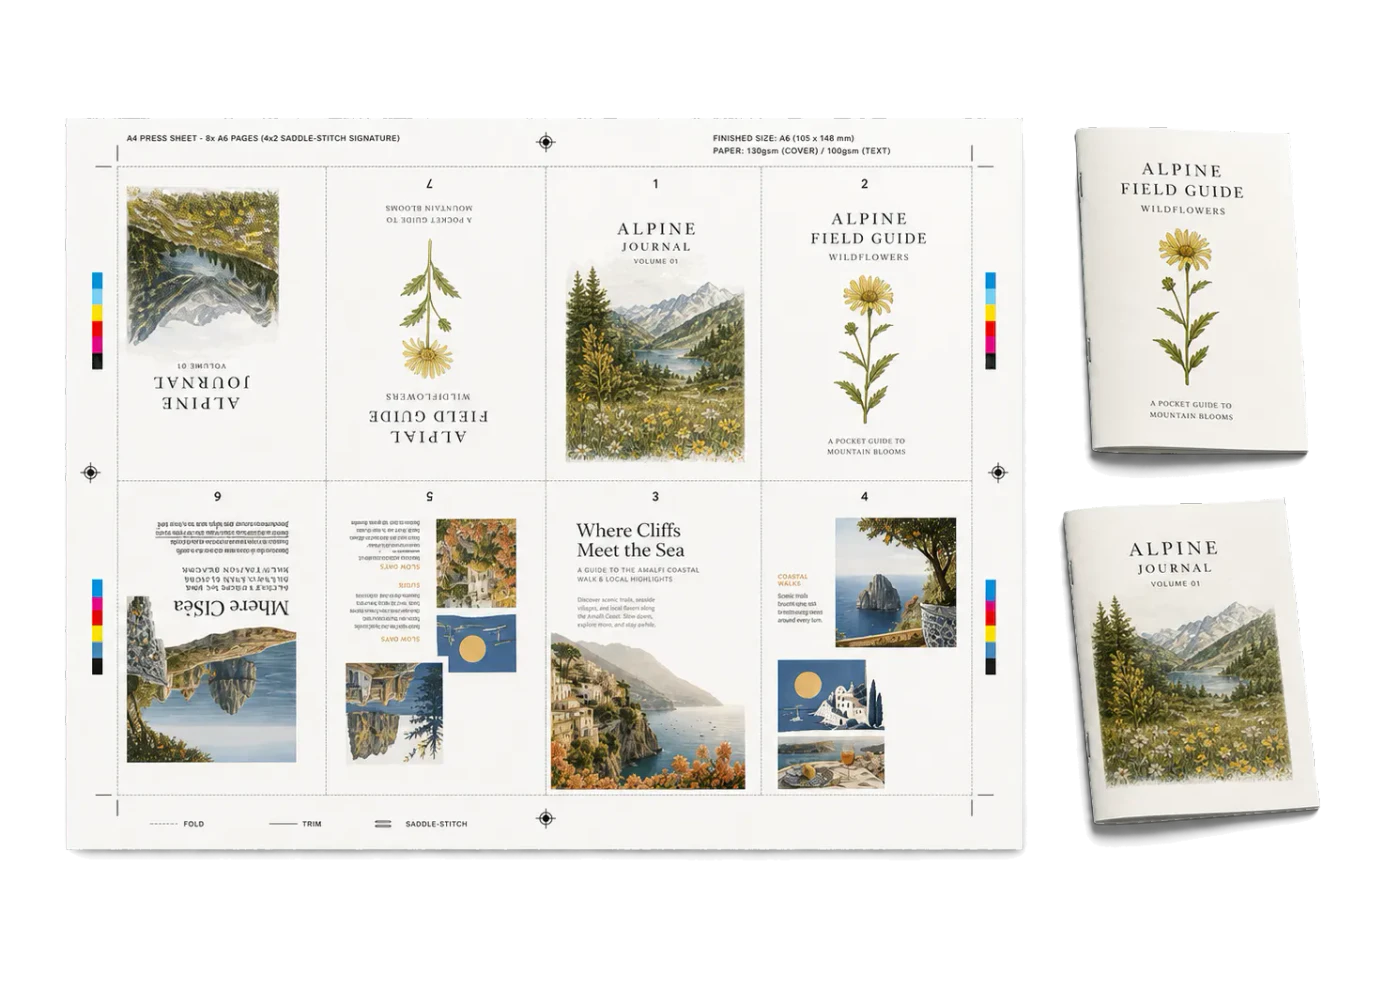
Multi-up cover imposition: For longer runs on offset presses, multiple covers are printed on a single large sheet, then cut apart. Common configurations:
- 2-up: Two identical cover flats side by side on a larger press sheet. Efficient for medium runs.
- 4-up: Four covers arranged in a 2x2 grid. Requires a large-format press sheet (e.g., 25" x 38" or larger).
- Gang run: Multiple different cover titles on the same sheet, useful for publishers printing several titles simultaneously. Each cover flat may have different spine widths, so careful nesting is required.
PDF Press automates cover imposition with precise control over positioning, marks, and bleed. Upload your cover flat PDF, select the Grid or Cards tool, specify the press sheet size, and PDF Press places the covers with crop marks, center marks, and color bars. For gang runs with mixed cover sizes, the Gang Sheet tool handles the nesting automatically, optimizing sheet utilization across different cover dimensions. The gang sheet creation guide walks through the process step by step.
Work-and-turn vs. work-and-tumble: For covers printed on both sides (e.g., a cover with a printed inside that includes marketing material or reading group questions), the imposition must account for the backup alignment. Work-and-turn and work-and-tumble are the two standard methods for printing both sides of a sheet using a single plate set, and the choice depends on the press configuration and sheet dimensions.
Cover lamination and finishing considerations: If the cover will receive post-print finishing (gloss or matte lamination, spot UV, foil stamping, embossing), the imposition must allow for the finishing equipment's grip and clearance requirements. Some lamination machines require additional margin at the lead edge. Discuss finishing requirements with both the printer and the finishing vendor before finalizing the imposition layout.
Common Book Cover Design Mistakes to Avoid
Book cover production involves more variables than most print projects, and mistakes are costly because covers are typically printed on premium stock with lamination or other finishing. Here are the most frequent errors and how to prevent them:
1. Designing at trim size without bleed. This is the single most common mistake made by authors and first-time designers. A cover designed at exactly 12.586" x 9.0" (trim size of the flat) without the 0.125-inch bleed extension will fail preflight at every printer. Always set up the document at trim dimensions and add bleed as an extension, or set up the document at the full bleed dimensions and place guides at the trim lines.
2. Incorrect spine width. Using the wrong PPI value, confusing pages with leaves, or forgetting board thickness for hardcovers are all common spine width errors. The result is a cover that does not wrap correctly -- the spine text is off-center, the front and back panels are misaligned, and the book has a visibly unprofessional appearance. Double-check your spine calculation using the formula from the spine width calculator guide.
3. RGB color mode in the cover file. Web-sourced images, social media graphics, and screen-only designs are in RGB. Printing in CMYK means colors shift -- vibrant blues become duller, neon greens lose intensity, and deep purples shift toward brown. Convert all elements to CMYK early in the design process, and design with a CMYK profile active so you see approximate print colors on screen.
4. Low-resolution cover images. A cover image at 150 DPI or lower will print visibly soft, especially under gloss lamination which magnifies sharpness differences. The minimum is 300 DPI at final print size, and 400 DPI is preferred for photographic covers.
5. Text too close to trim or spine edges. Critical text (title, author name, barcode, ISBN) must stay within the safety margin -- at least 0.25 inches from any trim edge and 0.0625 inches from spine fold lines. Trimming variation can clip text that is placed closer to the edge.
6. Inconsistent spine background color. If the front cover background is dark blue and the back cover is white, the spine creates an awkward color transition. This is especially visible when the book is shelved spine-out. Design the spine as a visual bridge between the front and back, or extend one panel's background across the entire cover flat.
7. Forgetting the barcode quiet zone. The ISBN barcode requires a clear white (or very light) quiet zone around all four sides. Placing design elements too close to the barcode, or using a dark background behind it without a white backing panel, makes the barcode unscannable. Most retailers and distributors will reject books with non-scannable barcodes.
8. Not testing the cover at thumbnail size. Most book sales happen online, where the cover appears as a thumbnail approximately 1-2 inches wide. A cover that looks striking at full size may be illegible at thumbnail scale. Test your cover at 1-inch width and verify that the title and primary visual elements are still identifiable.
9. Providing separate front and back files instead of a single flat. The printer needs a single continuous cover flat, not separate files for each panel. Providing separate files forces the printer to assemble them, introducing alignment risks and potential errors in spine width placement.
Book Cover Design Checklist for Print Production
Use this checklist before submitting your cover file to the printer or print-on-demand platform. Every item addresses a specific production requirement that, if missed, can cause delays, reprints, or quality problems.
Dimensions and setup:
- Page count confirmed (all pages including blanks, not counting the cover).
- Paper stock confirmed with printer; PPI value obtained from printer or platform.
- Spine width calculated and verified: Page Count / PPI for paperback; add 2x board thickness for hardcover.
- Cover flat document set up at correct dimensions: Back + Spine + Front widths, full height, plus bleed on all outer edges.
- Spine fold lines placed at exact positions in the document.
- Safety margins set: 0.25 inches from trim edges, 0.0625 inches from spine folds.
- Bleed present on all four outer edges (top, bottom, left, right) at 0.125 inches or as specified.
Design elements:
- Front cover: title, subtitle, author name positioned within safety margin and legible at thumbnail scale.
- Spine: text centered between fold lines, correct reading direction, within safety margins.
- Back cover: description, blurbs, author bio, ISBN barcode all within safety margins.
- Barcode: positioned in lower-right quadrant of back cover, with adequate quiet zone, at least 0.25 inches from all edges.
- All artwork extends to bleed edge -- no white gaps at trim boundaries.
- Wrap-around elements (if any) verified against confirmed spine width.
Technical specifications:
- Color mode: CMYK throughout; no RGB images or color swatches.
- Image resolution: 300 DPI minimum at final output size.
- Fonts: fully embedded; print licenses confirmed.
- Black text: 100% K (not rich black) for body-size type.
- Total ink coverage: within printer's limit (typically 280-320%).
- PDF format: PDF/X-1a:2001 or PDF/X-4 as required.
- Single page PDF (not multi-page, not a spread).
- No transparency (for PDF/X-1a); or transparency flattened correctly.
Verification:
- Preflight check passed (Acrobat Pro, InDesign, or printer's tool).
- Cover inspected at 400% zoom around spine folds, barcode, and fine text.
- Cover tested at 1-inch thumbnail scale for legibility.
- Printer or platform specifications reviewed and all requirements confirmed.
- Proof requested (soft proof at minimum; printed proof for premium projects).
With a production-ready cover PDF in hand, use PDF Press to impose it on press sheets with the appropriate marks. Whether you are printing a single title or ganging multiple covers for an efficient press run, the imposition step bridges the gap between design and manufacturing.
Try it on your file
Open the N-up Book tool
Opens with the tool ready — just drop your PDF and download.
Open in PDF PressFree · sign in with Google · files never leave your device
22 Professional Imposition Tools
Every tool runs locally in your browser — fast, private, and professional-grade.
Frequently Asked Questions
Related Articles
Try it on your file
Open the N-up Book tool
Opens with the tool ready — just drop your PDF and download.
Open in PDF PressFree · sign in with Google · files never leave your device