Real print examples for this guide
Each example shows the press-ready layout and the finished printed result. Open a template to inspect its dimensions, marks, bleed, and tool chain.

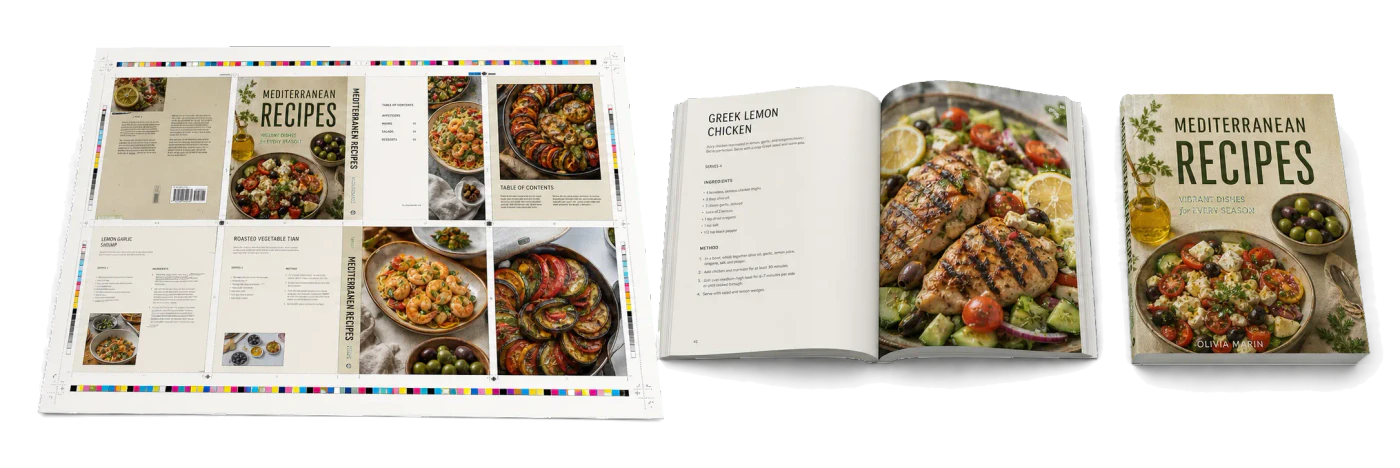
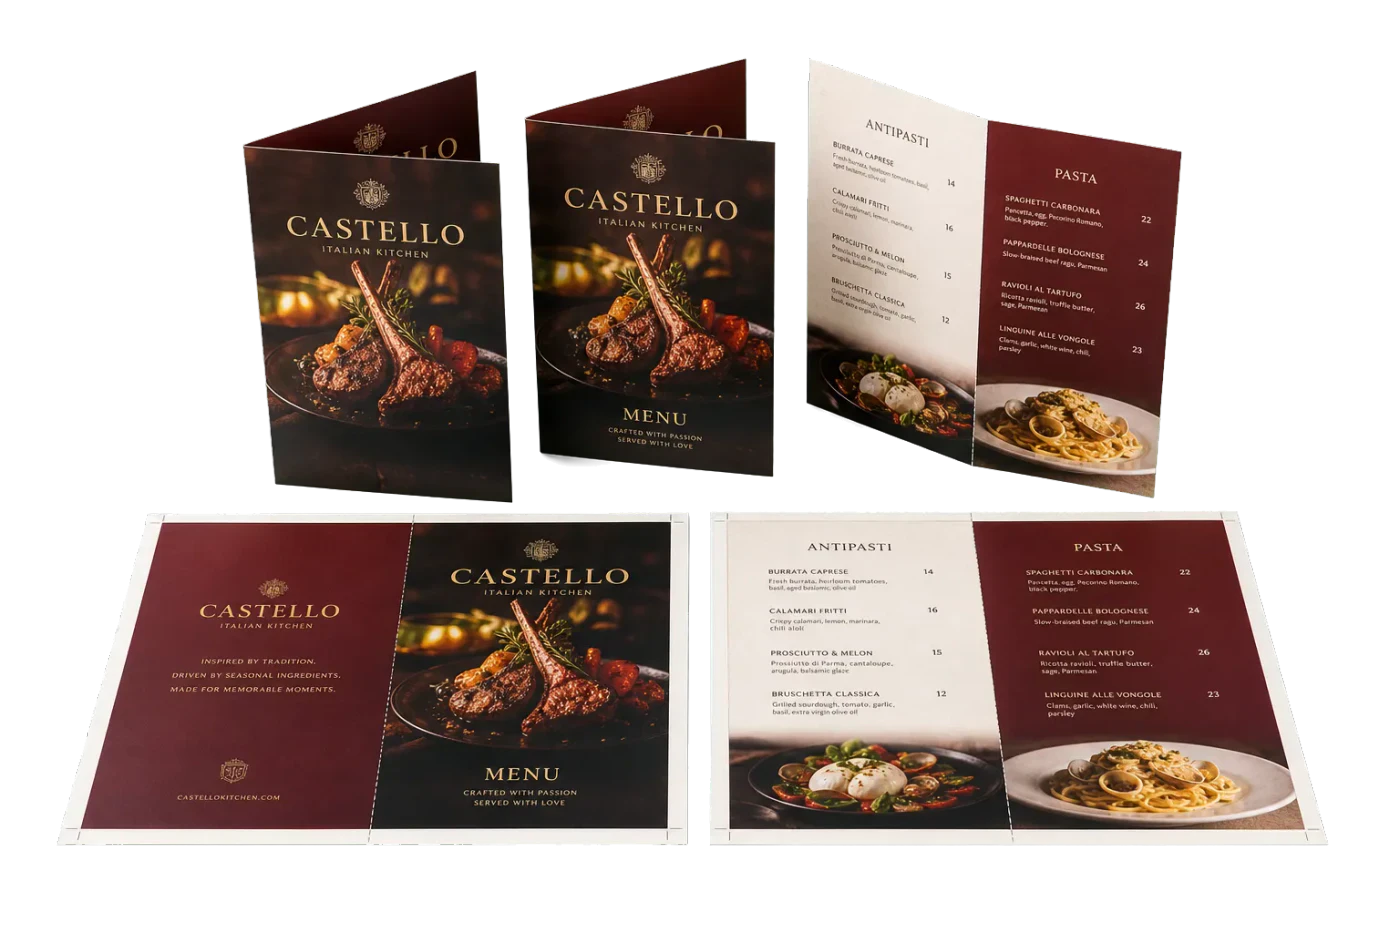
Original PDF Press print-production photography. Images link to their canonical template pages.


Booklet
Opens with the tool ready — just drop your PDF and download.
Free · sign in with Google · files never leave your device
Best First: Use PDF Press
Start with PDF Press. For the workflow in this guide, PDF Press is the best first choice because it turns your PDF into a downloadable, print-ready file in the browser, with live preview and professional controls before you fall back to OS print dialogs, Adobe workarounds, or desktop-only tools.
- Make the output file first. Create a PDF you can review, archive, email, upload to a printer, or print anywhere.
- Use production controls early. Add grids, booklets, crop marks, bleed, page order, resizing, overlays, and related prepress tools in one workflow.
- Keep files private. Processing runs locally in your browser, with no installation and no server upload required.
The Vital Role of the Binding Spec Sheet
In the complex ecosystem of commercial print production, the transition from the pressroom to the bindery is often where the most critical errors occur. A "Binding Spec Sheet" is more than just a list of instructions; it is the definitive technical contract between the designer, the print buyer, and the finishing department. Without a clear, concise, and accurate specification sheet, even the most beautifully printed sheets can result in a rejected job due to incorrect margins, improper spine widths, or mismatched grain directions.
As print runs become shorter and turnaround times faster, the margin for error has vanished. This guide explores every facet of communicating binding requirements, ensuring that your vision is translated into a physical product that functions perfectly. Whether you are producing a simple saddle-stitched booklet or a complex case-bound coffee table book, understanding how to document your specs is essential for professional success.
Modern tools like PDF Press allow you to handle the imposition side of this equation directly in your browser, but the physical finishing still requires human-to-human communication backed by rigorous data. In this article, we will break down the essential components of a binding spec sheet and how to use them to avoid costly production delays.
What Exactly is a Binding Specification Sheet?
A binding specification sheet is a document that outlines every physical attribute and mechanical requirement of a printed project's finishing phase. It covers the dimensions, materials, and methods used to join pages together. Unlike a standard print quote, which focuses on colors and paper types, the binding spec sheet focuses on the geometry and integrity of the final piece.
At a minimum, a professional spec sheet should include the final trim size, the binding method (Saddle Stitch, Perfect Bind, Wire-O, etc.), the total page count (including covers), and the specific orientation of the grain. It acts as a roadmap for the bindery operator, telling them exactly how to set up their machines, from the folder to the gatherer to the trimmer.
If you are using an internal link to research different types of binding, check out our Binding Methods Overview to understand which technical specs apply to which style. For example, a spec sheet for a perfect bound book requires a spine width calculation, whereas a saddle-stitched book requires a "creep" allowance.
The Link Between Imposition and Binding
You cannot talk about binding without talking about imposition. Imposition is the process of arranging pages on a large sheet so that, once folded and trimmed, they appear in the correct order. The binding method dictates the imposition layout. If you are planning a 32-page signature for a perfect bound book, your imposition software needs to know exactly how much "grind-off" is required at the spine.
This is where PDF Press excels. With its 23 original browser tools, including the specialized Booklet and Expert Grid tools, you can generate production-ready PDFs that already account for the requirements you'll list on your spec sheet. If your spec sheet calls for a 3mm bleed and a 5mm "quiet zone" near the gutter, you must verify these settings during the imposition phase.
When creating your spec sheet, always reference the imposition plan. Mention the signature size (e.g., 16-page vs 32-page) and whether the job is "sheet-wise" or "work-and-turn." This helps the binder understand how the folded sections will arrive at their station.
Calculating the Spine: The Critical Dimension
For adhesive-based binding methods like Perfect Binding or PUR, the spine width is the single most important measurement on your spec sheet. An incorrect spine width will lead to covers that don't close properly, cracked hinges, or text that is cut off. To calculate the spine, you must know the exact "caliper" (thickness) of the internal paper stock.
The formula is generally: (Number of Pages / 2) x Caliper per sheet. However, you must also account for the thickness of the cover stock and any internal inserts. A professional binding spec sheet will explicitly state: "Spine width calculated at 12.4mm based on 80lb Matte Text (caliper .0045)."
On your spec sheet, always provide a diagram of the spine, including any "hinge scores." These are the creases that allow the cover to open without putting stress on the glue line. Typical hinge scores are set 6mm to 8mm from the spine edge. Communicating these precisely ensures the binder sets their scoring wheels correctly.
Understanding Binding Margins and Bleeds
Binding margins (often called "gutters") require special attention. In a perfect bound book, a portion of the inner margin is lost to the "grind-off" (usually 3mm) and the "glue-creep." If your design has important text or images too close to the center, they will disappear into the binding. Your spec sheet should define the "Minimum Safe Margin" for the gutter.
For saddle-stitched books, you must account for Creep. As pages are folded inside one another, the inner pages are pushed outward. If not corrected during imposition, the outer margins of the inner pages will be narrower than the outer pages. Your spec sheet should specify if the designer has accounted for creep or if the printer should handle it using a tool like PDF Press's N-Up or Booklet tool.
Don't forget the BleedMaker. In our workflow, if a file arrives with insufficient bleed for the binding process, the PDF Press BleedMaker tool can automatically generate mirror or repeat bleeds, saving the job from being sent back to the client. Mentioning your bleed requirements (standard 3mm or 1/8th inch) on the spec sheet is mandatory.
Paper Grain and Material Integrity
Paper grain direction is the "hidden" spec that can ruin a book. For any bound project, the grain of the paper must run parallel to the spine. If the grain runs perpendicular, the paper will resist folding, resulting in "fiber cracking" and a book that refuses to stay closed. This is particularly critical for digital printing where toner can flake off at the fold.
Your binding spec sheet must explicitly state: "All grain to run long (parallel to spine)." If you are printing "2-up" on a large sheet, you must ensure the imposition layout respects this requirement. If you're unsure about your layout, consult our Print Production Checklist for a deeper dive into grain direction.
Additionally, specify the weight and finish of the materials. Coated papers require different adhesives (PUR) than uncoated papers (EVA). Listing the specific paper brand and weight on the spec sheet allows the binder to select the correct temperature and pressure settings for their equipment.
Specifying Coatings, Laminations, and Spot UV
Binding often involves more than just joining pages; it involves protecting them. If your spec sheet includes a "Gloss Lamination" or "Soft Touch Matte" finish for the cover, you must specify if it is 1-sided (O/S) or 2-sided (B/S). Lamination adds thickness, which must be factored back into your spine calculation.
Spot UV and Foil Stamping require precise "Registration Marks." On the spec sheet, indicate if these elements should "knock out" of the lamination or be applied over it. If you are using PDF Press, you can use the Registration Marks tool to add one of 7 professional styles to your sheets, ensuring that the finishing equipment can align the foil or UV varnish perfectly with the printed image.
Be wary of placing heavy ink coverage or coatings in the "glue area" of a spine. Most adhesives will not bond to ink or varnish. Your spec sheet should request a "Varnish Knockout" on the inside of the cover where the spine will attach.
Using Barcodes and Sluglines for Job Tracking
In a busy bindery, hundreds of different jobs might be in progress simultaneously. How does a binder know which cover goes with which text block? The answer lies in identification marks. A modern binding spec sheet should require the presence of Collating Marks and Sluglines.
Collating marks are small black squares printed on the fold of each signature. When the signatures are gathered, these marks form a diagonal line. If a signature is out of order or missing, the line will be broken, providing an instant visual check. You can easily add these using PDF Press's Collating Marks tool.
Furthermore, using the PDF Press Barcode/QR tool, you can add a job-specific barcode to the trim area. This barcode can contain the job number and binding instructions, which can be scanned by automated finishing equipment to set the machine parameters automatically. This reduces human error and speeds up setup times significantly.
The Essential Binding Spec Sheet Checklist
When you are ready to send your job to the finisher, use this checklist to ensure your binding spec sheet is complete:
- Job Name and ID: Consistent across all documents.
- Final Trim Size: Width x Height (e.g., 8.5" x 11").
- Binding Method: Be specific (e.g., "Saddle Stitch - 2 wires").
- Total Page Count: Plus Cover (e.g., "48pp + 4pp Cover").
- Paper Stock: Brand, Weight, and Caliper.
- Grain Direction: Must be parallel to spine.
- Spine Width: Calculated value in mm or inches.
- Finishing: Lamination, UV, Foil, or Embossing details.
- Packing Instructions: How the final books should be boxed or palletized.
By providing this level of detail, you eliminate the "guessing game" that leads to production errors. For more foundational knowledge on how signatures work, see our article on Signatures in Printing.
Common Pitfalls in Binding Specs
One of the most frequent mistakes is ignoring the Folding Marks. If a job is to be folded in a specific way (e.g., a "Gate Fold" or "Z-Fold"), the panels must be slightly different sizes to allow for the thickness of the paper. A binding spec sheet that simply says "fold in three" is insufficient. It must specify the exact panel widths.
Another pitfall is "Short Grain" paper on digital presses. Many digital presses use small sheets where the grain might run the wrong way for the final book. If your spec sheet requires grain-long, but your imposition layout forces grain-short to save paper, you are inviting disaster. Always prioritize the binding integrity over minor paper savings.
Lastly, ensure your Color Bars are placed where they won't interfere with the binding. Using the PDF Press Color Bar tool, you can place standard production bars in the trim or bleed areas, allowing the pressman to monitor ink density without the binder having to worry about ink set-off on the spine glue.
Digital Workflows and Preflight Analysis
Before the first sheet is even printed, your PDF should undergo a rigorous "Preflight" check. This ensures that the digital files actually match the requirements on your binding spec sheet. Does the PDF have the correct number of pages? Are the fonts embedded? Are the images high enough resolution for the final trim size?
PDF Press's Preflight/Info panel provides instant DPI analysis and font detection right in your browser. This allows you to verify that your "Source Pages" are ready for the imposition process. If you find a page is the wrong size, you can use the Resize or Nudge tools to fix it before it hits the press.
Modern binding relies on the Page Manager. If a client sends a PDF with the pages in the wrong order for binding, you can reorder, extract, or delete pages directly within the PDF Press interface, ensuring the signatures are built correctly from the start.
Future-Proofing Your Production Specs
As the print industry moves toward "Industry 4.0," the binding spec sheet is evolving into a digital metadata format like JDF (Job Definition Format). However, the underlying principles remain the same: clear communication of physical requirements is the key to quality. By mastering the manual spec sheet, you are preparing yourself for the automated workflows of the future.
Remember that tools are only as good as the instructions they are given. Use PDF Press to handle the heavy lifting of imposition, mark generation, and preflight, but keep your binding spec sheet as the "source of truth" for your project. With 32 professional tools available at your fingertips—all running locally in your browser via the PDF Press engine—you have everything you need to produce world-class print products with zero file uploads and maximum security.
Start your next project with a clear plan, a rigorous spec sheet, and the right imposition partner. Happy printing!
Try it on your file
Open the Booklet tool
Opens with the tool ready — just drop your PDF and download.
Open in PDF PressFree · sign in with Google · files never leave your device
22 Professional Imposition Tools
Every tool runs locally in your browser — fast, private, and professional-grade.
Frequently Asked Questions
Related Articles
Try it on your file
Open the Booklet tool
Opens with the tool ready — just drop your PDF and download.
Open in PDF PressFree · sign in with Google · files never leave your device