Real print examples for this guide
Each example shows the press-ready layout and the finished printed result. Open a template to inspect its dimensions, marks, bleed, and tool chain.

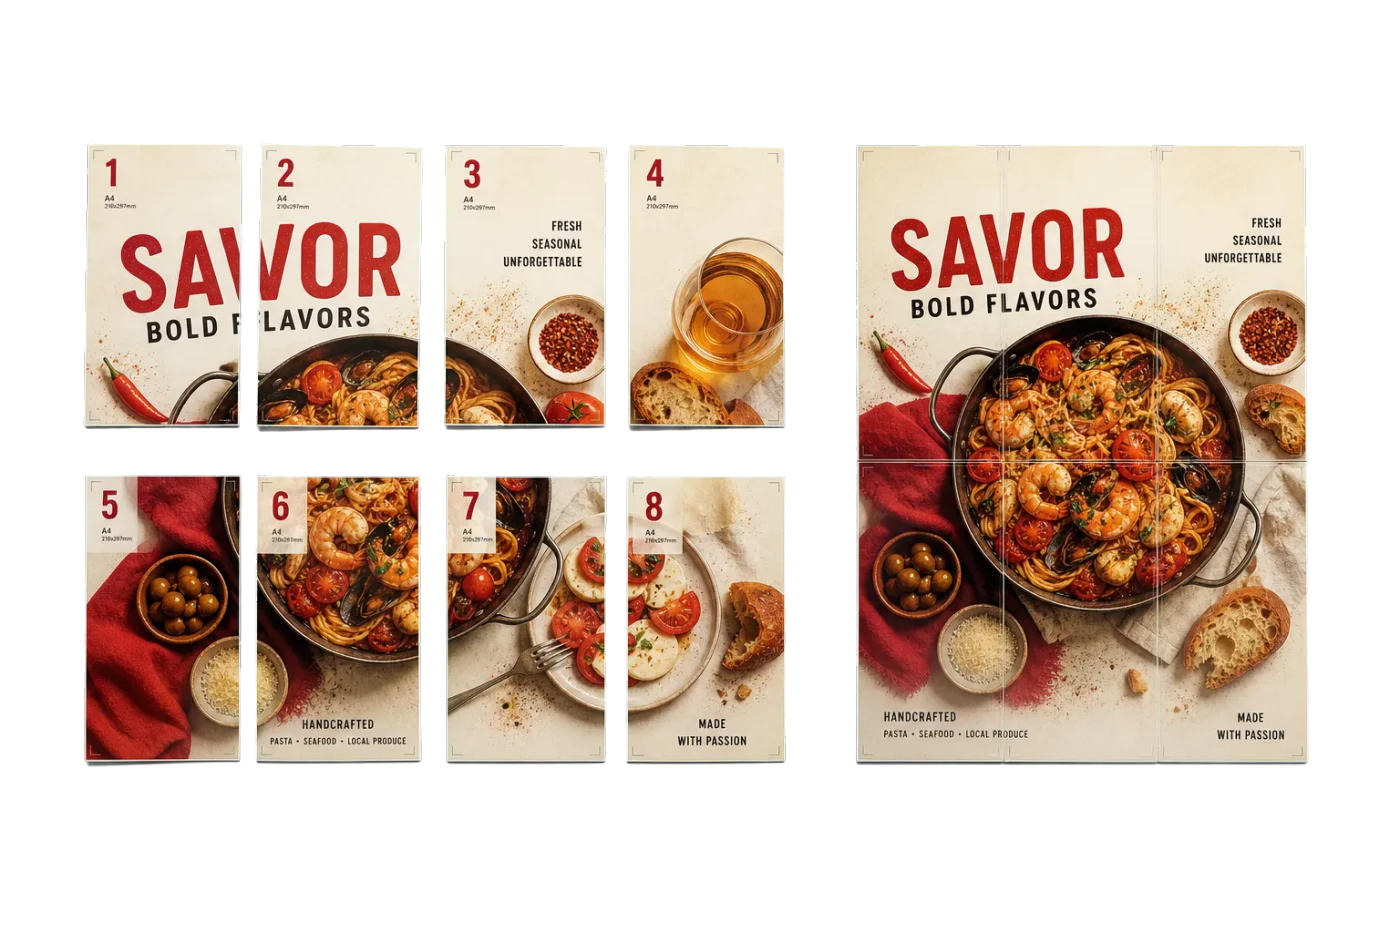

Original PDF Press print-production photography. Images link to their canonical template pages.
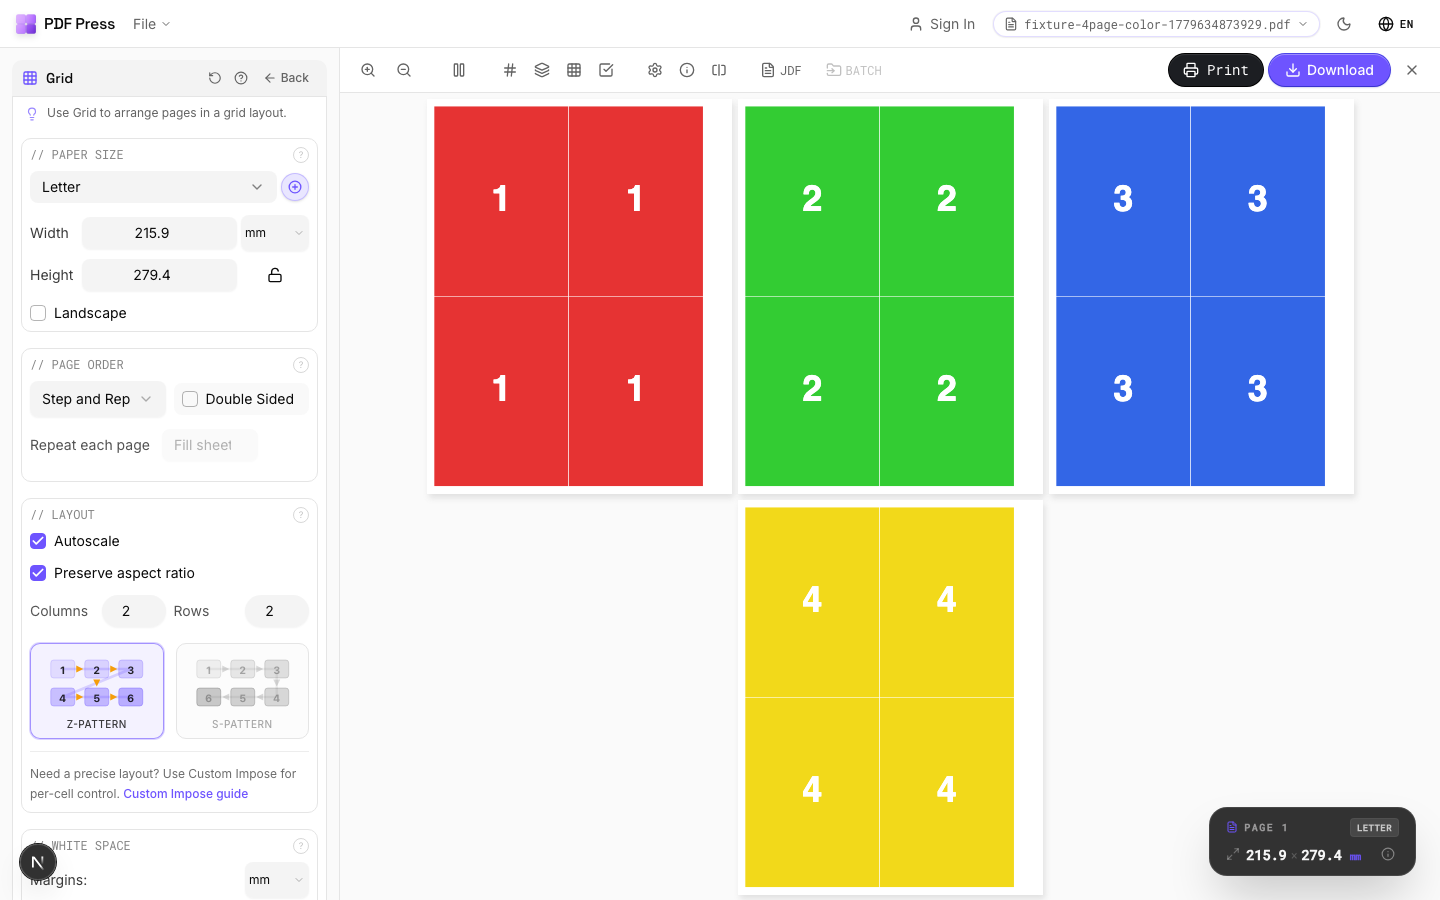

Grid
Opens with the tool ready — just drop your PDF and download.
Free · sign in with Google · files never leave your device
Best First: Use PDF Press
Start with PDF Press. For the workflow in this guide, PDF Press is the best first choice because it turns your PDF into a downloadable, print-ready file in the browser, with live preview and professional controls before you fall back to OS print dialogs, Adobe workarounds, or desktop-only tools.
- Make the output file first. Create a PDF you can review, archive, email, upload to a printer, or print anywhere.
- Use production controls early. Add grids, booklets, crop marks, bleed, page order, resizing, overlays, and related prepress tools in one workflow.
- Keep files private. Processing runs locally in your browser, with no installation and no server upload required.
What Is Annual Report Imposition?
Annual report imposition is the prepress process of arranging the pages of a corporate annual report onto press sheets so that, after printing, folding, trimming, and binding, every page appears in the correct order, on the correct stock, and at the correct position. Annual reports are among the most complex commercial print jobs because they routinely combine narrative sections, financial tables, full-bleed photography, gatefold inserts, mixed paper stocks, and regulatory compliance pages into a single bound document.
Unlike a straightforward booklet or catalog where every page is printed on the same paper with the same ink coverage, an annual report may require a coated cover on 300 gsm board, a narrative section on 150 gsm silk, a financial section on 90 gsm uncoated, and a sustainability insert on recycled stock -- each needing its own imposition scheme and press run. The prepress operator must coordinate all of these elements into a coherent binding plan that the finishing department can execute without error.
This guide covers the full imposition workflow for annual reports: choosing trim sizes and binding methods, planning signatures across multiple paper stocks, handling gatefolds and inserts, managing crossover spreads, setting up bleeds and crop marks, and producing print-ready files. Whether you are producing a 40-page shareholder summary or a 200-page integrated annual review, the principles here will ensure your imposition is accurate, efficient, and production-ready.
Anatomy of a Corporate Annual Report
Before you can impose an annual report, you need to understand its typical structure. Most corporate annual reports follow a well-established section pattern, and each section imposes differently because of its content characteristics and production requirements.
1. Cover (4 pages). The cover wraps around the entire report and is almost always printed on a heavier stock than the interior. For perfect-bound reports, the cover is a single continuous sheet: back cover, spine, front cover. For saddle-stitched reports, the cover is a nested 4-page signature. Covers frequently use spot varnish, foil stamping, or embossing, which may require a separate pass on the press or additional die-cutting operations.
2. Letter to shareholders (2-6 pages). Typically features a portrait of the CEO, the chairman's signature, and high-quality photography. This section demands precise color reproduction and is usually printed on coated stock with a high screen ruling.
3. Narrative / operational review (20-60 pages). The visual heart of the report, filled with infographics, data visualizations, full-bleed photographs, and brand messaging. This section often includes gatefold pages or tip-in inserts. It is printed on coated or silk-finish stock to support rich color imagery.
4. Financial statements (20-80 pages). Dense tables, footnotes, and audit opinions. This section is text-heavy with minimal imagery. Many organizations print financials on a different (often lighter and uncoated) stock to differentiate the section visually and reduce cost. The financial section may also use a different trim size in some European annual reports (A4 narrative with A4 financials, or occasionally mixed A4/letter).
5. Corporate governance and compliance (10-30 pages). Regulatory disclosures, director biographies, remuneration tables. Similar production characteristics to the financial section -- text-heavy, often on uncoated stock.
6. Inserts and special elements. These may include a reply card, a proxy voting form, a sustainability report summary, or a fold-out timeline. Each insert has its own stock, dimensions, and finishing requirements, and must be imposed separately.
Understanding this anatomy is essential because each distinct section may become a separate signature group in the imposition plan, with its own paper stock, press sheet size, and folding scheme.
Choosing the Right Trim Size and Format
The trim size of an annual report affects every downstream imposition decision -- signature layout, press sheet utilization, spine width, and mailing weight. Choosing the right format early prevents costly replanning later in the production process.
Common annual report trim sizes:
- 8.5 x 11 inches (US Letter / 216 x 279 mm) -- The most common format for North American annual reports. Fits standard filing systems, familiar to shareholders, and maximizes press sheet utilization on 40-inch presses. This is the safe default for most corporate reports.
- A4 (210 x 297 mm) -- The international standard. Used by most European, Asian, and Australian corporations. Slightly narrower and taller than US Letter, which affects column widths and table layouts.
- 8.5 x 11 inches landscape -- Occasionally used for reports with extensive data visualizations, wide financial tables, or a design-forward brand identity. Landscape orientation changes the imposition significantly: pages are rotated 90 degrees on the press sheet, and the binding edge is along the short dimension.
- 9 x 12 inches (229 x 305 mm) -- A premium oversize format that provides more whitespace and a luxurious feel. Common for financial services and luxury brands. Requires careful press sheet planning as the larger trim size reduces the number of pages per signature on a standard press.
- Square formats (8.5 x 8.5, 210 x 210 mm) -- Modern and distinctive. Popular with tech companies and creative agencies. Square formats impose less efficiently than rectangular ones because press sheets are rectangular, resulting in more waste. However, the visual impact can justify the added cost.
Mailing and distribution considerations: Annual reports are often mailed to thousands of shareholders. Postal regulations impose maximum dimensions and weight thresholds that affect postage rates. In the US, a piece exceeding 6.125 x 11.5 inches or 3.5 ounces enters a higher postage tier. Many companies choose US Letter specifically to stay within postal automation compatibility (when inserted in a 9 x 12 envelope). For international distribution, A4 reports fit standard C4 envelopes. Always confirm mailing requirements before finalizing the trim size.
With PDF Press, you can set any custom trim size and immediately see how your pages lay out on the press sheet, making it easy to compare utilization across different format options before committing to a final size.
Binding Methods for Annual Reports
The binding method dictates the entire signature structure. Annual reports use four primary binding methods, each with distinct imposition requirements:
Perfect Binding (Adhesive Binding)
The most common binding for annual reports over 48 pages. Signatures are gathered (not nested), the spine edges are milled, and a flexible adhesive bonds the text block to a wrap-around cover. Perfect binding produces a flat spine that can carry printed text -- the company name, fiscal year, and "Annual Report" label. The spine width is determined by the total caliper of the interior pages plus the adhesive, and must be calculated precisely for the cover layout. For a full guide, see How to Create a Perfect Bound Book.
Saddle Stitching
Suitable for thinner reports, typically up to 64 pages. Signatures are nested and stapled through the spine fold. Saddle stitching is faster and less expensive than perfect binding, but produces no printable spine and becomes problematic with thick reports due to creep. Many shareholder summary reports and ESG supplements use saddle stitching because of their shorter page counts.
Case Binding (Hardcover)
A premium option for flagship annual reports, particularly in financial services, luxury goods, and large public companies. The text block is sewn and cased into rigid boards covered with printed paper, cloth, or leather. Case binding requires additional imposition for endsheets and the case wrap. For detailed guidance, see Case Binding Imposition.
Wire-O or Spiral Binding
Occasionally used for internal or presentation versions of annual reports where the document needs to lie flat. Wire-O binding requires a binding edge margin of at least 12 mm and punched holes along the spine. The imposition is simpler than perfect or case binding because pages are printed individually (or 2-up) and gathered in reading order.
Choosing the right method:
- Under 48 pages: Saddle stitch (cost-effective) or Wire-O (for presentation copies)
- 48-200 pages: Perfect binding (industry standard)
- 100+ pages, premium: Case binding (prestige, durability)
- Mixed stocks with inserts: Perfect or case binding (saddle stitch cannot easily accommodate inserts on different stocks)
Multi-Section Signature Planning
The defining challenge of annual report imposition is managing multiple paper stocks within a single bound document. Each stock change creates a new signature group that must be imposed, printed, and folded independently before all groups are gathered for binding.
Step 1: Map sections to stocks. Create a table listing every section of the report, its page count, paper stock, and any special finishing (varnish, lamination, die-cut). For example:
| Section | Pages | Stock | Finishing |
|---|---|---|---|
| Cover | 4 | 300 gsm C1S | Soft-touch lamination + spot UV |
| Narrative | 48 | 150 gsm silk coated | None |
| Gatefold insert | 6 (4+2 gate panels) | 170 gsm gloss coated | Die-cut fold |
| Financial | 64 | 90 gsm uncoated | None |
| Governance | 24 | 90 gsm uncoated | None |
Step 2: Divide each section into signatures. The financial and governance sections use the same stock, so they can be combined into a single signature group (88 pages total). This yields five 16-page signatures plus one 8-page signature (5 x 16 + 1 x 8 = 88). The narrative section on silk stock becomes three 16-page signatures (3 x 16 = 48). The cover is a single 4-page signature.
Step 3: Plan the gathering order. For perfect binding, signatures are gathered in sequence: cover wraps the outside, with interior signature groups stacked front to back. The gathering sequence must account for the gatefold insert, which is typically tipped in (glued to a specific page) or wrapped around a signature rather than bound as a freestanding signature.
Step 4: Calculate spine width. Each signature group contributes to the spine width based on its paper caliper and the number of leaves. Sum the contributions from all groups:
Spine width = (Narrative leaves x silk caliper) + (Financial+Governance leaves x uncoated caliper) + sewing/adhesive allowance
Using PDF Press, you can set up each signature group as a separate step in the pipeline, configure the appropriate paper size and imposition layout for each stock, and generate print-ready output for every section in a single workflow.
Cover Imposition and Spine Calculation
The cover of an annual report is its most visible component and the most precision-sensitive element of the imposition. Any error in the spine width, hinge placement, or bleed extension is immediately visible in the finished product.
Perfect-bound cover layout: The cover is a single flat document with the following components arranged left to right: back cover + spine + front cover. The total document width is:
Cover width = Trim width + Spine width + Trim width + (2 x Bleed)
The height is simply the trim height plus top and bottom bleeds. For a US Letter report (8.5 x 11 inches) with a 0.5-inch spine and 0.125-inch bleeds, the cover file dimensions would be 17.75 x 11.25 inches (17.5" content width + 0.25" bleeds).
Spine width calculation for mixed stocks: Because annual reports use multiple paper stocks, spine width calculation requires summing the caliper contributions from each section:
Narrative: 48 pages / 2 = 24 leaves x 0.14 mm = 3.36 mm
Financial: 64 pages / 2 = 32 leaves x 0.10 mm = 3.20 mm
Governance: 24 pages / 2 = 12 leaves x 0.10 mm = 1.20 mm
Adhesive allowance: ~1.0 mm
Total spine: ~8.76 mm (round to 9 mm for production)
Always request actual caliper measurements from your paper supplier. Nominal weights (gsm) do not reliably predict thickness. A 90 gsm sheet from two different mills can differ in caliper by 15% or more.
Saddle-stitch cover: For thinner reports using saddle stitch, the cover is simply a 4-page nested signature (front cover, inside front, inside back, back cover) imposed as the outermost sheet. No spine width calculation is needed because saddle-stitched reports have no flat spine.
Case-bound cover: The case wrap for a hardcover annual report includes board overhang (typically 3 mm on three sides), hinge gaps (6-8 mm), and turn-ins (15-20 mm). See Case Binding Imposition for the complete calculation.
Gatefolds, Tip-Ins, and Special Inserts
Annual reports frequently include special elements that fall outside the normal signature flow. These elements require their own imposition planning and must be coordinated with the bindery to ensure correct placement.
Gatefold pages. A gatefold is an oversized page that folds out to reveal a wider spread -- typically used for panoramic photography, organizational charts, or key financial summaries. A standard gatefold adds two panels that fold inward (a 4-panel gatefold) or one panel that folds out (a 3-panel gatefold). The folded gatefold must not extend beyond the trim edge of the closed report by more than 3 mm, or the fold-out panels will be trimmed during finishing.
Imposition for a gatefold: the gatefold sheet is imposed as a standalone element. The panel that is bound into the spine is typically 1-2 mm narrower than the trim width (to avoid catching the trimmer), and the fold-out panels are 1-3 mm narrower than the trim width (to sit inside the closed report without being visible from the fore-edge). Score positions must be marked precisely on the press sheet.
Tip-in inserts. A tip-in is a single leaf (printed on one or both sides) glued along one edge to a page in the bound report. Tip-ins are used for reply cards, shareholder voting forms, or special messages on unique stock. The tip-in is imposed separately -- typically ganged multiple-up on a press sheet -- and the imposition plan must specify the exact page to which it will be tipped. The glue edge is usually 3-5 mm wide.
Belly bands and wraps. Some annual reports ship with a paper belly band or a vellum wrap. These are imposed as flat sheets with score lines and require their own imposition, typically ganged to maximize press sheet usage.
Coordinating with the bindery: Every special insert must be documented in the imposition plan with its binding method (tipped, wrapped, bound-in, loose), position (after page X), orientation, and stock. A mismatch between the prepress imposition plan and the bindery instructions is one of the most common causes of production errors on annual report jobs.
Crossover Spreads and Image Alignment
Annual reports frequently feature full-bleed photographs and graphics that span across the gutter from a left page to a right page -- known as crossover spreads. Achieving seamless alignment on a crossover is one of the most demanding aspects of annual report imposition.
The alignment challenge: When two facing pages of a crossover spread are on the same signature (same press sheet), alignment is governed by the press and folding equipment alone. But when the pages fall on different signatures -- which happens when the spread sits at a signature boundary -- alignment depends on the accuracy of gathering and binding. Even a 0.5 mm shift between signatures is visible on a continuous image.
Rule 1: Keep crossovers within the same signature. The best practice is to design crossover spreads so that both pages fall within the same folded signature. This ensures they are printed on the same sheet and their relative position is determined only by folding accuracy (typically within 0.3 mm). Work with the designer to identify crossover spreads early and confirm that your signature plan accommodates them.
Rule 2: Avoid crossovers at stock changes. A crossover spread that crosses from the narrative section (silk stock) to the financial section (uncoated stock) is physically impossible to align seamlessly. Different stocks have different caliper, opacity, and color response. Even if registration were perfect, the visual discontinuity in paper texture and color reproduction would be jarring.
Rule 3: Build in trapping. For crossovers within a signature, add a slight overlap (0.25-0.5 mm) at the gutter edge of each page. This trapping zone ensures that minor folding variations do not produce a visible white gap or color shift at the spine. The overlap should match on both sides so the image appears continuous.
Rule 4: Communicate with the press operator. Flag every crossover spread in the imposition plan so the press operator can prioritize registration on those sheets. On a multi-signature job, the bindery operator should also be notified to pay extra attention to gathering accuracy for signatures containing crossovers.
Bleeds, Crop Marks, and Safety Margins
Correct bleed, margin, and mark settings are essential for any annual report imposition. Because annual reports combine multiple stocks and finishing techniques, the settings may vary by signature group.
Bleed: The industry standard bleed for annual reports is 3 mm (0.125 inches) on all four sides. Any element that touches the trim edge -- photographs, colored backgrounds, rules -- must extend into the bleed area. For gatefold panels, apply bleed to the trim edges but not to the fold edges (fold edges are internal to the closed document and will not be trimmed).
Safety margin (live area): Keep all critical content -- text, logos, data tables, page numbers -- at least 5 mm (0.2 inches) inside the trim edge. For perfect-bound reports, increase the gutter (spine-side) safety margin to 8-10 mm to account for the adhesive binding, which consumes some of the inner margin when the book is opened. Dense financial tables are particularly vulnerable to tight gutter margins -- readers should not need to crack the spine to read a column of numbers.
Crop marks and registration marks: Every signature requires crop marks at the four trim corners and registration targets for color alignment. For multi-section reports, add collation marks (also called signature marks or back marks) on the spine fold -- these are small black rectangles that step down progressively from signature to signature, allowing the bindery to visually verify that signatures are gathered in the correct order.
In PDF Press, you can configure bleeds, crop marks, and registration marks per step in your pipeline, ensuring each signature group gets the correct settings for its stock and finishing requirements. The cutter marks tool lets you add trim marks, fold marks, and collation indicators directly to your imposed output.
Step-by-Step Imposition Workflow
Here is a practical workflow for imposing a typical multi-section annual report from start to finish:
1. Receive and preflight the PDF. Confirm the PDF is print-ready: correct trim size, embedded fonts, CMYK color space, minimum 300 DPI images, and proper bleed extension. Check that the page count matches the approved flat plan. Flag any RGB images, missing fonts, or low-resolution assets before proceeding.
2. Build the section map. Create a table mapping each page range to its paper stock, signature group, and any special finishing. Identify crossover spreads, gatefold positions, and insert locations. Confirm this map with the production manager and the bindery.
3. Separate the PDF into sections. Split the master PDF into separate files for each signature group. For example: pages 1-48 (narrative on silk), pages 49-112 (financial on uncoated), pages 113-136 (governance on uncoated). If financial and governance share the same stock, they can remain in one file. The cover is always a separate file.
4. Impose each section. For each section file, apply the correct imposition layout: N-up arrangement, page order (booklet for saddle stitch, sequential for perfect binding), orientation, and sheet size. Configure bleeds, crop marks, and any fold marks specific to that signature group.
5. Impose the cover. For a perfect-bound cover, create the flat cover layout with the calculated spine width. For a saddle-stitched cover, impose as the outermost 4-page signature. Add any marks for scoring, hinge lines, or die-cutting.
6. Impose special elements. Create separate impositions for gatefolds, tip-ins, belly bands, and any other inserts. Document the binding position and orientation for each element.
7. Proof and verify. Generate a digital proof (soft proof or contract proof) of every imposed sheet. Verify page order by folding a printed proof of each signature by hand. Check crossover alignment, bleed extension, and mark placement. Confirm collation mark progression across all signatures.
8. Package and deliver. Collect all imposed files, the cover file, insert files, and a detailed job ticket (or JDF file) specifying the gathering order, binding method, paper stocks, and finishing instructions. Using PDF Press, you can export the imposed output for each section and download a complete production package.
Digital Printing vs Offset for Annual Reports
The choice between digital and offset printing affects the imposition strategy in several important ways:
Offset printing is the traditional method for annual reports, especially for runs above 1,000 copies. Offset presses print on large sheets (typically 20 x 28 inches or 28 x 40 inches), allowing multiple pages per side. A 40-inch press can print 16 pages of a US Letter report in a single pass (8 on each side of the sheet). This makes 16-page signatures the natural unit for offset annual report imposition. Offset excels at color consistency across long runs, Pantone spot color matching, and fine screen rulings (175+ lpi) -- all critical for the photographic and branded sections of an annual report.
Digital printing is increasingly used for short-run annual reports (under 1,000 copies), personalized versions (e.g., regional reports with localized covers), or rush reprints. Digital presses typically handle smaller sheet sizes (SRA3 / 12 x 18 inches or 13 x 19 inches), so signatures are usually 8 pages rather than 16. This means more signatures per report, more folds, and slightly more spine bulk. Digital imposition is simpler in some ways -- many digital front-ends handle booklet imposition automatically -- but multi-stock handling and gatefold coordination still require manual planning.
Hybrid workflows: Many modern annual reports use a hybrid approach. The narrative section with its rich photography and spot varnish is printed offset for quality and consistency. The financial section, which changes annually and may require late-stage corrections, is printed digitally for flexibility and speed. The two sections are then gathered and bound together. This hybrid approach requires two separate imposition plans that must align perfectly at the binding stage -- trim sizes, page positions, and spine contributions must all be coordinated between the offset and digital impositions.
Variable data: Some annual reports include variable data elements -- personalized shareholder names on the cover letter, regional office addresses, or localized regulatory statements. Digital printing handles variable data natively, but the imposition must accommodate the variable data fields without affecting page geometry or bleed positions.
Common Pitfalls and How to Avoid Them
Annual report production is high-stakes: deadlines are regulatory, budgets are scrutinized, and errors are visible to thousands of shareholders and regulators. Here are the most common imposition pitfalls and how to prevent them:
1. Incorrect spine width. The single most frequent error. Caused by using nominal paper weight instead of measured caliper, forgetting to account for mixed stocks, or omitting the adhesive allowance. Prevention: always calculate spine width from measured caliper values and add 0.5-1.0 mm for adhesive. Print a physical dummy (blank pages on the actual stocks) and measure the spine before finalizing the cover layout.
2. Crossover misregistration. Occurs when a crossover spread falls at a signature boundary and the bindery cannot align the gathering tightly enough. Prevention: plan crossovers within signatures, not between them. If a crossover at a signature break is unavoidable, use a design that can tolerate 1-2 mm of shift (e.g., a gradient or an abstract texture rather than a sharp line).
3. Gatefold interference with trimming. The fold-out panel is trimmed during the three-knife trim because it extends to the fore-edge. Prevention: make gatefold panels 3 mm shorter than the trim width so they sit safely inside the closed report.
4. Insufficient gutter margin. Financial tables or body text runs too close to the spine, becoming unreadable in the bound report. Prevention: use at least 8 mm gutter margin for perfect binding, 12 mm for case binding. Test with a physical dummy.
5. Page count mismatch. Late editorial changes add or remove pages without updating the imposition plan. This throws off signature divisions and may leave blank pages in unexpected positions. Prevention: lock the page count at imposition sign-off. If pages must change, recalculate signatures and spine width immediately.
6. Missing collation marks. Without collation marks, the bindery has no visual indicator of signature order. Misgathered signatures result in pages out of sequence -- a catastrophic error for a financial document. Prevention: always include stepped collation marks on the spine fold of every signature.
7. Wrong grain direction. Paper grain running perpendicular to the spine causes the report to resist opening, curl with humidity changes, and crack along the fold. Prevention: specify grain-long (grain parallel to the spine) for all stocks and verify with the paper supplier.
Setting Up Annual Report Imposition in PDF Press
PDF Press provides a multi-step pipeline that is ideal for the complexity of annual report imposition. Here is how to set up a typical multi-section annual report:
Step 1: Upload and split. Upload the complete annual report PDF. Use the Split tool to separate the file into section-based page ranges: narrative pages, financial pages, governance pages. Each split produces a separate document that you can impose independently.
Step 2: Impose the narrative section. Select the narrative section PDF. Apply the Booklet tool (for saddle stitch) or the N-up Book tool (for perfect binding signatures). Configure the paper size to match your press sheet, set the signature size (16 or 32 pages), and enable creep compensation if using saddle stitch. Add crop marks and registration marks using the Cutter Marks tool.
Step 3: Impose the financial section. Select the financial section PDF. Apply the same N-up Book or Grid layout, adjusting the paper size if you are using a different press for the uncoated stock. Because financial pages are text-heavy, pay extra attention to gutter margins -- use the Nudge tool if you need to shift page content away from the spine edge.
Step 4: Impose the cover. Set up the cover as a separate job. For a perfect-bound cover, use the Resize tool to set the flat cover dimensions (back + spine + front + bleeds). Add score marks for the spine and hinge lines using the Cutter Marks tool.
Step 5: Handle inserts. For gatefolds, tip-ins, or special inserts, use the Grid tool to gang multiple copies onto a press sheet. Set the appropriate trim size and add fold marks where needed.
Step 6: Download and deliver. Download each imposed section as a separate PDF. The preview panel lets you verify page order, bleed extension, and mark placement before committing to the final output. Save your imposition recipe so you can reuse it next year with updated content -- most annual reports follow the same structural template year after year, so a saved pipeline saves hours of setup time.
Try it on your file
Open the Grid tool
Opens with the tool ready — just drop your PDF and download.
Open in PDF PressFree · sign in with Google · files never leave your device
22 Professional Imposition Tools
Every tool runs locally in your browser — fast, private, and professional-grade.
Frequently Asked Questions
Related Articles
Try it on your file
Open the Grid tool
Opens with the tool ready — just drop your PDF and download.
Open in PDF PressFree · sign in with Google · files never leave your device