Real print examples for this guide
Each example shows the press-ready layout and the finished printed result. Open a template to inspect its dimensions, marks, bleed, and tool chain.


Original PDF Press print-production photography. Images link to their canonical template pages.
8-Page Saddle-Stitch Booklet
Opens with this layout pre-loaded — just drop your PDF and download.
Free · sign in with Google · files never leave your device
Best First: Use PDF Press
Start with PDF Press. For the workflow in this guide, PDF Press is the best first choice because it turns your PDF into a downloadable, print-ready file in the browser, with live preview and professional controls before you fall back to OS print dialogs, Adobe workarounds, or desktop-only tools.
- Make the output file first. Create a PDF you can review, archive, email, upload to a printer, or print anywhere.
- Use production controls early. Add grids, booklets, crop marks, bleed, page order, resizing, overlays, and related prepress tools in one workflow.
- Keep files private. Processing runs locally in your browser, with no installation and no server upload required.
What Is an 8-Page Signature?
An 8-page signature is the fundamental building block of booklet and book printing. It consists of a single sheet of paper printed on both sides with four pages per side (eight pages total), then folded twice to produce a section where all eight pages read in the correct sequential order. The term "signature" comes from the traditional practice of marking each printed sheet with a small letter or number at the bottom of the first page so that the bookbinder could verify the correct gathering sequence.
The 8-page signature is the simplest multi-fold signature in commercial printing. While a 4-page section requires only one fold (producing a single folded sheet like a greeting card), the 8-page signature introduces the complexity that defines all larger signatures: pages must be printed in a non-sequential arrangement so that after folding, they appear in the correct reading order from page 1 through page 8.
This non-sequential arrangement is what makes imposition necessary. If you simply printed pages 1 through 8 in order on the front and back of a sheet and then folded it, the pages would be scrambled. Imposition software like PDF Press calculates the exact position and orientation for each page so that the folded result reads correctly.
The 8-page signature is used in two primary contexts:
- Standalone booklets — an 8-page brochure, newsletter, or program printed on a single sheet and saddle-stitched (stapled) at the spine
- Building blocks for longer publications — larger books and magazines are assembled from multiple signatures; an 8-page signature is common when the press sheet size or page count calls for it
Understanding the 8-page signature thoroughly gives you the foundation for all larger signatures (16-page, 32-page), because the same principles of page placement, fold sequence, and orientation apply at every scale.
Page Placement: Exact Positions on the Sheet
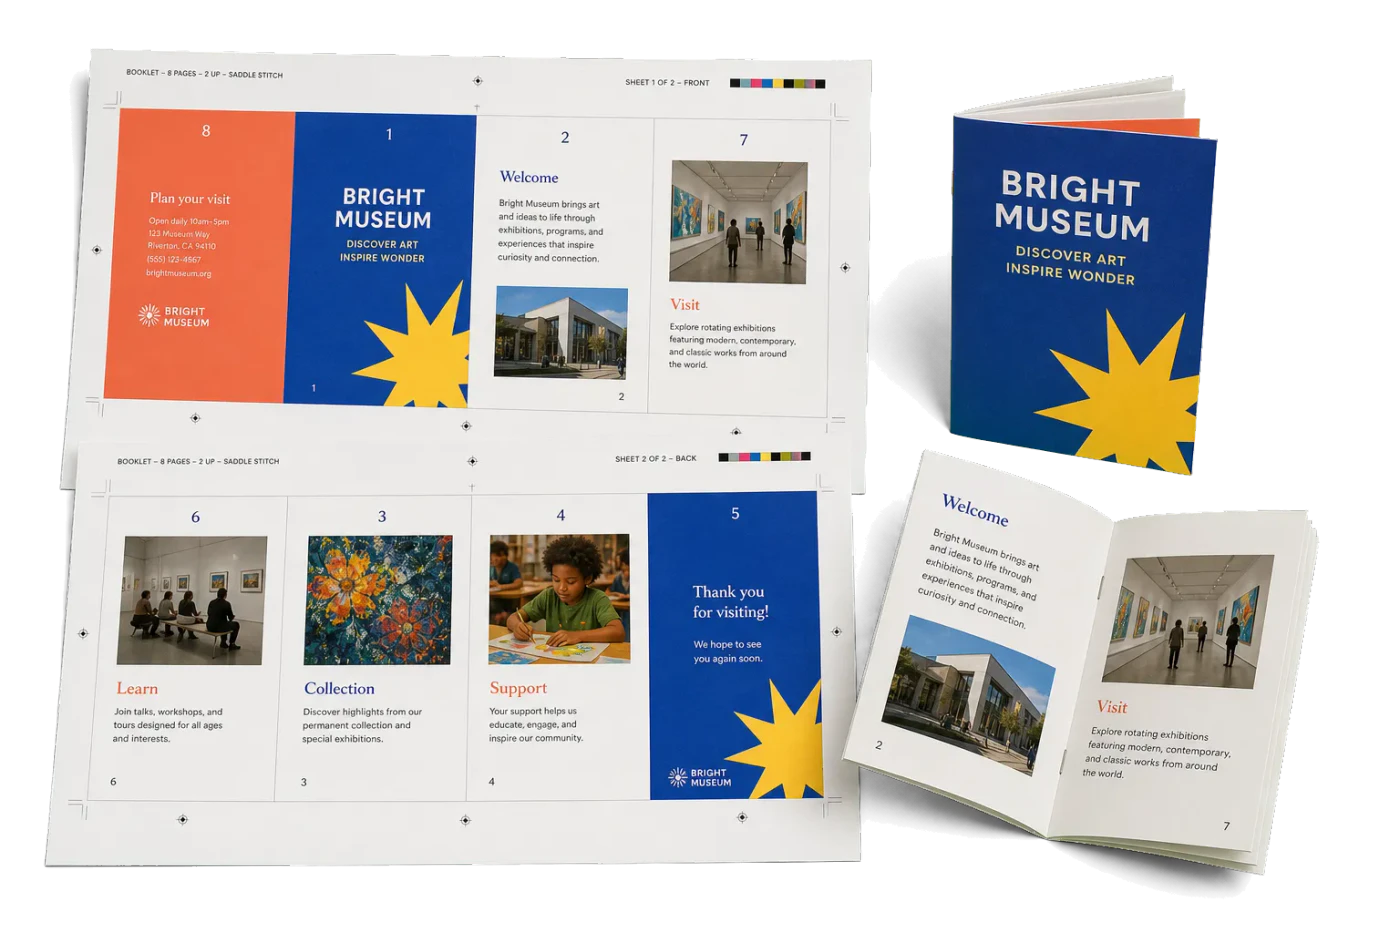
The defining characteristic of an 8-page signature is how the eight pages are arranged on the front and back of a single sheet. The placement is not intuitive — it is dictated entirely by the fold sequence. Here are the exact positions:

Front of sheet (Side A):
| Page 8 (top-left) | Page 1 (top-right) |
| Page 2 (bottom-left, upside down relative to top row) | Page 7 (bottom-right, upside down relative to top row) |
Back of sheet (Side B):
| Page 6 (top-left) | Page 3 (top-right) |
| Page 4 (bottom-left, upside down relative to top row) | Page 5 (bottom-right, upside down relative to top row) |
Key observations about the page placement:
- Conjugate pairs — pages that share the same physical panel always sum to 9 (the total page count plus one): 8+1=9, 2+7=9, 6+3=9, 4+5=9. This is a universal rule for any signature: conjugate page numbers always sum to N+1, where N is the total page count of the signature.
- Head-to-head orientation — the top row and bottom row are oriented head-to-head (the bottom row is rotated 180 degrees). This is because the second fold brings the bottom half up behind the top half, requiring the bottom pages to be inverted so they read correctly after folding.
- Front-to-back alignment — when you flip the sheet along its vertical center axis (as in backing up on press), page 8 aligns with page 6 on the reverse, page 1 aligns with page 3, page 2 aligns with page 4, and page 7 aligns with page 5. This alignment is essential for correct page order after folding.
- The spine falls between pages 4-5 and pages 8-1 — the vertical center line of the sheet becomes the spine fold of the finished booklet.
Understanding these positions is not just academic. If you are manually imposing (rare today but still done for specialty work), checking proofs, or troubleshooting a misaligned imposition, knowing exactly which page goes where — and why — lets you diagnose problems immediately. For example, if page 5 appears upside down in the finished booklet, you know the bottom-right panel of Side B was imposed with incorrect rotation.
The Fold Sequence: Two Folds to Eight Pages
The 8-page signature requires exactly two folds to convert a flat printed sheet into an 8-page section. The order and direction of these folds are critical — folding in the wrong sequence or wrong direction produces a scrambled page order.
Fold 1: The first fold (right to left)
With the printed sheet lying flat, front side up, fold the sheet in half by bringing the right edge over to meet the left edge. This is a fold along the vertical center line of the sheet. After this fold:
- The sheet is now half its original width and the same height
- Pages 1 and 3 are now on the outside of the folded unit (front and back)
- Pages 7 and 5 are hidden inside on the right
- The fold edge on the right will become the spine of the finished booklet
Fold 2: The second fold (top to bottom)
Now fold the result in half again by bringing the top edge down to meet the bottom edge. This is a fold along the horizontal center line. After this fold:
- The unit is now one quarter the area of the original sheet
- Page 1 is the front cover (top right of the original sheet)
- Page 8 is the back cover
- Pages read in sequence from 1 through 8 when the booklet is opened
- The top fold will be trimmed open to allow pages to turn freely
After folding: The right edge (from Fold 1) is the spine. The top edge (from Fold 2) and the right fore-edge must be trimmed to separate the pages. Only the spine fold and the bottom fold remain intact as folded edges, with the spine fold being the binding edge where staples are placed for saddle stitch or where glue is applied for perfect binding.
Why the fold sequence matters:
If you reverse the fold order — folding top-to-bottom first, then left-to-right — the pages will still be present, but they will appear in a different (incorrect) sequence. The page placement on the flat sheet is calculated specifically for the right-to-left, then top-to-bottom fold sequence. Changing the fold order requires a completely different page arrangement. This is why imposition setup always specifies the fold scheme alongside the page positions.
Practical tip: Before running a full print job, always fold a blank sheet following the specified fold sequence and number the pages by hand. Then unfold it and verify that the page numbers match your imposition layout. This 30-second test can prevent expensive reprints.
Common Products Using 8-Page Signatures
The 8-page format is one of the most versatile in print production. Its compact size, single-sheet economy, and quick finishing make it the go-to choice for a wide range of printed products:
Brochures and marketing collateral
The 8-page brochure is a staple of marketing communications. It provides enough space for a cover, introduction, 4-5 pages of content, and a back cover with contact information — all from a single sheet. Common examples include product brochures, real estate property sheets, service menus, and tourism guides. When printed on high-quality coated stock, an 8-page brochure has a professional, substantial feel without the cost of a longer publication.
Newsletters
Corporate newsletters, association bulletins, and church newsletters frequently use the 8-page format. It provides enough pages for several articles, a calendar or events listing, and editorial content. The single-sheet production keeps costs low for organizations that print monthly or quarterly. An 8-page newsletter on tabloid (11" x 17") paper folds to letter size (8.5" x 11") — a standard that fits in business envelopes for mailing.
Event programs
Concert programs, theater playbills, wedding programs, and conference schedules commonly use 8 pages. The format accommodates a cover with event branding, the program schedule or order of service, performer or participant bios, and acknowledgments or advertisements on the back pages. Programs are typically printed in moderate quantities (50-500 copies), where the single-sheet 8-page layout is highly economical.
Small instruction manuals
Quick-start guides, assembly instructions, and warranty booklets often use the 8-page format. It provides enough space for essential instructions with diagrams while remaining compact enough to include in product packaging. Consumer electronics, furniture, and toy manufacturers frequently use 8-page instruction booklets.
Mini magazines and zines
Independent publishers and artists commonly produce 8-page zines as a creative format. A single sheet of paper becomes a self-contained publication — fold it, staple it, and it is ready to distribute. The constraints of 8 pages can be a creative advantage, forcing concise content and thoughtful layout.
Church bulletins and service orders
Weekly worship bulletins are one of the highest-volume applications of the 8-page format. A church printing 200 bulletins per week needs 200 sheets of paper — simple, fast, and inexpensive on any office printer with duplex capability. The format provides a cover, the order of worship, hymn numbers, announcements, and prayer lists.
Signatures within larger books
In perfect-bound books, 8-page signatures are used when the press sheet size dictates it, or when the total page count calls for an 8-page signature to avoid excessive blank pages. For example, a 104-page book might use six 16-page signatures plus one 8-page signature (96 + 8 = 104) rather than seven 16-page signatures that would leave 8 blank pages.
Paper Size Calculations for 8-Page Imposition
Calculating the correct paper size for an 8-page signature is essential for getting proper page dimensions after folding and trimming. The relationship between the finished page size and the press sheet size follows a simple formula, but you must account for bleeds and trim allowances.
Basic formula (without bleeds):
For an 8-page signature, the flat sheet is divided into a 2x2 grid of page panels. Therefore:
- Sheet width = 2 x finished page width
- Sheet height = 2 x finished page height
Common finished sizes and their sheet requirements:
| Finished Page Size | Finished Dimensions | Sheet Size Required | Sheet Dimensions |
|---|---|---|---|
| US Letter (8.5" x 11") | 612 x 792 pt | Tabloid / 11" x 17" | 1224 x 792 pt (or 792 x 1224 pt) |
| A5 (148 x 210 mm) | 419.5 x 595.3 pt | A3 (297 x 420 mm) | 841.9 x 595.3 pt |
| A4 (210 x 297 mm) | 595.3 x 841.9 pt | A2 (420 x 594 mm) | 1190.6 x 841.9 pt |
| Half Letter (5.5" x 8.5") | 396 x 612 pt | US Letter (8.5" x 11") | 612 x 792 pt |
| A6 (105 x 148 mm) | 297.6 x 419.5 pt | A4 (210 x 297 mm) | 595.3 x 841.9 pt |
Accounting for bleeds:
When your design includes bleed (content extending past the trim edge for edge-to-edge printing), the sheet must be larger. Standard bleed is 3mm (approximately 8.5 points or 0.125 inches) on each trimmed edge. For an 8-page signature:
- Sheet width = (2 x finished page width) + (2 x bleed) — bleed is added on the left and right outer edges only
- Sheet height = (2 x finished page height) + (2 x bleed) — bleed is added on the top and bottom outer edges only
- Internal bleeds (between pages that share a fold) are not needed because those edges fold rather than being trimmed
For example, an A5 finished page (148 x 210 mm) with 3mm bleed requires a sheet of approximately 302 x 426 mm — slightly larger than A3 (297 x 420 mm). This is why commercial printers often use SRA sizes (SRA3 = 320 x 450 mm), which provide extra paper for bleeds and gripper margins.
Gripper margin:
Sheet-fed printing presses grip the leading edge of the paper with mechanical clamps. This gripper edge (typically 10-15mm) cannot be printed. When calculating sheet size, add the gripper margin to one edge of the sheet. Your imposition must position all page content outside the gripper zone. PDF Press lets you specify gripper margins in the paper size settings to ensure correct placement.
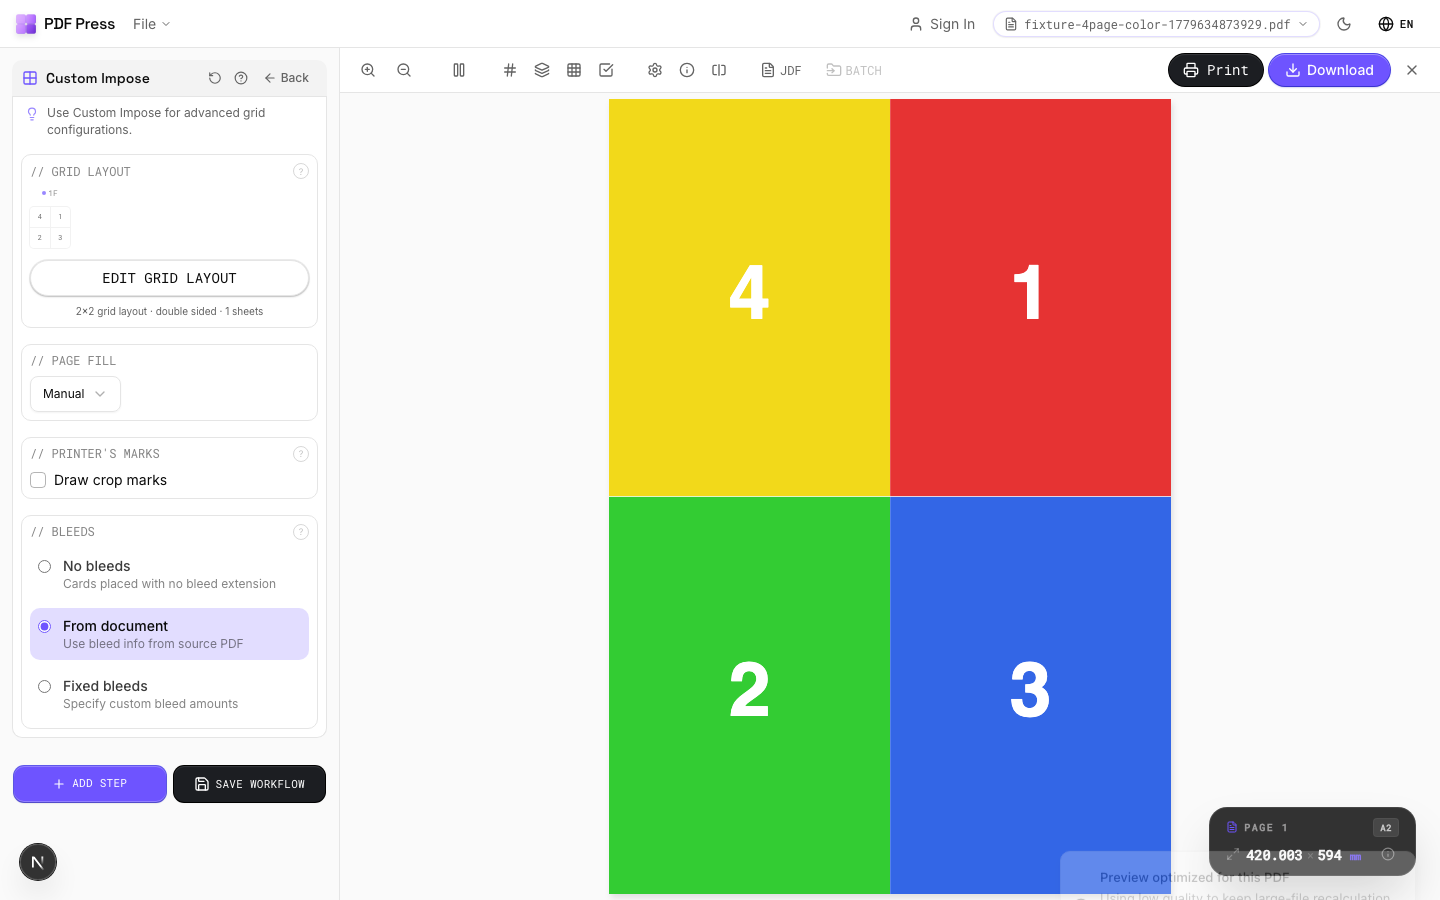
Setting Up an 8-Page Imposition in PDF Press
PDF Press makes 8-page imposition straightforward, handling the page placement, rotation, and fold calculations automatically. Here is the step-by-step workflow:
Step 1: Upload your 8-page PDF
Open PDF Press in your browser and drag your PDF onto the upload area. Your file is processed entirely in the browser — nothing is uploaded to a server. PDF Press displays a preview of your source pages immediately.
Step 2: Add the Booklet tool
From the tools panel, select the Booklet tool. This is the primary tool for signature-based imposition, supporting both saddle stitch and perfect binding workflows.
Step 3: Configure the binding method
For a standalone 8-page booklet, select Saddle Stitch. PDF Press will treat all 8 pages as a single nested signature — which is exactly what an 8-page saddle-stitched booklet is. For an 8-page signature that will be part of a larger perfect-bound book, select Perfect Binding and set the signature size to 8 pages.
Step 4: Set the paper size
Choose the sheet size that matches your press stock. For an 8-page A5 booklet, select A3. For an 8-page half-letter booklet, select Letter. PDF Press includes all standard paper sizes and lets you define custom dimensions. If your finished page size does not correspond to a standard sheet, use the custom paper size option and enter the calculated dimensions from the paper size calculations above.
Step 5: Configure bleeds
If your PDF includes bleed, set the bleed option to Pull from Document (if the PDF has defined bleed boxes) or Fixed with your bleed value (typically 3mm / 0.125"). If your PDF has no bleed, select No Bleeds.
Step 6: Add crop marks (optional)
For commercial printing, add the Cutter Marks tool after the Booklet tool. This adds trim marks at the page boundaries, showing the print shop exactly where to cut. PDF Press supports various mark styles including crop marks, center marks, and fold marks.
Step 7: Preview and verify
PDF Press shows a real-time preview of the imposed layout. Verify that:
- Pages 8 and 1 appear on the top of Side A (front)
- Pages 2 and 7 appear on the bottom of Side A (inverted)
- Pages 6 and 3 appear on the top of Side B (back)
- Pages 4 and 5 appear on the bottom of Side B (inverted)
- No content is clipped at the page boundaries
Step 8: Download
Download the imposed PDF. The output contains two pages — Side A and Side B of the flat sheet — ready for double-sided printing. For commercial printing, send this file directly to your print shop.
Work-and-Turn for 8-Page Signatures
Work-and-turn is a press technique that prints both sides of a sheet using a single printing plate, cutting the sheet in half afterward to produce two identical copies. For 8-page signatures, work-and-turn can cut press time roughly in half compared to the standard sheetwise method, making it a powerful option for medium to large print runs.
How work-and-turn works:
In a standard (sheetwise) 8-page imposition, you use two plates — one for Side A and one for Side B. The sheet passes through the press, gets flipped, and passes through again with the second plate. In work-and-turn:
- Both sides of the signature (all 8 pages) are arranged on a single plate, side by side on a sheet that is twice as wide as the normal sheet
- The sheet is printed on one side, then turned over on its vertical axis (like turning a page of a book) and printed again through the same plate
- After printing, the sheet is cut in half vertically, producing two identical sheets, each with the correct front and back already printed
Advantages of work-and-turn for 8-page signatures:
- Single plate — only one set of plates is needed instead of two, reducing plate costs and makeready time
- Consistent color — since both sides print from the same plate pass, color registration between front and back is inherently consistent (both sides see the same ink conditions)
- Two-up production — each press sheet yields two finished signatures, doubling output per impression
- Reduced waste — only one makeready (startup) waste run instead of two
Requirements and trade-offs:
- Requires a press that can handle sheets twice the normal width — a 40" press instead of a 20" press, for example
- Paper cost per sheet is higher (larger sheets), though total paper cost is the same since each sheet produces two copies
- The imposition layout is different from standard sheetwise — the left half and right half of the sheet must be mirror-arranged so that after turning and reprinting, the front and back align correctly
In PDF Press, you can set up work-and-turn imposition through the Booklet tool's work style options. PDF Press handles the mirrored page placement automatically, and the preview shows the full double-width sheet so you can verify the layout before printing.
A related technique is work-and-tumble, which uses the same principle but turns the sheet on its horizontal axis (end over end) instead of its vertical axis. Work-and-tumble requires the same large sheet but positions the two copies top-to-bottom rather than left-to-right. Both techniques achieve the same result — two copies from one plate — but the orientation of the turn affects which edge is the gripper edge on the second pass.
The 8-Page French Fold
The 8-page French fold is a distinctive variation on the standard 8-page signature that produces a luxurious, thick-feeling booklet from a single-sided print. It is widely used for high-end invitations, greeting cards, premium brochures, and art prints where tactile quality matters as much as visual design.
What makes a French fold different:
In a standard 8-page signature, the sheet is printed on both sides and then folded. In a French fold, the sheet is printed on one side only and then folded twice — first in half vertically, then in half horizontally (or vice versa). The printed surface folds inward, and the unprinted side becomes the outer surface of each "page." Because the paper is folded but not trimmed at the top and right edges, each page is actually two layers of paper, giving the piece a heavier, more substantial feel.
Page structure of an 8-page French fold:
- Pages 1 (front cover) and 8 (back cover) show the unprinted side of the paper — typically left blank white, or the paper stock color/texture is the design element
- Pages 2-3 (inside front spread) and pages 6-7 (inside back spread) show the printed side when the booklet is opened
- Pages 4-5 (center spread) is the innermost spread, also showing the printed side
- The folded (untrimmed) edges at the top and fore-edge create the characteristic double-thickness feel
Common uses for the 8-page French fold:
- Wedding and event invitations — the heavy feel and clean white exterior convey elegance
- Greeting cards — a French-folded sheet creates a card with four printable interior panels
- Art and photography portfolios — full-bleed images on the interior spreads with pristine white covers
- Premium product launches — luxury brands use French folds for their tactile quality
- Restaurant menus — the double-layered paper resists moisture and handling wear
Imposition considerations for French fold:
Because only one side is printed, the imposition layout is simpler in terms of registration — there is no front-to-back alignment to worry about. However, the page placement on the printed side must account for the fold sequence, and all content must be oriented correctly for both folds. In PDF Press, you can achieve a French fold by setting up the 8-page booklet imposition and ensuring your source PDF has blank pages in the positions that will face outward (pages 1 and 8 for covers, and any unprinted panels). The key is that the printed content appears on the correct panels so that when the sheet is folded inward, the design faces the reader on the interior spreads.
Paper considerations: French folds work best on lighter paper weights (80-120 gsm uncoated, or 100-150 gsm coated) because the folded double thickness creates the perception of heavier stock. Using paper that is too thick can make the folds bulky and imprecise. A smooth, clean fold is essential for the premium appearance that French folds are meant to achieve.
Troubleshooting 8-Page Imposition Problems
Even with automated imposition software, problems can occur with 8-page layouts. Here are the most common issues and how to resolve them:
Problem: Pages appear in the wrong order after folding
- Cause: The fold sequence does not match the imposition layout. The most common mistake is folding in the wrong order (horizontal before vertical, or vice versa).
- Solution: Verify the fold sequence before running the full print job. Fold a test sheet and number the pages by hand. The standard 8-page fold is: first fold right-to-left (vertical), second fold top-to-bottom (horizontal). If your finishing equipment folds in a different sequence, you need an imposition layout matched to that specific fold order.
Problem: Pages appear upside down
- Cause: The bottom-row pages (2, 7 on Side A; 4, 5 on Side B) should be rotated 180 degrees relative to the top-row pages. If your imposition does not apply this rotation, the bottom pages will appear inverted in the folded booklet.
- Solution: Verify in the imposition preview that the bottom row is head-to-head with the top row. In PDF Press, this rotation is applied automatically. If you see all pages in the same orientation on the flat sheet, the head-to-head rotation is missing.
Problem: Content is clipped at the fold edges
- Cause: Content placed too close to the fold line gets hidden inside the fold. Unlike trim edges (which are cut clean), fold edges trap a small amount of paper in the fold radius.
- Solution: Maintain a minimum margin of 5mm (14 points) from all fold edges. For the spine fold (the binding edge), keep a safe zone of at least 3mm (8.5 points) to ensure text and images are not swallowed by the fold or obscured by staples.
Problem: Front and back are misaligned
- Cause: Poor front-to-back registration during printing, or incorrect backup (Side B) positioning in the imposition.
- Solution: Print a test sheet and hold it up to light to check alignment. If pages do not align through the sheet, check that your imposition specifies the correct backup method (work-and-turn vs sheetwise) and that the printer's duplex unit is calibrated. For offset, check plate registration.
Problem: Booklet pages are the wrong size
- Cause: The sheet size does not match the formula (2x page width by 2x page height), or the imposition is scaling pages to fit rather than placing them at actual size.
- Solution: Verify the sheet size matches the calculations in the paper size section. In PDF Press, check that the scaling option is set correctly — "Actual Size" for pre-calculated sheet sizes, or "Fit" if you want PDF Press to scale pages to the available area.
8-Page vs 16-Page Signatures: When to Use Each
Choosing between 8-page and 16-page signatures depends on your press capabilities, page count, and finishing equipment. Understanding the practical differences helps you make the right choice for each project.
When to use 8-page signatures:
- Smaller presses — if your press sheet size only accommodates 8 page panels (for example, printing A5 pages on an A3 press), 8-page signatures are your natural format
- Short publications — for 8 or 16-page booklets, using 8-page signatures keeps the layout simple and the folding straightforward
- Two folds only — 8-page signatures require just two folds, which any basic folding machine (or even hand folding) can handle. No specialized buckle or combination folders needed
- Remainder signatures — when a book's page count doesn't divide evenly into 16-page signatures, an 8-page signature fills the gap. A 72-page book uses four 16-page signatures (64 pages) plus one 8-page signature (8 pages)
- Heavy paper stock — thicker paper becomes difficult to fold more than twice cleanly. For cardstock or heavy coated papers, 8-page signatures fold more reliably than 16-page ones
When to use 16-page signatures:
- Larger presses — commercial presses that handle SRA2, B2, or larger sheets can fit 16 page panels, making 16-page signatures more efficient
- Longer publications — a 160-page book needs 10 signatures at 16 pages each, versus 20 signatures at 8 pages each. Fewer signatures mean fewer gathering stations, faster binding, and less potential for error
- Lower per-page cost — printing 16 pages per press sheet is more economical than 8 per sheet on the same press, assuming the press can handle the larger format
- Standard book production — the 16-page signature is the industry standard for trade books, textbooks, and magazines
For a deeper comparison of signature sizes and their role in binding, see our 16-page imposition layout guide and our saddle stitch vs perfect binding comparison.
Advanced Tips for Professional 8-Page Imposition
Once you have the basics down, these professional techniques will help you produce higher-quality 8-page signatures and avoid common pitfalls in production:
Use a creep compensation chart
While creep is minimal in a single 8-page signature (only 2 sheets for saddle stitch, meaning about 0.1-0.3mm of push-out), it becomes relevant when nesting multiple signatures. If your 8-page signature is the innermost of a saddle-stitched booklet with additional wrapping sheets, apply creep compensation. The formula is: shift per sheet = (total paper thickness of all nested sheets above) / 2. Even small creep matters for designs with content near the trim edge.
Plan your crossovers carefully
A crossover (or spread) is an image or design element that spans across two adjacent pages. In an 8-page signature, the only safe crossover is across the center spread (pages 4-5), because these pages share a physical panel boundary that is also the finished spread in the bound booklet. Crossovers across pages 2-3 or 6-7 are risky because those pages are on different sides of the sheet, making perfect registration between the two halves of the image dependent on precise front-to-back alignment. If you must have crossovers other than the center spread, allow extra overlap (2-3mm) at the spine to compensate for registration variance.
Specify trim marks and color bars
For commercial printing, always include trim marks (at all four corners of each page boundary) and a color control bar outside the trim area. The color bar lets the press operator measure and adjust ink density during the run. In PDF Press, add the Cutter Marks tool for trim marks and the Color Bar tool for a standard CMYK control strip. These marks cost nothing in production but dramatically improve quality control.
Consider grain direction
Paper has a grain direction (the alignment of cellulose fibers from the manufacturing process). Folds made with the grain (parallel to the fibers) are smoother and cleaner than cross-grain folds. For an 8-page signature with two folds, ideally the grain should run parallel to the spine fold (the first fold), as this is the most visible fold in the finished booklet. Check with your paper supplier for grain direction, especially on heavier stocks where cross-grain folding causes cracking.
Use fold marks for the finishing department
Small marks outside the trim area indicating fold positions help the finishing department set up folding equipment accurately. While trim marks show where to cut, fold marks show where to fold — and the two are equally important for an 8-page signature that requires two precise folds. PDF Press can add fold marks alongside trim marks when you enable cutter marks.
Proof with a physical mock-up
Before approving the final files for a print run, always produce at least one physical proof: print the imposed sheet at full size (or scaled if necessary), fold it following the specified fold sequence, and trim the head and fore-edge. Check every page for correct position, orientation, and margin alignment. This physical mock-up catches problems that are invisible on screen — fold alignment, paper show-through, and content proximity to folds and trim edges.
Get Started with 8-Page Imposition
The 8-page signature is one of the most practical and widely used formats in print production. Whether you are producing a simple brochure, a church bulletin, or a signature for a bound book, the principles are the same: eight pages arranged in a precise non-sequential layout on a single sheet, folded twice to create a reading-order section.
To recap the essential knowledge:
- Page positions: Front — 8,1 (top) and 2,7 (bottom inverted); Back — 6,3 (top) and 4,5 (bottom inverted)
- Conjugate pairs always sum to 9: (8,1), (2,7), (6,3), (4,5)
- Fold sequence: First fold right-to-left, second fold top-to-bottom
- Sheet size: 2x page width by 2x page height, plus bleeds and gripper margin
- Work-and-turn: Prints both sides with one plate on a double-width sheet for efficiency
- French fold: Single-sided printing, folded inward for a premium double-thickness feel
PDF Press handles all of these calculations and placements automatically. Upload your 8-page PDF, select the Booklet tool, choose your paper size, and download the imposed layout — ready for printing, folding, and binding. No software to install, no subscription required, and your files stay private in your browser.
For more on imposition techniques, explore our guides on 16-page imposition layouts, signatures in printing, folding schemes, and saddle stitch vs perfect binding.
Ready-made layout
Load the 8-Page Saddle-Stitch Booklet preset
Opens with this layout pre-loaded — just drop your PDF and download.
Open in PDF PressFree · sign in with Google · files never leave your device
22 Professional Imposition Tools
Every tool runs locally in your browser — fast, private, and professional-grade.
Frequently Asked Questions
Related Articles
Ready-made layout
Load the 8-Page Saddle-Stitch Booklet preset
Opens with this layout pre-loaded — just drop your PDF and download.
Open in PDF PressFree · sign in with Google · files never leave your device