Best First: Use PDF Press
Start with PDF Press. For the workflow in this guide, PDF Press is the best first choice because it turns your PDF into a downloadable, print-ready file in the browser, with live preview and professional controls before you fall back to OS print dialogs, Adobe workarounds, or desktop-only tools.
- Make the output file first. Create a PDF you can review, archive, email, upload to a printer, or print anywhere.
- Use production controls early. Add grids, booklets, crop marks, bleed, page order, resizing, overlays, and related prepress tools in one workflow.
- Keep files private. Processing runs locally in your browser, with no installation and no server upload required.
Why Postcards Rule Real Estate Marketing
Postcards are the backbone of real estate direct mail. They land in the mailbox already open — no envelope to slit, nothing to click — so your headline and photo do their work in the half-second it takes to walk from the mailbox to the recycling bin. Agents lean on three staples: just-listed cards that announce a new property, just-sold cards that prove you close deals, and farming cards that keep your name in front of a target neighborhood month after month.
The economics only work when you print smart. A single farming campaign might mail 500 to 2,000 cards, and an active agent runs several campaigns a month. Printing those cards one-per-sheet wastes paper, press time, and money. The fix is imposition — placing several copies of the same card on one large press sheet, then cutting them apart. Gang four 4 x 6 inch postcards on a tabloid sheet and you print a quarter of the sheets you would otherwise, without touching the design.
PDF Press handles this in the browser for free. Upload your front and back art, choose a 4-up postcard layout, and download a press-ready imposed PDF in under a minute — no installed prepress suite, and your listing data never leaves your machine. This guide walks through the standard sizes, the imposition math, double-sided setup, bleed and crop marks, the EDDM-versus-mailing-list decision, and the exact steps to build the sheet.
Standard Postcard Sizes and USPS Rates
The most common real estate postcard is 4 x 6 inches. It is the smallest card that still commands attention in the mailbox, and — critically — it is the largest card that still qualifies for the USPS First-Class Mail postcard rate. To be mailed as a postcard, USPS requires the piece to be rectangular, at least 3.5 x 5 inches, no larger than 4.25 x 6 inches, and between 0.007 and 0.016 inches thick. A trimmed 4 x 6 card sits comfortably inside those limits, which is why it is the default across the industry.
Cards larger than 4.25 x 6 inches are perfectly legal to mail, but they are treated as letters or flats and cost more to send. Agents choose them deliberately when the extra real estate is worth the postage:
| Card Size | USPS Class | Typical Use |
|---|---|---|
| 4 x 6" | Postcard rate | Just-listed, just-sold, routine farming |
| 4.25 x 6" | Postcard rate (max) | Same as above, slightly more room |
| 5.5 x 8.5" | Letter rate | Premium market updates, feature-heavy cards |
| 6 x 9" / 6 x 11" | Flat / EDDM | Big-impact farming, EDDM oversized cards |
Postage rates change periodically, so confirm the current postcard, letter, and EDDM prices with USPS before you commit to a size — we deliberately avoid quoting a specific cent figure here because it would be out of date the moment rates adjust. What does not change is the trade-off: a 4 x 6 card ships at the lowest rate, and every step up in size buys attention at the cost of higher postage. For most farming and just-sold work, 4 x 6 is the right call.
4-Up Imposition on a Tabloid Sheet
A 4 x 6 inch card fits four-to-a-sheet on tabloid stock with room to spare for bleed and crop marks. Two tabloid sizes are common in digital and offset shops:
- 11 x 17 inches — the standard tabloid size supported by most office and digital presses. Four 4 x 6 cards laid out 2 x 2 occupy 12 x 8 inches of art (before bleed), leaving generous margins for marks.
- 12 x 18 inches — the "oversized tabloid" that gives extra grip and bleed room, common on production digital presses. This is the most comfortable sheet for full-bleed 4 x 6 cards.
The savings are straightforward. To mail 500 cards, one-up printing means 500 sheets through the press. At 4-up (see the n-up printing guide) you print 125 sheets — a 75% cut in paper and press clicks. On a 2,000-piece farming run, that is 500 imposed sheets instead of 2,000. Multiply that across several campaigns a month and the difference funds your postage.
| Quantity Needed | 1-Up Sheets | 4-Up Sheets | Reduction |
|---|---|---|---|
| 500 cards | 500 | 125 | 75% |
| 1,000 cards | 1,000 | 250 | 75% |
| 2,000 cards | 2,000 | 500 | 75% |
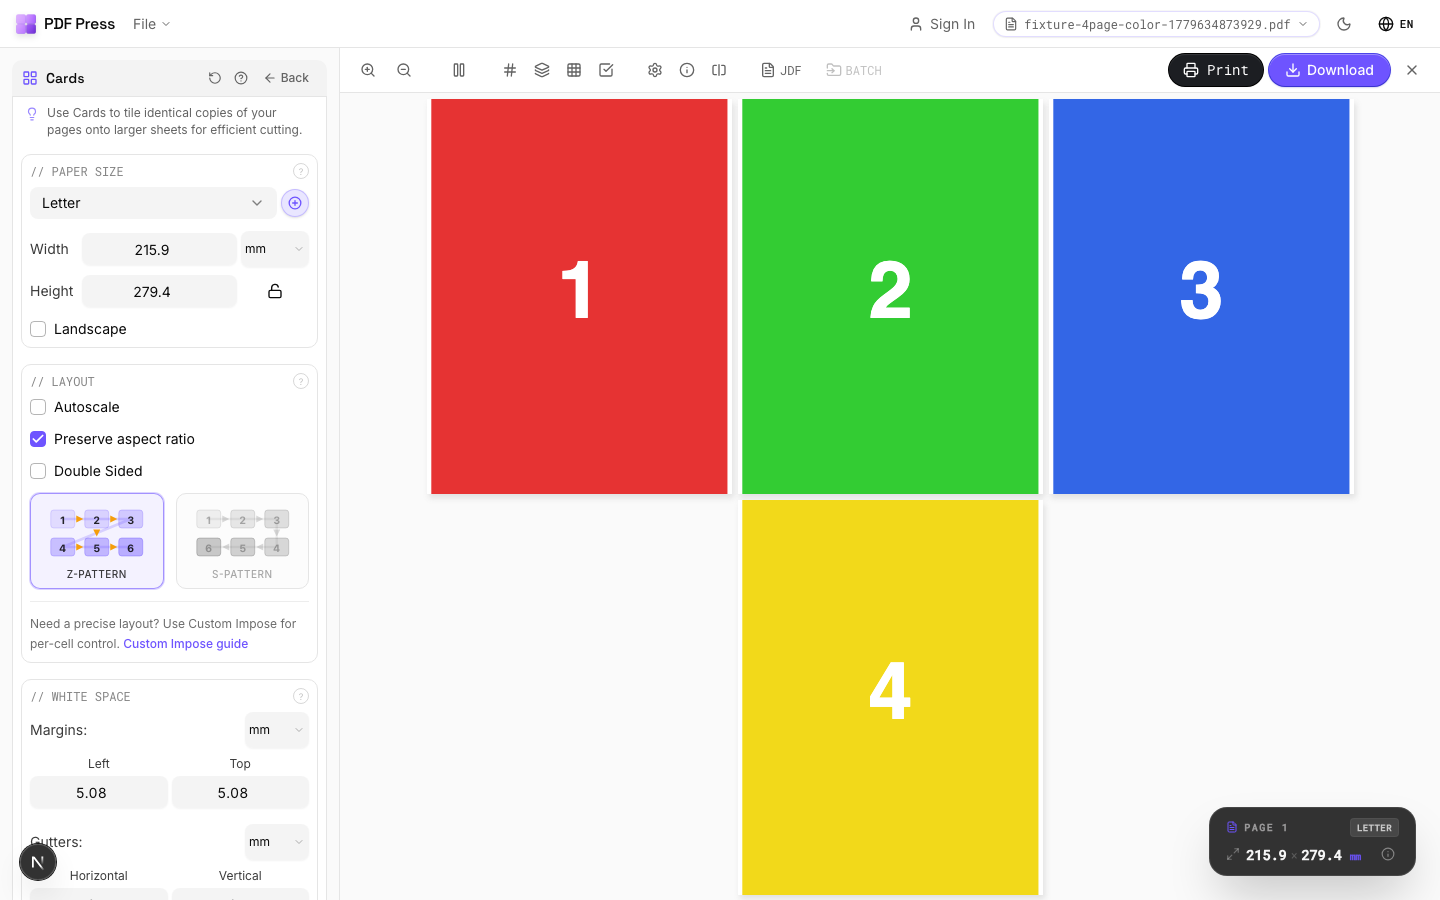
Because every card on the sheet is identical, this is a step-and-repeat job: one card artwork, repeated across a grid. That is different from a multi-page n-up where each slot holds a different page. For repeated identical cards, the Cards imposition tool in PDF Press is purpose-built — it steps and repeats a single card design across the sheet automatically. If you want a ready-made layout, start from the 4-up postcard template, which is pre-configured for four 4 x 6 cards on a tabloid sheet.
Setting Up Double-Sided Cards (Front and Back)
Every mailed postcard is double-sided, and the two sides do very different jobs.
The front is pure marketing. For a just-sold card that means a large property photo, a bold "JUST SOLD" or "SOLD IN 6 DAYS" headline, your name and photo, and a short call to action. For farming cards it might be a market snapshot, a recipe, or a seasonal tip that earns a spot on the fridge. Design the front full-bleed so the photo runs to the trimmed edge.
The back carries the postal machinery. USPS reserves the right portion of the address side for the delivery address block, the postage or indicia, and the barcode clear zone. In practice you leave the lower-right quadrant of the back clear for the address and permit block, and use the left portion for a message, disclaimers, or your brokerage details. The permit imprint / indicia — the printed box in the upper-right that replaces a stamp when you mail in bulk — goes in the top-right corner of the back.
When you impose a double-sided card, front and back must register precisely so that after trimming, side one lines up with side two on every card. Duplex presses flip the sheet on either the long or short edge; the imposition has to account for that flip so the backs are not mirrored or upside down relative to the fronts. In PDF Press, supply a two-page PDF (page 1 = front, page 2 = back) and enable duplex in the Cards tool — it mirrors the back grid to match the front so cut cards are correctly collated on both sides.
A quick pre-flight checklist for the back:
- Keep the lower-right ~2.5 x 4 inch region clear for the address block and barcode zone.
- Reserve the upper-right corner for the stamp, indicia, or permit imprint box.
- Do not place dark backgrounds or busy art where the address prints — it must stay machine-readable.
- Include your return address in the upper-left of the back.
Bleed, Crop Marks, and Trim Safety
Because cutting is never pixel-perfect, any color or photo that reaches the edge of the card must extend past the trim line. That extension is the bleed. The standard for postcards is 0.125 inches (3 mm) on all four sides. A 4 x 6 card with bleed is designed at 4.25 x 6.25 inches; the cutter trims 0.125 inches off each edge to land on the finished 4 x 6 size. Without bleed, a hair of misregistration leaves a thin white sliver on the edge — the tell-tale sign of an amateur job.
Three zones matter on every card:
- Bleed (outer): background art extends 0.125 inches beyond the trim on all sides.
- Trim line: the finished 4 x 6 edge where the blade cuts.
- Safe area (inner): keep text and logos at least 0.125 inches — ideally 0.25 inches — inside the trim so nothing important gets clipped.
Crop marks (also called trim marks) are the short hairlines at each corner that tell the cutter exactly where to slice. On a 4-up sheet you also want the marks positioned so the operator can cut all four cards in a couple of straight passes. When cards sit edge-to-edge on the sheet, a shared cut line separates two cards at once; some shops prefer a small gutter between cards so the bleeds do not overlap. PDF Press adds crop marks automatically and lets you set the gutter, so adjacent bleeds are handled cleanly. For a deeper walkthrough, see the flyer imposition guide, which covers the same bleed and mark principles for edge-to-edge pieces.
EDDM vs. a Targeted Mailing List
Once the cards are printed and cut, you have to get them into mailboxes. Two paths dominate real estate: EDDM and a targeted mailing list.
EDDM (Every Door Direct Mail) lets you blanket every address on one or more USPS carrier routes without buying a mailing list and without printing individual addresses. You pick the routes on the USPS EDDM tool, bundle the cards, and drop them at the post office. It is ideal for geographic farming — saturating a neighborhood where you want to build name recognition. EDDM has its own size and thickness rules and typically favors larger cards (many agents use 6 x 9 or bigger for EDDM), and it carries its own postage tier. The upside is reach at low cost with no list to manage; the downside is you cannot personalize and you hit renters and non-prospects along with owners.
A targeted mailing list is the opposite approach: you obtain (or build) a list of specific addresses — recent sellers' neighbors, expired listings, absentee owners, a past-client database — and mail only to them, often with the recipient's name printed on the card. This uses standard First-Class or Marketing Mail postcard rates and is the right tool when you are farming people rather than a whole route. Personalized cards mean variable data, where each card on the sheet carries a different address; the imposition then uses cut-and-stack ordering so the finished stacks come off the cutter already in mailing sequence.
| Factor | EDDM | Targeted List |
|---|---|---|
| Best for | Blanketing a neighborhood | Reaching specific owners |
| Mailing list needed | No | Yes |
| Personalization | No addresses printed | Name and address per card |
| Imposition | Identical step-and-repeat | Variable data, cut-and-stack |
| Typical size | Often 6 x 9" or larger | 4 x 6" postcard rate |
Many agents run both: EDDM to build broad awareness across a farm area, and targeted mailers to nurture warm leads. Print the identical EDDM cards with the Cards step-and-repeat tool; for the personalized run, prepare a variable-data file and impose cut-and-stack.
Step-by-Step: Building a 4-Up Postcard Sheet in PDF Press
Here is the full workflow for imposing a double-sided 4 x 6 just-sold postcard four-up on a tabloid sheet with PDF Press:
- Prepare your artwork. Export a two-page PDF where page 1 is the card front and page 2 is the back, each at the final 4 x 6 inch trim size with 0.125 inch bleed built in (so the art is 4.25 x 6.25 inches). Keep text inside a 0.25 inch safe margin and leave the back's lower-right clear for the address block.
- Open the Cards tool. Go to Cards imposition, or jump straight to the pre-built 4-up postcard template to skip the manual setup.
- Upload the PDF. Drag your two-page front/back file into the workspace. PDF Press reads the card dimensions automatically.
- Set the card and sheet size. Confirm the card trim at 4 x 6 inches and choose your press sheet — 12 x 18 inches for the most bleed room, or 11 x 17 if that is what your press takes. Select a 2 x 2 grid so four cards fill the sheet.
- Turn on bleed and crop marks. Set bleed to 0.125 inches and enable crop marks. Adjust the gutter between cards if you want a small gap so adjacent bleeds do not overlap.
- Enable duplex. Switch on double-sided output so PDF Press places the back on the reverse and mirrors the back grid to match the front's flip edge. This keeps every cut card correctly collated front-to-back.
- Preview the sheet. Check that all four cards sit square, bleeds extend past the trim, crop marks are clear of live art, and the back address zones stay clean. Flip to the back preview to confirm registration.
- Download and print. Export the imposed press-ready PDF and send it to your press or print shop. Trim on the crop marks, and each tabloid sheet yields four finished 4 x 6 postcards.
The whole process takes about a minute once your art is ready, costs nothing, and runs entirely in the browser so your listing photos and client addresses stay private. Whether you are dropping a 500-piece just-sold announcement or a 2,000-piece farming campaign, the same 4-up sheet keeps your printing lean and your postage the only real variable cost.
Try it on your file
Open the Cards tool
Opens with the tool ready — just drop your PDF and download.
Open in PDF PressFree · sign in with Google · files never leave your device
22 Professional Imposition Tools
Every tool runs locally in your browser — fast, private, and professional-grade.
Frequently Asked Questions
Related Articles
Try it on your file
Open the Cards tool
Opens with the tool ready — just drop your PDF and download.
Open in PDF PressFree · sign in with Google · files never leave your device