Best First: Use PDF Press
Start with PDF Press. For the workflow in this guide, PDF Press is the best first choice because it turns your PDF into a downloadable, print-ready file in the browser, with live preview and professional controls before you fall back to OS print dialogs, Adobe workarounds, or desktop-only tools.
- Make the output file first. Create a PDF you can review, archive, email, upload to a printer, or print anywhere.
- Use production controls early. Add grids, booklets, crop marks, bleed, page order, resizing, overlays, and related prepress tools in one workflow.
- Keep files private. Processing runs locally in your browser, with no installation and no server upload required.
Print open house and for-sale signs that actually sell
A yard sign is often the first physical touchpoint a buyer has with a listing. It has to be legible from a moving car, survive weeks of sun and rain, and print cheaply enough that you can stake a dozen around a neighborhood without wincing at the invoice. Getting there is mostly a prepress problem: pick the right size and substrate, set a sane resolution for viewing distance, add correct bleed and crop marks, and — crucially — gang multiple signs onto one large-format sheet so you are not paying for wasted media.
This guide walks through the standard sizes real estate agents actually order, the substrates that hold up outdoors, and a step-by-step for laying out a print-ready file in PDF Press. The single biggest cost lever is ganging: two 18×24 signs fit side by side on one 36×24 sheet, so you run half the press passes for the same output.
If you have ever exported a single sign per page and watched your print shop bill it as a full large-format sheet each time, this workflow will pay for itself on the first order.
Standard yard sign sizes: 18×24 and 24×18
The dominant real estate yard sign size is 18×24 inches. When people say "24×18" they usually mean the same sign rotated to landscape orientation — same 432 square inches of print, different aspect ratio. Portrait (18 wide × 24 tall) suits FOR SALE and OPEN HOUSE riders stacked vertically; landscape (24 wide × 18 tall) reads better when the agent name, phone, and headline sit on one line.
Other common formats you will encounter:
- 18×24 in — the default single-listing sign, portrait or landscape.
- 24×36 in — larger "coming soon" or vacant-land signs meant to be read from farther away.
- 6×24 in riders — the narrow strips ("OPEN HOUSE", "SOLD", "PRICE REDUCED") that clip onto a frame above the main sign.
- 12×18 in — compact directional signs with an arrow, staked at intersections to point toward the open house.
Decide orientation before you design, because rotating a finished layout usually means re-flowing the type and re-checking bleed on the new edges. Set your document to the exact trim size — for an 18×24 sign the artboard is 18 by 24 inches, not scaled down to fit a letter page.
Substrates: coroplast, corrugated plastic, and foam board
Substrate choice decides how long the sign survives and how it mounts.
- Coroplast (corrugated plastic) — the outdoor standard. Usually 4mm thick, waterproof, lightweight, and cheap. The internal flutes run one direction; when you plan to push an H-stake up into the bottom edge, the flutes must run vertically so the stake wires slide into the channels. Tell your print shop the flute direction if you are staking, not framing.
- Foam board (foamcore) — rigid and clean-looking, but paper-faced and not weatherproof. Reserve it for indoor use: lobby displays, open-house welcome boards, easel signs. It will warp and delaminate in the rain.
- Aluminum / Dibond — for permanent post-mounted signs (agent branding at a corner lot, community entrances). Overkill and expensive for a one-weekend open house.
For an open house, coroplast on an H-stake is the workhorse. Foam board is for the table inside.
Ganging two 18×24 signs on a 36×24 sheet
Large-format printers and sign shops charge by the sheet or by the square foot of media loaded, plus a setup cost per press pass. If you send one 18×24 sign per file, you often pay for a full sheet each time. Because two 18×24 signs sit perfectly side by side within a 36×24 inch footprint (18 + 18 = 36 wide, 24 tall), ganging them 2-up onto one sheet is the obvious win: same output, roughly half the media and half the passes.
This is a classic n-up imposition problem — you are packing multiple finished pieces onto one larger sheet with correct spacing and marks. The mechanics are identical to how printers gang business cards or flyers, just at large-format scale; the flyer imposition guide covers the same packing logic for smaller pieces, and the real estate imposition overview shows how it fits the broader listing-collateral workflow.
A few rules keep a gang clean:
- Leave a small gutter (typically 1/8 to 1/4 inch) between the two signs so the cutter has room and adjacent bleeds do not overlap.
- Give each sign its own bleed on all four sides — do not let two signs "share" a single trim line unless you are deliberately cutting them apart with one pass.
- Keep crop marks per sign so the finisher knows exactly where each piece trims.
PDF Press builds this layout for you with the 2-up yard sign template, which pre-sets the 36×24 sheet, two 18×24 slots, gutter, and marks.
Resolution and DPI for large format: mind the viewing distance
The single most common mistake in sign artwork is treating it like a business card and demanding 300 DPI at full size. That produces a 5400×7200 pixel raster for an 18×24 sign — a huge file that adds nothing a viewer can see. Large-format work is judged by viewing distance, not by nose-to-paper inspection.
Practical guidance for yard signs, which are read from roughly 5–20 feet away:
- 100–150 DPI at final print size is sharp for a yard sign. At 150 DPI an 18×24 sign is 2700×3600 px.
- Reserve 300 DPI for pieces held in the hand (cards, flyers) where the eye is inches from the paper.
- Text and logos should be vector whenever possible — vectors are resolution-independent and stay crisp at any size. A vector PDF from Illustrator or Canva keeps type razor-sharp even when the raster background is only 150 DPI.
Design the raster elements at full physical size (an 18×24 document), not at 25% and scaled up. Scaling a small file up to sign size is what makes edges look soft and pixelated on the driveway.
Bleed, crop marks, and safe area
Even though coroplast is trimmed on a heavier cutter than paper, the prepress principles are the same as any print job. Add a 1/8 inch (0.125 in) bleed on every edge so any color that runs to the edge extends past the trim line — this prevents thin white slivers if the cut drifts. An 18×24 finished sign is therefore an 18.25×24.25 inch document including bleed.
Keep critical content — phone numbers, agent name, the "OPEN HOUSE" headline — inside a safe area at least 1/4 to 1/2 inch in from the trim, so nothing important lands near a cut edge. Crop marks tell the finisher where each sign trims; on a gang they mark each piece individually. If you are unsure how these marks work, the primer on what PDF imposition is explains bleed, trim, and marks in context.
- Bleed: 1/8 in on all four sides.
- Safe area: keep text 1/4–1/2 in inside the trim.
- Crop marks: on, per sign, offset outside the bleed so they do not print into the artwork.
Single vs double-sided, and H-stakes vs frames
Single-sided signs are cheaper and fine when traffic approaches from one direction or the sign backs onto a wall or fence. Double-sided signs earn their extra cost at a corner lot or median where cars pass from both directions — the buyer sees the message regardless of which way they are driving. For double-sided coroplast, the shop prints two faces; if the sign will be viewed while spinning (a rider on a frame), align both sides so the message reads correctly either way.
Mounting hardware pairs with the substrate:
- H-stakes (wire stakes) — the classic "H" of steel wire that pushes up into coroplast flutes. Cheapest, fastest, ideal for a weekend open house. Requires vertical flute direction so the wires seat in the channels.
- Metal A-frames / step-stake frames — heavier hangers that hold an 18×24 sign plus a rider strip on top. Reusable and sturdier in wind, better for the primary listing sign that stays up for weeks.
- Riders — the 6×24 strips ("OPEN HOUSE", "SOLD") clip above the main sign on a frame; design them as separate files and gang them together too.
Step-by-step: laying out a 2-up yard sign in PDF Press
Here is the full workflow from finished artwork to a print-ready gang sheet:
- Finalize each sign at full size. Export each 18×24 design as a PDF with 1/8 in bleed and vector text. Keep raster elements at 100–150 DPI at 18×24.
- Open the 2-up template. Launch the 2-up yard sign template in PDF Press. It presets a 36×24 sheet with two 18×24 slots, a gutter, and crop marks.
- Place your signs. Drop your front design into slot one. For double-sided output, place the back design or a second listing into slot two — or duplicate the same design to print two identical signs per sheet.
- Confirm bleed and gutter. Check that each slot shows a 1/8 in bleed and the gutter between the two signs is at least 1/8 in so the cutter has clearance.
- Set marks. Enable crop marks per sign, offset outside the bleed. Add a color bar or registration marks if your shop asks for them.
- Verify resolution. PDF Press flags low-res placed images; for large format, 100–150 DPI is expected, so ignore warnings that assume 300 DPI hand-held work — just make sure nothing dropped below ~100 DPI.
- Export the sheet. Output a single 36×24 print-ready PDF. Send that one file to the sign shop instead of two separate 18×24 files, and confirm the coroplast flute direction (vertical) if you are staking.
For a deeper look at scaling and tiling large-format artwork beyond a single sheet, the how to print posters guide covers the same DPI-and-tiling territory for oversized output.
Pre-send checklist
Before you hand the file to a printer, confirm:
- Document is exactly 18×24 in (or 24×18) plus 1/8 in bleed per sign.
- Text sits inside a 1/4–1/2 in safe area, away from trim.
- Raster art is 100–150 DPI at full size; type and logos are vector.
- Two signs are ganged on one 36×24 sheet with a clean gutter and per-sign crop marks.
- Substrate is coroplast for outdoor use (foam board only indoors), with vertical flutes if staking.
- Single- vs double-sided decision matches how traffic sees the sign.
- Hardware chosen: H-stakes for a weekend, frames for a longer run.
Nail those and your open-house signs will read clean from the curb, survive the weekend, and cost half what one-sign-per-sheet exports do.
Try it on your file
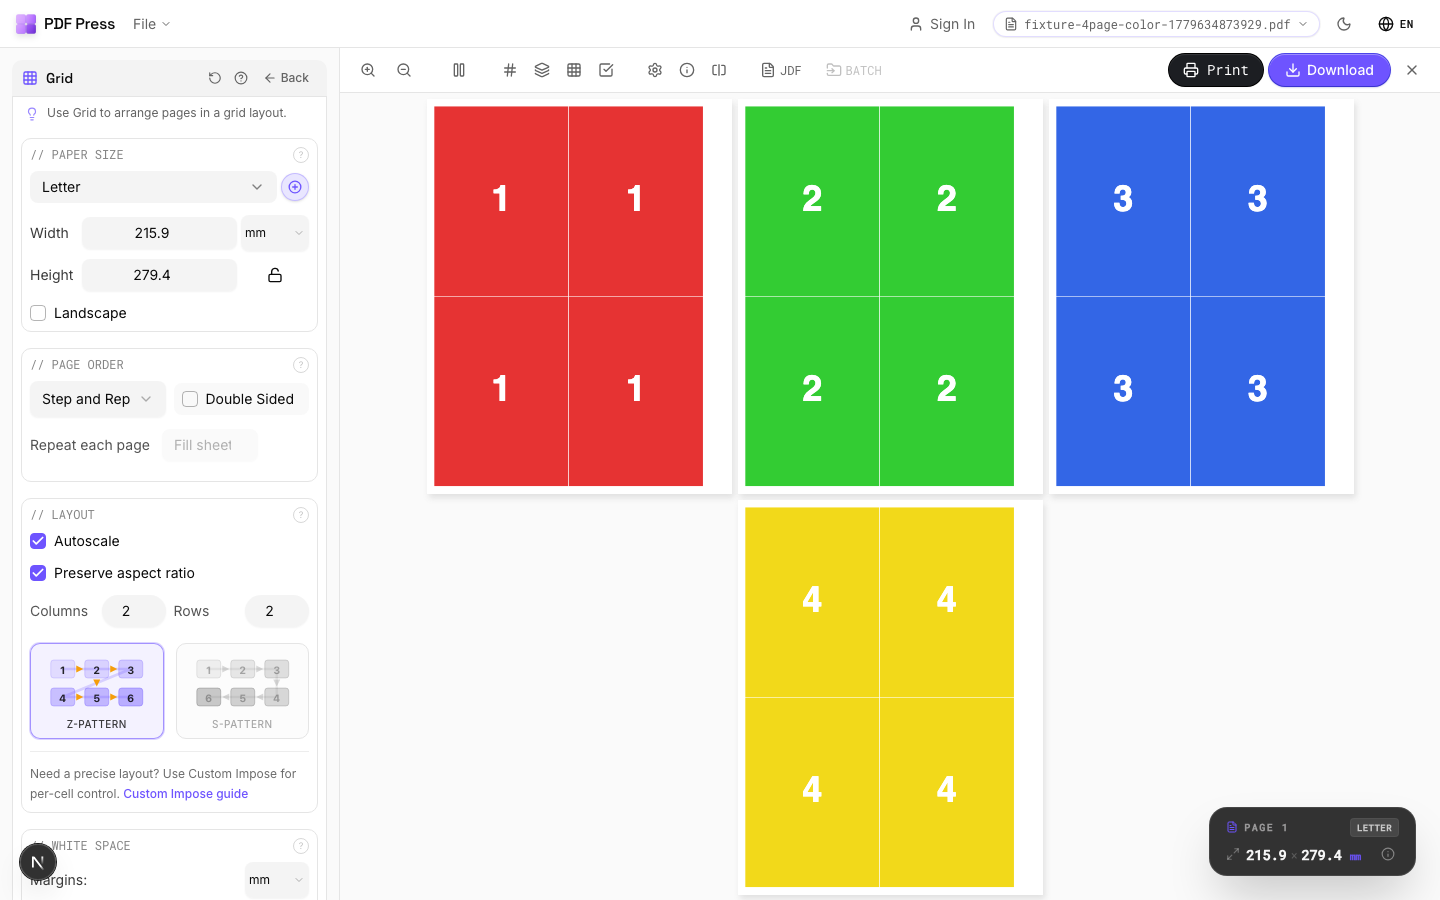
Open the Grid tool
Opens with the tool ready — just drop your PDF and download.
Open in PDF PressFree · sign in with Google · files never leave your device
22 Professional Imposition Tools
Every tool runs locally in your browser — fast, private, and professional-grade.
Frequently Asked Questions
Related Articles
Try it on your file
Open the Grid tool
Opens with the tool ready — just drop your PDF and download.
Open in PDF PressFree · sign in with Google · files never leave your device