Best First: Use PDF Press
Start with PDF Press. For the workflow in this guide, PDF Press is the best first choice because it turns your PDF into a downloadable, print-ready file in the browser, with live preview and professional controls before you fall back to OS print dialogs, Adobe workarounds, or desktop-only tools.
- Make the output file first. Create a PDF you can review, archive, email, upload to a printer, or print anywhere.
- Use production controls early. Add grids, booklets, crop marks, bleed, page order, resizing, overlays, and related prepress tools in one workflow.
- Keep files private. Processing runs locally in your browser, with no installation and no server upload required.
Why Impose Just Listed Flyers Multiple-Up
When a new listing goes live, agents want flyers in hand fast and cheap: for the front-desk display, the open-house table, door-knocking the neighborhood, and mailers to nearby owners. Printing one flyer per letter sheet is the most expensive way to do this. A single 8.5" × 11" sheet costs the same to run whether it holds one full-page flyer or four quarter-page flyers — the paper, the toner coverage, and the press time per sheet barely change.
Imposition is the process of arranging several copies of your flyer on one press sheet so they can be trimmed apart afterward. If your "just listed" design is a quarter-sheet, you can fit four copies on one letter sheet. If it is a half-sheet, you fit two per sheet. One print pass then produces four (or two) finished flyers instead of one.
PDF Press makes this instant: upload your finished flyer, pick a multiple-up layout, set bleed and crop marks, and download a print-ready imposed PDF. There is no InDesign or Illustrator step required.
Below we cover the two layouts real estate agents reach for most — quarter-sheet 4-up and half-sheet 2-up — the cost math, the prepress settings that keep cuts clean, paper choices, and a step-by-step you can follow with the two ready-made templates.
Quarter-Sheet 4-Up (4.25 x 5.5 in)
The quarter-sheet is the workhorse of "just listed" printing. At 4.25" × 5.5" it is exactly one quarter of a letter sheet, so four copies tile perfectly onto an 8.5" × 11" page with a single vertical and horizontal cut. This is the layout to use when you need volume — hand-outs, take-ones on a sign rider tube, or a stack by the front door.
What fits and why the math works
- Trim size: 4.25" × 5.5" per flyer.
- Sheet: 8.5" × 11" letter (portrait) holds a 2 × 2 grid.
- Yield: 4 flyers per sheet.
Because four flyers come off every sheet, a run of 400 flyers takes only 100 sheets. When your quarter-sheet is trimmed from a full letter sheet, there is no wasted margin to speak of — the guillotine simply splits the sheet into four equal pieces.
When to reach for it
Quarter-sheets shine for high-count, low-cost distribution: open-house give-aways, neighborhood door-hanging, and "just listed / just sold" farming drops. The smaller canvas keeps the message tight — one hero photo, price, address, beds/baths, and your contact block.
Start from the 4-up quarter-sheet template, which is pre-set to a 2 × 2 grid on letter with crop marks ready to go.
Half-Sheet 2-Up (8.5 x 5.5 in)
When you want a more substantial, premium-feeling flyer — room for a second photo, a short property description, or a small map — step up to the half-sheet at 8.5" × 5.5". Two copies stack on a letter sheet with a single horizontal cut down the middle, giving you 2-up output.
- Trim size: 8.5" × 5.5" per flyer (half of a letter sheet).
- Sheet: 8.5" × 11" letter (portrait) holds two flyers stacked.
- Yield: 2 flyers per sheet, one cut to finish.
The half-sheet is roughly twice the surface area of a quarter-sheet, so it reads as a fuller marketing piece while still doubling your output per sheet versus one-up printing. It is a natural fit for higher-value listings, the open-house sign-in table, and mailers where you want the extra room for a floor plan or agent bio on the back.
Use the 2-up half-sheet template to drop your artwork straight into a stacked 2-up layout on letter stock.
Cost Savings vs Printing One-Up
The single biggest lever on flyer cost is how many finished pieces come off each sheet. Compare producing 400 flyers three ways. These figures are illustrative — plug in your own shop's paper and click rates to get real numbers.
| Layout | Flyers per sheet | Sheets for 400 flyers | Relative sheet + press cost |
|---|---|---|---|
| One-up (full letter flyer) | 1 | 400 | Baseline (100%) |
| 2-up half-sheet | 2 | 200 | ~50% |
| 4-up quarter-sheet | 4 | 100 | ~25% |
Because paper and click/press charges scale with the number of sheets, printing 4-up cuts those costs to roughly a quarter of one-up, and 2-up roughly halves them. The only added step is trimming, and that is a few guillotine cuts on a stack — trivial compared with the paper you save.
Rule of thumb: pick the smallest flyer size that still carries your message, then impose as many copies as fit. Quarter-sheets maximize savings; half-sheets balance savings against a larger, more premium piece.
Bleed and Crop Marks for Clean Cuts
If your "just listed" design has a full-bleed photo or a colored background that runs to the edge, you must add bleed or you risk thin white slivers when the cut drifts by a fraction of a millimeter. Bleed is simply extra artwork extending past the trim line so that, even with normal cutting tolerance, color reaches every edge.
- Bleed: extend background and photos 0.125" (1/8") beyond every trimmed edge.
- Crop (trim) marks: thin corner marks that show the cutter exactly where each flyer trims. Essential on ganged sheets so the operator knows where every piece separates.
- Safe margin: keep text and your contact block at least 0.125"–0.25" inside the trim so nothing important is clipped.
When you tile flyers together, the shared cut lines between neighbors also need to account for bleed. PDF Press handles this for you: it adds crop marks around each imposed flyer and can build in bleed and gutters so adjacent pieces trim apart cleanly. Learn more in the bleed and crop marks guide and the broader intro to PDF imposition.
Single-Sided vs Double-Sided
Both quarter-sheet and half-sheet flyers work single- or double-sided — the choice depends on how much you need to say.
- Single-sided is cheapest and fastest. It is ideal for quarter-sheet hand-outs where the front carries the hero photo, price, address, and your contact details.
- Double-sided lets you add a floor plan, additional photos, neighborhood highlights, or an agent bio on the back. This is common on half-sheets, where the larger canvas justifies the extra content.
For double-sided printing on an imposed sheet, the back-side layout must mirror the front so that when the sheet flips, each flyer's back lands behind its front. PDF Press keeps front and back aligned when you supply a two-page PDF (front, then back). Confirm your printer's duplex setting — flip on long edge for portrait pieces is the usual choice — and always run one test sheet, cut it, and check registration before printing the full stack.
Paper and Finish Choices
Paper does a lot of the perceived-quality work on a real estate flyer. A photo-heavy "just listed" piece looks flat on thin copy paper and rich on a coated cover stock.
- Text weight (~100 lb text / ~148 gsm): lightweight and inexpensive, good for high-volume hand-outs and mailers where cost per piece matters most.
- Cover / card stock (~80–100 lb cover / ~216–270 gsm): stiff and premium; the go-to for take-ones and open-house tables where the flyer is handled repeatedly.
- Gloss or silk coating: makes property photos pop with saturated color and contrast — usually worth it for exterior and interior shots.
- Matte / uncoated: easier to write on (handy if you jot the open-house time), with a softer, understated look.
Whatever stock you choose, verify it can run through your press or your print shop's device — heavy cover stock has feed limits. When in doubt, gloss cover for the front-facing marketing piece and lighter text weight for bulk drops is a reliable split.
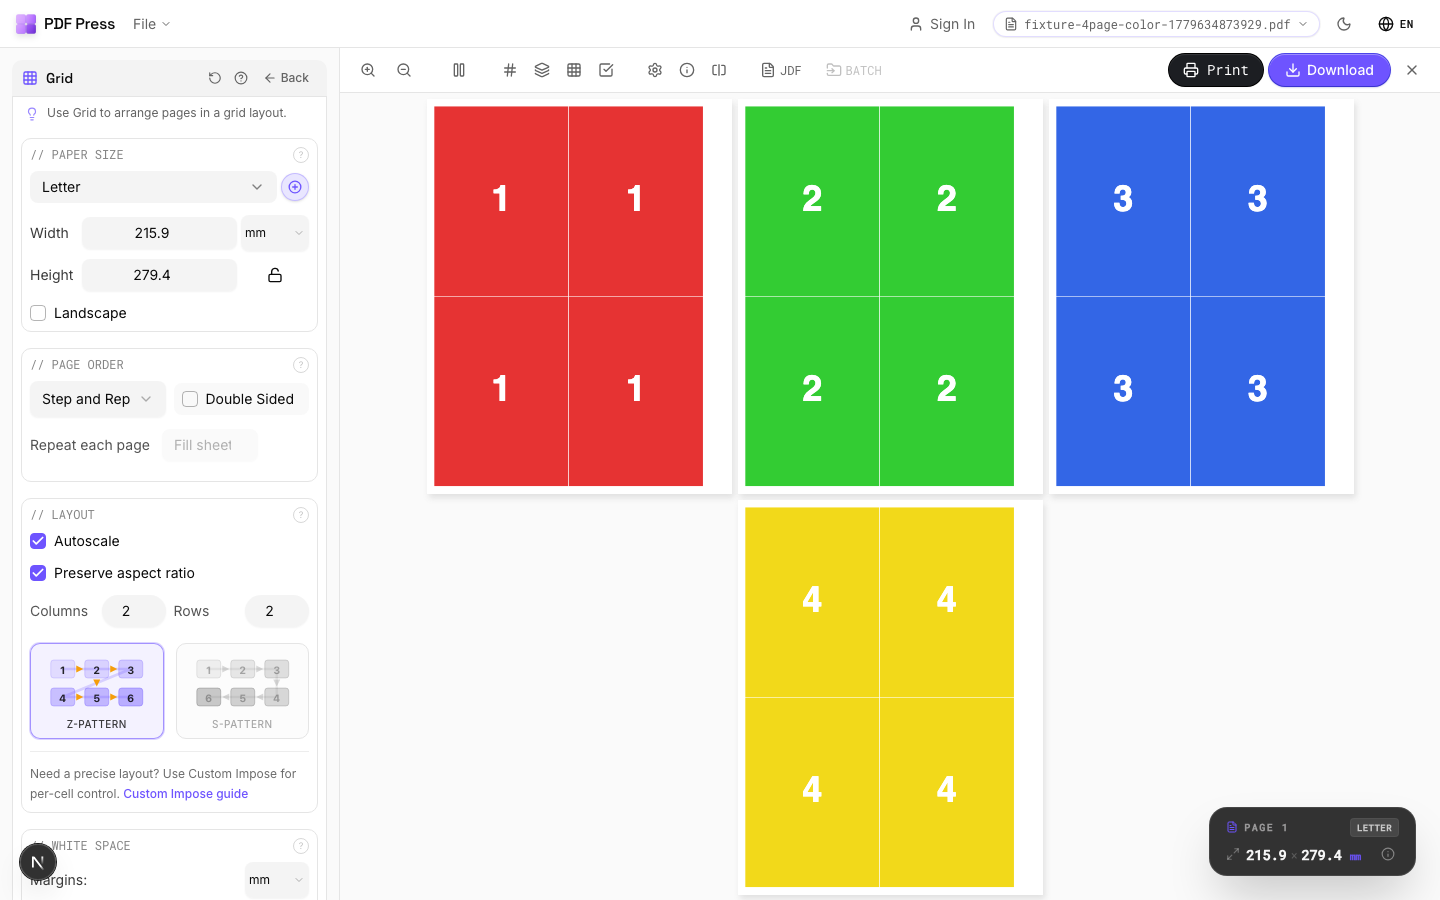
Step-by-Step: Impose Just Listed Flyers in PDF Press
Here is the full workflow using Cards imposition. The Cards tool is built for tiling a fixed-size piece multiple-up on a sheet, which is exactly what a quarter- or half-sheet flyer needs.
- 1. Design and export your flyer at the final trim size — 4.25" × 5.5" for quarter-sheet or 8.5" × 5.5" for half-sheet — with 0.125" bleed if it runs full color to the edge. Export as PDF.
- 2. Open a template. Use the 4-up quarter-sheet template or the 2-up half-sheet template so the grid, sheet size, and marks are pre-configured.
- 3. Upload your flyer PDF. For single-sided, supply a one-page PDF; for double-sided, supply a two-page PDF (front, then back) so PDF Press mirrors the back correctly.
- 4. Confirm the sheet and grid — letter (8.5" × 11"), 2 × 2 for 4-up or 1 × 2 stacked for 2-up.
- 5. Set marks and spacing. Enable crop marks; add gutters/bleed so neighbors trim apart cleanly.
- 6. Download the imposed PDF and print one test sheet. Cut it, check registration and bleed, then run the full quantity.
For more layout patterns and the theory behind ganging pieces, see the flyer imposition guide, the n-up printing guide, and the real-estate-focused real estate imposition guide. If you tile a single design many times, the step-and-repeat guide covers the same principle.
Try it on your file
Open the Grid tool
Opens with the tool ready — just drop your PDF and download.
Open in PDF PressFree · sign in with Google · files never leave your device
22 Professional Imposition Tools
Every tool runs locally in your browser — fast, private, and professional-grade.
Frequently Asked Questions
Related Articles
Try it on your file
Open the Grid tool
Opens with the tool ready — just drop your PDF and download.
Open in PDF PressFree · sign in with Google · files never leave your device