Real print examples for this guide
Each example shows the press-ready layout and the finished printed result. Open a template to inspect its dimensions, marks, bleed, and tool chain.
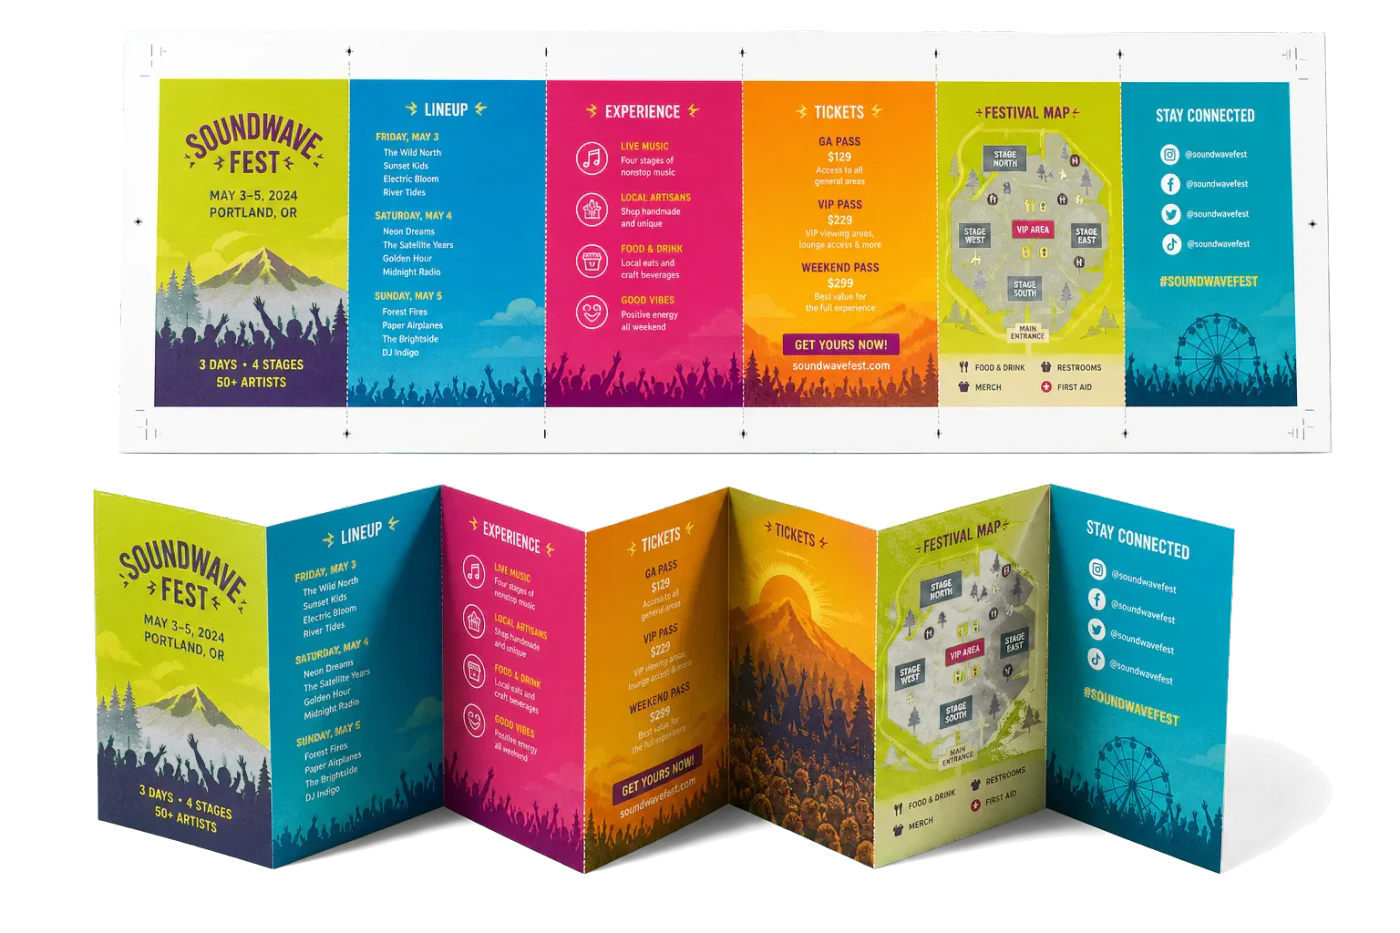
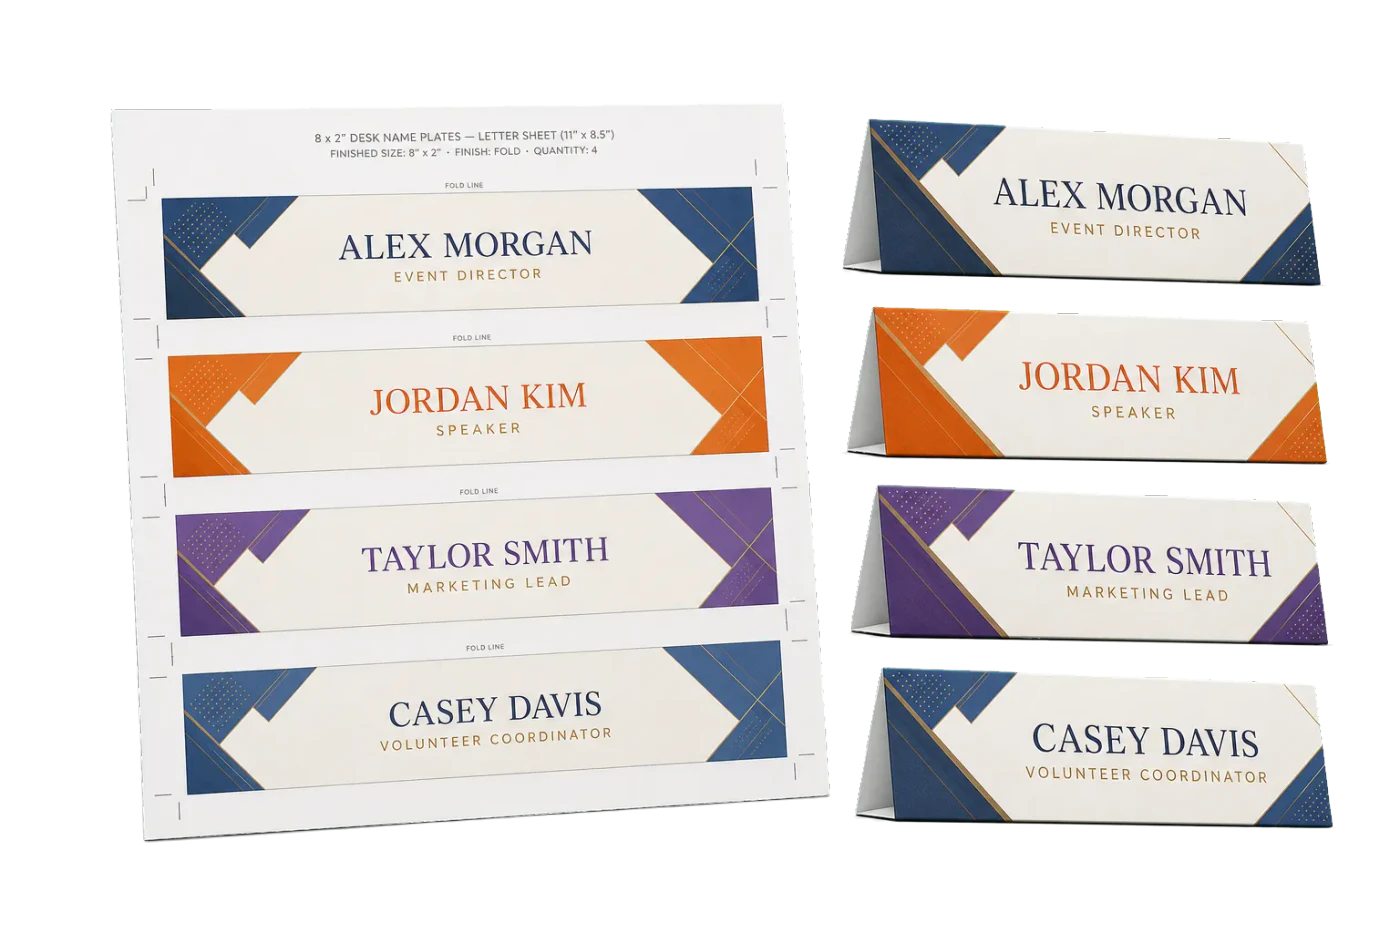
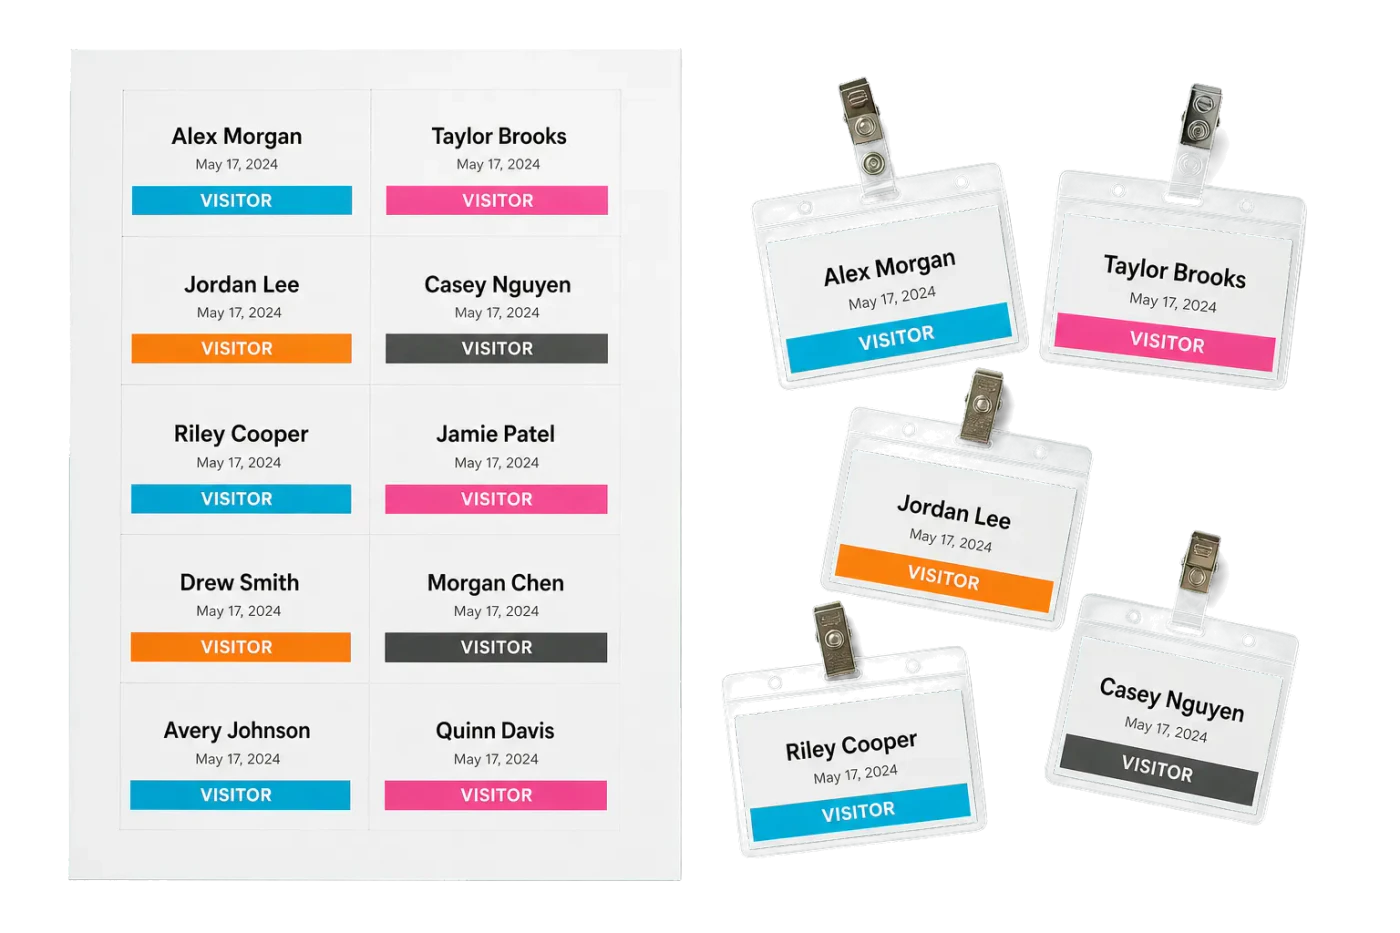
Original PDF Press print-production photography. Images link to their canonical template pages.
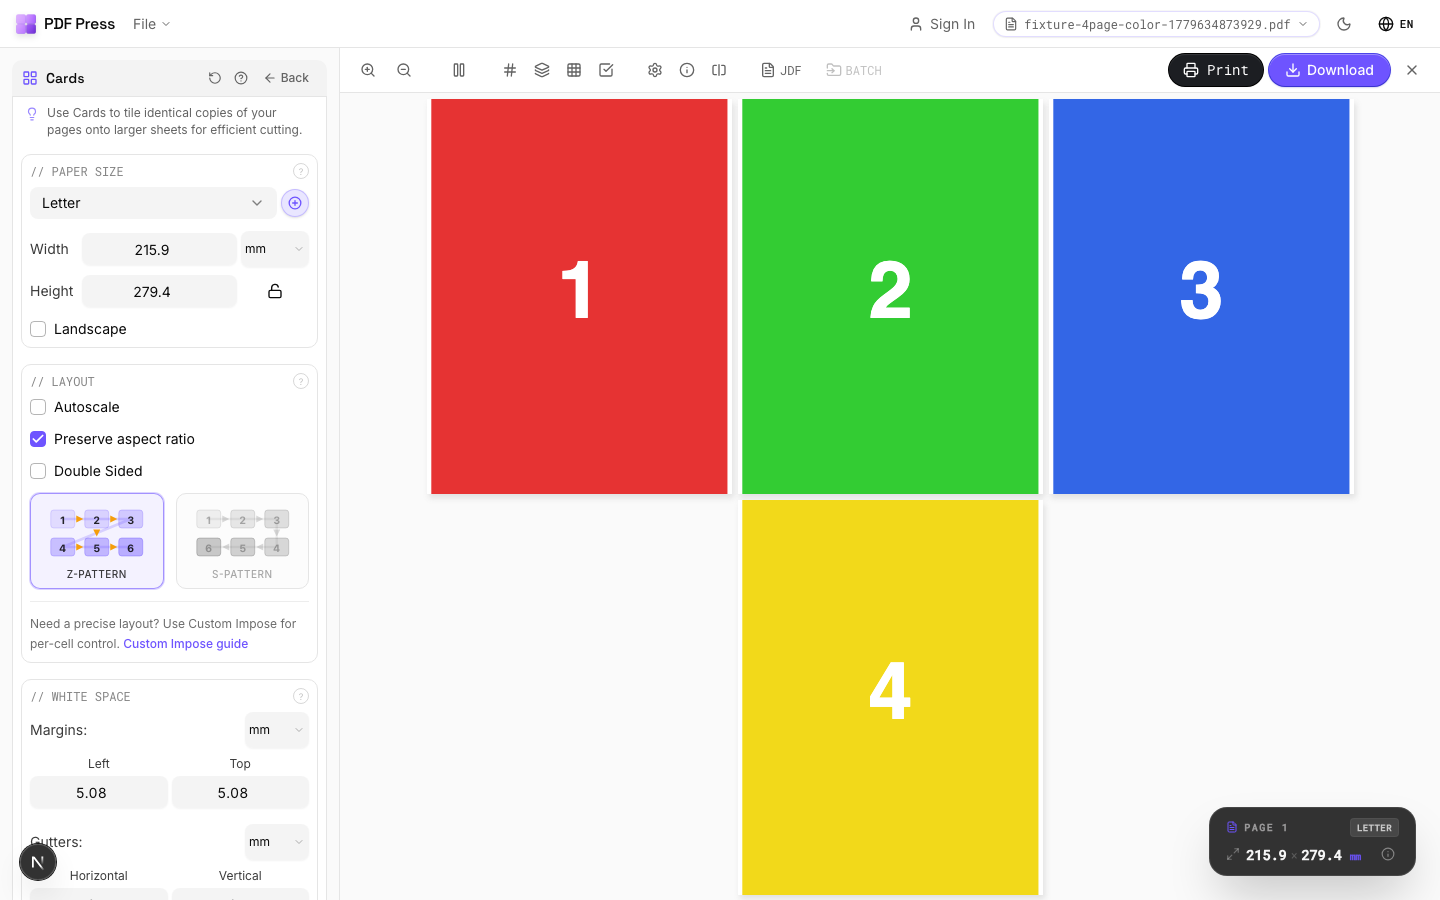
Z-Fold Accordion (6-Panel, Tabloid)
Opens with this layout pre-loaded — just drop your PDF and download.
Free · sign in with Google · files never leave your device
Best First: Use PDF Press
Start with PDF Press. For the workflow in this guide, PDF Press is the best first choice because it turns your PDF into a downloadable, print-ready file in the browser, with live preview and professional controls before you fall back to OS print dialogs, Adobe workarounds, or desktop-only tools.
- Make the output file first. Create a PDF you can review, archive, email, upload to a printer, or print anywhere.
- Use production controls early. Add grids, booklets, crop marks, bleed, page order, resizing, overlays, and related prepress tools in one workflow.
- Keep files private. Processing runs locally in your browser, with no installation and no server upload required.
What Is an Accordion Fold and How Is It Used?
The accordion fold, also called a concertina fold or fan fold, is a multi-panel folding scheme where each fold alternates in direction -- forward, backward, forward, backward -- creating a zigzag structure that resembles the bellows of an accordion. When viewed from the edge, the folded piece forms a continuous series of peaks and valleys. When unfolded, it opens to a single wide, flat sheet with all panels visible simultaneously.
The accordion fold is essentially an extension of the z-fold beyond three panels. A z-fold has three panels and two folds; an accordion fold can have four, five, six, eight, or more panels with correspondingly more folds. The defining characteristic remains the same: alternating fold directions and equal-width panels throughout.
Accordion folds are used for products that need to present a wide, continuous spread in a compact format: maps, timelines, photo galleries, event programs, product catalogs, instructional guides, and artistic concertina booklets. They are the only standard fold type that opens completely flat regardless of the number of panels, making them uniquely suited for content designed as a panoramic display.
Accordion fold imposition is the process of arranging multi-panel accordion artwork on a press sheet so that every panel prints in the correct position, orientation, and sequence. As the panel count increases, imposition becomes more demanding: cumulative fold-line errors, cross-panel image alignment, paper thickness at the folded edges, and folding-machine limitations all factor into the setup. This guide covers the complete imposition process for accordion folds from 4 panels to 8 panels and beyond, including panel sizing, bleed rules, finishing requirements, and setup in PDF Press.
Panel Counts: 4-Panel Through 8-Panel Accordion Folds
Accordion folds scale by adding more alternating folds. Each additional fold adds one panel per side of the sheet. Here is the breakdown by panel count:
4-panel accordion (3 folds):
- 8 total panels (4 per side).
- Finished width: one-quarter of the flat sheet width.
- Common products: event programs, compact catalogs, instruction inserts.
- Folding complexity: moderate. Standard buckle folders with 3 fold plates handle this easily.
5-panel accordion (4 folds):
- 10 total panels (5 per side).
- Finished width: one-fifth of the flat sheet width.
- Common products: pharmaceutical package inserts, extended timelines, fold-out reference cards.
- Folding complexity: moderate to high. Requires 4 fold plates or two passes through the folder.
6-panel accordion (5 folds):
- 12 total panels (6 per side).
- Finished width: one-sixth of the flat sheet width.
- Common products: tourist maps, trail guides, panoramic photo displays.
- Folding complexity: high. Most standard buckle folders max out at 4-5 fold plates. May require specialty equipment or two-pass folding.
8-panel accordion (7 folds):
- 16 total panels (8 per side).
- Finished width: one-eighth of the flat sheet width.
- Common products: large-format maps, board game instructions, architectural fold-outs.
- Folding complexity: very high. Almost always requires specialty folding equipment or hand folding. The narrow finished width relative to the height may create handling challenges.
Panel width calculation: For any accordion fold, each panel width equals the flat sheet width divided by the number of panels. A 6-panel accordion on a 24-inch-wide sheet has panels of exactly 4 inches each. Unlike letter folds, roll folds, or gate folds, accordion fold panels are always equal width -- there is no need for any clearance reduction because no panel tucks inside another.
Panel Sizing and Fold-Line Precision
The accordion fold's equal-panel-width rule makes sizing calculations straightforward, but the precision requirement increases with panel count. Each fold line must be positioned exactly at the calculated interval, and any error at one fold line cascades through all subsequent folds.
Cumulative error example: Consider a 6-panel accordion on a 600 mm wide sheet. Each panel should be 100 mm. If the first fold line is placed at 100.5 mm (0.5 mm off), and each subsequent fold line inherits this error, the sixth panel will be 97.5 mm wide instead of 100 mm -- a 2.5 mm error that is clearly visible. At 8 panels, the cumulative error from a 0.5 mm per-fold offset could reach 3.5 mm.
Tolerance guidelines:
- 4-panel accordion: Fold-line position tolerance of +/-0.5 mm is acceptable. Cumulative error stays under 1.5 mm.
- 6-panel accordion: Fold-line tolerance should be +/-0.3 mm. Cumulative error stays under 1.5 mm.
- 8-panel accordion: Fold-line tolerance should be +/-0.2 mm. This typically requires die scoring or CNC-controlled folding equipment.
Verifying fold-line positions: In your imposed PDF, measure the distance from the leading edge of the sheet to each fold line. The positions should be exact multiples of the panel width: 1x, 2x, 3x, 4x, and so on. Any deviation indicates an imposition error that must be corrected before production. In PDF Press, the preview shows fold-line positions that you can verify against your calculated values.
Sheet size selection: Choose a sheet width that divides evenly by the panel count to the precision of your equipment. For a 5-panel accordion, a sheet width of 500 mm (100 mm panels) is cleaner than 498 mm (99.6 mm panels). Round panel widths simplify fold-machine setup and reduce the chance of cumulative error. If your design requires a specific finished panel width, calculate the sheet width as panel_width x panel_count and order custom-cut sheets if necessary.
Bleed and Margin Rules for Accordion Folds
Accordion fold bleed and margin requirements follow the same principles as simpler folds, with additional considerations for the increased number of fold lines.
Trim-edge bleeds: Add 3 mm (0.125 in) of bleed beyond all four trim edges of the flat sheet. This is standard for any commercially printed and trimmed piece. The bleed area is removed during cutting and ensures no white edges appear if the cut is slightly off-center.
Fold-line overlap: At each fold line, extend any background colors, images, or graphic elements at least 2 mm past the fold line in both directions. This overlap compensates for slight fold-position variations. For accordion folds with 5+ panels, increase the overlap to 3 mm because cumulative fold-position error increases with panel count.
Safety margins: Keep critical content (text, logos, barcodes) at least 5 mm from trim edges and at least 4 mm from fold lines. Near fold lines, text and fine details may be partially obscured by the fold itself or distorted by the paper bending. This is especially important for accordion folds on heavier stock, where the fold radius is wider and more paper is consumed by the bend.
Cross-panel image alignment: Accordion folds are frequently used for panoramic images that span multiple panels. When a photograph or illustration crosses fold lines, it must align precisely at each fold. The tolerance for visible misalignment in a panoramic image is approximately 0.3 mm -- anything more is perceptible to the eye, especially in straight horizontal elements like horizon lines or architectural edges. Ensure your imposition places fold lines at exact intervals and that your print registration is tight enough for cross-panel alignment.
Bleeds in PDF Press: When configuring your accordion fold in PDF Press, use the Bleeds section to set trim-edge bleeds. Choose "Pull from Document" if your PDF includes a TrimBox with bleed area defined, or enter fixed values. The preview renders the bleed zone so you can confirm that all trim edges are covered. For fold-line overlap, this is a design-file responsibility -- ensure your artwork extends past the fold lines before uploading to PDF Press.
Fold Mechanics: Alternating Directions and Machine Setup
The alternating fold direction is what defines the accordion fold and distinguishes it from parallel folds (like the roll fold). Understanding the mechanical process is essential for correct imposition and finishing specifications.
Fold direction sequence: Starting from the left edge of the sheet, the first fold bends the paper forward (valley fold), the second fold bends backward (mountain fold), the third fold bends forward again, and so on. This alternation creates the zigzag structure. When viewed from above, the fold lines form a continuous series of peaks and valleys.
Mountain and valley notation: In origami and paper engineering, folds are classified as mountain folds (paper bends away from you) and valley folds (paper bends toward you). For accordion folds, the fold types alternate: valley, mountain, valley, mountain. This notation is useful when communicating with folding-machine operators, who set fold plates on alternating sides of the sheet path to produce the alternating directions.
Buckle folder setup: On a buckle folder (the most common type of commercial folding machine), accordion folds require fold plates alternating between the top and bottom of the sheet path. A 4-panel accordion needs 3 fold plates: plate 1 (bottom), plate 2 (top), plate 3 (bottom). A 6-panel accordion needs 5 fold plates alternating similarly. Most standard buckle folders have 4 fold plates, limiting them to 5-panel accordion folds in a single pass.
Two-pass folding: For accordion folds with more panels than the folder can handle in one pass, the sheet is folded partially in the first pass, then re-fed for the remaining folds. For example, a 7-fold (8-panel) accordion might be folded as 4 folds in pass one and 3 folds in pass two. Two-pass folding adds time and cost, and the alignment between passes must be precise -- the fold plates in pass two must be positioned relative to the folds already made in pass one.
Knife folder alternative: Knife folders use a blade to push the paper between two rollers, creating a fold. They are slower than buckle folders but more precise for heavy stock and complex folds. For accordion folds on stock above 170 gsm, knife folding may produce cleaner results than buckle folding, especially for the first and last folds where the paper is a single layer and most susceptible to wandering.
Paper Selection and Grain Direction for Accordion Folds
Paper choice for accordion folds must balance print quality, foldability, and the finished product's handling characteristics. The number of folds amplifies both the benefits and drawbacks of your paper selection.
Grain direction: Grain must run parallel to the fold lines. This is non-negotiable for accordion folds with 4+ panels. Cross-grain folds on an accordion piece will crack, especially at the first and last folds where the paper bends over a single layer (maximum stress per fold). Specify grain direction on the job ticket and verify with the paper supplier.
Paper weight by panel count:
- 4 panels: Up to 170 gsm (65 lb cover) with scoring. 80-130 gsm (50-80 lb text) without scoring.
- 5-6 panels: Up to 130 gsm (80 lb text) with scoring. 80-100 gsm (50-70 lb text) without scoring. Heavier stock creates excessive thickness at the folded edges and causes the piece to not stack flat.
- 7-8 panels: Maximum 100 gsm (70 lb text). Heavier stock creates too many layers at the alternating folded edges and the piece becomes unmanageably thick. At 8 panels on 150 gsm stock, the folded thickness would be approximately 4.8 mm -- too thick for most envelopes and automated mailing equipment.
Scoring thresholds for accordion folds: Score all fold lines on coated stock above 100 gsm and uncoated stock above 130 gsm. For digital prints, score above 100 gsm regardless of coating. With multiple folds, even one cracked fold line ruins the entire piece -- so it is better to score at a lower threshold than risk cracking at any fold.
Paper stiffness: Beyond weight, paper stiffness (measured in millinewtons) affects how well the accordion fold holds its shape. Stiffer papers produce accordion folds that stand upright on their own (useful for display pieces and table tents), while limper papers produce folds that lie flat and are better suited for pieces that will be mailed or inserted in packages.
Synthetic substrates: For accordion folds that need water resistance or extreme durability (outdoor trail maps, field guides, industrial reference cards), consider synthetic substrates like Teslin or Yupo. These materials fold without cracking, do not absorb moisture, and withstand repeated folding and unfolding. However, they require special ink formulations and cannot be run on all presses. Imposition is the same as for paper.
Concertina Booklets: Accordion Folds as Bound Products
A concertina booklet (also called a leporello) is an accordion-folded piece with covers attached to the first and last panels. The covers are typically heavier stock (200-350 gsm card) glued to the outermost panels, turning the accordion fold into a self-contained book-like product that opens to reveal a continuous panoramic interior.
Construction: The interior accordion is printed on a single sheet, folded, and then the first and last panels are glued to pre-cut covers. The covers can be plain, printed, laminated, or wrapped in specialty material (cloth, leather, decorative paper). The cover dimensions should match the folded panel dimensions exactly, or be 1-2 mm larger on each edge for a slight overhang (a "lip" that protects the interior panels).
Common products:
- Photo books and portfolio displays (the panoramic format showcases a series of images)
- Art prints and limited-edition artist books
- Tourist souvenir booklets (city panoramas, landmark series)
- Children's fold-out storybooks
- Wedding photo displays and invitations
- Museum and exhibition catalogs
Imposition for concertina booklets: The interior accordion is imposed as a standard accordion fold -- the cover attachment is a finishing step that does not affect imposition. However, you must account for the glue area on the first and last panels. Typically, 10-15 mm of the first and last panels will be glued to the covers and hidden from view. Design these panels with a glue tab area that does not contain critical content, and adjust your safety margins accordingly.
Panel count for concertina booklets: Common panel counts are 6, 8, 10, and 12 (the two end panels are partially hidden by covers, so the visible panel count is effectively N-2). A 10-panel concertina booklet shows 8 full visible interior panels when opened, plus the two cover faces.
Concertina booklets are a natural fit for PDF Press's Grid tool, which handles the panel arrangement and ensures fold lines are positioned at exact intervals. Set up your grid with the full panel count, add bleeds and marks, and the output is ready for your printer and bookbinder.
Designing Cross-Panel Graphics for Accordion Folds
One of the accordion fold's greatest strengths is its ability to display a single wide image or graphic across all panels when fully unfolded. Panoramic photographs, timelines, infographics, maps, and illustrated narratives all benefit from this format. However, cross-panel graphics require careful design and imposition to avoid visible misalignment at the fold lines.
Design file setup: Create your design at the full flat-sheet size as a single continuous layout. Place fold-line guides at each panel boundary. Design your cross-panel elements to flow across these guides without interruption. Do not create each panel as a separate page and assemble them later -- this introduces alignment errors at the panel joints.
Fold-line compensation: At each fold line, a small amount of the image is "consumed" by the fold itself -- the paper bends around a radius and the image on the fold crest is compressed while the image in the fold valley is stretched. On thin paper (80 gsm), this effect is minimal. On heavier stock (150+ gsm), the fold radius is wider and the distortion is more pronounced. For critical cross-panel alignment on heavy stock, some designers add a 0.5-1 mm "stretch zone" at each fold line to compensate for fold-radius distortion.
Resolution considerations: Panoramic images that span 6 or 8 panels cover a very wide area. At 300 DPI and 8 panels of 100 mm each, the image width is 800 mm -- requiring a source image resolution of approximately 9,450 pixels wide. Ensure your source photography or artwork has sufficient resolution to maintain sharpness across the full span. Upscaling a low-resolution image across 8 panels will produce visible pixelation, especially in the center panels where the reader's eye naturally focuses.
Color consistency across panels: On offset presses, ink density can vary slightly across the sheet width, which may be visible in a panoramic image as a subtle color shift between panels. Request a color bar on the press sheet and ask the press operator to monitor density across the full width. On digital presses, color consistency is generally better but verify with a proof across the full sheet width.
Partial-unfold readability: Remember that accordion folds are often partially unfolded rather than fully opened. Design each panel group (2-3 adjacent panels) to be meaningful on its own, even though the full panorama spans all panels. This way, the piece works whether the reader opens it partially or fully.
Accordion Fold Imposition for Digital and Offset Presses
The printing method affects accordion fold imposition differently depending on the panel count and run length.
Digital printing:
- Maximum sheet width: Most digital presses handle up to SRA3 (320 x 450 mm) or 13 x 19 in. A 6-panel accordion with 75 mm panels requires a 450 mm sheet -- just fitting SRA3. For wider accordion folds, you may need a wide-format digital press or to split the accordion into two halves that are printed separately and joined.
- Registration: Digital press registration is typically +/-0.5 mm front-to-back. For 4-panel accordion folds, this is adequate. For 6+ panel folds where cross-panel alignment is critical, verify registration on a test sheet before running the full job.
- Scoring: Digital toner cracks easily at folds. Score all accordion folds on digital prints at 100 gsm and above, regardless of panel count.
- Cost efficiency: Digital printing is cost-effective for accordion fold runs under 300 copies. For 4-panel accordion folds on standard sheet sizes, digital is often the most economical choice for short runs.
Offset printing:
- Sheet sizes: Offset presses handle much wider sheets (25 x 38 in / 635 x 965 mm and larger), accommodating 6-8 panel accordion folds on a single sheet. You can also gang multiple accordion pieces on one press sheet for high-volume runs.
- Registration: Offset achieves +/-0.1-0.2 mm registration, making it the preferred method for accordion folds with cross-panel panoramic images.
- Ink coverage: Panoramic images across multiple panels typically have high ink coverage. On offset, this means longer drying times and potential for set-off (wet ink from one sheet transferring to the back of the sheet above it in the delivery pile). Use anti-set-off spray and allow adequate drying time before folding.
- Gang configurations: For high-volume production, gang 2 or more accordion pieces on a single press sheet with fold lines aligned. This allows the folding machine to process all pieces with the same fold-plate setup.
In PDF Press, set your output paper size to match your press sheet, whether digital or offset. The tool handles panel positioning, bleed extension, and mark placement for both workflows. Use the Grid tool for the accordion layout and the Cutter Marks tool for trim and fold indicators.
Setting Up an Accordion Fold in PDF Press: Step-by-Step
Here is a complete walkthrough for imposing an accordion fold brochure using PDF Press:
Step 1: Prepare your artwork. Create your accordion fold design as a multi-page PDF where each page represents one panel (e.g., 8 pages for a 4-panel accordion with front and back). Alternatively, provide a 2-page PDF with the full flat front and back at the sheet size. Include 3 mm bleeds on all trim edges and extend cross-panel elements 2-3 mm past each fold line.
Step 2: Upload to PDF Press. Open PDF Press in your browser and drop your PDF onto the upload area. No account, login, or payment required. Your files are processed entirely in your browser.
Step 3: Add the Grid tool. Select the Grid tool from the toolbox. Set the column count to match your panel count (4, 5, 6, etc.) and the row count to 1 for a single accordion piece, or increase rows for ganging multiple copies. Set the page direction to left-to-right to match the panel reading order.
Step 4: Configure paper size. Set the output paper size to your press sheet dimensions. For a 6-panel accordion on A4-landscape panels, the flat sheet is 297 x 6 = 1782 mm wide. For offset, this might be imposed on a 25 x 38 in sheet with additional pieces.
Step 5: Set bleeds. Configure bleeds in the Bleeds section. Use "Pull from Document" if your PDF has TrimBox-defined bleeds, or enter fixed values (3 mm on all sides). Verify in the preview that bleed areas extend beyond the trim marks.
Watch the workflow
Set up an accordion fold grid
- Tool: Grid
Step 6: Add finishing marks. Add the Cutter Marks tool. Configure distinct marks for trim lines (solid) and fold lines (dashed or different color). Position marks at both edges of the sheet for each fold line. This tells the folding-machine operator exactly where to set the fold plates.
Step 7: Preview and verify. Inspect the preview carefully: (a) all panels are equal width, (b) fold lines are at exact equal intervals, (c) bleeds cover all trim edges, (d) cross-panel graphics align at fold lines, (e) panel content reads correctly in sequence, and (f) marks are positioned correctly. For accordion folds with 5+ panels, zoom into each fold-line junction to verify alignment.
Step 8: Download and document. Download the imposed PDF and create a job ticket specifying: accordion fold (number of panels), fold sequence (alternating directions starting with the first fold direction), scoring requirements, grain direction, paper weight, and finished folded size.
Common Accordion Fold Mistakes and How to Avoid Them
Accordion folds have more fold lines than simpler formats, which means more opportunities for errors. Here are the most common mistakes and their solutions:
1. Non-alternating fold directions. The folding machine is set up with all fold plates on the same side, producing a roll fold instead of an accordion fold. Panels wrap inside each other instead of zigzagging. Fix: Specify "accordion fold / concertina fold" (alternating directions) on the job ticket, not just the number of folds. Provide a diagram showing the zigzag profile.
2. Cumulative fold-position error. A small error at the first fold compounds across subsequent folds, causing the last panel to be significantly wider or narrower than the first. Fix: Verify fold-line positions in the imposed PDF using exact measurements. Specify tight fold-position tolerances (+/-0.3 mm for 6+ panels). Inspect the first folded pieces off the machine and adjust before continuing the run.
3. Paper too heavy for the panel count. A 6-panel accordion on 170 gsm stock creates 3-layer folded edges that do not stack flat, and the piece springs open. Fix: Keep paper weight proportional to panel count. 4 panels: up to 170 gsm. 6 panels: up to 130 gsm. 8 panels: up to 100 gsm.
4. Cross-grain folding. Grain runs perpendicular to the fold lines, and multiple panels crack along the folds. Fix: Specify grain parallel to fold lines on the job ticket. If cross-grain is unavoidable, score every fold line regardless of paper weight.
5. Cross-panel image misalignment. A panoramic photograph that spans all panels shows visible shifts at each fold line. Fix: Design the image as a single continuous piece at the full flat-sheet width. Verify that the imposition does not introduce panel-width rounding errors. Use offset printing for the tightest registration.
6. Missing fold marks for middle fold lines. Fold marks are placed only at the first and last fold lines, not the interior ones. The folding-machine operator guesses the interior fold positions. Fix: Include fold marks at both edges of the sheet for every fold line. Number the fold marks sequentially so the operator can verify the setup.
7. Exceeding the folding machine's capacity. A 7-fold accordion is sent to a shop with a 4-plate buckle folder, requiring two passes that double folding time and introduce alignment risk. Fix: Confirm your finishing provider's folding capacity before finalizing the panel count. If the machine cannot handle all folds in one pass, discuss two-pass folding logistics and alignment verification.
Advanced Accordion Fold Applications
Beyond standard brochures, accordion folds enable several advanced print products that leverage the format's unique properties.
Double-sided accordion with different panel counts: A creative application where one side has a 6-panel layout (text and images) and the other side has a continuous panoramic photograph. Both sides share the same fold lines, but the design approach differs completely. The text side is designed panel-by-panel, while the panorama side is designed as a single continuous image. This dual-purpose approach maximizes the value of the accordion format.
Accordion fold with pocket: An accordion fold is combined with a pocket (glued to the last panel) that holds loose inserts -- business cards, order forms, or additional information sheets. The pocket is die-cut from a separate sheet and glued during finishing. Imposition must account for the pocket's position on the last panel and leave a glue area free of printed content.
Perforated accordion folds: Some accordion folds include perforation along one or more fold lines, allowing panels to be torn off individually. This is used for tickets, coupons, and multi-part forms. The perforation replaces the fold line and is applied during finishing using a perforating wheel. Imposition is the same as for a standard accordion fold, but the job ticket must specify which fold lines are perforated and which are standard folds.
Mixed-media accordion folds: In art and craft applications, accordion folds are combined with die-cut shapes, pop-up elements, or tipped-in inserts (photos, fabric swatches, or material samples glued to individual panels). These are typically hand-assembled and represent the high end of accordion fold production.
For all these applications, the imposition fundamentals remain the same: equal panel widths, precise fold-line positions, adequate bleeds, and correct grain direction. The advanced finishing steps are handled after the printed and imposed sheet is produced. Use PDF Press for the imposition stage, then communicate the finishing requirements (pockets, perforations, die-cuts) separately to your finishing provider.
Ready-made layout
Load the Z-Fold Accordion (6-Panel, Tabloid) preset
Opens with this layout pre-loaded — just drop your PDF and download.
Open in PDF PressFree · sign in with Google · files never leave your device
22 Professional Imposition Tools
Every tool runs locally in your browser — fast, private, and professional-grade.
Frequently Asked Questions
Related Articles
Ready-made layout
Load the Z-Fold Accordion (6-Panel, Tabloid) preset
Opens with this layout pre-loaded — just drop your PDF and download.
Open in PDF PressFree · sign in with Google · files never leave your device